Pete Wenman
-
Posts
3,172 -
Joined
-
Last visited
-
Days Won
3
Everything posted by Pete Wenman
-

Experimental Design - CM1 Operations in CM2 (Video)
Pete Wenman replied to Ithikial_AU's topic in CM2 Scenario and Mod Tips
@Ithikial_AU I always meant to try something like this with my Shadow of the Hill missions. The concept behind them was for a finite British force to attack across the full map, against a finite German defender, but broken into a number of scenarios to create the sense that the attackers could only advance by securing the necessary objectives. Fail a mission and it would need to be attempted again, but with both sides having a reduced pool of units. This would hopefully then cause questions as to when to commit reserves and if the attacker pushed too hard too early on would he still have sufficient "good order" forces for the latter battles. As it was I've never had the time to link things together and create the various branches necessary but in simple term it was going to be that a win would allow the British to move on to the next mission, but a loss would require it to be fought again (perhaps only in part) with fresh troops possible being committed to complete the objective. I always though the concept would probably work best for HTH and so require a 3rd party to administer but I feel it could be done. P -
CMBS Russian Ammo Dump Problem
Pete Wenman replied to MOS:96B2P's topic in Combat Mission - General Discussion
Just to add I'm not sure Blue forces can see Red ammo dumps and vice versa -
CMBS Russian Ammo Dump Problem
Pete Wenman replied to MOS:96B2P's topic in Combat Mission - General Discussion
@MOS:96B2Pcheck the engine manual but I'm pretty sure ammo dumps don't show at the lower difficulty settings with the ammo being distributed between units. Play the game at elite as the Red player and you should see Red ammo dumps P -
Mord's CMFB Unit Portraits Mod
Pete Wenman replied to Mord's topic in CM Final Blitzkrieg Maps and Mods
Ah the memories ! Happy B day P -
You can never have enough integrated integration imo !!!
-
Yep, that is correct p
-
Looking at this I do wonder if they may be an error in the briefing info. The three named occupy objectives featured in the previous mission, but do not feature on the scenario AAR screen for this mission.. In addition the points quoted in the briefing schedule do not total 1750 and so I think this is most likely an error with the previous briefing images not being cleared out of info before being reused. Ignore the three occupy objectives - they don't exist in the scenario P
-
This is what you should see Use the arrows at the top to rotate a bridge through 90 degree increments and the diagonal button for bridges on NW-SE axis etc, again using arrows at top to rotate as required The editor changes to this P


-
Are Tank secondary weapons ever used?
Pete Wenman replied to joethejet's topic in Combat Mission - General Discussion
No worries - I learnt something new myself Take your time, don't fret the detail and play to enjoy. P -
Are Tank secondary weapons ever used?
Pete Wenman replied to joethejet's topic in Combat Mission - General Discussion
Well there's the correct answer - every day is a learning day P -
Are Tank secondary weapons ever used?
Pete Wenman replied to joethejet's topic in Combat Mission - General Discussion
Just to avoid confusion the 66m rifle grenades carried by the team are noted as AT Grenades, and so most likely are the M9A1. I've edited the previous post to clarify. As akd mentions there is discussion as from where the 66mm sizing actually comes from, as these things are not 66mm in diameter, but in game, in this context it refers to rifle grenades. P
-
Are Tank secondary weapons ever used?
Pete Wenman replied to joethejet's topic in Combat Mission - General Discussion
@joethejet This is one of the ammo teams from the third mission of the FB training campaign which is where I think you are coming from At full strength it has 4 men. 75 rounds for each M1 carbine -225 in total 104 rounds for the M7 Garand which in addition has three 66mm rifle AT grenades Between the four men two hand grenades are also carried All of the above represent the personal weapons of the 4 man team, and I assume are pretty accurate in terms of real life TOE. (All 4 teams in that scenario are scaled the same) In addition the team is carrying 40 81mm HE rounds and 4 WP rounds for the mortars. HTH P
-
Happy New Year's Day! 2018 look ahead
Pete Wenman replied to Battlefront.com's topic in Combat Mission - General Discussion
You tease. Here's one I think I can get away with sharing Cool eh ? P
-
http://cmmodsiii.greenasjade.net/?cat=25 P
-
Does the wait for trigger in the AI editor not do this ? This trigger relies on the orders of another unit to be activated rather than a terrain type objective.
-
You might be misunderstanding the trigger mechanism just a little. The two times set the period for which the trigger is live (on the game clock). So a trigger will not work if activated before the first time, and the trigger will automatically activate by the end time if not previously triggered. However once live the trigger orders will activate as soon as the trigger is activated (the following turn). Keep in mind that triggers are not conditional and so will always trigger based on either being tripped while active, or at the end of the active period. (Although this can be set for after the game end, but doing so means the unit can be given no subsequent orders) HTH, but to be honest the best way to get your head around the concepts is to set up simple movements in the editor and replay them in scenario author mode until you can see the connection between the orders you have issued and AI movement you want to see. P
-
The engine manual and JonS's excellent scenario design AAR are probably the best place to start. Pdf files of both come with the game and are well worth reading P
-
Yep all timings are relative to the game clock and so absolute. P
-
As at Engine 4 this is now in game Page 103-104 of the engine manual details Each AI Order can designate a Fire Zone for area fire. This is done by painting on the 2D map just like a Movement Zone, but by CTRL-left-clicking instead. The tiles designated as targets will be colored red instead of yellow. While that AI Order is being carried out, the AI Group will attack the Fire Zone with suppressive area fire if it doesn't have any spotted enemy units to engage or other important tasks to do. It is important to note that the Fire Zone is the lowest priority task for the AI Group. Other tasks, such as moving, unloading, attacking a spotted enemy unit, etc will take priority over shooting randomly at the Fire Zone. Each AI Order can be given a location for it to Face towards. After painting the Movement Zone, Alt-left-click on a single tile that you wish the AI to face towards. When the AI Group reaches its destination, it will pivot or rotate towards the designated point. By shift-left-clicking on the map, AI Groups can be ordered to Withdraw while moving towards their movement destination. Vehicles will move in Reverse to the destination, while infantry will leapfrog back while turning around to face behind them. Like the Facing Zone, Withdraw Zones are a single tile that the AI Group will face towards. For example, a vehicle given a Withdraw Zone will reverse towards the Movement Zone, while keeping its front pointed towards the Withdraw Zone. P
-
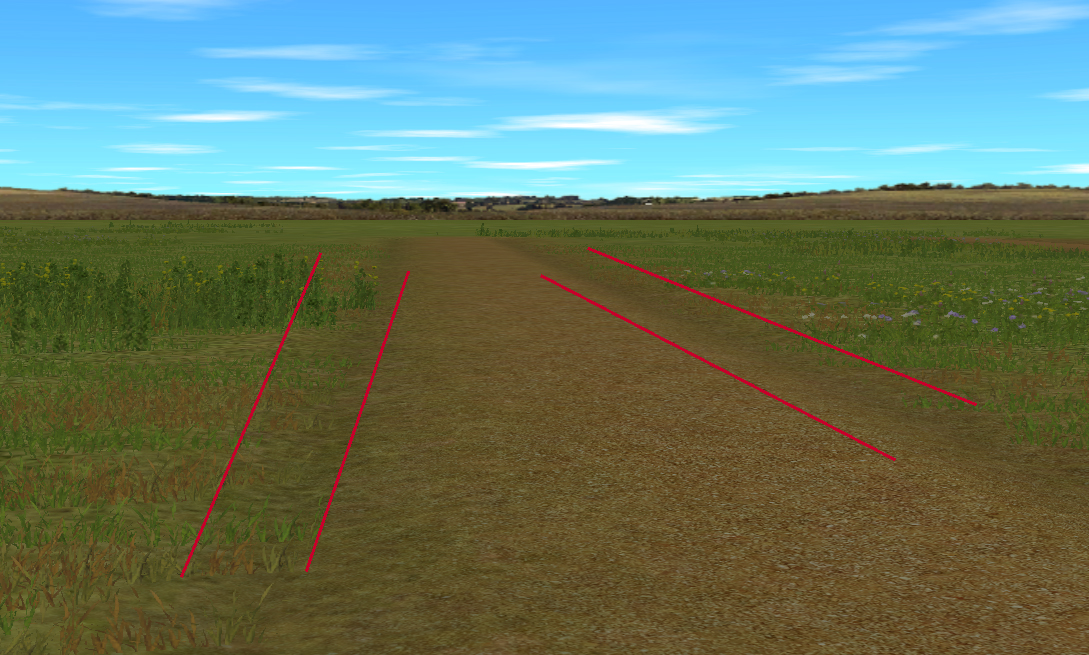
CMBN with the track being used
-
This is as good as it gets without manually adding ditches using the elevation tool as Combatintman suggested. A very slight depression can be seen either side of the track, and this is the feature referenced in the manual. Troops will often walk in the "ditch" when given Move or Hunt orders down the road, and I believe they gain a modifier from fire due to the presence of the ditch. It is subtle and certainly in my opinion it is better to manually add roadside ditches if they are required. P

-
Our SOP in BAOR was to move the battle group CP every eight hours or so if we were using the radios.
-
Naughty or nice... here's some bones!
Pete Wenman replied to Battlefront.com's topic in Combat Mission - General Discussion
Just a little something I found under the Christmas Tree P -
P

-
Mord's CMFB Unit Portraits Mod
Pete Wenman replied to Mord's topic in CM Final Blitzkrieg Maps and Mods
Yep I've always been here ! P