Combatintman
-
Posts
5,065 -
Joined
-
Last visited
-
Days Won
68
Everything posted by Combatintman
-

Bud's Russian Attack AAR: Красная молния
Combatintman replied to Bud Backer's topic in Combat Mission Red Thunder
Bud_B, I wouldn't be too hard on yourself - I have plenty of moments when I think to myself ... now why did I do that again? or how come I made that mistake AGAIN? This thread is great entertainment, well put together and easy to follow - you are a good story teller and despite the setbacks you think you're having, you won't know what's on the other side of the hill until the game is over - some of those rounds you're putting downrange may be causing your opponent plenty of hurt. -
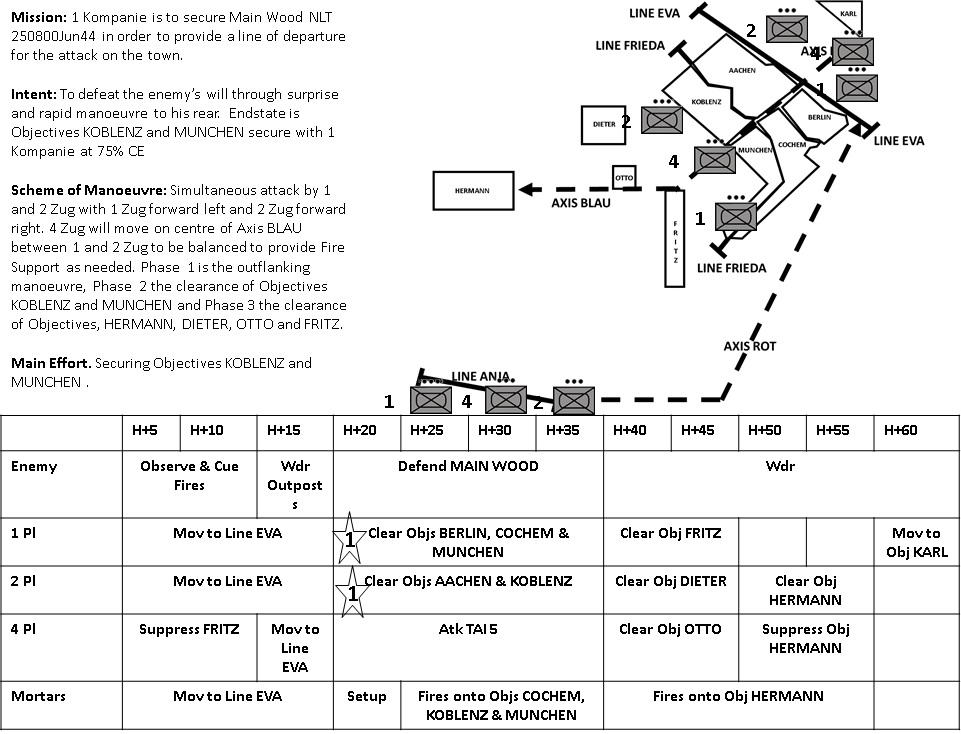
Again thanks for the comments gents - c3k, I'm not sure you would want me to plan your battles, I lose/draw more than I win. Anyway onwards ... QUESTION 7 – WHAT CONTROL MEASURES DO I HAVE TO IMPOSE? So what does this mean – in CM terms it has little meaning because you as the Commander have a privileged view and can control every single friendly element on the battlefield. However for the purposes of education we will touch on control measures. So what are they? ‘Control Measures are the means by which the commander and his staff coordinate and control what is going on in the battlespace’. This is stuff like boundaries, routes, report lines and the like. They are there to ensure things like: Units stay within their assigned areas. Avoidance of fratricide (this fits into the above point but there are many means of doing this such as using report lines, designating no fire areas and establishing limits of exploitation for example. Rules of Engagement. The schematic below are my control measures – remember these are very light on and I’m doing this for the purposes of illustration more than anything else. To explain then: All of my TAIs have been turned into named objectives, using boy’s names. You will also note that what was TAI 5 has been broken up into a series of smaller named objectives and this is the essence of my control measures (note that I have stripped out the NAIs – this is because they aren’t control measures but don’t worry they will be covered when I do the DSO and DSM). Fighting in woods and forests presents huge command and control challenges so by creating these smaller objectives I can facilitate command and control and reduce the chance of fratricide. As an example, 1 Zug in my scheme of manoeuvre is clearing south of Axis BLAU while 2 Zug is clearing East of it. When 1 Zug comes on the radio and tells me that he is clearing Obj BERLIN I know where that element is. I have created some report lines (using girl’s names) to assist with this command and control of which Line FRIEDA is the best example. Let us say that 1 Zug is racing ahead and has cleared BERLIN and COCHEM but 2 Zug is struggling. To synchronise the attack, I can say to all callsigns that they are not to cross Line FRIEDA until ordered to do so. I can now wait until 2 Zug have sorted themselves out and when they say they are ready to push on I can issue the order to cross Line FRIEDA. Note that there is no requirement to name your TAIs or turn them all of them into objectives, whether you do so or not will depend on the effect required in the TAI. The general rule of thumb I employ is that if it requires a physical presence then I would turn it into an objective. Also, a quick word on the methodology for breaking TAI 5 into small objectives, all I have done is mark off areas within the former TAI 5 that are enclosed by easily recognisable terrain features which in this case are paths, tracks and the wood boundary. Now to clear up the DSO and DSM (remember this is unfinished business from Question 6) I also need to finalise my Decision Support Overlay and Matrix. The draft DSO and DSM are tested and refined in Question 6 – it is one of the main reasons for wargaming. As I have previously stated, I should have finalised this at Question 6 but I have left it until now because the way I have carved up the AO for my control measures means that I can use those control measures as named TAIs and so it makes laying out the DSO a lot simpler. Also there was quite a lot to digest in Question 6 already!!!! Here is what my Decision Support Overlay and Matrix look like: Now you are probably a little confused right now because the graphic is quite busy and because there are now 7 NAIs compared to the 4 NAIs that I had when you last saw them. First off, I’ve coloured the NAIs red for no other reason than to make the graphic easier to understand. The reasoning behind adding NAIs is this: NAI 5, I had originally identified in Question 1, but for some reason (human error) it dropped off as I moved through the planning process. Luckily, this oversight was picked up in the wargame and it is another reason for doing a wargame (ie, to highlight oversights and refine the plan). NAIs 6 and 7 cover areas that were originally identified in Question 1 and have been added at this stage because of the scheme of manoeuvre. What I mean by this is that I am coming at the enemy from his rear and therefore I need some means of confirming his COA. As things stand I would only get indications from what I see in Obj FRITZ and NAIs 4 and 5. All of my TAIs as explained earlier are named objectives. In case it is not obvious, the way I have allocated the assets column in the Decision Support Matrix is derived from the scheme of manoeuvre (eg 2 Zug is advancing through Obj AACHEN and NAI 1 so it is logical that 2 Zug is allocated as an asset because 2 Zug can put eyes on it). Finally I will explain the Decision Line (this is marked as a star with the number 1 on the Decision Support Overlay). Decision Lines or Decision Points are where the Commander has to make a decision. Usually the big decision he needs to make is when to commit his reserve but other decisions are when to trigger/cue manoeuvre (such as a counterattack or a block) or when to execute a branch or sequel. This is not an exhaustive list but covers some of the important ones. So about my Decision Line … From the Decision Support Matrix I see that the decision is to ‘Execute Left Hook’ – this is the branch plan that was identified in wargaming. Remember the premise is that I get bogged down during my initial flanking manoeuvre leaving me insufficient time to get all the way around the back of Main Wood. So this is all about time and ability to get around the rear of the enemy. Placement of the Decision Line is derived from the analysis done way back in Question 1 (remember the Event Matrix?) and refined in the wargame. The conditions that I have specified in the remarks column of the Decision Support Matrix obviously relate to time but also vehicle losses (I need those half tracks to get my guys to Line EVA). So how it will work is that at H+20 if any or all of the following conditions have been met: I have less than a platoon across Decision Line 1. I have lost three half tracks before crossing Decision Line 1. I have dropped to 75% Combat Effectiveness (75% CE) before crossing Decision Line 1. I should decide whether to continue with my plan or consider executing Branch Plan 1 – Left Hook. So that is it in a nutshell, WE HAVE A PLAN the next steps are to refine the products and write the order. Which predictably will come next ....


-
New Scenario - Der Ring der 5. Panzer-Division
Combatintman replied to George MC's topic in CM Red Thunder Maps and Mods
Fixed that for you I've only played a few turns of this one but it is a great scenario so far. -
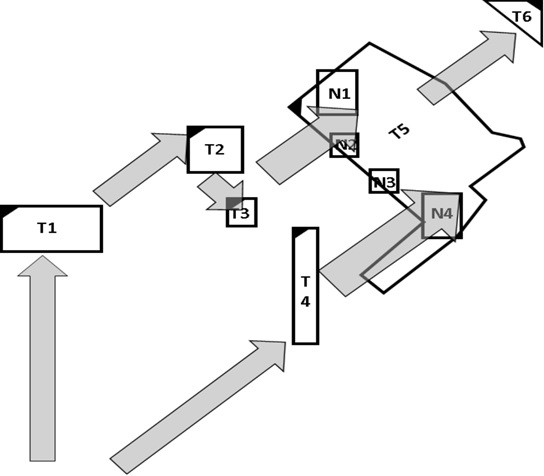
QUESTION 6 CONTINUED With the decision made it should be a matter of leaping straight into Question 7, but not quite. The wargame that I mentioned earlier is an opportunity to identify branches and sequels to a plan. A branch is defined as: ‘The contingency options built into the basic plan. A branch is used for changing the mission, orientation, or direction of movement of a force to aid success of the operation based on anticipated events, opportunities, or disruptions caused by enemy actions and reactions’. A sequel is defined as: ‘A major operation that follows the current major operation. Plans for a sequel are based on the possible outcomes (success, stalemate, or defeat) associated with the current operation’. For the purposes of CM, branching is the only thing we need to consider here. So in my notional wargame activity I have identified a single branch: Branch 1 What I will call ‘Left Hook’ The premise of this is that I get bogged down during my initial flanking manoeuvre leaving me insufficient time to get all the way around the back of Main Wood. The branch plan then envisages hooking into the wood on a broad front with all of my manoeuvre elements in line abreast. The scheme of manoeuvre looks something like this: Now strictly speaking I should fully resource this branch plan but I’m not going to mainly because I have shown you the techniques already (you apply the same steps) but also I’m guessing you’re itching to see me actually cross the start line and execute the plan. I also need to refine my synch matrix (I’m not going to do this because the one I have is good enough for government work) and my Decision Support Overlay (DSO) and Decision Support Matrix (DSM). The only thing I’m going to do with the Synch Matrix is add a Decision to it. This is related to my Branch Plan identified above. It is marked as a star with the number ‘1’ in it. I will explain the mechanics of this in Question 7 (although it should be done here,I am explaining it later for reasons of clarity). So the refined Synch Matrix looks like this: Although I should refine my DSO and DSM here, I’m not going to. There are two reasons for this, one is that there has been quite a lot to digest in Question 6 and two, the way I’m going to implement my control measures actually plugs into my DSO and DSM. I think it will be clearer to you all if I explain my control measures first and then show you the DSO and DSM. Question 7 (and the tidying up of Question 6 as discussed above) will be coming soon ...


-
Bill, when I first looked at this problem - I always reckoned I'd be going with something that looked like COAs 1 or 2 or my branch plan which I will post later on today. However once I knew from the timings that I had enough time to get around the back, COA 3 started to look attractive. Had I not gone through this whole process I would never even have considered it which for me demonstrates the value of going through planning ... if I pull it off of course!
-
QUESTION 6 CONTINUED Earlier I promised you that the Commander was going to make a decision about which COA to adopt – that time is right here and right now. Usually (I’m talking Battalion level and above – which this is not) the Commander would receive a COA Backbrief/Commander’s Decision Brief. Formats vary from HQ to HQ but generally it would involve the draft Scheme of Manoeuvre, Synch Matrix, Draft DSO and a scoring method and relative advantages and disadvantages. We’re not going to do all that because you’ve seen the draft products being developed so I want to focus on relative advantages and disadvantages and a scoring method. The scoring method will be a 1-5 scale with 1 being the lowest and 5 being the highest and we will score the COAs against the principles of offence, because this is an offensive operation. Clearly if this was a defensive operation I would employ the principles of defence as my scoring method. There are other methods/metrics (eg Principles of War or by Functions in Combat (Battlefield Operating Systems (BOS) for US forum dwellers)) but this is the one I prefer. So what are they: Seek surprise. Maintain security. Seize key terrain. Achieve fire superiority. Exploit manoeuvre. Concentrate the effects of combat power. Plan to exploit success. Keep it simple. Here we go then: So COA 3 it is then … well not yet, but it is off to a good start. Before I move on, some explanation as to the scoring where it is not blindingly obvious. Seek Surprise – COAs 1 and 2 score badly here because the initial phases employ predictable avenues of approach and attack the enemy from the direction he is expecting. Maintain Security – COA 3 scores badly here because the hook around the rear of the enemy position cuts the force off from the remainder of the (notional) Panzergrenadier Battalion. Seize key terrain – All COAs plan to seize key terrain, but COA 3 scores lowest because it does it last in the scheme of manoeuvre. Achieve fire superiority – While all are much of a muchness, COAs 2 and 3 score higher because of the flexibility to deploy firepower inherent in the 4 Platoon grouping in the TASKORG and its planned scheme of manoeuvre. Concentrate combat power – Although COA 3 shades it here over COA 2 because it is attacking the main position first and is therefore less likely to lose combat power in the preliminary phases than any of the other COAs. Exploit success – All score a 1 because there is no reserve in the TASKORG to exploit success. Keep it simple – COA 1 scores badly here because the attack into TAI 5 (Main Wood) is being launched from two directions and when fighting in woods and forests it makes command and control a nightmare. With that done and dusted, it is time for advantages and disadvantages and for this part of my notional Commander’s Decision Brief I want to deal with factors that have not been scored already: COA 1 Advantages Attrition of the enemy starts early Facilitates identification of enemy laydown Early occupation of buildings provides cover for observation and fire on TAI 5 COA 1 Disadvantages Increased risk of denuding combat power prior to assault of ME objective (TAI 5) High risk of fratricide during assault of TAI 5 due to attack axis being from different points of the compass Assaults onto TAIs 3 and 4 expose elements to flanking fires. Only two manoeuvre elements in TASKORG COA 2 Advantages Attrition of the enemy starts early Facilitates identification of enemy laydown Early occupation of buildings provides cover for observation and fire on TAI 5 COA 2 Disadvantages Increased risk of denuding combat power prior to assault of ME objective (TAI 5) Attacks onto TAI 2 and 3 vulnerable to fire from multiple positions COA 3 Advantages ME objective (TAI 5) is assaulted first Enemy loses initiative early By manoeuvring to a position to the enemy’s rear, the enemy is likely to withdraw without fighting I am less likely to suffer attrition from the enemy prior to my assault on TAI 5 meaning that this COA maximises my chances of securing TAI 5 by giving me the largest force ratios of all three COAs. COA 3 Disadvantages Attrition of enemy does not begin until assault on TAI 5 Early flanking manoeuvre carries risk The other activity in the planning process that should occur during Question 6 is the wargame. We will skip over that because at the end of the day we are playing a wargame … or we will once the plan is done. So I think we’ve done enough for the Commander to do the brainy stuff …. and his decision is …… COA 3 - UNHINGE Just a bit more to do for Question 6 but we'll leave that for another time ...

-
Agree with everyone else on here - there'll be a market for it, so this sounds like an interesting prospect.
-
Bill, the purpose of planning is to reduce uncertainty and to generate tempo IOT stay inside your opponent's OODA loop so of course it cannot legislate for every eventuality. However, if you throw enough resources at each TAI, it gives you the flexibility to overcome the unexpected. In the scenario you describe, I can always throw more indirect fire at TAI 4 to deal with the additional long range AT asset (this would be at the expense of time). The other mechanism is to identify branch plans and decision points to cater for these eventualities - you will see my branch plan and decision points soon ...
-
QUESTION 6 – WHEN AND WHERE DO THE ACTIONS TAKE PLACE IN RELATION TO EACH OTHER? This is synchronising …. Or put another way arranging activities in time, space and purpose to mass maximum relative combat power at a decisive place and time. As with other steps in the process, this draws on information and deductions made earlier, particularly some of the timings identified in Question 1 on the event overlay. In Question 2 (Mission Analysis) we know we have an hour to complete the mission, from Question 4 we know where our effects need to be and from Question 5, we know what resources are required. The tool employed is the Synchronisation Matrix (Synch Matrix). This shows a schematic of the scheme of manoeuvre, a simple table showing timings and the actions of each of the elements in the TASKORG and a narrative with the mission, intent and scheme of manoeuvre. This is the Synch Matrix for COA 1: This is the Synch Matrix for COA 2: And finally, the Synch Matrix for COA 3: For the purists – yes I have used some pretty loose language, particularly in the table but space is a constraint. Abbreviations that may be unfamiliar are: Mov = Move Atk = Attack Wdr = Withdraw MDA = Main Defensive Area Fwd = Forward CE = Combat Effectiveness So to summarise this what I have done – I have taken the relevant inputs (mostly time related) from the previous Questions and populated the matrix. We're not done with Question 6 yet - but as there is a fair amount to digest here, I will continue with Question 6 in the next post.


-
Stick with it mate - I understand where you are coming from because most steps build on previous ones so change/progress appears incremental. It is the reason why most of the intellectual effort is expended in Questions 1-3 - if you get that right, Questions 4-7 can get thrown together pretty quickly because you have all of the facts/assumptions to hand. If you focus on the title of the Question rather than the various components (a sort of seeing the Woods from the Trees approach), I think it will clarify things for you.
-
QUESTION 5 PART TWO – DRAFT COURSES OF ACTION Draft COAs I will be showing three COAs below and resourcing them broadly in accordance with my deductions from Question 5. I say broadly because I can throw more resources than were in Question 5 as the deductions there were my minimum assessed force requirements. The important thing is not to employ fewer resources than were identified in Question 5. I hope you can see that I could actually have come up with far more draft COAs than the three I am going to look at in detail but for reasons of brevity (relatively speaking of course!!!) I am sticking with three. COA 1 – Left Flanking So this is pretty much what it says on the tin (well they all are really). In this COA I am clearing the outposts first before tackling the main objective and I am trying to present the enemy with attacks from more than one direction. The COA sketch is shown below. The draft resourcing document is the TASKORG (Task Organisation) which is a simple way of illustrating how units will be grouped and who will command them. In this TASKORG we have our three Platoons, 1 Zug, 2 Zug and 4 Zug as the column headers and the elements they command are below them in the respective column. Real TASKORGs are slightly more complex than this showing different states of command, but for the purposes of Combat Mission games this is not important. You will note that 1 Platoon has the most resources and this is because this is the element that I’m going to allocate to clearing TAIs 1, 3, 4 and 5 and by my reasoning it therefore has the most to do relative to the other elements. COA 2 – Frontal This one is not overly subtle but it is a perfectly viable way of achieving the mission. Again I am clearing the outposts first and then maximising my combat power by attacking from one direction simultaneously. The COA sketch is shown below: The TASKORG for this COA is shown below: As you can see I now have 4 Platoon and a ‘Mortars’ grouping. By using 4 Pl HQ and grouping my MGs and the Sdkz 251/17, I have a third manoeuvre element giving me more flexibility. COA 3 – Unhinge This COA is audacious and probably carries the most risk (this is a typical characteristic of audacious plans). Here the plan is to get behind the enemy and attack him from an unexpected direction. The COA sketch is shown below: The TASKORG for this COA is shown below: Apart from the title, the TASKORG is exactly the same as that for COA 2. So we are done with Question 5 – a point to note before moving on is that the commander could have made a decision at this point as to which COA to adopt. For the purposes of illustration we will press on because doctrinally the commander can make a decision after Question 6 (and between you and me … he’s going to) and because I think it is more educational if you can see more than one attempt at synchronisation … which is next.


-
QUESTION 5 – WHAT RESOURCES DO I NEED TO ACCOMPLISH ACTION OR EFFECT? So onto Question 5 which again is conceptually simple. This is all about working out the forces you are going to need for the effects and is where the scheme of manoeuvre starts to be put together. Accordingly I will break this into two steps – resourcing TAIs and then draft schemes of manoeuvre/COAs. The important point here is, while you need to keep within the boundaries of the forces available to you, this should not be an absolute constraint. In this example for instance I basically have two platoons, a heavy weapons platoon, a flak vehicle and some mortars but I have five actions/effects to accomplish. This doesn’t mean that I stop resourcing at my third or fourth action/effect (when theoretically I have run out of assets/resources). I should also resource my Main Effort first This process, like pretty much everything we’ve done so far, draws on the analysis from previous steps. Remember we have to start with the Commander’s Main Effort effect first which is TAI 5. TAI 5 The most important consideration is the effect which to remind you is ‘Secure’ (to gain possession of a position or terrain feature, with or without force, and to make such disposition as will prevent, as far as possible, its destruction or loss by enemy action). It doesn’t take Einstein to work out that this will probably require a fair amount of resources. Next let’s return to our Question 1 analysis because once we know the size of the enemy in each TAI we can make deductions about the forces required to achieve the effect. From that analysis we assessed that the bulk of the enemy force will be in this TAI. Total strength worst case will be the whole platoon with all three LMG and ATR teams. Even at best case the force level drops only by a scout team, LMG and ATR team. Using our military experience we know that a successful attack needs a 3:1 force ratio to stand any chance of success. The following table details the resourcing: Notes for all tables: For the number count I am not going to be slavish but only include the relevant numbers. For example: Vehicle crews and their personal weapons are not included Pistols have been ignored for weapon comparisons Indirect fire team crews and their personal weapons are not included MG42 teams in 4 Platoon are counted as HMG because they can be tripod mounted Some figures have been rounded for simplicity TAI 1 This is a ‘Clear’ effect (‘to clear terrain of enemy direct fire and keep clear until handed over to another unit/formation’) IVO village A. Factors from Question 1 to consider are the ground – the village provides both cover and concealment to the Enemy – and the assessed Enemy force which was a scout team plus an observer team. This is far easier than TAI 5 as I can do this with a platoon pretty easily. TAI 2 This is another ‘Clear’ effect IVO Wood C. From Question 1 it was identified that this would be a possible fall-back position for the scout and observer team. Again a small enemy force here which should be easily solved by throwing a platoon at the problem. TAI 3 Another ‘Clear’ effect IVO Complex D. The enemy here at worst case will comprise a scout team, LMG and ATR team. Like TAIs 1 and 2, this should be solved by a platoon sized force TAI 4 This is yet another ‘Clear’ effect IVO Wood E. At worst case the enemy will have a couple of scout teams, a couple of LMGs and a couple of ATRs. This again should be well within the capabilities of a platoon-sized force. TAI 6 This is the ‘Screen’ effect (as ‘observe, identify and report; only fight in self-protection’). There should be no enemy there so I should be able to resource this with a squad/section I also need to resource the NAIs which at this stage will get a platoon each. I appreciate that this seems a bit course grained but I will be able to refine this later if I need to – they may get discarded in the final cut. Some key deductions that drop out of this process are that I can possibly combine TAIs 2 and 3 due to their geographic proximity and that I cannot do everything at once because I need pretty much all of my force to Secure TAI 5 and I need at least a platoon for most of my other TAIs and realistically I only have two manoeuvre platoons, although I generate three at a stretch. It is only now that we start to think about a scheme of manoeuvre, although this can be directed by the Commander at Question 3, particularly if the staff is inexperienced or where planning time is short. I have left it until now not only because doctrinally this is where the scheme of manoeuvre should be drafted, but also to illustrate the value of going through the process. So that is resourcing – part two of Question 5, where I look at draft COAs/schemes of manoeuvre will be the subject of the next post.


-
Don't be afraid to ask mate - that's the point of the thread. PM me if you don't want to post your questions.
-
Bill, The effects were covered in Question 3 - have a look at the intent schematic here: http://community.battlefront.com/topic/120527-no-plan-survives-first-contact-with-the-enemy-planning-tutorial/?p=1626906 Don't worry I will consolidate all of this later around about Question 6 or Question 7.
-
Trucks, Kubelwagen/Jeeps... Too Robust Cross Country?
Combatintman replied to CarlWAW's topic in Combat Mission Red Thunder
I don't test slavishly but I do a bit of it here and there and yes I think X-country movement over snow or in conditions other than dry is a bit of a black art. I'm wondering if crew experience and being buttoned also play a factor in the likelihood of bogging. I certainly am interested in whatever anybody turns up. -
stikkypixie - sorry for not making it clear. Bill is essentially right and not the only one drawing on memory banks!!. So to eliminate confusion I decided to look it up, here is what the good book says: Named Areas of Interest (NAI). A point or area along a particular avenue of approach through which enemy activity is expected to occur. Activity or lack of activity within an NAI will help to confirm or deny a particular enemy course of action. These are points and areas in the AO where the recognition of particular events and activities associated with the threat will confirm, or deny, the threat’s intentions to pursue a specific COA. Once an NAI has been identified, the event or activity that will focus attention on the NAI should be clearly defined and recorded. NAIs should be covered by ISTAR assets or form a serial in the ICP for action by higher formation. Target Areas of Interest (TAI). The geographical area or point along a mobility corridor the successful interdiction of which will cause an enemy to either abandon a particular course of action or require him to use specialised engineer support to continue and where he can be acquired and engaged by friendly forces. Not all TAIs will form part of the friendly COA; only TAIs associated with higher payoff targets (HPTs) are of interest to the staff. These are identified during staff planning and wargaming. TAIs differ from engagement areas in degree. Engagement areas plan for the use of all available weapons; TAIs might be engaged by a single weapon. TAIs are points and areas in the AO where the commander intends to target the threat in order to achieve a specified effect. They are identified during COA development and form the focus for the integration of resources to achieve the desired effect. I've employed them pretty loosely, I've highlighted and underlined the parts of the definition which best explains my rationale in employing them in this tutorial.
-
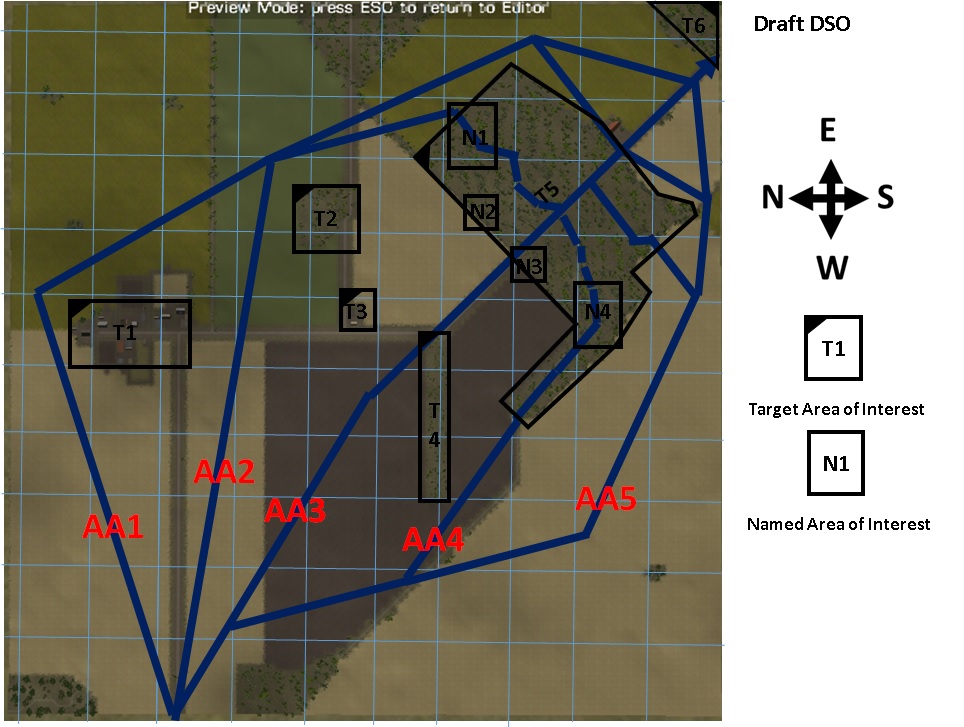
QUESTION 4 – WHERE CAN I BEST ACCOMPLISH EACH ACTION OR EFFECT? Question 4 is really all about refining some of the previous outputs, the most important being the Commander’s Intent Schematic developed in Question 3. The other previous product is the Event Overlay which was produced in Question 1 and showed draft NAIs and timings. The refined product from Question 4 is the draft Decision Support Overlay (DSO). Here is what mine looks like for this mission: A word about the symbology conventions – a box with a triangle in the top left hand corner is a Target Area of Interest (TAI) and each relates to an effect. The boxes without triangles are Named Areas of Interest (NAI) and these are where we look in order to acquire, confirm or deny information. First off the TAIs TAI 1 correlates to my previously identified NAI 1 and the Commander’s ‘Clear 1’ direction on the intent schematic. TAI 2 correlates to my previously identified NAI 2 and the Commander’s ‘Clear 2’ direction on the intent schematic. TAI 3 correlates to my previously identified NAI 3 and the Commander’s ‘Clear 2’ direction on the intent schematic. TAI 4 correlates to my previously identified NAIs 4 and 5 and the Commander’s Clear 3 direction on the intent schematic. TAI 5 is the Main Wood and encompasses my previously identified 6, 7, 8, 9 and 10 and the Commander’s Secure direction on the intent schematic and of course the Secure (in CM terms ‘Occupy’) objective specified in the mission. TAI 6 corresponds to the Commander’s Screen direction on the intent schematic. Note that there is an argument for this being an NAI (where I look) but my deduction is that I have to put troops there so I have made it a TAI. Now the NAIs NAI 1 is the previously identified NAI 6. NAI 2 is the previously identified NAI 7. NAI 3 is the previously identified NAI 8 NAI 4 is the previously identified NAI 9 Strictly speaking, because these sit within TAI 5 these NAIs probably wouldn’t appear on the real DSO but for this purpose I have kept them in. They may disappear later on as I develop the plan. And as they say in the cartoons ... That's all Folks!!! (Well for Question 4 anyway)

-
It is a critical part of the process - and as you say many people do a form of own force analysis, it is particularly relevant for QBs so you can maximise your points allocation. Also I think many people do it during execute, the best example I can think of is for indirect fire missions - you're generally going to pick your best observer/HQ to call those missions in to minimise the time to call it in and to reduce the chances of dropping short. Talking soft factors, for real it is one of the reasons a commander must know his subordinates well. If he knows who his top performers are, you can guarantee they will be the people getting the most difficult missions/tasks. The relevance of the hard factors you will see later in the process, particularly when I do Question 5, which is all about resourcing. In my example analysis, those hard and soft factors will add value later and you'll find that some of the analysis may not be used in the final plan. In this instance, the lack of resources means that I may have to go for sub-optimal solutions - as it is never a perfect World, this is where the commander accepts risk or mitigates it by adding resources, synchronising effects or using some other means such as surprise or deception. But it is only until you do the analysis that you understand those risks and your strengths and weaknesses versus those of the enemy. Stay tuned to see how they come into play ..
-
Why do you think I gridded the map Bill? The tools I will use to battle track will be: The gridded map. An enemy force kill chart. A friendly force casualty tracker. The synchronisation matrix. Possibly a combined decision support overlay/matrix. Inevitably I will cover these at the appropriate time but very briefly the main tool for executing the plan will be the synch matrix along with map plots. Enemy battle tracking will be mainly from the map. Hope that eases your concerns .
-
QUESTION 3 – WHAT EFFECTS DO I WANT TO HAVE ON THE ENEMY AND WHAT DIRECTION MUST I GIVE TO DEVELOP A PLAN? This step is all about the commander and is his opportunity to articulate his battle winning idea and direct the staff. In this situation, where we are in effect a Coy HQ, the 2nd part of this question is essentially redundant because the Coy Comd would likely be going through this process himself. For the purposes of education though, I will dwell on the direction piece. The sort of direction given will vary according to the situation and the factors creating those variables. A couple of factors revolve around the amount of time available and the experience of the planning staff. As a general rule, where there is little time available and an inexperienced staff, the more hands-on the direction is likely to be from the commander. The tool used to convey the effects on the enemy part of Question 3 is the Intent Schematic. The following graphic is my Intent Schematic for this mission: The accompanying amplifying direction given by the commander in relation to this schematic is: Clear (1) to prevent enemy observation and disruption of friendly forces. Clear (2) to prevent enemy observation and disruption of friendly forces. Clear (3) to prevent enemy observation and disruption of friendly forces. Secure Main Wood to defeat the enemy (MAIN EFFORT). Screen to identify enemy reinforcement. As the term hasn’t been explained before, ‘Screen’ is defined as ‘observe, identify and report; only fight in self-protection’. The term ‘Defeat’ is defined as ‘to diminish the effectiveness of the enemy to the extent that he is unable to participate further in the battle or at least cannot fulfil his intention’. The important things here are the effects and their purpose – by articulating these clearly it allows a plan to be developed by the staff which will meet the commander’s intent. Additionally, by employing this method, it gives the staff sufficient latitude rather than pushing them into a scheme of manoeuvre early. The commander’s main effort is also designated at this stage and clearly articulated to the staff – it should be the focus of the plan. Having seen the Intent Schematic and looking at some of the deductions that dropped out of Question 2, you might be thinking …. A lot of this stuff was covered off there. You would be right in thinking that, the Question 3 ‘value add’ is the commander’s direction – he has used his experience to extract those elements of the previous analysis that he deems to be the most important and has either modified or discarded those that he deems to be less important. The commander could also give firm direction about use of: Firepower Manoeuvre Deception And how much risk he is prepared to carry In CM, you are the commander so this is an internal process and is likely to be influenced by your experience (eg your playing style – taking the illustrious Bill Hardenberger as an example – you will see from his AARs that he places great emphasis on reconnaissance). The other thing that should drop out of Question 3 is direction to recce, the body of this will be in the form of finalised Priority Intelligence Requirements (PIR). PIR are enemy or environment focussed and should relate to information/intelligence that will be vital to planning and successful execution of the mission. As previously stated when discussing NAIs in Question 1 – PIR should be carefully selected and pared down to the absolute minimum required to facilitate collection of the information, avoid overtasking limited assets and to prevent information overload. As an example, it would be nice to know the enemy commander’s name but it is hardly critical to planning or executing this mission. So with all of that said, my PIR are: Where is the enemy main position? What is the composition of the enemy’s outpost line? What is the trafficability of the Main Wood for my vehicles? How quickly can the Main Wood be reinforced from the SE? Anyway that’s is a brief trot through Question 3 – it will come as no surprise to you that Question 4 will follow in the next post.

-
I always blunder into stuff myself - to be honest this is the first time I've gone into a mission and planned it properly. Some of my blundering is due to lack of consideration of all of the planning factors and some of it is because of poor execution drills - there are some real pros out there who have mastered fast, pause, hide, target briefly orders combos whose skill I just marvel at. Anyway, the proof of this pudding will be in the eating when I get down to the execution phase.
-
Great book & CMSF UK scenario possibilities, too
Combatintman replied to John Kettler's topic in Combat Mission Shock Force 1
Welcome Chantelle - haven't read the book but by all accounts it is a belter. Sounds like you had a more interesting tour than I did (I spent 6 months in Lash Vegas in 06-07 on Herrick 5). Glad you got home safely and respect for what you did over there. -
Bud's Russian Attack AAR: Красная молния
Combatintman replied to Bud Backer's topic in Combat Mission Red Thunder
To be honest I was scared for the guys on point - I thought from the get go that some of them would have got whacked by some of your rocketry. I'd take it as a bonus mate . Keep the screenshots coming, I am enjoying this and also picking up some great tips for the execution of my forthcoming battle. -
Again, thanks for the comments gents and hopefully the plan will resemble the genius of Paulus's avatar but I can't guarantee execution will minimise casualties as C3K predicts ... there will be some attacking though. Anyway ... in the spirit of a drill lesson 'I left you in this position' (being Question 2, What have I been told to do and why?). On with the rest of it ... Mission Analysis Step 3 – Analyse tasks. Here you look at specified tasks and identify implied tasks. A specified task is generally stated in the order. In this case there are none which is no biggie because we can come up with plenty of implied tasks from what we have worked out from all of the previous steps. So here’s how it looks: Remember my mission is to secure the woods to the SW (or as I have called them – Main Wood) and my intelligence analysis has identified that the enemy is likely to be in those woods. Given all of this some implied tasks are: Task 1 - Clear Main Wood because I cannot secure the wood without clearing it and the enemy is likely to be in there. Task 2 - Clear Village A because the enemy has been reported there and it provides overwatch of the road to the Main Wood (this links into my understanding of the two up and one up – my force cannot launch an attack onto our off-map village from Main Wood if the enemy can call fire onto it. Task 3 - Clear Wood E because it is likely that there will be some form of enemy there but the main reason is because it will be difficult for me to clear and secure the Main Wood without clearing Wood E. Task 4 - Clear Wood M because this is part of me making such disposition as to prevent destruction of loss of the Main Wood by the enemy. Also within the context of the Main Wood being a form-up point, if I put some form of reconnaissance element or outpost there it will provide early warning of an enemy counter attack and allow me to disrupt or delay it. As I have been using the term, it is probably best to define it so that you understand what is meant by ‘Clear’. The definition is: ‘to clear terrain of enemy direct fire and keep clear until handed over to another unit/formation’. To save you trawling back through the thread - here is the BAE graphic with all of the annotations on it again: Mission Analysis Step 4 – Determine freedom of action. Here we look at what we can and can’t do and identify any opportunities. Again this requires a bit of analysis because not everything is stated. Within the CM context we don’t need to do this ad nauseum. It goes something like this: I must secure Main Wood NLT 0800 hours. I cannot cross my assigned boundaries (eg the extent of the map) I have complete freedom of action within the AO. Mission Analysis Step 5 – Identify critical facts, judgements and assumptions. Some clarification here on the terminology: Critical facts are statements of information that are known to be true. Judgments are statements of information that are believed to be true and are substitutes for facts. Assumptions are statements for which no proof is currently available and are substitutes for judgments. Note that all assumptions should be turned into facts by generating an information requirement which would then form part of the intelligence collection plan. Critical facts: There was an enemy presence in Village A last night The wind is from the west and is very strong. Friendly force is at 90% CE. Friendly force dismounts have a full ammunition load. I have only 2 x mortars. The AO is 1km x 1km Judgements: There is an enemy presence in Village A Smoke will likely be ineffective due to wind strength Accuracy at long range will be affected by crosswinds Other weather conditions will have no adverse effects on friendly and enemy operations Vehicles will have to manoeuvre carefully over damp ground Main Wood is restricted terrain I am unlikely to be able to employ indirect fire effectively in Main Wood. Coy HQ, one manoeuvre platoon and some support elements will not arrive until 0705 hrs at the earliest (note that this is a ‘fact’ in the briefing but in real terms would be a judgement and still might be a judgement if SeinfeldRules has done a varied arrival time for this reinforcement in the mission editor). My mortars are unlikely to arrive until 0710 hrs (note that this is a ‘fact’ in the briefing but in real terms it would be a judgement and still might be a judgement if SeinfeldRules has done a varied arrival time for this reinforcement in the mission editor). My mortars can only provide four minutes of indirect fire each. I have sufficient direct fire weapons and ammunition to be able to suppress targets in LOS. Assumptions: The enemy is of approximate platoon strength The enemy lacks armour and significant heavy weaponry The enemy can call on or has an indirect fire capability There are no manmade obstacles in the AO The enemy is unlikely to have sufficient ammunition to conduct a sustained defence. For Question 2 .... that is it - all done (no outputs at this stage but the results of Mission Analysis are recorded and will be used as inputs for flashes of brilliance later on in the process). Question 3 will be the subject of the next post so stay tuned ....

-
MOS, that scenario looks familiar ... 'Into the Green' by any chance?