Combatintman
-
Posts
5,065 -
Joined
-
Last visited
-
Days Won
68
Everything posted by Combatintman
-
Some belting screenshots in this AAR - good work.
-
No - it'll be the first module of an updated CMSF.
-
Err ... I disagree. This is like writing the perfect essay on the fall of the Roman empire in a geography exam or serving a perfectly fried egg to a customer who wants it boiled. Tactics are a means of solving problems - if you misunderstand or ignore the problem you are wasting your time. I find this a particularly surprising point of view in a thread discussing German attack doctrine given the German emphasis on Mission Command, which is underpinned by subordinates being given clear missions and clear intent. Are you sure you meant to say this?
-
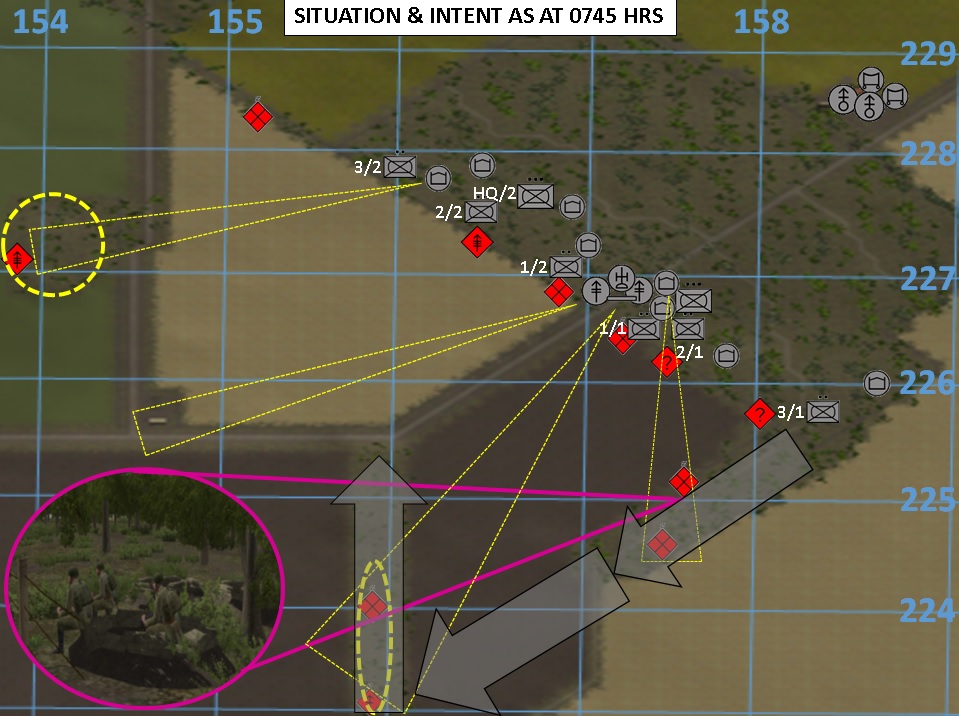
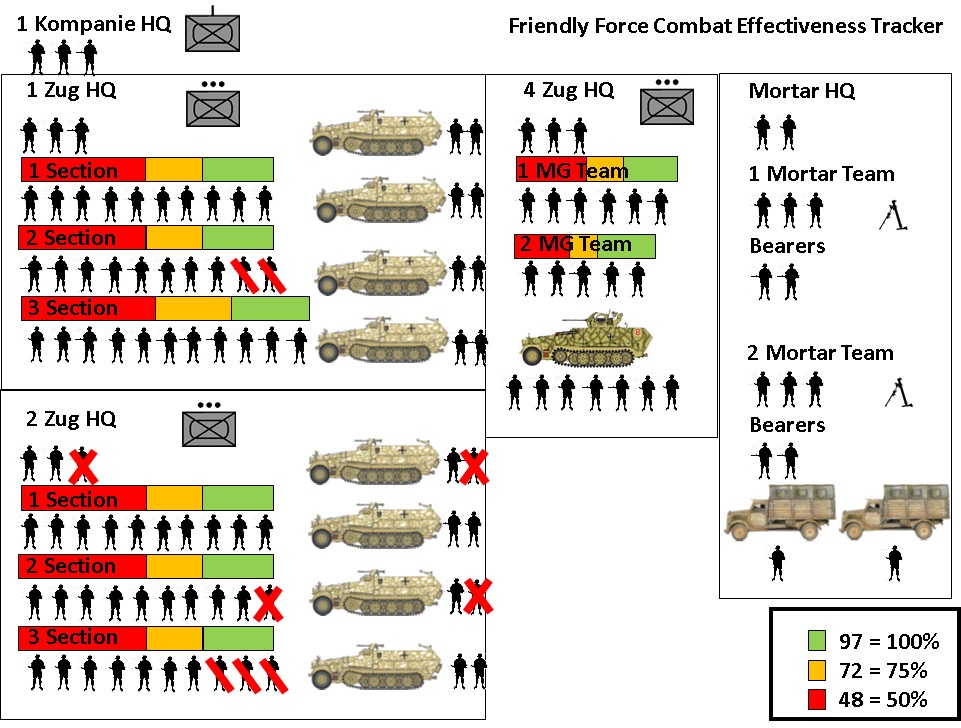
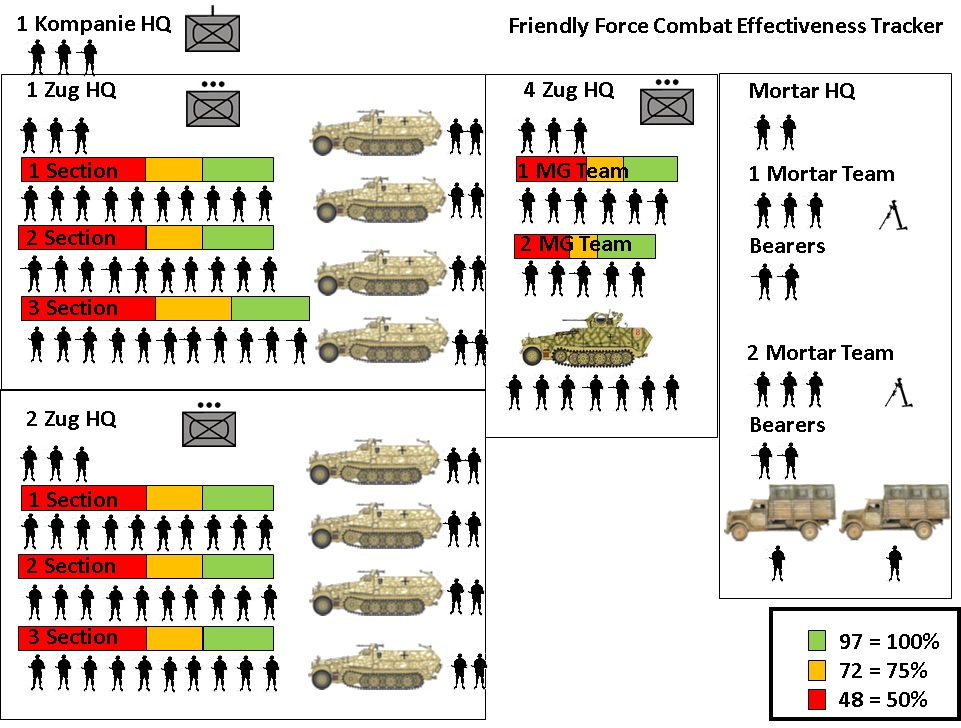
 0740 TO 0745 HOURS – TURNS 40-45 SPOILERS FOLLOW***************** ENGAGEMENT AT GRID 155228 AS AT 250741Jun44 2 Zug’s 3rd Section has manoeuvred to engage the enemy initially sighted at 0740 hrs. The first sighting identified a single rifleman in foxholes. The second sighting 20 seconds later identified an SMG armed soldier moving out of the line of engagement followed by a third spot at 0742 hrs of a rifleman (assessed as the first rifleman spotted) exfiltrating along the tree line NE. I assess this as a rifle half section. It will likely continue to exfiltrate along the tree line NE. One of the three WIA soldiers of 2 Zug’s 3rd Section succumbed to his wounds and is KIA. This is illustrated here: CONTACT! Date Time Group: 250743Jun44. Location of contact: Grid 156226. Location of observer: Grid 157227. Target description: Enemy dismounts, probably dismounted infantry in foxholes. Action by target: Engaging my MG section with small arms fire. Action by own forces: Have suffered 3 x WIA, am returning fire to suppress. 1 x enemy KIA. CONTACT! Date Time Group: 250743Jun44. Location of contact: Grid 157226. Location of observer: Grid 157226. Target description: Enemy dismounts, probably dismounted infantry in foxholes. Action by target: Engaging my 1 Zug 1 Section with small arms fire. Action by own forces: Conducting quick assault, have returned fire and inflicted 1 x enemy KIA. CONTACT! Date Time Group: 250743Jun44. Location of contact: Firing point not identified, likely to be Grid 157226. Location of observer: Grid 157226. Target description: Not observed, probably dismounted infantry in foxholes. Action by target: Engaging my Half-track with small arms fire. Action by own forces: Returning fire and reversing out of contact zone. Will manoeuvre 1 Zug, 2 Section to suppress and assault the position. This image summarises those contacts: I have not marked the UNK position on the tracker yet. Two identified contacts marked as Enemy 2 Sect – 2 x KIA marked and as I still have contacts I have marked 2 x sighted. This image shows the Enemy KIA at 0743 Hrs: CONTACT! Date Time Group: 250744Jun44. Location of contact: Grid 156227. Location of observer: Grid 156227. Target description: Enemy Maxim MG team in foxholes. Action by target: Reorientating MG and engaging. Action by own forces: 2 Zug, 2 Section has suffered 2 x WIA. Both 1 and 2 Sections plus supporting Half-tracks will suppress before assaulting. Enemy has suffered 1 x KIA on this position. Other significant events are the KIA of 1 x enemy from 2 Zug’s 3 Section contact Grid 155228 and UNK sound contacts at Grid 157225 in front of 1 Zug’s 3 Section. Sightings for the UNK sound contact will not be added to the kill tracker until the enemy engages or is sighted. New contacts and enemy update is shown below: CONTACT! Date Time Group: 250745Jun44. Location of contact: Grid 157225 Location of observer: Grid 157226. Target description: 3 x Enemy infantry in foxholes. Action by target: Engaging. Action by own forces: Will suppress position with MG and cannon fire prior to assaulting with 1 Zug. Contact 3 x Inf I assess to be different to the group that fired on me at 0722 hrs mainly due to orientation and ground, it would have been difficult for this group to have engaged my scouts from this position. They have been marked as new sightings in the 1 Section part of the Kill Tracker. Situation as at 0745hrs: Here is the Friendly Force tracker: Here is the Enemy Kill tracker: So my thoughts on the above … Well a busy turn for sure and although I have suffered some minor losses I am pretty pleased with the way it went. Bottom line is that I have now seen approximately 40% of the Enemy and got confirmed kills on just under 9% of the force. So from my new sightings, it is clear that the Enemy went for a variation of my assessed COA 1 – Defend Forward. I don’t see any reason to radically change my thoughts about the enemy, I’ve seen enough of him, he was pretty much where I thought he would be and now that I’ve found him and have now manoeuvred to a position of advantage I can now defeat him. My issue remains time, or lack thereof – nothing I can do about that now. My intent, now I have observers in place is to call indirect fire down onto Objectives DIETER and FRITZ. My HMG and Half-tracks lined up along the tree line will now engage Objectives DIETER, OTTO and FRITZ with direct fire and will engage identified enemy positions. My next priority for manoeuvre is the clearance of the Enemy in the wooded area of Grid 157224 and Grid 157225. This will be led by 3 Sect/1 Zug but my intent is to use most of 1 Zug for this task. This gives me a covered approach to Objective FRITZ which will be the next priority. Victory is close (I hope) …


-
Have a squint at this thread: http://community.battlefront.com/topic/119692-syrian-army-vs-insurgents/ Should keep you going for a while.
-
0735 TO 0740 HOURS – TURNS 35-40 SPOILERS FOLLOW***************** Significant event 0739 hrs. 2 Zug calls Codeword WURST (Obj AACHEN clear). CONTACT! Date Time Group: 250740Jun44. Location of contact: Grid 155228. Location of observer: Grid 156228. Target description: Enemy not seen, probably dismounted infantry. Action by target: Engaging my half section with small arms fire. Action by own forces: Half section will move out of contact zone, other half section will manoeuvre to engage firing point. Situation as at 250740Jun44 (End Turn 40) 1 Zug is making good progress through Obj COCHEM and lead elements of all sections are now crossing Line FRIEDA. Zug centre of mass is IVO Grid 158226. 2 Zug has now fully shaken out into its linear clearing formation. Only element in contact is 3 Section which has suffered 3 x WIA in its ongoing contact. Remainder of 2 Zug is poised to cross Line FRIEDA. Zug centre of mass is IVO Grid 157228. 4 Zug elements continue to move down Axis BLAU coordinated with the moves of 1 and 2 Zug Mortars remain in the area of the building complex at Grid 158228. Here is the updated Friendly Force Tracker Here is the updated Enemy Force Kill Chart Point to note here is that my new sightings I have estimated at 2 due to the initial nature of the contact. Also note that I am marking them off under the 3 Section header. This is not because I know that they are of the enemy’s 3 Section, it just means that these guys are likely to be a different section to the guys that I saw before and marked off as 1 Section. And finally the updated Synch Matrix So my thoughts on the above … Well we have definitely ruled out Enemy COA 2 (Defend Deep), as things stand we are still looking at Enemy COA 1 (Defend Forward) but not quite as templated. I have passed through NAIs 1 and 6 which was where I had enemy units templated for this COA. This might give me pause for thought (well in fact it did) but the contact at 0740 hrs pretty much tells me that he is indeed defending forward … right on the woodline which is where I thought he might have some outposts rather than main defensive positions. However, even though the initial assessment was not 100% accurate, there is nothing that has surprised me and I still feel as if I know more about the enemy than he knows about me. Clearly the Blue on Blue WIA incident was disappointing but at least the guys are alive. I think the best news for me is that the Sdkfz 251/17 has moved without bogging. Perhaps the driver has learnt his lesson. In terms of battletracking – I have 20 minutes left. Realistically I don’t think that is enough time to find and clear (remembering that I have only found the first element of the Main Wood defence) Main Wood, clear DIETER, FRITZ and OTTO and then get onto HERMANN. Despite my WIA I’m well within the parameters I set myself (my endstate) and I have enough combat power to complete the mission. Next time … I don’t think it would be too much to ask for me to kill some of the enemy … would it?


-
0730 TO 0735 HOURS – TURNS 30-35 SPOILERS FOLLOW***************** Situation as at 250735Jun44 (End Turn 35) 1 Zug has called Codeword SUPPE (Obj BERLIN Clear) with a centre of mass at Grid 158227 and is moving by bounds with lead elements clearing Obj COCHEM. 2 Zug has commenced its clearance of Obj AACHEN with its centre of mass at Grid 157228. 2 Zug is still waiting for its 1st Section to sort itself out but is continuing its clearance. 4 Zug elements are moving along Axis BLAU, with its lead 1 MG Team handrailing at Grid 158227. Mortars are now at the building complex at Grid 158228 and are setting up. So my thoughts on the above … Not much really – this was a pretty uneventful (I like those) turn. I won’t deny a sense of mild irritation with the AI in unsnarling my vehicles – although it achieved the aim, it is using up time I don’t have!!! Otherwise, once shaken out I have made pretty quick progress – the reason for this should be obvious – I am running out of time. This is not to say that I am being reckless in my movement but I am moving with less caution than I would like. Rest assured that teams are split, and no element moves without another element either having eyes on or putting suppressing fire down ahead of the axis of advance and my half-tracks never enter ground that a dismounted element hasn’t cleared. Enemy-wise, well it was a quiet turn as stated. However this is important to note, I have passed through NAI 7 and seen no enemy. If you look on the Situation graphic, NAI 7 covers the area that 1 Kompanie HQ, the MG Team and 1/1 Zug are sat on (Grid 158227). If my intelligence officer is right, this should indicate that the Enemy has adopted COA 1, which I think I called ‘Defend Forward’. If you go back through the execute part of the thread, you will note that most of my previous enemy sightings have pointed to COA 1 being the most likely COA that the enemy has adopted. Time will tell of course. Sometimes with your intelligence picture it can be a matter of what you don’t see that is important, rather than what you do see. I'm sure things will hot up again soon.

-
Yes Bill - that was the joke indicated by the 'no wait' comment - I knew I should have put a smiley in there. I'll add it to my growing list of lessons identified for the post operational report .
-
I really don't think you need to bother about not having too much of an idea about the processes to be honest George - I still have not solved the problems you set in your Battlegroup Attacks missions in CMSF. I think by the time I get to the end of this saga, I won't be making a uniform recommendation to say ... this is the way to go. I think it is best suited to Coy-sized engagements with what I would call small maps (2 x 2 km tops). Trying to apply a full planning process to a handful of your great scenarios for this game as an example (Studienka, Carius at Malinova and Der Ring) would certainly overwhelm me. Don't get me wrong btw - they are awesome scenarios with all of the right information required to go through the process (ok perhaps not Carius at Malinova - but then you have designed it to reflect what it was in real life - a bit of a mad crazy advance to contact). Chuffed you are enjoying the thread though and so long as it is adding value be it in a small or large way, I am happy - it is one of the reasons I started this project - ie add some value to the community. Thanks for your support.
-
0725 TO 0730 HOURS – TURNS 25-30 SPOILERS FOLLOW***************** Explanation of deployments IVO Line EVA 0726 hrs. While not featuring in my initial Enemy analysis, I am suspicious of the building at Grid 158228. If the Enemy has on map mortars, this is where they would most likely be, because it keeps them well back from what he considers to be my most likely avenue of approach (eg not the one I’m using) and, if he is employing the principles of defence, it provides all round defence to the main position covering his rear. To that end, I don’t want to be bimbling around there until I’m satisfied the building is clear. Also, now I’ve got around the back of his defensive laydown, I’m no longer interested in surprise, I want him to know I’m there with sufficient strength and firepower to cause him problems because this will have a psychological effect on him. He now has to look in two directions and if he has a reserve, which I don’t think is the case, he will now be worrying about where and when to commit it. This graphic shows the detail Significant event 0727 hrs – my Sdkfz 251/17 has bogged again at Grid 154220!!!! Hmm … it’s the Eastern Front for you my lad … no wait a minute … Hopefully with the Company HQ embarked, the driver of this wagon will receive suitable motivation … Significant event 0727 hrs - Truck carrying 2 Mortar Team and the Mortar HQ, took fire from the HMG previously identified at Grid 154226 but suffered no damage and embarked troops also suffered no casualties while crossing Grid 154220. Situation as at 250730Jun44 (End Turn 30) 1 MG Team on Line EVA at Grid 158227 and conducting fire and manoeuvre and suppressing the buildings at Grid 158228. 2 Zug is now complete IVO Line EVA at Grid 159226. 1 Zug is on Line EVA at Grid 159227 and suppressing the buildings at Grid 158228. 4 Zug Sdkfz 251/17 unbogged itself and is suppressing the buildings at Grid 158228 from Grid 159227. Both Mortar Teams remain embarked on trucks at Grid 159227, intent is for them to set up IVO the buildings at Grid 158228, once they have been cleared. So my thoughts on the above … Well, I’ve finally got behind the enemy with all of my combat power and have pulled it off without suffering significant casualties. I’m pretty pleased with that, even if I’m ten minutes late. Hindsight is a wonderful thing as it is probably pretty clear to you all that I could have just whizzed across that open ground and got to Line EVA at about the 15 minute point. Not much I can do about that now so all I can do is sort those buildings out and shake myself out into an assault line ready for the difficult bit, the clearance of Main Wood. Otherwise, the Sdkfz 251/17 has finally got some rounds downrange, hopefully the driver has finally mastered the skill of pulling away from the halt without bogging in – I do not want to be in the ‘Third time lucky’ arena. Nothing much new to report on the enemy really, I haven’t seen any more of them and I’ve seen no indications of them moving. I’m disappointed I didn’t really think as hard as I should have about the mortars because although I factored them in, I worked on the premise of them being off-map when actually I should have considered them being IVO those buildings – of course they may not be there at all or even exist at all but we shall see. On balance I suspect he has got nothing at all for indirect fire because if he did I could have expected love from above while I was faffing around IVO Grid 153220. Although remember the Red Army is not overly endowed with radios so my plan to use a flanking avenue of approach to stay out of sight of a radio-equipped observer may have paid off.


-
Bill, my plan for the Maxim HMG is straight from the mouth of a B movie bad guy 'I'll get you later'. In all seriousness, once I cross that open ground it is dislocated and I can deal with it when I get around to clearing Obj DIETER (which is where it is). It probably isn't apparent from my screenshots but the HMG is just short of the crest of the high ground in that little copse. This means that it cannot fire anywhere into Main Wood unless it move hence me saying it is dislocated and not being overly worried about it. Quite how I will deal with it will be a come as you are party, I don't need to think too deeply about that until I've sorted the woods out. Conceptually I see Obj DIETER getting stonked by my mortars, I'll probably fire a bit of 20mm at it and then rush it with either one or two sections from 2 Zug.
-
Lee, congrats on your decision to jump into the editor and have a go at scenario making. You're right that putting a scenario together is more than just focusing on force ratios. To get it right you really need to have a clear idea of what the narrative is and what the outcomes are. So as Raptorx7 says, 3:1 is a good starting point but it shouldn't be your absolute rule. If you are designing for H2H as an example, you will probably need to aim for closer force parity to make the scenario challenging for both players. If you haven't done so already - check this thread out http://community.battlefront.com/topic/109190-the-sheriff-of-oosterbeek-–-a-scenario-design-daraar/ Although I've got a few CMSF scenarios under my belt, I keep coming back to this thread before I start any new project, this is less for the mechanics of the editor and more for reasons of design philosophy and the scenario narrative. I think another useful tip is to read a few AARs and I'll shamelessly plug mine (which is an ongoing planning tutorial with an AAR following) here: http://community.battlefront.com/topic/120527-no-plan-survives-first-contact-with-the-enemy-planning-tutorial/ If you look at the planning part of this, you get an insight as to how I have tried to solve the problem set by the scenario designer. Additionally, I use some of these techniques in my own scenario design – have a close look at the resourcing part of the thread (Question 5). By looking at AARs you get insights as to how players tackle their battles which again can add value to the scenario design process. You can then use all of this information to inform your force picks and balancing.
-
0720 TO 0725 HOURS – TURNS 20-25 SPOILERS FOLLOW***************** CONTACT! Date Time Group: 250722Jun44. Location of contact: Exact location NK, IVO wood Grid 157224. Location of observer: Crossing field Grid 157224. Target description: UNK, friendly forces engaged by small-arms, assessed as Enemy rifle section. Action by target: Engaging with deliberate fire. Action by own forces: Have exited contact area and intent is to observe before continuing on task. Additional activity – fire orders were received by my mortars at 0721 hrs and spotting has commenced. First round impacted approximately 50m South (in Grid square 156223) of designated target area (Obj FRITZ) at 0722 hrs. CONTACT! Date Time Group: 250723Jun44. Location of contact: Grid 154226. Location of observer: Grid 156220. Target description: Single HMG in foxhole. Action by target: Engaging half-tracks with burst fire. Action by own forces: Will switch fire to suppress. Additional activity – 2 Zug HQ radio operator KIA from HMG fire. Enemy Situation: Enemy use of HMG was not part of assessed COAs, however it is sited in a location consistent with initial assessment. COA 1 remains the assessed most likely COA based on this and other identified contacts. Enemy HMG possibly replaces previously assessed 3 x LMG teams. According to TO&E, each HMG team comprises 4-5 x soldiers and 1 x HMG. Options are that this is a single HMG team in a Rifle Company or that this will be from one of the two HMG platoons from the Rifle Battalion. The platoon comprises 3 x HMG teams. I assess the latter to be the most likely COA. Here is the updated kill tracker - I've reorganised the scratch pad, updated the overall assessed numbers and combat effectiveness percentages. Keeping on top of your planning and tracking documents is key during execute - they are 'living' documents - and there is no point having them if you don't update them continuously Mortar on target 0724 hrs Situation as at 250725Jun44 (End Turn 25) 1 MG Team on Line EVA at Grid 159227 and manoeuvring to suppress building at Grid 158228. 2 Zug scouts at Grids 158224 and 159225. They are still being engaged by the enemy IVO Grid 157224. 2 Zug is in the process of concentrating IVO the small copse at Grid 159222. Once firm there, 2 Zug will advance mounted to Line EVA. 2 Zug has now suffered 2 x MG gunner KIA in engagements with the Enemy HMG at Grid 154226. Additionally, 1 x soldier from 2 Section is KIA from the same contact. 1 Zug has moved to Line EVA at Grid 159227. Sections are dismounting in preparation to commence assault on Obj BERLIN. 4 Zug Sdkfz 251/17 firm at Grid 154220 preparing to move to Line EVA. 1 Mortar Team embarked on truck on Line EVA at Grid 159227. 2 Mortar team at Grid 153220 engaging identified anti-tank rifle team and assessed scout team IVO Obj FRITZ at Grids 155223. On completion of mission, mortar team will embark on a truck and join 1 Mortar team IVO Line EVA. Updated Friendly Force Tracker Synch Matrix Update So my thoughts on the above … Apart from the appearance of the HMG (and I had considered it as a possibility in Question 1), the enemy laydown is pretty much conforming to my assessed COA 1 which gives me confidence in terms of how the rest of the laydown will look and also that the plan to defeat the enemy is therefore fit for purpose. I’m just surprised that the HMG took so long to unmask – had it done so earlier I would certainly have allocated one of my mortars to start stonking Obj DIETER. It also seems to be my luck in this battle that just as I think – time to get moving, another threats unmasks. Murphy’s law of combat is strong with me in this one. It goes without saying that it is disappointing that I haven’t hit my timelines but from an instructional and planning perspective my tardiness has illustrated the value of Decision Points/Decision Lines and branch planning. As I said earlier when discussing my decision – I am determined to see the original plan through to demonstrate the value of planning although I have to admit that clearing Obj HERMANN is going to be difficult to achieve due to time and space considerations. Although hope is not a viable course of action, if I can force a surrender then it becomes a moot point. My casualties, while obviously disappointing, are light and I have no real concerns about combat effectiveness or being able to resource and therefore complete the CLEAR and SECURE of Main Wood and I should be poised along Line EVA ready to start that task in the next five minutes or so.


-
0715 TO 0720 HOURS – TURNS 15-20 SPOILERS FOLLOW***************** CONTACT! Date Time Group: 250716Jun44. Location of contact: Grid 155224. Location of observer: Grid 156223. Target description: 1-2 x Enemy infantry in foxhole assessed as scout team. Action by target: Preparing to engage friendly forces. Action by own forces: Have pushed to a firing position and will suppress. Situation as at 250716Jun44 (End Turn 16) 1 MG Team dismounted and returned to Grid 154200 to engage Enemy IVO Obj FRITZ. 2 Zug scouts at Grids 158223, 157222 AND 156223. 2 x 2 Zug half-tracks have moved south and are short of a small copse at Grid 159222. Half-tracks are suppressing this feature and embarked sections are dismounting with the intent of clearing this feature. Remaining 2 Zug half-tracks are at Grid 156220, 1 x half-track is engaging enemy ATR team in Grid 155223 and other half-track is engaging suspected position Grid 157224. 1 Zug is now moving south to pass through 2 Zug, centre of mass is Grid 157220. 4 Zug Sdkfz 251/17 firm at Grid 154220 Mortars firm at Grid 153220 and setting up. Situation as at 250720Jun44 (End Turn 20) 1 MG Team at 154200 to engage Enemy IVO Obj FRITZ. 2 Zug scouts at Grids 157223 and 158223. 2 x 2 Zug half-tracks continued suppressing the small copse at Grid 159222 to cover the clearance of the feature by the two embarked sections. Both sections are now on this feature having discovered no enemy located there. The remaining 2 Zug half-tracks remain at Grid 156220 engaging the enemy ATR team in Grid 155223 and a templated position at Grid 157224. 1 Zug is firm in dead ground with the centre of mass at Grid 157220. 4 Zug Sdkfz 251/17 firm at Grid 154220 Mortars firm at Grid 153220 and preparing to fire a fire mission called in at 250718Jun44. This is a linear fire mission intent on suppressing/destroying the identified anti-tank rifle team and assessed scout team IVO Obj FRITZ at Grids 155223 and 155224. So my thoughts on the above … I now realise it has been a mistake to send Blind Pew as my lead scout – they still persistently refuse to see anything. However they continue to make good progress and although still suffering from being prone to tiring/tired they are at least still moving and they are all still alive. I am pleased that there was nothing in the small copse at Grid 159222 as it is one less thing to fight for and one less potential threat to my flanking manoeuvre to worry about. Now … onto the flanking manoeuvre. It is now H+20 and I know from my Synchronisation Matrix and Decision Support Overlay that I need to make a decision. This graphic is the DSO overlaid onto the Situation Map and the thing we are interested in is Decision Line 1 (the line between the two stars numbered 1). For those that don’t recall, these are the decision criteria for either continuing with the original plan or launching Branch Plan 1: So how it will work is that at H+20 if any or all of the following conditions have been met: I have less than a platoon across Decision Line 1 (I have 2/3rds of a platoon across DL 1). I have lost three half tracks before crossing Decision Line 1 (I have lost no half-tracks). I have dropped to 75% Combat Effectiveness (75% CE) before crossing Decision Line 1 (I am at 100% CE). So strictly speaking I should can the plan and go with the Branch Plan. I’m not going to for a number of reasons: 1. I think you’d feel cheated if I executed anything other than the plan I meticulously put together and it would blow a hole in my assertion that planning is generally a good thing. 2. I have only just failed to get a platoon across DL 1 and I know that within the next few minutes that criteria will be met. 3. I still have confidence in my plan and think I can still defeat the enemy despite falling slightly behind my timeline (and I am aware of it because I have a Synchronisation Matrix). 4. Just because there is a Decision Line, it is ultimately the Commander who makes the decision and so this is a reminder to him with a recommended course of action/decision to make. Bottom line though is that I really need to get my skates on with this outflanking manoeuvre. So, what about the Sdkfz 251/17 and its 20mm rapid firing love? Some of you are probably wondering why I haven’t committed it yet. I am asking myself the same question and this boils down to my sense of caution and wanting to make sure it is available for brassing up Objs DIETER, OTTO and HERMANN later on in the mission. I have decided that it will not cross the potential engagement areas in Grids 156220, 157220 and 1568220 until I am reassured that some Red Army comedian with an anti-tank rifle won’t whack it … or if I just need to crack on move. As discussed previously – I am employing a single mortar to suppress the identified enemy in Obj FRITZ, in terms of synchronisation my plan is that as soon as the rounds are on target, I will lift the MG fire from the half-tracks and scoot along Axis ROT. Likewise MG Team 1 will up sticks and embark on a truck. The Sdkfz 251/17 will either move to a fire position to suppress any remaining enemy on Obj FRITZ or will just crack on and I will take the chance that over 15 minutes of MG fire and mortar fire will have sorted out the enemy there. Finally – some enemy and battle tracking matters. First up the enemy – the contact report of 0716 hours doesn’t change anything for me. While the location of the enemy is not exactly where I had it templated, it is still within Obj FRITZ where overall for enemy COA 1, I was expecting groupings to include an anti-tank rifle team (seen), a scout team (seen) and an LMG team (not seen). As a reminder that was identified in the initial event matrix here: http://community.battlefront.com/topic/120527-no-plan-survives-first-contact-with-the-enemy-planning-tutorial/#entry1626428 So this is the updated tracker: That's it until next time ...
-
I'm not the greatest teacher so perhaps we'll cancel each other out!!! I would pick your scenario carefully if you are going to be doing a lot of planning - I think some scenarios lend themselves more readily to it than others. As an example I would avoid a large scenario - start small and see how you go. Of course if you're just going to employ the battle tracking techniques then fill your boots, these techniques can be easily employed. Obviously if you have any questions just pitch in and I'll do my best to help.
-
MOS:96B2P, yes the scratch pad is exactly for that purpose. While I do think that I am vaguely good at my job, I will be astounded if my assessment exactly matches what is on the ground. I am less fussy about enemy elements within the ORBAT - the first guys that I see that I think are part of a rifle section will automatically be marked off in the '1 Section' part of the kill chart. From that point on I will try and mark elements that would be part of that same section as 1 Section based on where I see them. After all, it is not really very important whether they are members of 1, 2, 3 or whatever section. The important thing is the casualty track and being able to deduce which elements of the enemy grouping might be close to becoming combat ineffective based on either hard or soft factors.
-
0710 TO 0715 HOURS – TURNS 10-15 SPOILERS FOLLOW***************** Situation as at 250711Jun 44 (End Turn 11) 1 MG Team Grid 154200, Firing on suspected enemy position Grid 155223. 2 Zug scouts at Grids 156220 and 156221 heading south 2 Zug main body at Grid 154220 1 Zug main body traversing wood Grid 153220 4 Zug Sdkfz 251/17 and mortars heading south Grid 152220 250712Jun44 = End Turn 12 Situation as at 250713Jun44 (End Turn 13) 1 MG Team Grid 154200, Firing on suspected enemy position Grid 155223. 2 Zug scouts at Grids 156221, 157221 and 158221 heading SE 2 Zug main body embarked on half-tracks Grid 155220. Half-tracks firing on suspected enemy positions Grid 155223 and 157224 1 Zug main body traversing wood Grid 153220 4 Zug Sdkfz 251/17 firm at Grid 154220 Mortars heading south through woods at Grid 153220 CONTACT! Date Time Group: 250715Jun44. Location of contact: Grid 155223. Location of observer: Grid 155220. Target description: Enemy anti-tank rifle. Action by target: Engaging. Action by own forces: Exiting contact area South. Situation as at 250715Jun44 (End Turn 15) 1 MG Team Grid 154200, ceased engaging suspected position and embarking on truck. 2 Zug scouts at Grids 158223, 157222 AND 156222. 2 x 2 Zug half-tracks have moved south out of contact area to Grid 157220. 1 x half-track has damaged radio, otherwise functioning. Remaining half-tracks are at Grid 156220, 1 half-track is engaging enemy ATR team in Grid 155223 and other half-track is engaging suspected position Grid 157224. 1 Zug is firm at Grid 154220. 4 Zug Sdkfz 251/17 firm at Grid 154220 Mortars firm at Grid 153220 Notes: Reaction to contact, intent is to redeploy 1 MG team back to original fire position and deploy mortars IOT neutralise the identified enemy ATR team at Grid 155223, prior to move of 1 Zug along Axis ROT. 2 Zug will continue its move SE along Axis ROT. Enemy Situation: Position of ATR team at Grid 155223 indicates a variant of COA 1 ‘Defend Forward’. Nearest positions to Axis ROT assessed as: Outpost at Grid 157224 Section strength position at Grid 158226 These are illustrated in the following graphic – the top half being my Enemy COA Situation Template and the bottom half being the contact identified. While we’re at it – time to start populating the fancy kill chart. The convention I am using is: Sighted = single diagonal red line Killed = red cross Unsure = do nothing and wait for the picture to develop So my thoughts on the above … The contact at Grid 155223 brought feelings of both elation and frustration. Frustration because, Murphy’s Law of combat intervened in that the moment that I decided I’d done enough hosing down of that general area with MG Team 1 the anti-tank rifle team popped up. Also frustration because I’ve been hammering away at the area with 7.92mm for just shy of 10 minutes and I don’t seem to have had any effect. Elated because I have identified one of the enemy main threat weapon systems early (and not lost a vehicle doing so) but most importantly in a place that I had templated it to be in. Given that my forum username reflects my day job, I feel reassured that I am vaguely good at it (now to convince my Boss to read this thread!!!!). Otherwise, my scouts are making good progress, even if they’re not seeing much but movement is taking it out of them (they are pretty much hitting tiring/tired status at the end of three moves). I am using mainly quick moves although there is always at least one scout team stationary working on the one foot on the ground while the other is moving principle. So long as none of them hit exhausted I’m happy as things are – although of course it would be nice if they did some of that finding the enemy/scouting stuff!!! The mortars did arrive on time so I am obviously pleased about that and I want to use them early to deal with the identified and possibly templated threats to Axis ROT. I also want to see how long they take to get into action and how good my HQs are at calling fire in. This will help me to make decisions about what to target as the plan unfolds (eg if they are not very accurate I will not be calling in danger close missions and if they take an age to call in then I will have to factor in early calls for fire or depth targets).


-
Brevity isn't your strong point is it, or did you want this to be a one post thread? There isn't too much to disagree with but I'm not seeing much here that I can directly apply to a QB, scenario or campaign, why not try breaking this up a bit into manageable chunks?
-
c3k, the exact terrain I would have to look at - I had marked it as restricted terrain in Question 1. As my planning was focussed at the Company level, I was never going to delve into the minutiae - I knew to be careful, I was and it didn't work out initially, however no damage has been done so onwards and upwards or as you would probably say .... ATTACK.
-
Bill - the scouts are dismounted and were initially on move orders. Towards the latter stage of the time block they moved on fast orders. WRT the rest, in the light of the 251/17 bogging, I am driving through the wood at Grid 153220 with a degree of care and progress through that wood is slow. My intent is to move mounted for as much as I can but I want to be relatively sure that I can do so with minimum risk. Otherwise I ack your points about tempo although I'm not so sure that a human opponent would be doing much at this stage, all he has likely seen are 3 x scout pairs and an MG. He will have sited his positions carefully and therefore will have emotional investment in them - it will take more reporting IMHO before he's going to give up his recce'd arcs of fire. Additionally, based on the intelligence brief, he doesn't have much 'fat' in his ORBAT, he is probably like me and has no reserve to commit which limits his response options. I'm also not convinced that he can move as easily as you say. If you look at my templated enemy COAs, he can't really move anything from Obj FRITZ for fear of it being engaged. If we work on the premise that the enemy commander decides that the axis I am taking is my ME, his likely COA would be to move the section templated at Grid 156228 in COA 1 or 157227 in COA 2 and move it to Grid 158226. Although I've said it before, I'll say it again - he needs to be sure that my ME will be on Axis ROT and moving will take a minimum of five minutes. By that time, if I get my skates on, I'll be behind him. The end result is that he is out of position and dislocated. So - I don't think the enemy is going anywhere right now.
-
PTAB - an air delivered munition, GShAP a Guards Assault Aviation Regiment. Enemy at the Gates - not seen.
-
0700 TO 0710 HOURS – TURNS 1-10 SPOILERS FOLLOW***************** The first 10 minutes … Situation as at 250705Jun44 (End Turn 5). 1 MG Team Grid 154220. Firing on suspected enemy position Grid 155223. 2 Zug moving through woods Grid 153220. 2 Zug scouts crossing open ground Grid 154220 heading south. Situation as at 250706Jun44 (End Turn 6) 1 MG Team Grid 154200, Firing on suspected enemy position Grid 155223. 2 Zug moving through woods Grid 153220 2 Zug scouts crossing open ground Grid 154220 heading south. 1 Zug and Kompanie HQ crossing Line ANJA in IVO woods Grid 150220. SIGNIFICANT EVENT 0708 hours (Turn 8) Sdkfz 251/17 bogged Situation as at 250710Jun44 (End Turn 10) 1 MG Team Grid 154200, Firing on suspected enemy position Grid 155223. 2 Zug scouts at Grids 156220 and 156221 heading south 2 Zug main body firm at Grid 154220 1 Zug main body traversing wood Grid 153220 4 Zug Sdkfz 251/17 and crossing road Grid 152220 So my thoughts on the first ten minutes … First of all I am pleased that 1 Zug has arrived at the specified arrival time, while their arrival time plus or five minutes was never going to be a showstopper to my plan, an arrival time of plus five minutes for the mortars could be a problem. So I am working on the premise that because this first reinforcement has arrived on time, I should see my mortars arrive on time too. The bogging of the Sdkfz 251/17 was a major fright. It is one of my key equipments/capabilities. While I may lose it further down the track I do not want to have lost it without putting it to some use. Fortunately it is unbogged and I am breathing a huge sigh of relief. No enemy contacts yet, I am not too bothered about this but I would rather see an anti-tank rifle and deal with it before it sees one of my vehicles. This is one of the reasons I’m putting suppression down on templated enemy positions closest to Axis ROT. Looking ahead, my main concerns are: Moving my vehicles across the ground between Grids 156220 and 159220. This is a likely engagement area for enemy elements I have templated close to Axis ROT. Additionally, the small copse in Grid 159222 is sowing seeds of doubt. While any enemy located there would effectively be on a suicide mission because there are no covered escape routes, it is an excellent position with coverage of the large open field. I have no enemy templated there but the more I look at it (from a scenario design rather than a doctrinal perspective) I am concerned that there may be an MG team and an anti-tank rifle there.


-
Before we get into it, I will first of all show you some orientation images as you haven’t had a detailed look at the ground yet. The reason for this was deliberate as I didn’t want to get into the minutiae of looking at specific arcs and suchlike in the planning phase – this is strictly tactical business and is up to the platoon commanders to decide. As we were planning as the company commander it would be an unnecessary imposition, and I think leads to the temptation to leap straight into a scheme of manoeuvre. So first up a look at some of the named features: At this point, as I alluded to before, I will be referring to grid references throughout the AAR. The following should serve to orientate those of you whose map reading skills are a bit rusty. Objective HERMANN is in Grid 151225 Objective DIETER is in Grid 154227 Objective OTTO is in Grid 154225 The top end of Objective FRITZ is in Grid 155225 The bottom end of Objective FRITZ is in Grid 155223 Finally for this post, this is the screenie of the setup relative to some of the named objectives and initial orientation arrows for Axis ROT So into the breach ….


-
Thanks for the comments on the trackers gents - I came up with the idea of generating them after having been exposed to quite a few of them in my day job and also because when playing at the harder difficulty levels I always found myself looking at an enemy contact and asking myself 'what was there again? I think these are going to be really useful as I go through execute, if for no other reason than they will tell me how much risk I can take and (hopefully) how close the enemy is to capitulating. Anyway, execute starts soon - the platoon commanders are doing their rehearsals ....
-
THE OPERATIONS ORDER The long planning journey has ended and the output is the Operations Order (OpO or OPORD). I have made this a pdf and it is attached to the bottom of the post. The main reason I’ve done this is to give you an easy reference to follow the execute part of the mission. In terms of putting it together, it is a pretty simple task because you already have all of the data and it is in a set format so it is just a case of plugging the data in to the right paragraph or annex. Like most things in this process, I have tried to keep it fairly short (as an example there is no enemy forces annex and I haven’t bothered with an intelligence collection plan) but I have tried to strike a balance of showing you what one looks like with the appropriate amount of detail. The acid test will be for you to put yourself in the shoes of one of the platoon commanders, read through it and think ‘could I make a plan and execute from this?’ The answer I’m looking for is ‘yes’ by the way!!! As I said from the start, I’m no expert in this but I have been around the process so it is by no means something that would pass muster at a staff college – but hey, we’re doing this for our own enjoyment. So some thoughts about planning, firstly I hope you’ve found it interesting and informative. From my perspective, this was something I’d always wanted to do with Combat Mission but had just been waiting for the right time and the right scenario to come along. Secondly, I have really enjoyed putting this together and for the most part it was pretty easy, until I got to Question 5. That was a real struggle to put together. Coming up with the draft COAs/schemes of manoeuvre was pretty easy but I created a problem for myself by making the main wood a single TAI which meant refining it back down using some of the work I had frontloaded from Question 1. The most pleasant surprise for me was arriving at the COA (COA 3 – Unhinge). This was because I would never have considered it if I had not gone through the intellectual rigour of the planning process. When I first looked at the map and the problem I figured that I was either going to do the small village first or go at the woods from the bottom LH corner. That is not to say they are bad COAs as I’m sure they would work if resourced and synchronised effectively, it is just COA 3 is bold, aggressive and creates surprise. If you take nothing else away from this thread - don't rush into a scheme of manoeuvre, have a good think about the enemy, your resources and the things you need to do to win THEN COME UP WITH THE SCHEME OF MANOEUVRE. I will shortly be moving into execute, you now have the Operations Order and associated matrices and control measures to follow it (in the attached pdf). However I will also be using some other products to battle track as follows: The map with grid overlay (I shall be referring to grid references in my AAR). A friendly force combat effectiveness tracker An enemy force kill tracker So, while my platoon commanders are now going through their planning process, I will let you go through the products and the next time I post battle will have commenced. Operation Order.pdf