Baneman
-
Posts
4,448 -
Joined
-
Last visited
-
Days Won
13
Everything posted by Baneman
-
Well done ! Consider me gobsmacked It's nice to know I wasn't the only one "wasting" their youth.
-
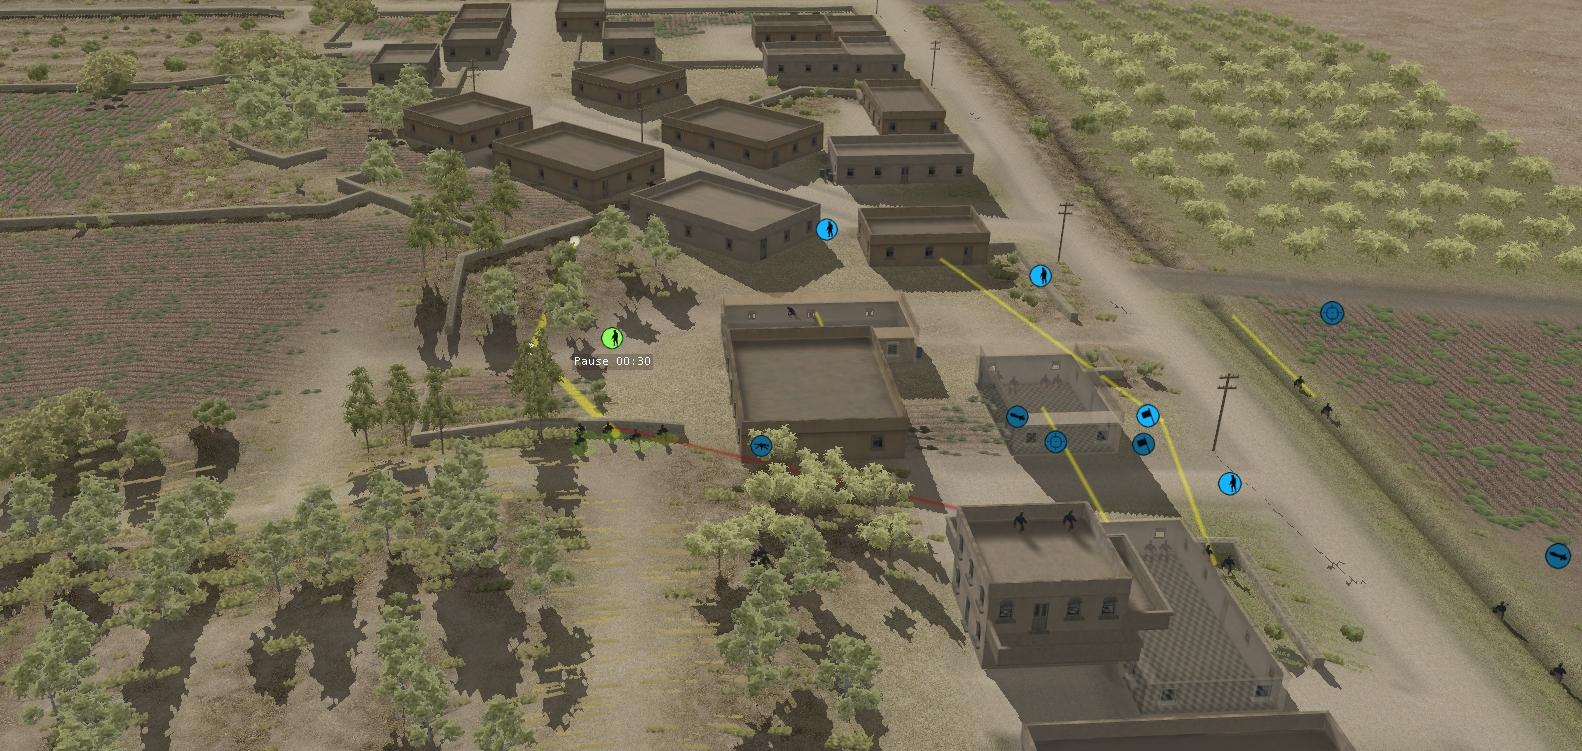
At the end of the turn, the Puddlers have almost reached the stream/irrigation ditch/canal. Not a lot else happened in this part of the map, so here's a close up of the "Something New" - knowing little about the various equipment ( like amphibious capabilities), it took me a long time in the editor to conclude that this is a BMP-2. If it's not ... be kind Uncons A encounter the first enemy when they occupy a building. They see and target some desperate looking men charging across the open ground. Sadly, although they cause one casualty, their aim is atrocious and that's all they achieve ( you'd think that they'd do better at that range ). They are then taken under fire by a group that made it into a ditch and another lot in the opposite building. They take a casualty themselves and end the turn cowering. This area is going to be a tough fight and it's too far away for almost any support. All I can say to Uncons A is, "Be Pure ! Be Vigilant ! Behave !" ( if anyone gets that quote, I will be utterly gobsmacked - and probably only long-term UK residents have a chance ).


-
On the far side of the map, two more bakkies are spotted behind the one my Watcher in the Woods KO'd. They begin to move, but the rearmost one moves into a new position that can still be seen ( shown with arrow ). My Scimitar is not very accurate ( I read up about the UK's Rarden cannon and it's supposed to be more accurate than most to make up for its low magazine and slow reload. Hmph, not here it seems. Mumble, mutter ) but eventually lands some rounds near the vehicle - at the end of the turn, the crew have jumped out. I'm not sure if it's still a viable vehicle at this point.


-
Turn 2 : Hahahaha, of course it turns out that assumptions made about Bil's options turn out to be wrong. This turn some of my Uncons get spots on units moving up just behind Apprehension Height and Worry Ridge ... because they're amphibious. I definitely did not see that coming, so "Bottleneck Bridge" immediately goes down as the most inappropriately named terrain feature on the map ! What appear to be 2 BMP-2's and one TOW-toting vehicle put in an appearance. At least one of the BMP's disgorges some men and the other probably does so too. So infantry are about to start peering over the crest next turn. The good news is that none of these vehicles are poking their own noses over the crest, so I should be able to suppress their infantry with MG fire ( if I can spot them ). Naturally, if they have any kind of AT weaponry with a range greater than 300m, I'm going to be sad panda.


-
Right Flank: Uncons A - the MMG on the roof - spot a single enemy in the Obj Steel area ( some way ahead of my Uncons C ) The vehicles of Uncons B will push forward as shown, with the lead vehicle moving to gain LoS on some of the Obj Steel buildings. Last pic shows Uncons C moving forward more, but still cautiously. Also - some of these uncons are not Fit, so small movements is best.


-
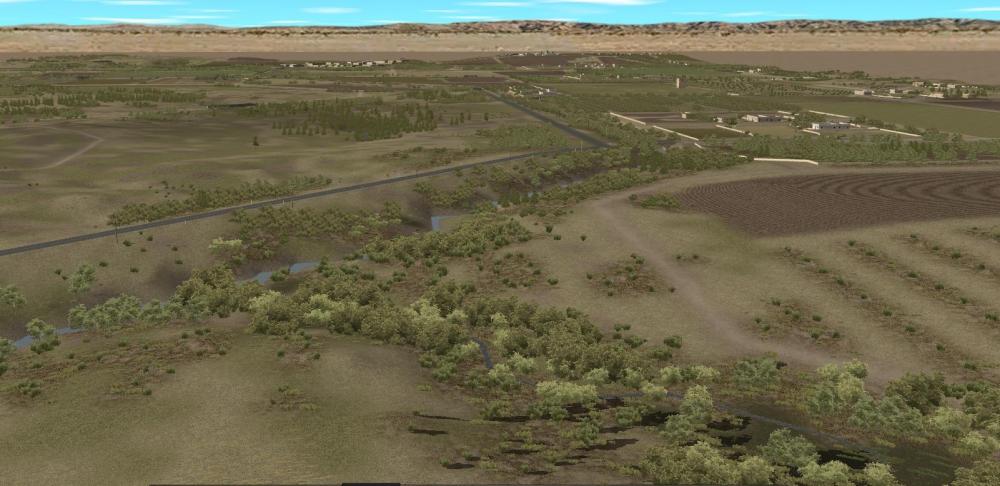
Left Flank : This shows the situation on my left flank. 2 Units have almost reached the dig site with backup and overwatch following up. German Fennek on the left - now titled "Puddlers" - is going to press on much further because ... I discover by looking further back that it seems Bil has a bridge he must cross with the bulk of his forces ( I make an assumption that he did not have a deployement zone on this side of the river ). This is likely to slow him down since I'm sure he's not going to swan around with single units. Thus I reckon I have another turn of largely unobserved movement available. - Also, when I woke up to turning labels on, it seems that Apprehension Height (aka Hill 41.1 ) and Worry Ridge ( aka Hill 42 ) do have designations. They may be a little hard to read, so I've added them to my labels. Accordingly, the Puddlers will attempt a crossing of the river as shown. A closer view - the sides of the river are fairly steep and if the Fennek doesn't bog, it will remain in the ravine as a surprise to any infantry that may try to run forward that far.


-
Turn 1 : ( bear in mind that I wrote up the info as I was doing each turn, so even though the battle has moved on in time, these are the thoughts I had at the time ). Well, first blood to us. It seems that Bil had a similar set of 3 Uncon vehicles. They were over-cautious and did not move. My Watcher in the Woods turned out to have even better views than I hoped - it spotted the lead vehicle and took it out with some 30mm fire ( initially it fired short, but corrected before the end of the turn ). Overwatch of the two hills. The Scimitar in the Orchard/Olive grove also has LoS to the Apprehension Height. This shows the other movement in this area - the Scimitar unlabelled is waiting for the infantry recce squad to confirm a lack of enemy in Obj Gold - I would have pushed on, but there's always a risk of an RPG7 in the flank which would ruin anyone's day.


-
Just a quick apology for the slowness of this thread after getting everyone excited - I had a sudden burst of hectic this week. Normal service should resume later tomorrow or on the weekend. In the meantime I'm sure Bil is entertaining you with pictures of (my) burning vehicles...
-
Setup and Initial moves I'm operating under the assumption that no one is going to see the other for at least the first 30 seconds. So I'm pushing forward fast to reach decent positions from which to observe or cover. 2 Scimitars head for Obj Gold - as you can see, the ground slopes down in that area, so we should be out of sight relatively quickly. The infantry recce team will also be moving towards it from the orchard. One Scimitar "The Watcher in the Woods" is moving up into a small copse which offers an excellent overwatch position. Pushing the furthest is one of the German Fenneks - it looks like the touch objectives Diamond 1 & 2 and Ruby will be tough to reach as the intervening ground may be extremely exposed. So these guys "The Sacrificial Lambs" will be attempting to get there early. If they don't make it, it's unlikely that anyone will until the enemy force is largely neutralised ( which may not happen ). So I'm hoping to grab a quick win with a largely expendable unit ( c3k would be proud ). On the left flank, the rest of the German recon platoon is moving up as far as the Dig Site. My plan is somewhat nebulous here, but I don't want to leave this edge of the map un-observed. Uncons A, B ( not shown ) & C As you can see, I'm being cautious with these guys - spreading out and moving forward in bounds. Possibly unrealistic, but most of them are conscripts, albeit highly motivated, so I can imagine them peeking around corners, then again, then again and then moving.


-
Ze Chermans : The Germans appear to favour smaller units and have only 4 vehicles in their recon platoon. 2 of their Fenneks are armed with an MG, 2 have some sort of HE chucker (vehicle shown). And some tank porn - ok, technically there are no tanks on the field yet, but we do what we can Lastly, a slightly zoomed shot ( so a bit foreshortened ) looking directly east of my deployment zone. As you can see, what I have called Apprehension Height and Worry Ridge are dominating features. I can't see Bil not sending units up there, so several of my units will definitely maintain an overwatch on them. My Mortar Control team are posted on the roof of the one building I fortuitously have in my deployment zone and they have good LoS as shown I will definitely be dropping some rounds on the Height to dissuade any spotters/Javelin wielders. When the mortars are available anyway.


-
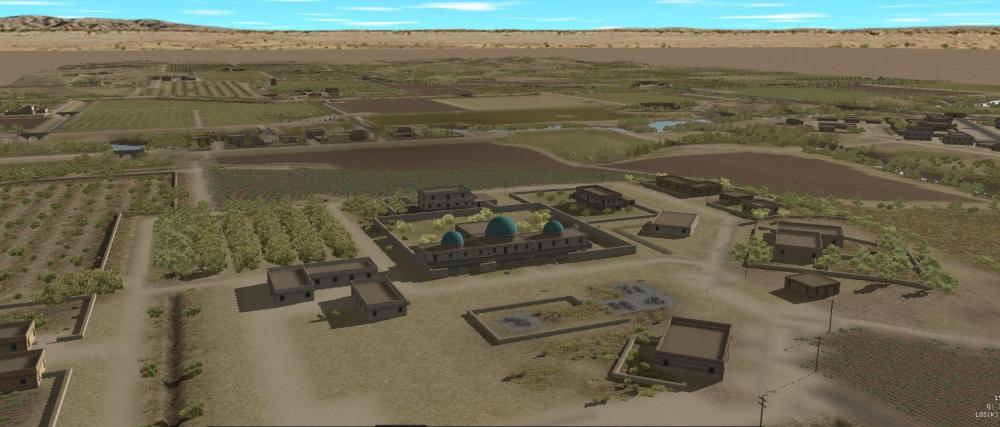
We're up against joint US-Syrian forces - how that happened is hard to imagine, but I'm going to go with the US having been bribed with oil money to pull out of NATO and now they're trying to keep our filthy grubby NATO hands off that same oil. Feel free to speculate ! I'm going to assume here that Bil will have far better screenshots of the map and its objective areas since he also has mad skills in the photoshop department, so if you're unhappy with what I'm showing or cannot make something out - go read his thread ! Right, so here we have an overview of most of the map, showing our brave UK recon force - 8 Scimitars, a Mortar Fire Controller Team in a Spartan and an infantry recon section in a FV432. In the distance you can see 3 groups of uncons henceforward referred to as (A), (B) and (C). A & C are infantry and B is a group of 3 armed "bakkies" - that's "pickups" to non-South-Africans. Eastern aspect of the map showing high ground which is a concern and worry for me. I have named these features accordingly. Dig site is the "abandoned archaeological site" I mentioned earlier. ( Bil's deployment zone is more or less between Worry Ridge and Obj Garnet ) This shows uncons A & C, but is primarily to give a feel for the map with its many Heights and dips. LoS will be crazy, but at least there will be places we can hide. Some close up shots. This shows Uncons A & B again and more detail of the map. As you can see, the rear vehicle has an SPG9 mounted. Front vehicle has a 12.7mm DShK and the middle a 7.62 MMG.


-
And here's the first look at where this is all going down - this is a pretty magnificent map ( I tried to make a small map once and it was a fairly miserable effort, hence my admiration for well made maps knows no bounds ). Looking North ( my deployment zone is top left ) Looking South Another view South ( just a bit to the right of the above shot ) showing what I like to think of as an abandoned archaeological dig site. Rolling hills - check. LOS nightmare - check

-
Well folks, here we are again. Your favourite ( I hope ) underdog is once again risking everything ( because I have a named unit on map ) against Bil, the evil genius. This battle is essentially a classic Meeting engagement between our recon elements and will escalate as our main forces enter later. Bil and I are both using forces from 2 nations and the makeup is essentially the same: Each nation has a platoon of mechanised recon and an infantry company with a couple of attached tanks. The battle area will also have some local guys, some of whom are on our side and some who have been seduced to the dark side. In my case, I am fielding elements from the UK and Germany. The battle is set up ( thanks to George MC ) as follows : Turn 0: Scouts - on-map in the set-up zone at the start: British recce platoon (Scimitars); German Aufklaring platoon (Fenneks). Turn 5 Advance Guard: 2 x Leopards; German PzGr Company HQ and Obs section and the 1st Platoon (Marders); Artillery ( some 105's ) and on-map mortars; Myself as the German body HQ - performing a classic c3k manoeuver by waiting until it's safe. Turn 10 Main Body: 2 x Challengers; Brit Arm.Inf company (all elements) - Primarily infantry mounted in Warriors. Turn 15 Rear Guard: Remainder of the German PzGr company - 2nd and 3rd Platoons (Marders). Bear in mind that I've never played CMSF1 and barely touched on CMBS due to my preference for WWII. So I am ignorant of many of the weapons systems and their capabilities. Just pointing out how underdoggy I am ( gotta get the excuses in early - yeah, I learned that from c3k too ! ).
-
Just wormsign, in your case.
-
Early war all the way, no contest. It easily trumps Fulda Gap for me too. Light tanks, tankettes, armoured cars - AT rifles actually a threat, "doorknocker" 37mm AT guns, outmanoevering ( having to do so ) French Chars ( although they'd be half-blind ), British Matilda 1's and 2's, trying to knock out Matilda 2's with PzIV 75mm HE gun, rubbish air support - Fairey Battles bombing miles off target ( and you could use most of that equipment to do early desert war too, so there ... )
-

The state of CMSF2
Baneman replied to Battlefront.com's topic in Combat Mission - General Discussion
Of course I will help in the grinding as much as possible ... It seems such a great period to model - modern ATGM's and attack helicopters and suchlike were still in their infancy, but nevertheless changing the battlefield environment. Even though I am not a great player of moderns, I think Fulda Gap would be a brilliant sandbox. Caveat : If the choice is between Fulda Gap and 1940-41, Early War gets my vote. -
There are abstracted field telephones - this is how some HQ's without radios can call in artillery. But that's as far as it goes. ( IIRC )
-
This is the case - just ask Helpdesk and they will give you additional activations.
-
20 000 point battles, however, ROCK ! Finding a keen opponent ( it's a bit of extra work to set up ) is the trick, but they are a total blast when they get going.
-
You were never winning. You have never won. It's that quantum stuff doing your head in ( you knew those physicists would get you, right ? )
-
New features curiosity
Baneman replied to silent_crescendo's topic in Combat Mission - General Discussion
Not really - I would have to look at a specific example ( ie. savegame ) and if not obvious, pass it on to the Brain. -
New features curiosity
Baneman replied to silent_crescendo's topic in Combat Mission - General Discussion
If you're doing it on a Setup screen, just leaving them be for a few seconds should let them recombine. If not, place one section in the same Action Spot as the other and they will shortly recombine. Giving either section a movement order will prevent them from recombining ( which can be useful in other circumstances ). Hope that helps. -
Definitely worked for me - great work providing an excellent resource, thanks !
-
What I find strange is that if Steve popped up in this thread and said "we're still working on the patch", that would theoretically satisfy what's being asked for. And yet ... you knew that already.
-
CMBS – Issues, Realism and Gaming Deficiencies
Baneman replied to JulianJ's topic in Combat Mission Black Sea
In the main, I agree with almost everything IanL has said above. To address just these couple of points : 1) Here I agree with you just a tiny little bit - in that if a vehicle does not have a gun, it cannot Target and thus check LoS. However, the times I'm likely to move a unarmed vehicle ( truck/jeep etc. ) close to harm's way are very few and far between, so I can live with it. Plus there are workarounds. But under normal circumstances, waving the Target line around to check LoS without clicking on the ground means it is easy to right-click to eliminate it. 4) Do you know what fitness state those troops were ? If they were "Weakened" ( -1 in the little box in the UI, see arrow in pic below ) or "Unfit" ( -2 ), they will get Tired and worse VERY FAST. Moving in woods is particularly tiring if the ground cover is heavy. Conclusion I would have rated CM1 as five - back in the day, before CM2 games came out. Now it is simply dated. Also, we tend to have rose tinted memories - I can recall teeth-grinding frustrations with CM1 too