Baneman
-
Posts
4,448 -
Joined
-
Last visited
-
Days Won
13
Everything posted by Baneman
-
I assure you that the finest beer I have ever tasted is Kaiser Doppelmalz ( from Austria ).
-

CMRT next module - will there be a Beta DAR?
Baneman replied to _Kraut_'s topic in Combat Mission Red Thunder
I got lucky. And I had the monster JagdTiger. And he got ample revenge in the first CMSF2 battle ( I still feel bad about disappearing on that, but I was already soundly drubbed before I dropped out ). -
Hello all, I'm back, sorry about the delay in the entertainment. I, at least, the NHS. I will hopefully have another instalment to post tomorrow, although by now I'm sure you've read all about it from the Bil's side.
-
The Sacrificial Lambs head off towards their next Touch objective. And a panorama of the left flank.


-
In the centre, little is happening. Up by the mosque, Bil's second contingent of Uncons swarms towards my Uncon A position. I'm moving a few of my "A" guys to cover that open ground - they'll probably arrive a bit too late, but one thing I've learned from moving my Uncon C group up is that a lot of these guys are Unfit or even Weakened. They can't go too far at speed as they Tire rapidly. I also move up the bakkies to try to interdict this movement. This shot shows the result of the enemy Wheeled Thingy fire - probably aimed at the bakkies as they crossed the higher ground, but now they are in a depression and should be safe from fire from Worry Ridge. The rest of Uncons A continue to reposition. The MG team spots Bil's last bakkie and hoses it down.


-
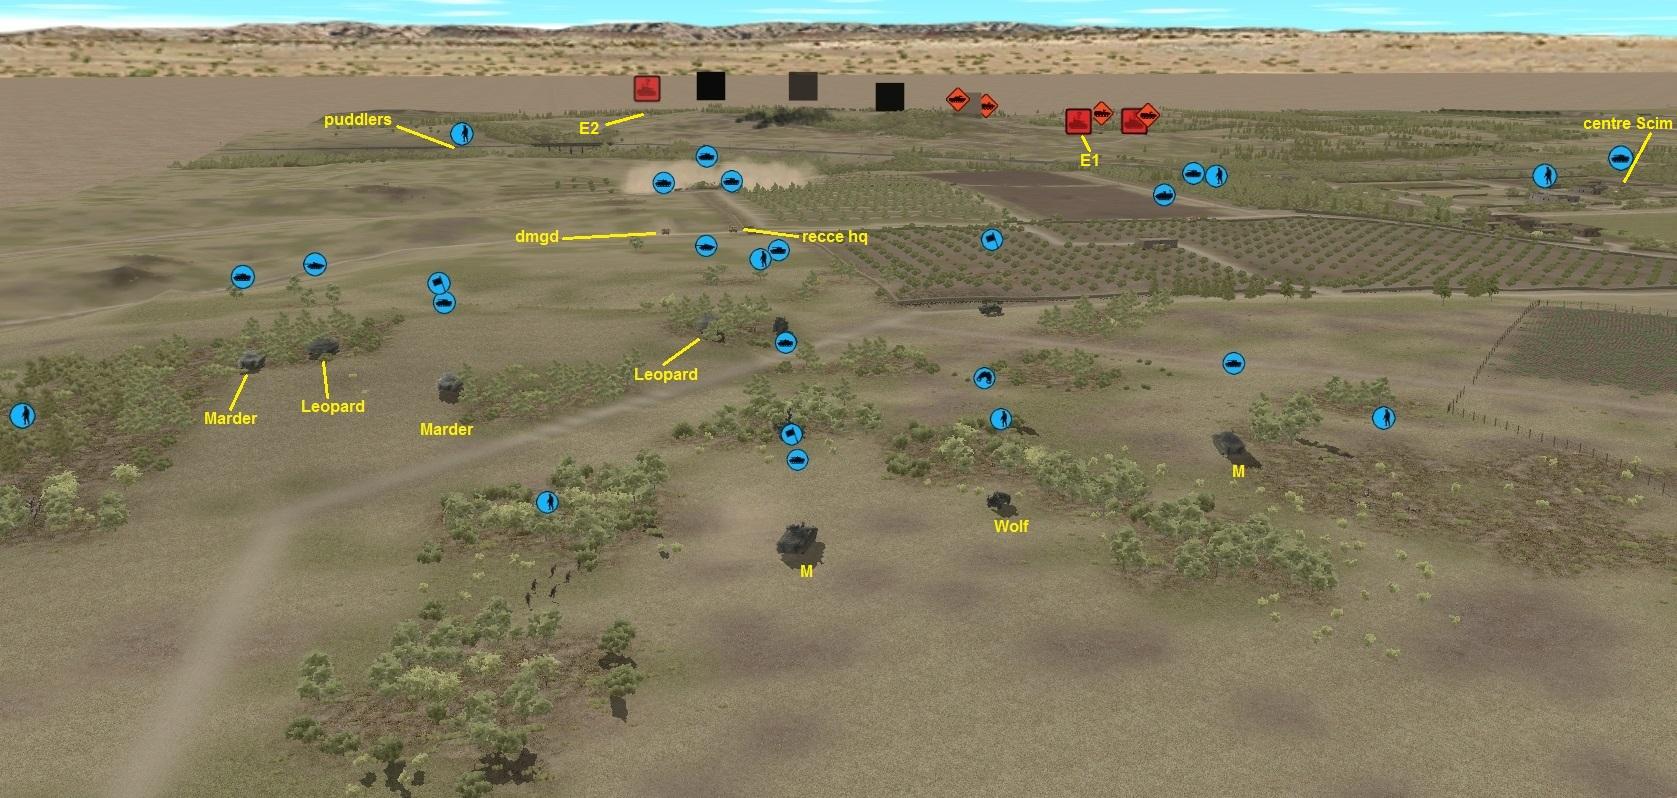
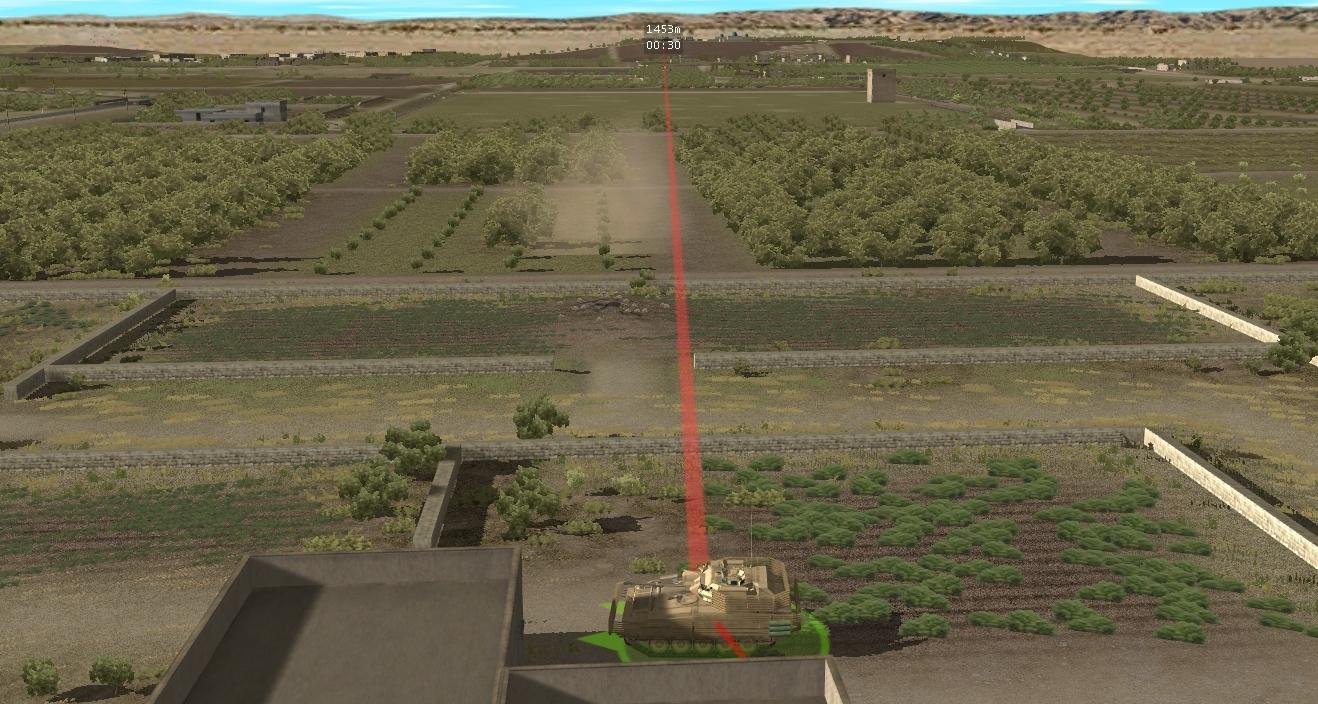
Turn 7: An overview of the left side of the map. Leopards are moving into overwatch positions. Marked Marder is the Company HQ's vehicle. As I've done with all the German infantry, I dismount the Company HQ before their vehicle moves off to its position. It's well that I do, because Bil's keyholed "Wheeled Thingy" gets a brief spot and fires ( rearmost vehicle is firing at my Uncon B bakkies ) He gets hits as the Marder crosses some high ground And again when it crests the next rise. Damage is severe.


-
They use the awesome power of Gameyness !
-
I've not seen that on any of my vehicles. Bil will have to confirm if US stuff has it or not.
-
I see a lot of voting but not much commentary ? No questions ? ( the black squares are "?" icons that weren't in the game yet ).
-
I dismounted most of the German infantry from their Marders in case they could be seen early. Man, those Panzerfaust 3's are large ! But it is an impressive sight as the reinforcements move up Further orders - since Bil is covering the Dig Site, he doesn't have anything looking down in the other direction due to his protective mound. So I think moving another Scimitar forward would be good At least one Marder joins the Watcher in the Woods - that's a good position even if the range is a bit too great for useful area fire against Bil's uncons. Final overview of the bulk of my position - Both Leopards have moved onto the highest tiny mound available.


-
By the end of the turn, we can see several Wheeled Thingy's on the hill. He has a nasty little gully that he can use to interdict anything in the Dig Site area but which has a lump of earth protecting these vehicles from view from other directions. The Uncons by the mosque are definitely moving fast towards my "A" group Bakkie opens fire, but misses everyone.


-
The increasingly mis-named Sacrificial Lambs roar off towards their next objective. This camera level 1 shot shows how the ground is only slightly lower than the surrounds, but it makes a big difference. They reach and duck into the irrigation ditch to hide. Their next objective is visible on the right. Their orders for the next round(s) - dismount and head for the touch objective Ruby.


-
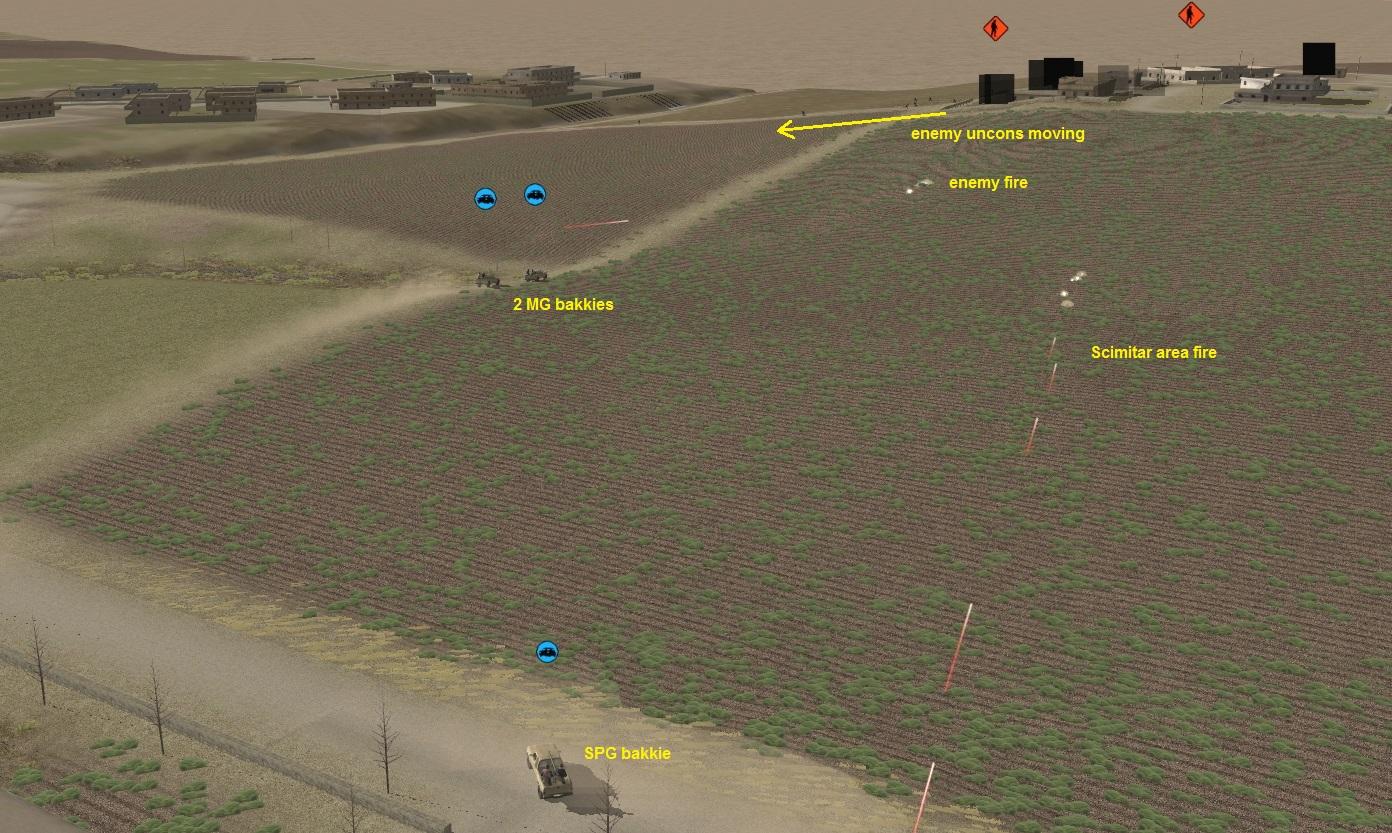
Turn 6: The followup burst from Bil's "Wheeled Thingy" (E1) goes high, so there's hope as the Scimitar pops smoke and begins to reverse away. The problem is that something new pops up in view (E2). The Fennek continues to lob grenades at the Wheeled Thingy Unfortunately E2 resolves into a TOW-toting badguy ... who almost immediately fires... Oh dear ... incoming ! ( that black smoke is from a BMP behind the hill which popped the smoke when I was firing on the infantry AT team ) It doesn't end well. The Scimitar, which I'd given up for dead, actually makes it away The dig site and the destroyed Fennek ( no survivors ) are obscured by the smoke the Scimitar deployed.


-
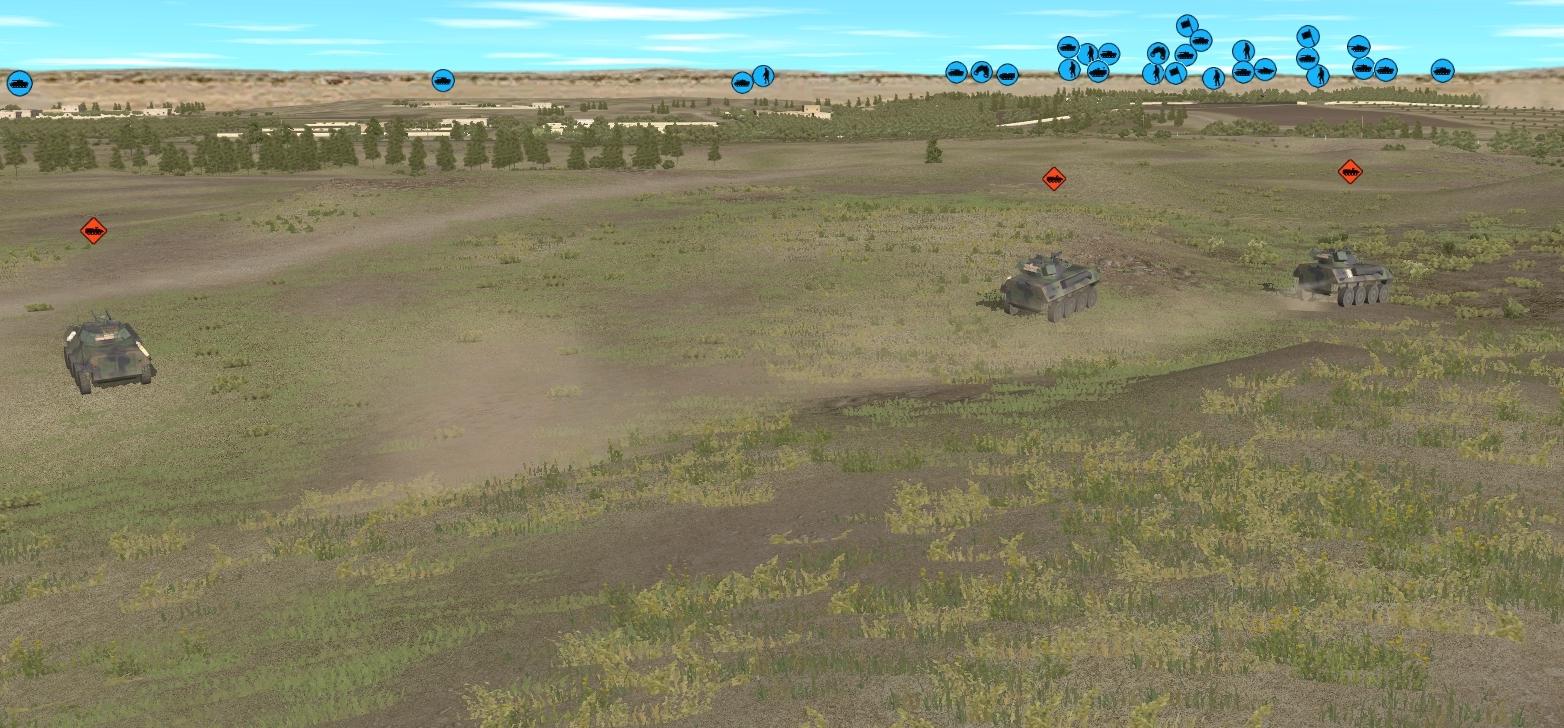
But the best part is the end of the turn when the Advance Guard arrives - a platoon of Panzergrenadiers in Marders and some armour.

-
Uncons C move up, but slowly. Now that it seems their opposition is heading to try and sandwich Uncons A, I will be speeding up movement here.


-
A view of "What the Uncons saw" - this is how I have all the spots on Bil's vehicles behind the hill - this is what Uncons A can see. I have in fact left this RPG teams to watch that direction constantly. Another shot ( looking the other way ) to show the scale - the range from the Infantry Recce team to the Uncon A area is 1500m+ and the Fennek HQ is chucking grenades at about 1900m. Those unhappy with the size of maps need have no fears Bil's uncons near the mosque appear to be changing direction and moving towards the Uncon A fight. I move up one of the bakkies to try to get between them The Sacrificial Lambs head further - the road is raised, so they are trying to stay low by running inside the olive grove


-
Turn 5: Praise be to shoddy Russian hardware ! It misses We pour it on to the hillside, but apparently it's bigger than a barn door and we don't hit anything. The AT team calmly jog away. Then, about 10 seconds from the end of the turn, the above Fennek spots an enemy vehicle to the right of Worry Ridge and switches target, lobbing a burst of grenades at it. The first burst goes long, the second (shown in flight) actually bracket the target, but short of a direct hit, they have no effect. At the end of the turn, it fires back... But it's firing at my Scimitar ( which, in an epic fail for a Recon vehicle, fails to spot the enemy firing at it ) The first rounds hit home and the main gun is immediately disabled


-
That explains a lot. Mainly why he seems to be in bunkers and I'm in a clapboard shack !
-
That is correct. I normally play with a ton of mods, but this is, after all, intended to showcase the game-you-will-receive.
-
The guys I ordered to crawl out of the "hot" houses take more casualties while crawling - in the end, only 1 makes it out of each house. Sad. Remaining orders primarily boil down to a lot of Target Light on the infantry AT position.

-
The infantry Recce team reaches Obj Gold ( Occupy ). They ignore it for now and head for a position giving eyes on the enemy Uncons' movements. The Sacrificial Lambs have done their job So they're back in the saddle And their backup Scimitar moves around to get some more fire on Bil's moving Centre Uncons. The Centre Scimitar is going to help out with that as well.


-
Turn 4: Infantry movement is spotted on Apprehension Height and my Fennek fires a few bursts of grenades at them ( the shot is zoomed so appears a bit foreshortened - the range is about 600m ) We have good cause for this Apprehension... Unfortunately, even at 600m, the GMG on the Fennek does not appear to be very accurate. Even the closest rounds aren't enough to make him duck And at the end of the turn, he launches ...


-
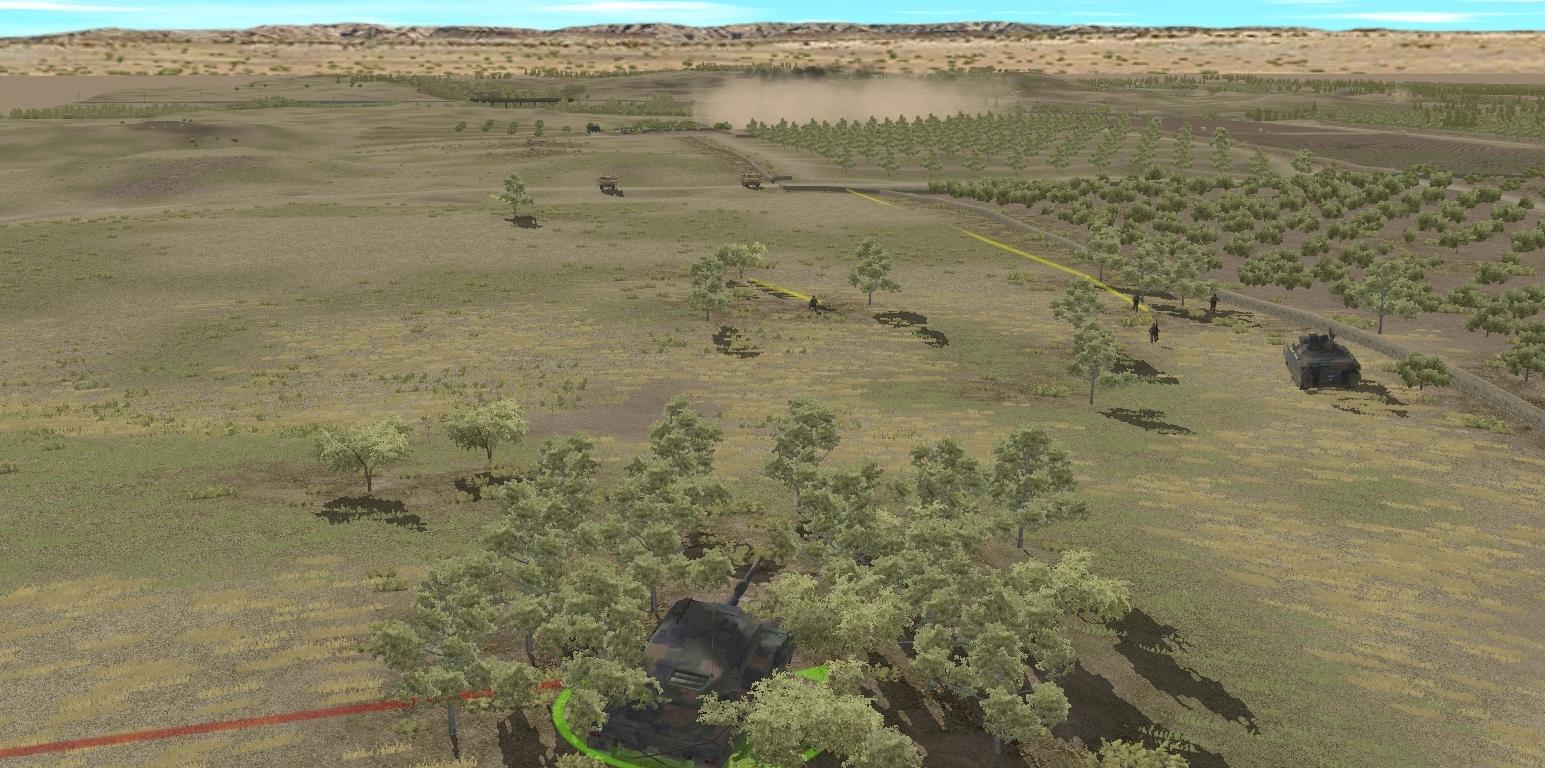
The Watcher in the Woods has LoS to some of the buildings occupied by the enemy, so I order him to shoot them up a tad, hopefully this will get Bil's guys to duck for a bit. I get one of my MG-bakkies close enough to see and take a few pot shots at some of Bil's guys near the centre mosque And I move the German Fennek HQ to a position where it can see and hopefully lob some grenades on the same units which have been seen crossing open ground. The range is close to maximum though. ( this picture doesn't show all my units because, unfortunately for me, we're playing on Iron which I personally dislike - mostly because I have to keep remembering to deselect units to see other units or take screenshots ) The Sacrificial Lambs and their backup Scimitar reached their destination - now I want them to grab the Touch objective - against Bil, I think it's wise to get as many "easy" points as possible ( I originally drove up to the zone, but I obviously needed to be more "in it" than the vehicle could get without crushing the wall, so this is a dismount order ) The Puddlers reach and cross the irrigation canal - they will now lurk in this defile against any infantry incursion down from the heights I also get the Orchard Scimitar to put some MG fire on the hills - note that the enemy icons shown are all spots from my Uncons who can largely see behind the hills


-
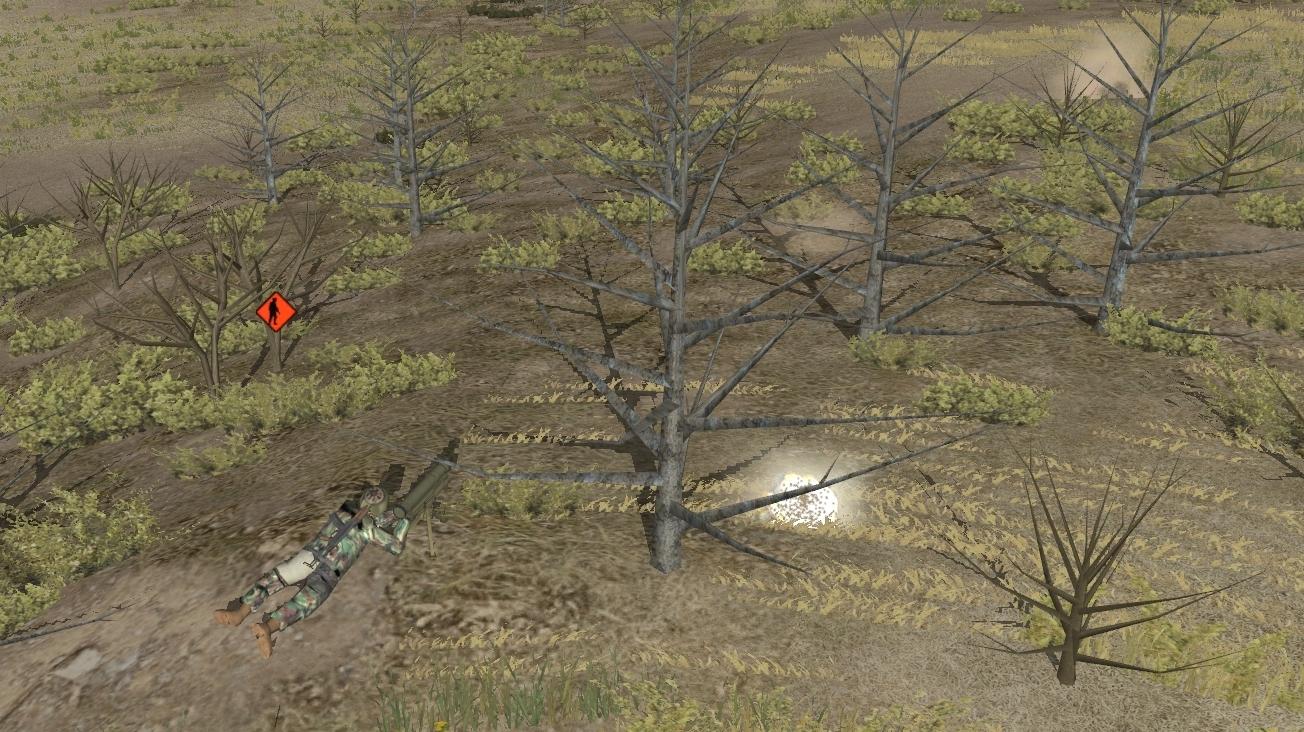
Right Flank : The uncon fight is furious, but sadly, Bil has fire superiority against my guys in the 2 houses. At first we hold our own, causing 2 casualties to 1 of our own. But then he scores a devastating hit with an RPG round... And that takes the wind out of their sails... I order the remaining men to Withdraw (crawling) And try to move the rest of the force to get LoS to just the ditch and the one building to reduce Bil's force's fire superiority


-
Turn 3: Overview pic showing the situation in the non-Uncon area - I moved the Scimitar that was near Obj Gold further to the centre, elsewhere most of my movements have completed. He keeps the buildings between him and the bad stuff up on the 2 hills, but should be able to see and hopefully interdict any movement towards the Uncon area.