A Canadian Cat
-
Posts
16,675 -
Joined
-
Last visited
-
Days Won
55
Everything posted by A Canadian Cat
-
 Heck why have one game for the west and south and a separate game for the east. Let's get it all in one It would be pretty cool but Steve has said in the past that there are internal design constraints that make this unattractive and testing is a big issue as well (that is from memory I cannot for the life of me find the post). Right now if they are working on a new module they only have to test that things work with at most two other modules and a pack (CMBN) where as if it were all in one then all those interactions would be potential breakage points. I am pretty sure $ has nothing to do with it - they could just adjust the way they price modules and the whole thing could be made revenue neutral I am sure.
 -
Need help on PvP campaign
A Canadian Cat replied to delliejonut's topic in Combat Mission Battle for Normandy
Oh well that sucks. If you go my route that problem goes away too. Look forward to hearing about it. -
His, and yes I agree.
-
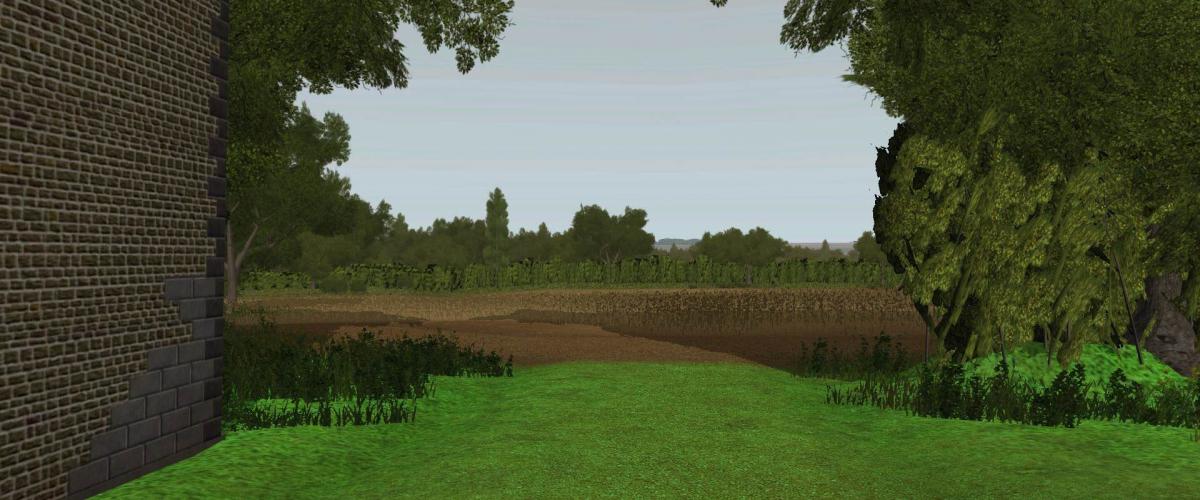
Notes: Navigating the map and looking at possible attack routes As you can see one of the first things to do is look at the map. Here are a few notes on how I do that plus some views from the defenders side. First pick a way that is comfortable for you to navigate the camera. I use the QWEASD keys (Q – rotate left, W – move forward, E – rotate right, A – slide left, S – move back, D – slide right). You can use multiple keys at the same time to do some cool stuff. D and Q at the same time will slide right and rotate left which lets you go in a circle. Let go of one and press again and you can control the size of that circle. The key based camera controls have been getting smoother and smoother with each release. That improvement in game performance coupled with a computer upgrade a while back and I am super happy with this method of controlling the camera. Camera height is important too. I directly control the camera height with the mouse scroll key. I don’t think there is a direct equivalent on the key board. The F and R keys also change the camera tilt which I don’t like so only ever use them very occasionally. Mostly I use the number keys for camera level and then adjust with the mouse wheel. You can use 7 to see an overview of the map. This is an OK place to start especially to get oriented compared to the briefing’s tactical map. I would use the scroll wheel to go higher until I can see the whole map. Honestly, this is not a view I use very much. Cameral level 3 is good for looking around. It gets you up above the trees but you are close enough to be able to see the main terrain features. I’ll move around the map at level 3 a lot. But level 3 will not let you tell what the ground is doing. For that you need to get closer. Most of the time camera level 2 is good but so is level 1. To actually make sense of what your troops will be able to see you need to get the camera to their height. For infantry go as low as you can camera - level 1. That is actually a bit higher than they are but not by much. For tall tanks (Panther, Sherman) go to camera level 2 and the two down clicks on the scroll wheel. For short tanks camera level 2 and three clicks down on the scroll wheel. To get an idea of what they can see position the camera over the ground they will be on (for buildings and bocage move the camera so you pass just through the walls / hedge) and use the X key to zoom in while using the keyboard arrow keys to control the camera view (similar to Q and E but the up and down tilt the camera too). This will allow you to see what your troops will see. If you do this often enough combined with the targeting tool and you will begin to recognize weather or not your troops will have a view of the enemy at a given location. Here are some thoughts while looking from the enemy positions. Figure 5 From the second story of the farm house I was thinking that the farm house would be a good location for and observation post but I am not so sure it would be. The view looks pretty obstructed. It does however have a good view of the objective area and will be dangerous during the final assault. Figure 6 View of the fields along A1 As I suspected, there is a pretty commanding view from the bocage out over the fields at the end of A1. The defenders do not seem to be able to see the base of the hedge row on the opposite side of the field but there still is a lot of open ground that they can see. Figure 7 View down the road The road will offer very close quarters fighting and lots of ambush potential. Figure 8 View of the open area past the forest The view of the open area is pretty good but this is from the open itself. I am sure there will be plenty of hiding spaces for the enemy but they will also tend to be more exposed too. This brings up an important point: Trees. Do not play with trees off, ever, period. Trees have three settings in the game [off], [on] and [trunks only]. The key command <alt>T controls the tree setting. Off means they are gone. This gives you a totally distorted view of what the battle field is like. Just don’t use it. OK now that I have said that I have used the trees off setting a handful of times when the map is big and large numbers of units need group orders. In those uncommon cases I have turned the trees off temporarily so I could manage things from a high view point. Trees on is clearly the right setting if you are visually evaluating what your units will see once they get to a location. If you don’t have the trees on you will not see what they see. Turning the trees to the trunks only setting when you are using the targeting tool to investigate LOS will take the trees into account even if you cannot see them. The trunks only setting is what I have the tree view set to most of the time. It allows you to see your units in a forest but still lets you see where the tree lines are across the map. Just make sure you turn trees fully on for investigating what the view is like for your units. Turning the tress on is also important for trouble shooting spotting and firing issues.


-
Sweet. Nice screen shots. I wish I had time to help out...
-
Beats me. I see this kind of behaviour when there is bocage near by - which is pretty good cover and lets you fire through it. Fox holes on grass I don't really see issues with most of the time. Other than non split squads of course. If a multi team squad is not split and it chooses secondary and tertiary AS's for the second and third team that do not happen to have fox holes they will find the best cover in those AS's and not go to the next AS for the fox holes.
-
Great advice Ken. I have done that when things go hot for a team but I like the idea of doing it as a matter of SOP.
-
Oh my bad. If you are not bothered lets just keep going. The point of this game and thread will be unaffected by some wire out of place.
-
OK I am with you so far. Sounds reasonable. It is not a guarantee by any means but your tank at least has a pretty good chance to spot the enemy - especially if he is there for a while. I do not think so. In your previous example the enemy tank is in full view of your tank. In this case only part of the enemy tank is in view of your tank. Less of the enemy to see reduced the chance that your tank sees him. I think that makes sense. It does not mean your tank has no chance or will never spot the enemy but the chances are reduced. It does not sound like there is a problem here. If the enemy tank stays there for a while there is a good chance that your tank will eventually spot it. If it just passes through a location like that it would be easy to miss. Sounds more like you just do not have "perfect pixel troops"tm.
-
So, I saw you returned the turn yesterday. I should be able to do my initial real turn tomorrow morning unles.... Did you want to start again due to that issue with wire placement that @womble mentioned back a few posts?
-
Whats wrong with MIA and Broken units
A Canadian Cat replied to Wiggum15's topic in Combat Mission Battle for Normandy
Routing is still mentioned in the engine manual (I checked CMBN and CMBS). I do not recall it being removed but I do vaguely recall that it is not a common thing to have happen. I am pretty sure I have never noticed it. I am not sure what its status is. -
@RockinHarry makes a good point but the answer to your question is Yes they need to be in the fox hole to benefit from it. I have found that spiting teams helps a squad to get into fox holes. Facing can also help encourage errant guys to shift around and get in.
-
Need help on PvP campaign
A Canadian Cat replied to delliejonut's topic in Combat Mission Battle for Normandy
I wrote out some instructions a while back that could help here (check out the first few posts from http://community.battlefront.com/topic/104558-axis-side-20-000-point-quick-battle-dar/). If you are playing against a trusted opponent if you do the force selection in the right order you can keep it a secret. -
I don't know I think the LOS into that are is OK. I don't really want total visibility because that means he has the same back to me. The way I attack is basically summed up by moving is only done to find the enemy or get into a position to kill him. There is no moving for the sake of moving. So if my guys are in a place with restricted visibility then they are fairly safe and only scouts will move forward to find the enemy. Once they do I'll figure out how to get enough fire power to take them out or drive them off. For me I am happy if visibility is at least somewhat restricted because that means I'll get to face his guys a few teams at a time. Getting out into the open just means instead of trying overwhelm one or two fire teams I'll have to deal with a whole platoon. This is why I plan to go down the road and through the woods.
-
This is always the hardest part for me on defence. I say to myself "that was a successful turn, I'll let them shoot at the attackers for one more turn, yeah that will be safe" it never is @womble love the detailed description. Once you read my thread you will see you pretty much called my plan. Nice. Also good advice about placement of guns etc. I did not fire up the game by my reconnoitre with the camera made me thing the second floor of the farm house was not that great a location. I'll have to check with the targeting tool I guess.
-
It is a bug that has been reported. Looks like the top level formation is purchasable but non of the vehicles are available. So, you get charged for the 50 points formation charge and get nothing for it.
-
Thanks for the thoughts. I rather like A2 - but only if I can be at least partial assured the enemy is not on the other side of the bocage along the road. Which is to say I don't want to just attack along A2 - A2 needs support from both A1 and A3. Once past the major bend the units on the road can use the bend to protect their own left flank but they need help from the guys on A3 to keep their right flank clear. At any rate if A2 proves messy I'll just switch to A3 and visa versa. Switching might take making additional gaps but the engineers can do that.
-
A3's open ground is rough but no good hidden paths. How easy it will be to cross will mostly depend on what kind of resistance there is. I plan to recon in force down A2 and A3. Depending on what I find I'll switch over to focus on one if needed.
-
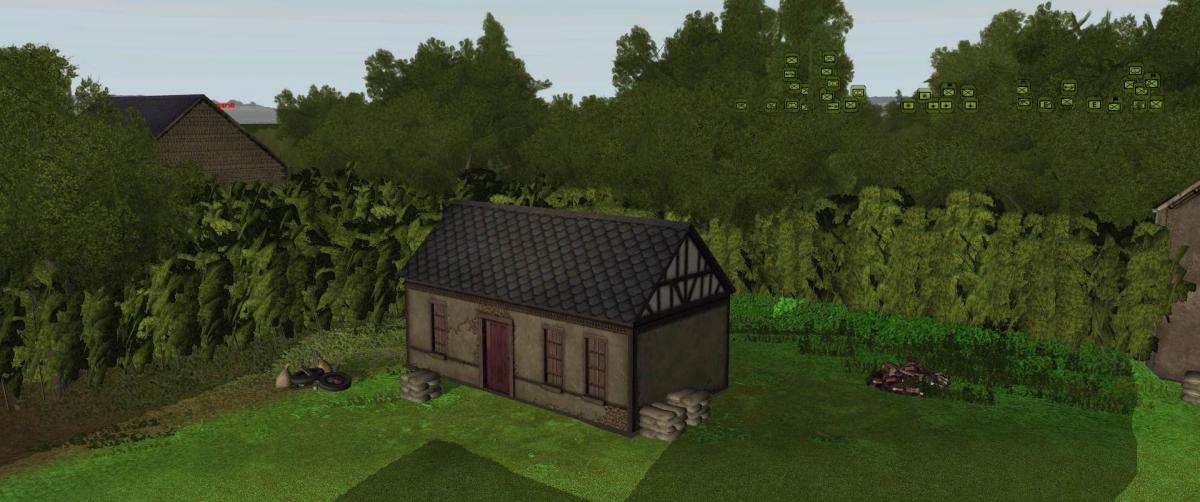
Wow that looks good. Question about the garage: is that a door? Does that imply that you cannot enter the building from the other sides?
-
Armata soon to be in service.
A Canadian Cat replied to Lee_Vincent's topic in Combat Mission Black Sea
What your first post was a mistake? That does not bode well All kidding aside welcome to the forum - pipe up some where. -
And for a third party to get something to work they would need some kind of command line or API to allow a lobby to work with the game. Even my proposal for a command line interface (see sig) would not be enough but it could be extended to support TCP/IP connections etc. Hint hint...
-
Yes, do try iron. I usually have a few games going on Iron. It is not my favourite but worth a try.
-
Whats wrong with MIA and Broken units
A Canadian Cat replied to Wiggum15's topic in Combat Mission Battle for Normandy
I would be OK with them fleeing out of LOS once they start fleeing but I don't want them to do that just for spotting the enemy. Broken troops still have something to contribute. I still use them in my battles. I just keep them back a bit and join in the fire fight. If they don't take much fire they will contribute to your overall fire power. They are just very skittish - which is the point. So something like what you suggest could work. -
I like that idea.
-
That's a good idea. Also the longer the movement order is the more likely they will form the conga line so keep things sort and the stay more spread out. But they also stop at each way point to form up again. So, it is a balancing act.