A Canadian Cat
-
Posts
16,675 -
Joined
-
Last visited
-
Days Won
55
Everything posted by A Canadian Cat
-

Test: Vehicle Speeds On Different Terrains
A Canadian Cat replied to CarlWAW's topic in Combat Mission Red Thunder
There fixed that for you. My tests showed that the chance of bogging does go up with speed, a little anyway. -
Test: Vehicle Speeds On Different Terrains
A Canadian Cat replied to CarlWAW's topic in Combat Mission Red Thunder
It accumulates. Each fence has a chance of doing a small amount of damage. Many times you don't notice anything in the damage panel because it is just several levels of green and its colours. I have no idea how many fences it would take to seriously hurt the tracks. Low walls are much worse. -
Crew members as recon
A Canadian Cat replied to Big Boss's topic in Combat Mission Battle for Normandy
Yes, that works too. I find that being in a HT or jeep a ways back out of the LOF works better though. When tanks go head to head with other tanks the guys riding on the back don't last very long. -
Yes, yes and agreed
-
Bud's Russian Attack AAR: Красная молния
A Canadian Cat replied to Bud Backer's topic in Combat Mission Red Thunder
The answer is yes. Yeah really helpful right? It could be a location your guys glimpsed or heard the HMG crew earlier. It could be a contact from another unit all together. It could be a left over contact from another unit. The one thing I can say is it appears that when you wipe out a unit all their lingering contact markers go. So, if you nail that guy carrying the rabbits foot (he is the last guy right) and that contact goes away then it was just a lingering HMG contact but if it sticks around then it was something else. That's my gamey advice on contacts for today Yeah we should. I'll send you an email later today. You too, I keep saying that to myself. -
It is totally cool - sort of It is cool that the game tracks this but the ammo sharing like this is one mag at a time. Now it is certainly possible that the sharing team cannot spare much more than that but it will be one mag at a time no matter how much ammo the sharing guys have. So as team A fires when one guy runs out of ammo he will get another single mag and so on. It would be nice if there was some way to manage this so you could do some ammo levelling or even if the game did some automatically - like at a certain threshold they gave the other team two mags or three mags each. Someday maybe.
-
Don't swing to far the other way. The advice to hold fire until there is something good to shoot at is solid. Once the bullets start flying (from either side) then forget about holding fire and let it rip.
-
Crew members as recon
A Canadian Cat replied to Big Boss's topic in Combat Mission Battle for Normandy
A friend of mine and I play with a house rule that unhorsed tank crews have to make their way to the rear or other safe location. The only exception is HQ crews - they are allowed to board a radio equipped vehicle to regain command of their platoon. -
Operational Level Game Announcement
A Canadian Cat replied to choppinlt's topic in Combat Mission Battle for Normandy
You know Kate Upton's phone number? I don't believe you -
Yep. Some parts of this plan I have in hand, some parts look like they have a chance but that spotting round in the field is really just an educated guess. Fingers crossed.
-
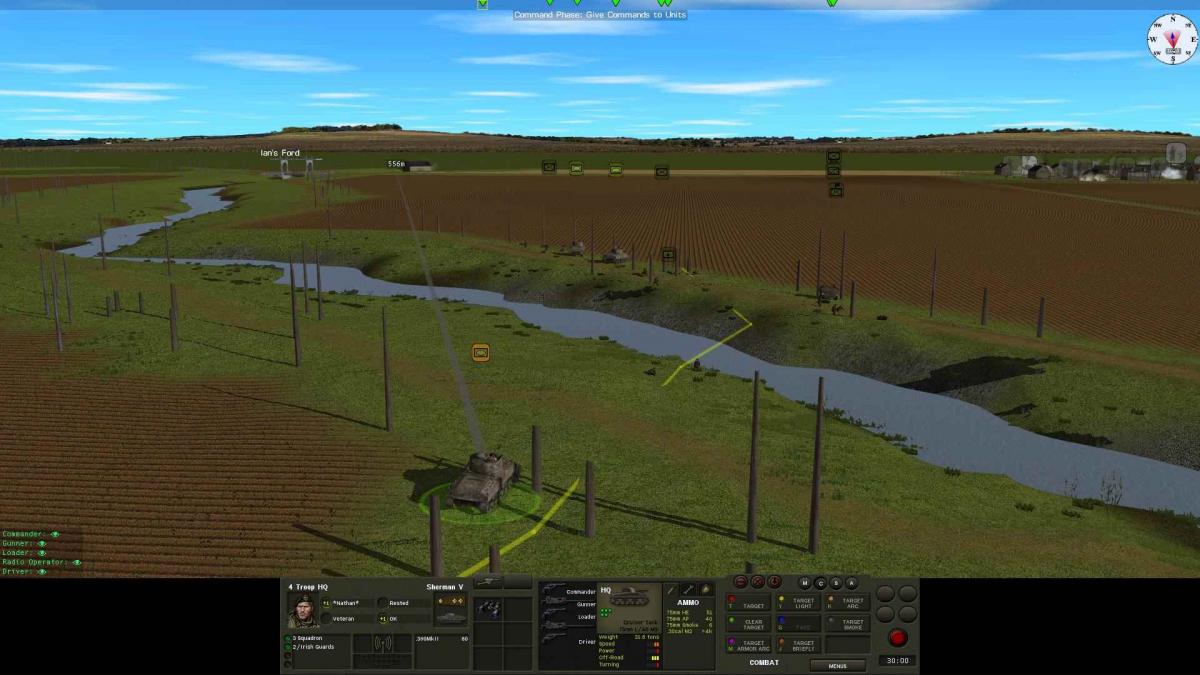
Minute 26-25: 5 Platoon has just about reached the edge of town. Here is the trailing squad covering for the assault teams. Figure 67 Cover Members of 4 Platoon are actually sneaking long the tree line. They have eyes on the AT gun behind the barn. They might be able to get some MG fire on it in a few moments. Figure 68 Sneaky Now this felt like bad news – an artillery shell landed between 6 platoon and there farm. This is clearly a spotting round. If the target is where they were then this is no big deal and they should just power through. If the target is to deny the field they are running through then this is a bit of a crap shoot, if they keep going they can get out from under before it rains or they might get caught. If the target is the farm where they are heading then they are screwed. My assessment is their original jump off point is the most likely target and denial of the field is the second most likely. Guess what my orders are… Figure 69 Oh my Minute 25: Orders 6 platoon will power on through the field and head for the farm. I removed all pauses and they are just going to go as fast as possible. Figure 70 Power forward I am taking @Kuderian’s suggestion and 4 troop is going to blast that barn. Before they do that they are going to throw some smoke towards that AT Gun that took out the carriers though. Meanwhile 4 platoon will continue to both sneak along the treeline and the river bank. Figure 71 Fire on barn Figure 72 Fire on barn


-
Sorry Chappy but you did not make it out of the carrier - the one in flames. And the rest of your team and the sniper bought it not even 3m away.
-
Oh, yeah that is one of the fun part of the end. I like trying to see who racked up the most casualties. Equally interesting are the dozens and dozens of units that cause no casualties at all. Unfortunately the any kills by off board artillery or air support are not accounted for
-
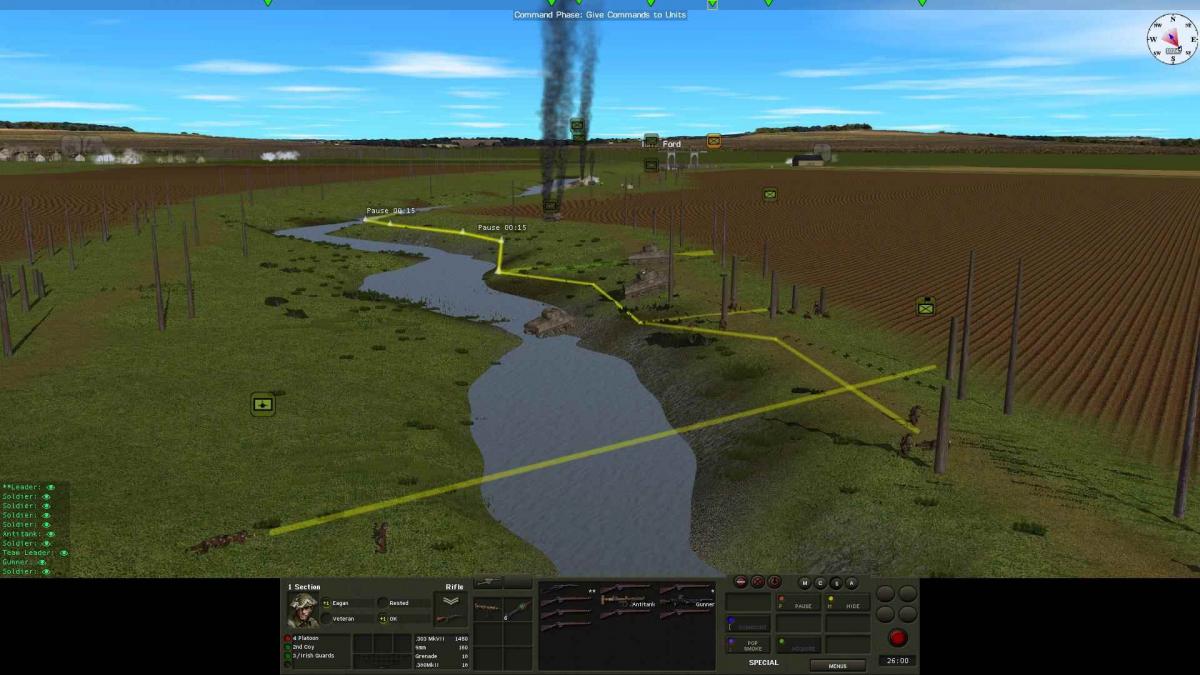
Minute 26: Orders Clearly that AT gun is going to have to be dispatched by 4 platoon and their supporting tanks. 4 platoon will move along the river bank – but much closer to the water. Meanwhile 5 platoon is actually within striking distance of the first houses of the town. Figure 64 4 Platoon moves on AT gun Figure 65 5 platoon prepares assault Figure 66 Advance


-
But there only seem to be AT guns here the infantry presences seems very light. True it was a nasty couple of turns - especially for Chappy and the Carrier platoon. But without some infantry and MGs to protect those guns this should be an opportunity to take out a battery of AT guns. That's my silver lining take.
-
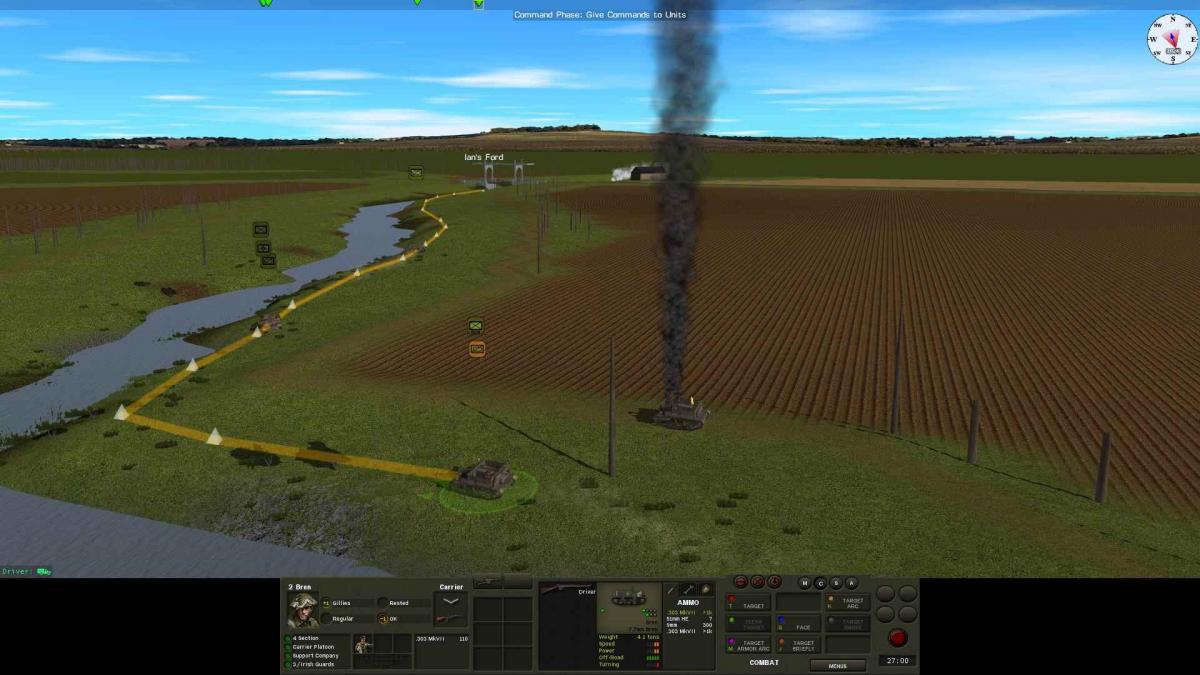
Minute 27: Orders Now that the smoke screen has begun arriving 5 and 6 platoon start their dash across the fields. The AT gun opposite my right is blinded at the moment too and since the town smoke screen is in place now is the time. Figure 55 Begin town assault Figure 56 Begin farm assault Figure 57 Redirect carriers to river bank Minute 27-26: The advance across the fields begins just fine. Figure 58 Advance Figure 59 Advance But the carriers are clearly not protected from the new AT gun and they go down one, two, three. My 2IC never makes it out of his carrier and the recon platoon is devastated. That is a hard loss to swallow. Figure 60 New carrier route a failure Figure 61 Total failure Figure 62 Absolute failure Member of 4 platoon move to the tree line near the village. Figure 63 Moving on village


-
Minute 29: Orders The plan to deal with that AT gun is to have the 4 carrier platoon plus the 2IC rush forward under the cover the barn and assault the AT gun’s position. Figure 46 Carrier advance on AT gun Figure 47 Carrier assault Minute 29-28: A new surprise shows up – a recoilless rifle. It opens fire on my right flank but does not damage. Figure 48 Surprise rifle But there is another surprise – another AT gun. This one in the woods near the town – scratch one carrier. Figure 49 Surprise another AT gun Minute 28: Orders That AT run in the woods threatens my right flank. All the tanks will pull back down the river banks. The carriers redirect themselves to follow the river but down the bank to hide their advance from the new AT gun. Figure 50 Pull back Figure 51 Redirect carriers to river bank We also need to deal with that recoilless rifle. Figure 52 Deal with recoilless rifle Minute 28-27: Recoilless rifle dealt with. Figure 53 Recoilless rifle dealt with The carriers move along the river bank safely. Figure 54 Carriers make progress


-
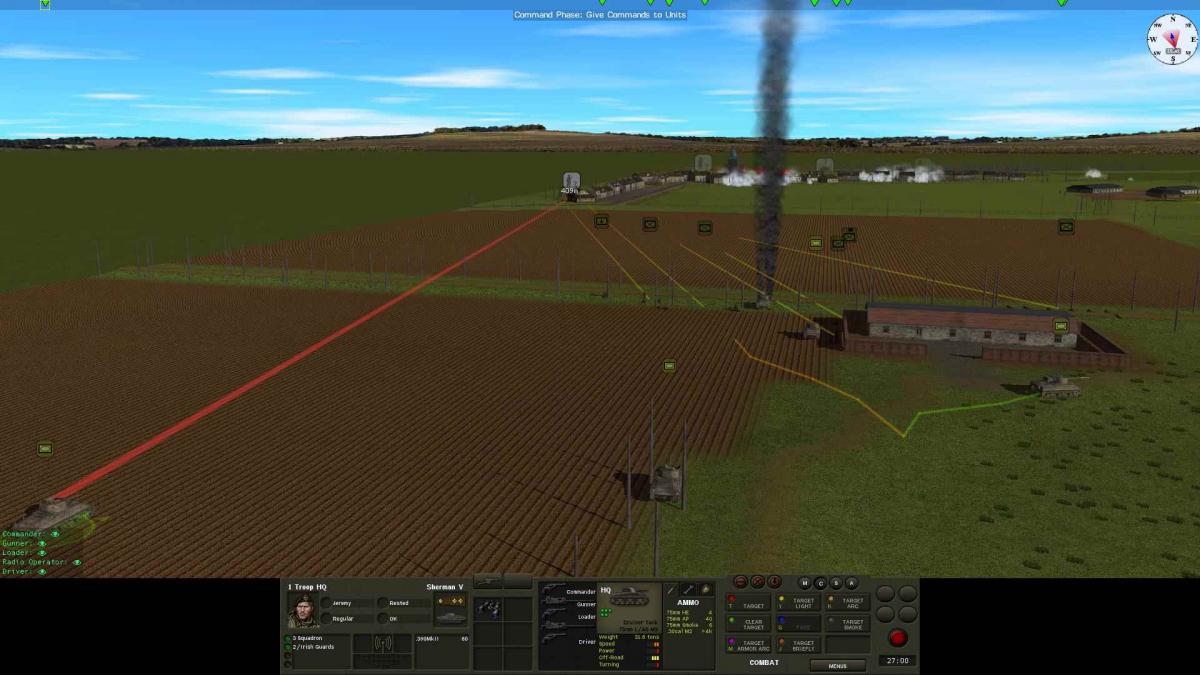
Minute 32-31: Fairly quiet turn again. 4 Platoon continues to consolidate along the river bank now with their supporting tanks. Figure 36 Infantry cross the Dommelen The last known position of the enemy mortar team comes under fire. Figure 37 Fire on enemy mortar position Minute 31: Orders Position 4 platoon to face off against the village. Figure 38 4 platoon faces village Minute 31-30: A bit surprise appears. The enemy has managed to setup an AT gun in an excellent positon. They are masked from 4 platoon by the barn and can cover the open ground in front of the town. Figure 39 AT Gun And the score a one hit kill on a Sherman. So, it was a nasty surprise for me. Figure 40 Lost tank Minute 30: Orders 4 Platoon’s supporting tanks will fire on the barn and smoke the AT gun’s position as best they can. Figure 41 Blind the AT gun Figure 42 Fire on barn Meanwhile on the other side of the map the tank will pull back to put the farm between themselves and that AT gun. They can still fire on the town if need be but they will be protected from that AT gun. Figure 43 Pull back Minute 30-29: The results of the fire on the AT gun position. Figure 44 AT gun position Spotting rounds for the smoke screen begin arriving. Figure 45 Smoke spotting rounds


-
Combat Mission: Battle of the Bulge?
A Canadian Cat replied to Boomkow's topic in Combat Mission Battle for Normandy
In all seriousness BFC never gives release dates. They tell us approximately what order they are doing things in and give us status updates as things get closer. It is much easier to deal with people clamouring for a release date than it is to either miss the date or ship it before it is ready and deal with the complaints about bugs. -
Combat Mission: Battle of the Bulge?
A Canadian Cat replied to Boomkow's topic in Combat Mission Battle for Normandy
Oh, can I say it? can I? Please. "When it is ready." -
I think this would be very difficult as the Germans. The one saving grace is the US troops are pretty green. My 1st platoon was not combat effective at all by the end so if the Germans had managed to cause some casualties in the other platoons they can do better. The thing is though they don't really have enough resources to do that - not against four platoons anyway. If the US goes hell bent across the open fields then sure but that is really not something an experience player would do. Note: I am not saying an experience player would not cross the fields I am saying they would not just rush across without knowing what they faced and having a plan to deal with it.
-
That mortar did a lot of damage to 1st platoon which took most of my casualties. Yes, the held things up quite a while. My green platoon along the road was constantly ducking for cover. The lead tank saved the day for me. Agreed. I think it will be a fairly useful thread for new players.
-
Someone forgot the lock pin! (bug or ....?)
A Canadian Cat replied to umlaut's topic in Combat Mission Battle for Normandy
Good. What about if you try to mount them in the jeep again? Just curious if it happens again or not - but not important enough to go out of your way. -
To expand on my farm assault plans. Here is the plan in more detail: If the game had gone on my plan was to continue to fire on the trench works (yellow arrows) while one squad of 2nd Platoon covered that side of the road bocage and the other two squads were positioned along the bocage in the corner of the farm stead (small ** squad icons around farm). An engineering team would have breached (red arrow) while the bulk of the engineering platoon would have stayed along the road bocage and fired into the farm (more yellow arrows). 3rd Platoon would have assaulted the farm stead (blue arrow). After that the buildings would have been cleared one or two at a time with lots of suppressive fire.

-
I want to thank my friend @MethodGamer for doing this. It was his idea and I think he did a fine job defending. With the odds stacked so heavily in m favour his only hope was to run out the clock. I hope everyone reading this now and in the future can learn something from it, I know I did.