
nathangun
-
Posts
311 -
Joined
-
Last visited
-
Days Won
1
Reputation Activity
-

 nathangun reacted to A Canadian Cat in CMSF 2 - Co-op AAR (Bil v IanL) Using Realism Rules
Just been busy. There is more to come - just not quickly.
-
nathangun reacted to SgtDeadly12 in So I Recognized the Russian from the Installation Background...
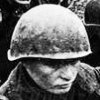
I was installing Combat Mission Afghanistan when I recognized that the background picture of a Soviet soldier nearly being hit by a round in the installation menu looked very similar to another picture that I had seen of a U.S. Marine in Afghanistan. I did a little digging and managed to find the picture.
Here are the two pictures side-by-side for reference.
I originally saw the picture in a reddit thread about a year ago. Apparently the picture is of U.S. Marine Sergeant William Bee while he was taking fire from the Taliban in 2008. I thought it was somewhat fitting that the art for this game of a Soviet taking fire in Afghanistan was based on a U.S. Marine taking fire in Afghanistan decades later.
-
nathangun reacted to IICptMillerII in Combat Mission AAR: MSR Titan
FINALE
Bridges 31 and 32 are secure. Artillery is falling on the remnants of enemy infantry on NAI 6. Casualties are being recovered and tended to. No more enemy forces directly threaten the MSR. Task Force Miller has accomplished its primary objective. However, based on the initial intelligence reports, there should still be a sizeable enemy presence left on the field. A handful of enemy tanks are unaccounted for, and there is likely at least a full company of infantry left out there as well. In short, the enemy still has enough combat power to contest the MSR, if he so chooses.
My forces consolidate around the Bridge objectives and reorganize. No additional enemy forces are spotted. More curious is a complete lack of enemy artillery. I was expecting the bridges to be shelled once I moved onto them, but so far there has been no enemy artillery response. I’m still wary of this and keep an eye out for spotting rounds.
Its time for a little shock and awe. The battlefield is quiet, and SIGINT has been reporting a possible grouping of enemy armor in an orchard, behind a large earthen embankment just forward of the bridges. The JTAC vectors in the flight of 2 A-10s to seek and destroy and targets in the orchard.
A few moments later the A-10’s arrive on station. A single MANPAD is fired at them, but the missile misses.
Now it’s the A-10’s turn. They quickly acquire targets and unleash a flurry of Maverick AGM’s, scoring multiple hits in just a matter of seconds.
Smoke clouds soon begin to rise into the sky, indicating direct hits. This proves to be too much for the enemy, and his morale finally cracks. The enemy capitulates.
Task Force Miller successfully completed its objectives. The bridges were secured, the MSR was cleared, and the enemy was destroyed and routed from the field. 2/3rds of an enemy armored battalion was destroyed, and roughly half of an infantry battalion was destroyed as well. Additionally, the enemy lost most of its AFV’s and about half of its infantry heavy weapons company.
In comparison, my losses were very light, especially considering what I was up against. The task force has more than enough remaining combat power to continue combat operations, whether that means defending against an enemy counter attack or continuing the attack and exploiting the gains made here.
Special thanks to my opponent for sticking with it despite the losses he took.
I hope everyone has enjoyed the AAR. There will be a quick post combat write-up where I will give details on some technical aspects, and my thoughts on the battle overall. In the meantime, feel free to post any feedback you may have, whether it is tactical or technical.
-
nathangun reacted to IICptMillerII in Combat Mission AAR: MSR Titan
Just a quick update for those following along: the final reports are coming, I've just been delayed by IRL scheduling.
-
 nathangun got a reaction from JulianJ in Hard Cat Rules v2I - Simple to Use Command & Control Rules - UPDATED 01 JUNE 2022
How times have changed.
-

 nathangun got a reaction from IICptMillerII in Combat Mission AAR: MSR Titan
Enjoyable AAR to read, can't wait for the final chapter. @IICptMillerII
-
nathangun reacted to 37mm in Heaven & Earth: Project discussion thread
The mod package is for scenarios set in a fictional country.
Either way, here's another look at what we've come up with so far...
-
nathangun reacted to MOS:96B2P in Heaven & Earth: Project discussion thread
A Southeast Asia type mod created by @37mm. On a map created by @Sgt.Squarehead. Pretty cool.
-
nathangun reacted to IICptMillerII in Combat Mission AAR: MSR Titan
The Bridges (Cont.)
Then the infantry make contact. An enemy radioman is spotted moving between the buildings of NAI 6 up on the ridge. A Bradley from 2nd platoon spots the movement and pumps some 25mm HE rounds into the area.
As 1st squad cautiously advances closer to the buildings of NAI 12, they draw fire. A casualty is suffered, and the squad goes to ground and begins returning fire.
A sharp firefight breaks out. The infantry returns fire as tanks are brought up to pump coax and .50 cal fire into the buildings. A few enemy RPGs are fired at the tanks, but none hit. It’s a race to see who can build fire superiority and win the fight.
A fire mission is called in on the buildings up on the ridge on NAI 6 to help suppress/destroy the enemy infantry there.
Abrams along the MSR pump HEAT rounds into the buildings of NAI 12 and quickly help me gain fire superiority.
With the enemy forces near the MSR either destroyed, suppressed, or under direct observation, I move 2 Abrams across Bridge 32 to strongpoint the other side. They take no fire and encounter no obstacles on the bridge or the far side. I now have possession of both Bridge objectives.
I’ve spoken too soon. Scout team 2 moves up along the left (North) side of the bridge, only to discover what appears to be an entire infantry platoon in foxholes down in the gully directly next to the bridge.
The scouts take a casualty before returning fire. This is a curious threat. It doesn’t pose any direct threat to vehicles moving across the bridge, though I can’t just leave it be. The enemy infantry could mount a suicidal yet potentially damaging attack from this position so it must be dealt with.
The scouts Bradley moves up to put direct fire down into the enemy foxholes. It is only able to get a few bursts off before it is hit and knocked out by an RPG. Luckily, the crew survives and are able to bail out. Further, the Bradley is not on fire, so there is little risk to the scouts in close proximity.
A moment later, the scouts return fire with their javelin, vaporizing one of the enemy foxholes.
I decide to risk moving a tank forward to put fire into the gulch. I have the tank move forward just enough to only spot one of the enemy foxholes and give it a pause command of 20 seconds. After which the tank will reverse. The maneuver pays off, the tank is able to lay down coax fire and causes a casualty before reversing to safety. No RPGs are fired.
The tank repeats this maneuver and is soon joined by a wingman. The wingman performs the same maneuver but from a different vantage point. They fire both coax and main gun rounds into the foxholes down in the gulch.
1st squad, 2nd platoon takes up a position overlooking the enemy in the gulch. They add their fire to the two tanks, and the enemy position is quickly destroyed.
2nd platoon continues to slowly advance on the buildings of NAI 12. A few enemy infantry make their presence known, but they are quickly bombarded by both small arms and 25mm fire from my infantry and Bradleys. One of the Bradleys fires a TOW into a building, destroying it. The resistance in NAI 12 is rapidly diminishing and the area is soon cleared.
Some stragglers are seen milling around NAI 6 and are sporadically engaged by both Bradleys and infantry. The stragglers appear to be shellshocked and disoriented, wandering around with little semblance of order. At this point I think it is safe to assume that any threat posed by enemy units on NAI 6 has been neutralized. As final insurance, another short but sharp fire mission is called in on the rubble of NAI 6.
-
nathangun reacted to IICptMillerII in Combat Mission AAR: MSR Titan
THE BRIDGES
At this point, things are looking pretty good. I’ve established a decent base of fire observing both Bridge objectives as well as the far side of the objectives. So far, things have been relatively quiet.
Back on the elevated road leading to NAI 5, one of the fire teams from 1st platoon spots an enemy tank. It is on the far side on the bridges, in an orchard of small, short trees, surrounded by a dirt berm. They quickly break out the javelin and take aim.
The javelin gunner acquires a lock and fires. The missile flies true, and comes down on top of the turret of the enemy tank, destroying it instantly. There are additional faint contacts in the area, but no one can see anything else yet. It is probably that there is at least a platoon of tanks, maybe more in this orchard. It appears that they are lying in wait for my forces to expose themselves while crossing the Bridges before they attempt to engage.
To deal with this, I’ll keep the infantry in position and try to spot more tanks to engage with javelins. I’ve also made sure that my tanks in a base of fire can observe the dirt berms of the orchards. This way if the enemy does choose to reveal himself, I will have at least 2 assets to engage them, from 2 different angles and at different elevations. This should increase my ability to both spot and engage threats as they appear.
Covered by infantry and tanks, 2 tanks from 2nd platoon move forward across Bridge 31.
They take no fire as they move across the open bridge and encounter no obstacles of any type. The two tanks establish overwatch positions on the far side of Bridge 31. More assets move up and the bridge is strongpointed. Infantry from 2nd platoon begins to move up, mounted in their Bradley’s.
They move up and deploy in front of NAI 12. The buildings on this NAI are right next to the MSR and would provide a good place for enemy infantry to set up an ambush against my vehicles.
As this is happening, the infantry along the elevated road spot another T-72AV parked in the orchard. They engage it with a javelin missile, destroying this one as well.
-
nathangun reacted to IICptMillerII in Combat Mission AAR: MSR Titan
DOWN THE MSR
After the violent exchange, a momentary calm comes over the battlefield. A few enemy crewmen are seen fleeing away from the carnage, and there are a few pops and bangs from cooking off ammunition. I wait a turn or two to make sure there are no late surprises. When its clear there aren’t Task Force Miller begins to cautiously creep forward again.
Some of the tanks that were covering the infantry clearing the woods on NAI 1 are repositioned to move up and help cover the move on NAI 11.
The calm persists as infantry from 2nd platoon cautiously approach the buildings on NAI 11 and begin to enter and clear them.
The infantry clear the buildings without incident, discovering the corpses of what looks like an enemy infantry squad deployed in a scout role.
On the other side of the MSR, the situation is repeated. Infantry from 1st platoon clear the remaining buildings on NAI 3, discovering only corpses and the two burned out BMP-2’s.
The final T-72 in the reverse slope killsack is destroyed. That makes 10 tanks, an entire tank company. There don’t appear to be any other fortifications or enemy units in the area.
Back at NAI 1, the infantry are slowly making their way through the woods, trying to avoid making contact with the enemy dug in there. On the left, there is a small opening in the tree cover, looking down slope into a clearing. There are a lot of vehicle sound contacts in this clearing. I decide to move a tank over to help cover the infantry and spot for enemy vehicles.
This quickly pays off. Just a few moments after the tank gets in position, a BMP-2 is spotted. The Abrams fires, destroying the spotted BMP-2.
A second BMP that was unspotted but unfortunately positioned between my tank and its spotted target is killed when the sabot first passes through it on its way to its intended target. The vehicle itself remains unspotted, but a plume of smoke begins to rise into the sky, marking its location.
A team of infantry from 3rd platoon, currently making their way through the woods over to the position the tank has taken, set up in a shallow trench next to the Abrams and immediately spot another BMP-2 in the clearing.
The AT-4 flies true and hits the BMP-2, destroying it. The crew of the stricken vehicle bails out and are quickly greeted by a hail of bullets. Also spotted are some foxholes with a lone enemy infantryman crawling next to them.
As suspected, this entire area looks like a fortified hornets nest. For now, I’m trying to stay along the periphery and engage opportunity targets as they appear, while trying to avoid getting sucked into a slug match in the woods.
I spoke too soon. The infantry spot another BMP-2 and attempt to engage it with the Javelin. However, this time the enemy sees me as well, and the BMP fires first. Casualties are caused, including the javelin gunner.
This is an example of how deadly close range forest fighting such as this can be, and something I’m trying to avoid. My tank, mere meters away from this infantry team, cannot see the enemy BMP. Sight line geometry in environments like this are a nightmare.
I quickly pull the infantry back, trying to disengage from the situation. The entire platoon is able to move away without drawing any fire, though the team in the woods next to the tank takes an additional casualty and is pinned down.
To help cover 3rd platoon by NAI 1, NAI 11 is reinforced with more infantry from 2nd platoon, as well as some tanks and Bradleys.
NAI 11 provides good lines of sight across NAI 1, and forward along the MSR.
The goal will be to use NAI 11 as another forward base of fire as I advance further down the MSR towards the bridge objectives. If any enemy units in the woods on NAI 1 decide to make a break for it or try to flank my units as they advance on the bridges, NAI 11 should be able to spot and interdict them.
Back on NAI 3, 1st platoon moves forward and clears the woods to their front. The road leading up to NAI 5 climbs in elevation, and has a ditch running along it. I place some infantry teams in the ditch to provide overwatch, armed with a javelin. From their position, they can see the bridge objectives, which appear to be clear of the enemy and obstacles.
Scout team 1 moves up in its Bradley to get a better view into the back of NAI 1. The team dismounts and sets up on a berm, covered by their Cavalry Fighting Vehicle just behind them.
Moments after setting up at the berm, the scouts spot a BMP-2.
However, the BMP has also spotted the scouts Bradley, and the Bradley has not spotted the BMP. The javelin takes around 20 seconds or so to acquire a good lock on a target before the missile can be fired. In that time, the BMP-2 is able to fire an AT-5a at the Bradley.
The enemy missile zips overhead and hits the Bradley, destroying it instantly, though both crewmembers survive and bail out.
A few seconds later, the javelin is fired and the BMP-2 is destroyed. The 1:1 trade of vehicles is a bad one, especially for cavalry scouts who are generally supposed to avoid engagement if possible.
After the BMP is destroyed and no further contacts are spotted, I decide to push out the perimeter around NAI 11. Two tanks, the Company XO and 2nd platoons platoon leader, bound forward in a pair.
They establish overwatch positions along a lightly wooded berm that can directly observe both bridge objectives, as well as the far side down the MSR. Nothing is spotted either on the Bridges or on the far side.
With this area looking clear, more vehicles are moved up to expand the perimeter of NAI 11 and prepare an initial push for the Bridge objectives.
Back on the right at NAI 1, the bulk of 3rd platoon (infantry) are disengaging from the woods and moving across a field to an assembly area. There they will remount their Bradley’s and be moved forward to assist in the capture of the Bridge objectives. However, there are still unrecovered casualties from A Team, 3rd Squad. To help recover the casualties, B Team moves up to the shallow trench. Number 3 tank from 1st platoon is still in position trying to provide cover to the pinned down infantry.
As soon as B Team arrives, they take fire from a BMP. 30mm HE rounds tear through the foliage and explode around the team, causing another casualty. A SAW gunner equipped with the teams AT-4 stands up through the withering incoming fire and takes aim.
This act of bravery is rewarded. He fires his AT-4, and his aim is true. The BMP-2 is hit and destroyed.
With this BMP-2 destroyed, all incoming fire ceases. After making sure the coast is clear, 3rd squad begins the task of recovering its casualties.
The casualties are recovered, and the infantry and tank fall back away from NAI 1. As they clear the area, a fire mission is called down on the NAI. The mission will be a steady rate of fire for a long time (7-10 minutes) to keep anyone left in the woods pinned down.
-
nathangun reacted to IICptMillerII in Combat Mission AAR: MSR Titan
INVERTED KILLSACK
Moments after the Bradley engages the single ATGM team on Hill 113, a worst case scenario develops. An entire company of T-72AV tanks appear along the ridgeline of Hill 113. My entire force suddenly finds itself in a killsack. Most of my assets are deployed. The infantry are in the process of advancing on and clearing objectives, with their Bradley’s sitting in overwatch positions. Further, most of my tanks are either engaged at point blank range with the remains of the T-72 company on the reverse slope, with their sides and rear facing Hill 113. I only have a handful of tanks in overwatch observing the direction of Hill 113.
This is an extremely dangerous situation. The potential exists here for OpFor to inflict severe casualties on my force in a very short amount of time, and all of this can occur without me being able to properly react. In short, it could all be over for Task Force Miller.
The drama kicks off immediately. CPT Miller’s 66 tank, part of the handful of tanks on overwatch of Hill 113, is fired on by one of the enemy T-72s. A half second later, the 66 tank engages the same T-72 that fired at it. The sabot from the T-72 crashes into the lower glacis plate of the 66 tank, but is defeated.
The T-72 is not so lucky. The sabot from the 66 tank hits and penetrates its target, sending the sabot through the chin of the turret and out the back, detonating the ammo stored in the turret on its way through.
What follows is another short, violent tank duel. The other tanks in overwatch, including 2 tanks on the MSR, engage the threat on Hill 113. Bradley’s, including the infantry company commanders track, engage with TOW missiles. Sabot rounds and ATGMs (TOW’s from the Bradleys, AT-11s from the T-72s, and AT-5a’s from a few BMP-2s) zip past each other.
Despite the excellent gunnery of my tanks and Bradley’s, not all shots find their targets. The T-72s are firing from behind a berm at an elevation advantage, making them tough targets to hit. A number of sabot rounds and TOW missiles miss, and some that hit are defeated by the combined armor and angling of the T-72s.
Casualties are suffered on both sides. I quickly lose an Abrams when an enemy AT-11 tank fired ATGM slams into the top turret of one of my Abrams as it tries to orient itself towards the new threat. The ATGM punches through the soft top turret armor and explodes inside, killing the entire crew.
A moment later, one of the tanks engaged in a knife fight with the enemy T-72s in the reverse slope killsack takes multiple hits to the rear of its turret. It too is quickly destroyed, taking its entire crew with it.
Bradley’s from 3rd platoon in overwatch of their infantry currently clearing the woods of NAI 1 are hit next. One enemy sabot round destroys 2 of them, punching clean through the first Brad and into the second. If there is a silver lining to this, it is that the infantry was already dismounted.
My tanks and Bradley’s quickly increase their return fire, and soon gain fire superiority. A flurry of killing blows follows, and within the next 20 seconds, most of the OpFor T-72 company on Hill 113 has been smashed.
This engagement occurred over the course of roughly 50 seconds. I had no chance to give new orders based on the new threat. All I could do was watch. Luckily for me, I had maintained decent overwatch positions with my reserve tanks, and many of my Bradley’s were in positions that granted them some level of concealment to the threat. The rest all came down to the gunnery skill of my crews and, in the case of my Abrams, their excellent armor that allowed them to survive frontal hits.
This could have been disastrous for my forces. If I had not maintained good overwatch, I could have been stuck waiting an entire minute to react to the new threat on Hill 113. With modern weapons and targeting, as well as it being an entire company of enemy tanks, a minute would have been more than enough time for the T-72s to destroy/cripple most of my soft/vulnerable assets caught in the open. Remember, if I lose more than 30% of my force, I lose the battle.
What saved me from defeat has more to do with basic tactical fundamentals and less to do with equipment or technology (though equipment and technology certainly helps). All elements, while moving through the open, positioned in the open, or overwatching smaller assets like infantry, were in turn being covered themselves. Further, I knew Hill 113 was key terrain based on its near dominating sightlines covering the part of the map my Task Force has to initially deploy across. If I had not had my rearmost tanks oriented towards Hill 113 overwatching the rest of my Task Force, the T-72 attack could have been a complete disaster for me. Additionally, if my opponent had committed his two tank companies at the same time (the company in the reverse slope position, and the company up on Hill 113) he could have overwhelmed my vehicles by catching me in a deadly crossfire. 20 T-72 tanks, firing at me from different directions, elevations, and distances likely would have caused much more damage to my forces.
For now, I’ve managed to keep my Task Force intact. However, these killsack engagements are a sobering reminder of how quickly I can lose my command, and how crucial basic tactical fundamentals are regardless of weapons and technology.
-
nathangun reacted to Sgt.Squarehead in Combat Mission AAR: MSR Titan
And that, gentlemen, is why storing ammo in your turret ring is not always a brilliant idea!
-
nathangun reacted to IICptMillerII in Combat Mission AAR: MSR Titan
CONTACT
As soon as 1st platoon dismounts in front of NAI 3, they make contact.
It appears to be a squad sized element split between two buildings. Bradley gunnery is up to a high standard, and rounds are immediately pumped into both buildings before the enemy has a chance to fire at my dismounting infantry.
The enemy is suppressed, and friendly infantry begins to cautiously advance forward to clear the rest of the complex.
Suddenly an enemy ATGM flies out from behind NAI 3 and slams into a Bradley, destroying it and killing the driver.
Moments later, an Abrams in overwatch spots a BMP-2 hiding behind NAI 3 and destroys it with a HEAT round.
Just as suddenly, more enemy infantry are spotted in the buildings, and a close range firefight breaks out.
The firefight is short and violent. No friendly casualties are suffered.
A lull in the fighting momentarily occurs, and I use the opportunity to push up a scout team armed with a javelin to try to get eyes on the second BMP-2 to the rear of NAI 3.
As the scout team is moving up, they are suddenly engaged by the second BMP-2.
30mm HE rounds streak down the road and explode against trees and the ground, though miraculously none of my scouts are hit by the fire. One of the scouts is armed with an AT-4 and takes a shot at the BMP.
Unfortunately the shot falls short, but the scouts are able to crawl out of the line of fire and suffer no casualties. The BMP poses a problem due to its positioning, but the encounter could have gone much worse.
A survivor of the Bradley’s barrage pops up and fires a few bursts. This time, the enemy’s aim is good, and I suffer a casualty.
My infantry, as well as an Abrams in overwatch, return fire with small arms and coax. Its enough to finish off the lone enemy soldier.
The BMP-2 is in a good keyhole position, covering down a road that separates my infantry from the buildings on NAI 3. Crossing a road like this is already a very dangerous thing to do, and is known as a Linear Danger Area (LDA). In order to deal with this serious threat, I move Scout Team 3 off of their observation post and down into a position where they can get eyes on the BMP and engage it with their Javelin.
The scout team is able to get into position and take aim. The scout fires moments later, and the missile hits its mark.
On the right flank, 3rd platoon advances cautiously into the woods covering NAI 1. It doesn’t take long to find the enemy. A fire team takes fire from it’s front and suffers a minor casualty. Thankfully, the soldiers body armor prevents the wound from being serious.
One of the scout teams helping to clear the woods pushes up and spots the enemy. They begin engaging with rifle fire and grenades.
Having pinned down the enemy, the scout team capitalizes on the situation and rushes the fighting position.
The scouts kill the remaining enemy soldier and occupy the fighting position for themselves. In this short but violent exchange, I was lucky. I only suffered one man lightly wounded, while killing 2 enemy soldiers and taking their fighting position. The last thing I want to do is get sucked into a costly close quarter fight in these woods. It’s not even my main objective.
Moments later, another enemy position is discovered further into the woods, on a very slight reverse slope.
My goal is to quickly sweep the edges of the forest for enemy assets that can pose a long range threat to my advance down the MSR, such as ATGM teams or artillery spotters. Once these threats have been found and neutralized, the infantry will fall back and let the armored vehicles strongpoint the position. That way, if the enemy decides to attack out of the woods, they will be cut down in the open by my vehicles.
Here is an overhead view of the woods covering NAI 1:
This should help to illustrate my intentions with NAI 1. I would need much more than a platoon of infantry to clear these woods, and even then it would be long and bloody. It simply isn’t worth the effort. The good news is, the terrain appears to be too dense for the enemy vehicles to emerge in any semblance of order or speed. As long as NAI 1 is strong pointed by friendly armor, I should be able to keep it bottled up and it will not pose a threat to my advance down the MSR.
2nd platoon (infantry) along with elements of 2nd platoon (armored) and the Task Force command element move forward to establish new overwatch positions along the right side of the MSR.
A call comes over the radio informing the JTAC that the Apache called in on the possible enemy armor concentration behind NAI 1 is now on station. Moments later, a missile is seen streaking into the sky.
The shot came so fast that the Apache pilot didn’t have time to pop flares in defense. The enemy missile hits the Apache, destroying it. This is an expensive lesson to learn. The airspace is not safe for aircraft. Half of my available fire support is now restricted until I can proof the airspace.
However, there is hardly any time to contemplate this new dilemma. The two tanks from 2nd platoon (armored) advance to a berm and discover…
What appears to be an entire enemy tank company in a reverse slope position, at point blank range. Before either of my tanks have a chance to react, one of the enemy tanks fires at Number 3 tank. The round impacts the berm, causing no damage. My tanks are quick to respond. In rapid succession, they pump 2 rounds into targets to their direct front, destroying them.
The exchange is not one sided. Before either of my tanks have a chance to reload, number 3 tank takes a penetrating hit to its lower glacis plate.
The Abrams is destroyed, but all 4 crewmen survive the hit and are able to bail out of the tank without suffering a casualty.
While this is happening, the infantry from 2nd platoon dismount their Bradley’s and begin advancing on NAI 11. They are immediately greeted by a hail of gunfire from enemy infantry occupying the buildings on NAI 11.
The fire causes no casualties, and is quickly returned and silenced by 25mm HE fired from the Bradley’s overwatching the infantry as they dismount.
I’m now in a precarious position. I have deployed infantry and their Bradley’s dangerously close to enemy tanks in a reverse slope position. Further, I now only have 1 tank directly observing and engaging what appears to be a company of enemy T-72s. If the T-72s are able to maneuver out of the reverse slope position, they could destroy a significant number of Bradley’s and Abrams at point blank range with just a single volley. I have tanks in overwatch positions, but they would likely not be able to react in time to prevent a mini-catastrophe.
In response, I quickly maneuver 2 teams of Abrams to either flank of the reverse slope position to keep the enemy engaged and hopefully pin him down/destroy him so the T-72s cannot threaten my IFVs and infantry in the open.
What happens next is pure chaos.
-
nathangun reacted to IICptMillerII in Combat Mission AAR: MSR Titan
MOVEMENT TO CONTACT
The battle begins and my task force starts deploying. 2nd platoon (tanks) moves forward to establish hull down positions on the rise in front of them. 3rd platoon (tanks) establishes hull down positions on the MSR.
Artillery begins to fall on NAI 1.
On the left flank, scout team 3 moves forward, dismounts and establishes an observation post. All is quiet on the left.
Immediately after taking hull down positions, 2nd platoon encounters and engage enemy infantry moving in the open.
Upon doing my terrain analysis, it became quickly apparent to me that NAI 1 would be an excellent defensive position due to it’s cover, concealment and dominating sightlines along MSR Titan. In short, it is an excellent place for infantry to dig in and engage my forces as they try to move down the MSR.
It appears that the enemy is aware of the defensive advantages of this position as well. The enemy team my tanks engaged is proof that the enemy is on NAI 1 in some capacity, but to what degree?
In order to find out, I dispatch 2nd platoon (infantry) to begin moving towards NAI 1. In addition, scout team 1 pushes up to get extra eyes on and help discover any hidden threats not yet uncovered by the tanks.
As 2nd platoon and the scout teams begin their movement, Signals Intelligence (SIGINT) indicates that there could be a concentration of armor in the vicinity of NAI 1. I waste no time getting the JTAC to call in an Apache to put eyes on the area, and missiles into anything spotted there.
Scout team 1 dismounts and pushes up slightly to get better eyes on the tree line, but spot nothing. Covered by the tanks and scout team, 2nd platoon moves up on line and dismounts its infantry.
Meanwhile on the left flank, 1st platoon (infantry) covered by 2nd platoon (tanks) move forward along MSR Titan to gain a position overlooking NAI 3.
NAI 3 is close to the MSR and would be an ideal spot for the enemy to launch spoiling attacks against my task force moving down the MSR, such as firing RPGs into the flanks of my vehicles. Further emphasizing this point, SIGINT reports that there are potential contacts in the building complex farthest to the rear. Perhaps this is an enemy outpost watching the MSR? To prevent the enemy from launching any spoiling attacks against my task force and to deny him his (potential) observation post, 1st platoon (infantry) will establish a base of fire observing NAI 3, and then sweep and clear the buildings to ensure no threat is posed to the rest of the task force. As 1st platoon moves into position and establishes overwatch, the platoon fire support team calls in a fire mission on the suspected outpost. The mission is a single section (2 tubes) of 155mm and will be short but violent.
Shortly after calling it in, the fire mission lands.
The fire mission is short, only dropping a handful of rounds. As soon as it ends 1st platoon (infantry), covered by tanks on the MSR, advance and dismount in front of NAI 3.
Back on the right flank, my infantry are now fully deployed and arrayed against NAI 1, supported by their Bradley mounts, some tanks, and a scout team. Despite being in the open, my men have not taken any fire. Further, despite having good direct observation of the NAI, I have not been able to uncover any enemy positions. It’s time to advance.
I bring all my tanks in the area on line and begin bounding the infantry forward in teams towards the tree line.
As this is happening, an enemy artillery barrage begins to land. It seems to be falling in the open field to the rear of most of my forces and poses no immediate threat to me.
-
nathangun reacted to IICptMillerII in Combat Mission AAR: MSR Titan
Combat Mission Shock Force 2 PBEM AAR
MSR Titan
By IICptMillerII
INTRODUCTION
This is an after action report (AAR) of a play by email (PBEM) battle I recently concluded. The battle is in Combat Mission Shock Force 2 and features a combined arms task force attacking down a major highway against a near-peer opposing force (OpFor).
The map is taken from the first mission of the excellent campaign “Forging Steel” by GeorgeMC. All credit goes to him for designing the superb map. I have modified the BluFor and OpFor, as well as their respective objectives, but otherwise the map remains untouched.
This AAR features several mods. Chief among them are:
Veins Smoke and Effects mod Drakenlords Fire mod Sahrani Liberation Army (SLA) by myself playing the OpFor US 3rd Infantry Division Multicam uniforms by myself A number of the graphics used in this AAR (mainly the maps and task force layout) are large image files and are best viewed in full size, with the ability to fully zoom in on them.
All sprites of vehicles and soldier models used in the map and task force layout graphics are taken from the game “Armored Brigade” by Matrix Games and are slightly tweaked by me. All credit goes to the artists who created these sprites.
MISSION
Task Force Miller is ordered to assault down Highway 3, named Main Supply Route (MSR) Titan, in order to allow follow on forces to continue the attack.
Mission Specific Tasks:
Secure Bridges 31 and 32. Destroy any enemy forces in the vicinity of MSR Titan Do not suffer more than 30% casualties Desired End State:
MSR Titan, to include Bridges 31 and 32 secured and not directly threatened by the enemy. Task Force Miller combat effective and capable of conducting follow-on operations.
ENEMY
S2 (Intel) indicates the enemy is present in battalion size and are made up of elements from the 16th Guards Tank Division. Specifically, elements of the 47th Guards Tank Regiment appear to be deployed to our front. S2 anticipates a mix of dismounted and mechanized infantry (mounted in BMP-2s) in battalion (-) strength supported by at least one company of T-72AV tanks. It is anticipated that at least one additional company of tanks, maybe more, could be present on the battlefield, possibly as a quick reaction force (QRF).
The enemy is well equipped, well led, and well trained. They are expected to stand and fight and will not give ground easily. Entrenched enemy units not immediately threatening the MSR should be bypassed or be destroyed with indirect fires.
The T-72AV is a very capable tank and is well crewed. It is capable of frontally penetrating our M1A1’s at combat ranges. It is not a threat to be taken lightly.
Additionally, enemy infantry may be equipped with the AT-14 Kornet anti-tank guided missile (ATGM). This weapon can easily destroy our M2 and M3 Bradley/Cavalry fighting vehicles and can severely damage, disable, and even destroy our M1A1’s.
TERRAIN AND WEATHER
The weather is overcast, though rain is not expected. The Air Force has assured us that the weather will not impede their ability to support the task force.
The landscape is a mildly arid temperate climate. The dominating terrain features are Hill 113, and the gorge that runs North-South, crossing under MSR Titan at Bridge 32. The gently hilled terrain is a mix of grassland, agriculture, and light forest. The forested areas are not expected to prohibit tracked vehicles, though caution should still be used if passing through.
MSR Titan runs East-West along the 2240 Easting. It crosses two obstacles, unnamed gorges, at Bridges 31 and 32.
Several settlements of varying size are scattered through the area of operations. Only one is named, Kronenburg. The rest are designated by named areas of interest (NAIs). The most significant of these are likely to be NAI’s 5, 8, 9 and 12. These are larger settlements located closest to the MSR.
TROOPS
Task Force Miller is a combined arms task force composed primarily of two companies, one mechanized infantry and one armored. The armor company is Alpha Company equipped with M1A1HC Abrams tanks. The mechanized infantry company is Charlie Company riding in M2A3 Bradley Fighting Vehicles (BFV). Neither the tanks nor BFVs are equipped with explosive reactive armor (ERA) packages, so they are more vulnerable to HEAT rounds, specifically modern tandem HEAT warheads. These units come from 1st Battalion, 64th Armored Regiment. The parent division is the 3rd Infantry Division.
Also attached is 1st Platoon, Alpha Company, 5-7th Cavalry. The scouts operate the M3A3 Bradley Cavalry Fighting Vehicle (CFV).
Supporting Fires:
The task force’s Joint Tactical Air Controller (JTAC) is assigned to the headquarters element of Alpha Company, and rides in a Humvee. Charlie Company has its Fire Support Officer (FSO) in its Bradley Fire Support vehicle (BFIST), part of C Company’s headquarters.
We have been given priority fires for the following assets
Battery A, 1-41st Field Artillery. x6 155mm Paladin self-propelled guns 1 flight of AH-64D Apache Gunships (2 helicopters) Armed with: 30mm HEDP x1000 70mm HE Rockets x38 AGM-114 Hellfire x8 1 flight of A-10C Thunderbolt II’s (2 fixed wing aircraft) Armed with: 30mm APDU x1350 500lb bomb x4 AGM-65 Maverick x4
TIME
The time is 0830. Task Force Miller has 2 hours to accomplish its objectives.
INITIAL SCHEME OF MANEUVER
The initial scheme of maneuver, illustrated by this map, is as follows:
Cavalry Scouts (White)
Scout team 3 will advance to NAI 2 and establish overwatch positions North-East to screen the task force’s left flank. Scout team 1 (dismounted) will observe to it’s North-East to provide another set of eyes from a different location to spot any threats that immediately appear as the task force deploys.
Tanks (Red)
3rd platoon will advance down the MSR and establish hull down overwatch positions that will allow observation down the entirety of the MSR and its immediate surroundings. 2nd platoon will advance forward into hull down positions and establish a base of fire position to cover the infantry 1st platoon will advance forward directly in front of NAI 1 in order to directly observe and engage any threats spotted there and allow the infantry to move up, dismount and begin sweeping the NAI.
Infantry (Blue)
For now, all infantry platoons will remain mounted and stationary in defilade as the tanks and scouts move forward to their initial positions. Once the tanks/scouts are in position, the platoons will fan out and deploy against their respective initial objectives. 1st platoon is tasked with clearing any discovered threats in the immediate vicinity of MSR Titan. 2nd platoon is effectively the reserve element and will respond to developing threats as needed. 3rd platoon is tasked with sweeping NAI 2 if the enemy is discovered there.
Preparatory Fires
1 section of 155mms (2 guns) will fire a light mission against NAI 1 to suppress any enemy forces deployed there that could threaten the initial deployment of the task force. The remaining 2 sections of the battery will be on call for fires. -
nathangun reacted to Bil Hardenberger in CMSF 2 - Co-op AAR (Bil v IanL) Using Realism Rules
I think this early iteration of the rules didn't have as much impact on firefight dynamics to be honest... the new set however should impact it greatly. Stay tuned though, there is a fierce struggle for the Bridge and the Gully Intersection coming in future reports. I am waiting for Ian to get caught up before continuing my side of the action.
-
nathangun reacted to IICptMillerII in CMSF 2 - Co-op AAR (Bil v IanL) Using Realism Rules
FWIW I used to really struggle with arrows as well. I also have taken to drawing them manually with the pen tool in photoshop, and then adjusting them to make them look more presentable with the available pen manipulation tools in photoshop. Unfortunately as others have said, it is a pain to do and it takes time and practice. I've also found that photoshop is a highly perishable skill, so I tend to take a few notes on how I accomplish something in a word document for easy reference. Plus its always nice to have a great example from Bil to shamelessly emulate yourself!
Back in relation to the AAR, I'm excited for a large fight to break out over this bridge. I really want to see how the C2 rules affect the dynamic of the firefight, and more specifically I want to see how they affect tactically adjusting once a fight is in progress. Reacting to new situations once one is already engaged is extremely difficult in reality, even with good C2. I'm interested to see if the rules depict this at all.
-
nathangun reacted to A Canadian Cat in CMSF 2 - Co-op AAR (Bil v IanL) Using Realism Rules
Approaching the bridge objective
A little further forward elements of B Co spot an enemy BMP. See, he can move assets without my overwatch units spotting them. Rats!
A little battle field overview from about the 5 or 6 minute mark.
The first teams from B Co 1 Pl reach the bridge. I order them to move into the steam bead and along it under the bridge. They don't do that and instead head right up on top before climbing down the hill. WTF – Why The Face as in the face of confusion and anger.
But they make it unharmed.
More of 1Pl move up and the next team gets much more detailed orders of how to get under the bridge out of the enemy view. The also ignore me and follow the same path as the first team. This time they take fire and someone is lightly wounded.
Meanwhile one overwatch mortar fire spotting rounds started a few minutes ago so the ATGM teams are on the run to avoid it. As the fire really starts they are safe but no longer on overwatch.
BMPs choosing their own targets
The bulk of 1Pl are in position but again the HQ team decides to go over out into the open but this time one member doesn't make it.
Meanwhile given where the fire at the bridge is coming from I move 2Pl up in the gully with the idea that they can interdict anything else joining the enemy threatening 1Pl and I can protect their flank.
After about 10 minutes this is where where everybody is.
-
nathangun reacted to A Canadian Cat in CMSF 2 - Co-op AAR (Bil v IanL) Using Realism Rules
Moving into position and the action starts
B Company 2 Platoon await with scouts near the ridge line.
Meanwhile 1 Platoon is moving through the woods towards the bridge.
A Company 1 Platoon HQ has some contacts at the farm and their BMPs are in C2. Time for some area fire.
On the spotting of the Platoon HQ and the company HQ BMPs open up on targets around the farm. The right two BMPs are from 1 Platoon and the left most one is A Co's ride. I give them target briefly orders of various lengths so that if something dangerous pops up later in the turn they will be free to engage on their own.
Meanwhile 2 Platoon moves into their position in defilade at KT6.
Over by the bridge lead elements of B Co are approaching the bridge.
Sure enough after some area firing a BMP spots some targets on its own...
And scores a hit. First blood to me. If only that were enough.
-
nathangun reacted to Bil Hardenberger in CMSF 2 - Co-op AAR (Bil v IanL) Using Realism Rules
You can always move.. regardless of your C2 state... as for losing a leader, well someone will always be in charge so the game will take care of that. For example, lose a Platoon Leader and then 1st Squad Leader takes over.. the other squads in that platoon will be out of C2 until the 1st Squad Leader can collect them. In the current rules C2 really only effects Area Fire anyway.
Bil
-
nathangun reacted to domfluff in CMSF 2 - Co-op AAR (Bil v IanL) Using Realism Rules
Might take you up on that some time. With full expectation of losing, mind you.
-
nathangun reacted to IICptMillerII in CMSF 2 - Co-op AAR (Bil v IanL) Using Realism Rules
I'm really liking the area fire rules and their implementation. I especially like how it puts more emphasis on small unit leadership. Looking forward to what comes next!
Has any thought been given to how different nations treat leader initiative? For example, a SSG in the US Army could have a greater leadership effect (himself being able to direct area fire with his squad) as opposed to the Syrians, who would require a LT to do the same. I think it could help add an additional layer of C3 realism that it looks like these rules are going for. Just a thought I had.
-
 nathangun got a reaction from Bil Hardenberger in CMSF 2 - Co-op AAR (Bil v IanL) Using Realism Rules
I wouldn't mind giving these rules a go.
-
nathangun reacted to Haiduk in I was viewing the Ukraine on google maps......
Initially Yandex maps updated own sattelite images of Ukraine in 2017, Google Maps - some after in 2017-2018. You can also watch almost week-by-week satellite images on TerraServer: https://www.terraserver.com


