

Combatintman
-
Posts
5,065 -
Joined
-
Last visited
-
Days Won
68
Everything posted by Combatintman
-
 The problem with doing the SAS is not core units or getting rid of bits you don't need - it is the fact that the shooty bang sticks for the Brit CMSF models are wrong for the SAS of this era. At the time the SAS were using Diemacos. Now if a skilled modder (and I'm not even a rubbish modder) were to take the Canadians, swap the voices to Brit ones and mod the uniform skins to a UK DPM pattern then we'd be talking .... The other problems with doing the SAS attack on Gberi Bana are the method of entry (fast roping) into an area infested with enemy and simulating the hostages. As I've demonstrated in the Osama Bin Laden mission - you can work around some of those problems through the narrative but I'm not sure the flavour of it would be right and above all else with my 'historical' missions, I do like to at least capture the flavour of the action if I can't replicate it exactly. The Magbeni part of Op BARRAS I can live with because, while the LMG was not issued to the Paras at the time, the assaulting company made a point of bringing heaps of GPMGs to the party so overall, with a DPM Mod (which exists at the repository) these guys look mostly right with about the same amount of firepower on hand. This mission is pretty much done bar a few tweaks by the way but I'm looking at a couple of other projects at the moment. Although if there is a clamour for me to release it sooner then I could be persuaded ...
 -
Aachen Campaign As Allies
Combatintman replied to user1000's topic in Combat Mission Final Blitzkrieg
@benpark's answer to that question I am sure is contained in his previous post - my bold. As anybody who has stepped into the editor will know - sometimes you have to make design compromises (generally in terms of time or force balance) to get your missions or campaigns to a standard that are playable, enjoyable and challenging. Certainly in my case, I find testing and then redesigning the most difficult aspect of scenario design when my designed mission doesn't work as I hoped it would first time out of the box. Rest assured that this is a superb campaign. -
Aachen Campaign As Allies
Combatintman replied to user1000's topic in Combat Mission Final Blitzkrieg
I tested this one and won every mission and I am by no means a great player. Of all the missions I thought the second one was the hardest but they all needed some careful planning and a deliberate approach with heaps of firepower. I really enjoyed testing it and I think it is a really well put together little campaign. -
how to remove text on screen?
Combatintman replied to gatter's topic in Combat Mission Shock Force 1
You'll have to give us a screen shot I think - I presume you are playing in WEGO. The only stuff I get on screen when reviewing the turn is text at the top of the screen that says 'Reply Phase: Review the Action' and the word 'DONE' at the end of the turn. AFAIK you cannot toggle either of those messages so your work around for getting rid of the 'DONE' message is to crop your video clip in whatever video editor you are using. -
Tactic military Symbols
Combatintman replied to JM Stuff's topic in CMSF Scenario and Mod Design Forum
Ok - I'll bite then. I have a book called 'The Mother of all Battles' which deals with Saddam Hussein's strategic plan for the first Gulf War (1990-1991). This book has an image of an Iraqi Enemy Situation Map with Arabic annotations on page 130. This map uses NATO map marking symbols for all symbology. The rest, I have no idea. -
Qarmat Ali 1 PWRR Basra Iraq 05 August 2004
Combatintman replied to Combatintman's topic in Combat Mission Shock Force 1
@MOS:96B2P I think you were a bit unlucky there - you must have missed out on a Total Victory by a whisker. Anyway glad you enjoyed it and thanks once again for another excellent AAR. In the mean time you can brush up on the Queen's English before the next one -
Having spent over 30 years in the Army, I have asked the same question frequently but never found an answer that would keep me out of trouble
-
No it is not possible - the workaround is to set them as reinforcements that do not arrive - by that I mean if your scenario is 2 hours long then you set the HQ (QG) to arrive at any time after that.
-
Qarmat Ali 1 PWRR Basra Iraq 05 August 2004
Combatintman replied to Combatintman's topic in Combat Mission Shock Force 1
@MOS:96B2P - clearly 6 Platoon has a US exchange officer in its midst what with all of these 'meters' and 'platoon XOs' in the narrative. Loving the AAR though and looks like you're cracking along well with this. -
Qarmat Ali 1 PWRR Basra Iraq 05 August 2004
Combatintman replied to Combatintman's topic in Combat Mission Shock Force 1
As a designer it is always interesting to see how people play the thing as well - both @George MC and @MOS:96B2P have gone for getting overwatch positions in buildings from the near bank. My scheme of manoeuvre in testing was far less sophisticated. As always a good AAR in progress from @MOS:96B2P. -
It is in the manual - page 141 (CTRL-SHIFT-CLICK).
-
Qarmat Ali 1 PWRR Basra Iraq 05 August 2004
Combatintman replied to Combatintman's topic in Combat Mission Shock Force 1
@George MCglad you enjoyed it and thanks for the recommendation. As to how it played out for you - it was clear that once you got into a fire and manoeuvre rhythm things started to move in the right direction for you. As to the result - your losses were, if you forgive the pun ... fatal. Mind you, as I think I have said before, I don't think I've ever finished your Battlegroup Attacks scenario so I will stop judging!!!! -
This one ... http://www.thefewgoodmen.com/tsd3/cm-red-thunder/cm-red-thunder-campaigns/kampfgruppe-von-schroif-cmrt-campaign/
-
@Dutchman1997 first of all - well done for clicking the 'scenario editor' button and trying to make something for everyone's benefit. To solve your problem I have rummaged around your scenario and the problem is that you have not assigned AI groups. Looking at it you have created AI plans for Axis Group 1, Axis Group 2, Axis Group 3 and Axis Group 4. However you have not assigned those groups in the 'Units' part of the editor - you do this by selecting the unit and hitting the appropriate 'F' key (i.e. F4 = AI Group 4). While this relates to CMSF the mechanics are the same for CMFB, here's how to do it ....
-
Qarmat Ali 1 PWRR Basra Iraq 05 August 2004
Combatintman replied to Combatintman's topic in Combat Mission Shock Force 1
Thanks @Bootie a bit fiddly but I think I worked it out - this scenario should be available for download here: http://www.thefewgoodmen.com/tsd3/cm-shock-force-2/cm-shock-force/qarmat-ali-qrf/ Enjoy. -
Qarmat Ali 1 PWRR Basra Iraq 05 August 2004
Combatintman replied to Combatintman's topic in Combat Mission Shock Force 1
Ok so there has been a delay due to a combination of RL issues (going back to work) and getting registered as an author on CMMODSIII. I have e-mailed @Bootie so shouldn't be long now. -
Kill count at the end of a battle
Combatintman replied to Royal's topic in Combat Mission Shock Force 1
It is not a feature of CMSF - the only kill counts you get are at the end game screen. -
Qarmat Ali 1 PWRR Basra Iraq 05 August 2004
Combatintman replied to Combatintman's topic in Combat Mission Shock Force 1
I truly am @George MC- I had 8 pints!!!! -
Qarmat Ali 1 PWRR Basra Iraq 05 August 2004
Combatintman replied to Combatintman's topic in Combat Mission Shock Force 1
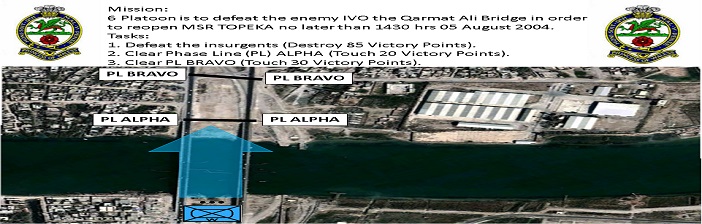
Ok - so I think this is pretty much in the can .... Mission Orders Situation Enemy Forces Exact enemy affiliation is unknown but assessed to be Mahdi Army elements who have been reported as attempting to close Main Supply Route (MSR) TOPEKA in the vicinity of (IVO) the Qarmat Ali Bridge from the North bank of the Qarmat Ali River. Strength and composition are unknown but likely to be small groups of 3-5 fighters equipped with small arms RPGs and possibly IEDs. Situation Friendly Forces After finishing lunch on 05 August 2004 at your base location in the Shatt al Arab hotel, 6 Platoon, B Company, 1st Battalion the Princess of Wales’ Royal Regiment (1 PWRR)) which was on duty as the Battlegroup armoured Quick Reaction Force (QRF) was hurriedly summoned to the Operations Room to be briefed on the enemy situation above. Half of the Platoon (2 and 3 Section) crashed out of the camp immediately. The remainder of 6 Platoon (Platoon HQ and 1 Section) left 10 minutes later followed by OC B Company 5 minutes after that. The lead elements of the QRF have now just reached the Qarmat Ali Bridge. Due to Rules of Engagement (ROE) you cannot use air, artillery or 81mm mortars and apart from the organic elements listed above, you will receive no reinforcement. Situation Ground and Weather The ground is a mix of traditional built up area and an industrial/factory complex. Vital ground is the Qarmat Ali Bridge which carries MSR TOPEKA spanning the Qarmat Ali River and is approximately 250m wide at this point. Otherwise the ground is open and generally flat. Buildings offer excellent cover and concealment and good fields of fire over the bridge and MSR. It is a clear blisteringly hot sunny day with only a gentle W-E breeze. It is currently 1330 on 05 August 2004. Mission These are your Quick Battle Orders … Mission: 6 Platoon is to defeat the enemy IVO the Qarmat Ali Bridge in order to reopen MSR TOPEKA no later than 1430 hrs 05 August 2004. Tasks: 1. Defeat the insurgents (Destroy 85 Victory Points). 2. Clear Phase Line (PL) ALPHA (Touch 20 Victory Points). 3. Clear PL BRAVO (Touch 30 Victory Points). Commander's Intent The lead Multiple (2 and 3 Sections) will move at best tactical speed to the southern approaches of the Qarmat Ali Bridge and will conduct a quick tactical assessment of the situation awaiting the arrival of the second multiple (Platoon HQ and 1 Section) at approximately 1340 hrs and OC B Coy at approximately 1345 hrs. Once the nature of the enemy threat is established, 6 Platoon will conduct the clearance of the enemy IVO the Qarmat Ali Bridge and RTE TOPEKA up to PL BRAVO. Key to success will be the use of effective fire and manoeuvre. Endstate is the enemy cleared from RTE TOPEKA and 6 Platoon ready to recover to the Shatt al Arab Hotel on order at 90% Combat Effectiveness (20 Victory Points). Basic Plan Your choice commander but given that the enemy is likely to have set up an ambush on the North bank of the river, it is recommended that you exercise caution initially. There is no need to conduct detailed clearances of the whole area, you just need to clear identified enemies IVO RTE TOPEKA. Designer’s notes There are no spoilers in this description. This mission is based on a real action which took place at the time and date stated by 6 Platoon, B Company, 1 PWRR during its tour of Iraq in 2004. The action is described in Richard Holmes’ book Dusty Warriors (pages 286-289). The design intent for this mission was simply to depict this small action as described and create a quick, simple and fun mission that can be played in a single sitting a ‘beer and pretzels’ scenario if you will. Therefore I sincerely hope that I have achieved that intent and that you have fun playing it. Finally, this mission is dedicated to all of those in B Company, 1 PWRR who fought in Iraq in those extremely dangerous and challenging times. Strategic Map Operational Map Tactical Map So - I think I've earned myself a pint ...

-
Qarmat Ali 1 PWRR Basra Iraq 05 August 2004
Combatintman replied to Combatintman's topic in Combat Mission Shock Force 1
Another test complete and VPs (after many rescrubs) are all fixed up - so I'm on track to kick this out of the door fairly soon. -
Qarmat Ali 1 PWRR Basra Iraq 05 August 2004
Combatintman replied to Combatintman's topic in Combat Mission Shock Force 1
Ok - so I've just tested this for the first time and it seems to be working a treat. I will test it a couple of more times and then I just need to sort out the objectives, VPs and write up the orders. Nothing particularly sophisticated about this mission - really a case of good use of fire and manoeuvre but I think it will be a fun little mission. Should be ready for upload in a few days. -
Qarmat Ali 1 PWRR Basra Iraq 05 August 2004
Combatintman replied to Combatintman's topic in Combat Mission Shock Force 1
@MOS:96B2P - Dusty Warriors is a good read if that is any consolation. Richard Holmes was both a very respected military historian as well as the Regimental Colonel of the PWRR. I used this book for the research for my Op HAMMERSMITH mission a few years back. I've always wanted to do this particular action but my previous map (created about 4 years ago) wasn't much cop and I didn't really have the scenario skills to pull it off. However as you can see I have built it all back up from scratch so I just need to get the thing to work which I think is easily doable. I will add that this is a very small action which I would consider one of those beer and pretzels scenarios that you can just load up and play in a single sitting. That said my beer and pretzels missions seem to go down pretty well with the community so I'm sure it will hit the spot. -
Not if you're doing a map based on real terrain ... it can be slow and painful but you're right the mechanics are pretty easy. My top tip is to make sure that you pay attention to your buildings and make sure that doors and windows line up where you have buildings joined together and of course make sure that troops can enter them if they are designed to be entered. Keep at it .
-
Qarmat Ali 1 PWRR Basra Iraq 05 August 2004
Combatintman replied to Combatintman's topic in Combat Mission Shock Force 1
1 PWRR was an Armoured Infantry Battalion at the time so Warrior equipped. A Mechanised Infantry Battalion would be Bulldog equipped. As to the David Rowlands picture I had to Google it ... judging by the description (owned by 2 LANCS) and the fact that it shows an action that quite clearly took place at night whereas this one took place just after lunchtime, it is not the same as the one I am portraying. Good find though ... I may get to reuse the map for another scenario. If you want to know more, the action is described in Richard Holmes book Dusty Warrior (pages 286-290 refer). -
Qarmat Ali 1 PWRR Basra Iraq 05 August 2004
Combatintman replied to Combatintman's topic in Combat Mission Shock Force 1
More accurately ... 'Son of an L85A2',


