

BigDork
-
Posts
589 -
Joined
-
Last visited
Posts posted by BigDork
-
-
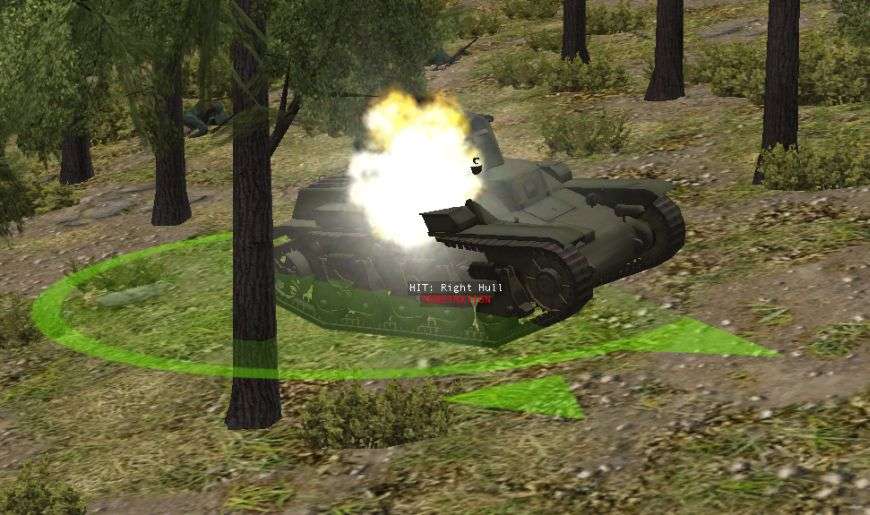
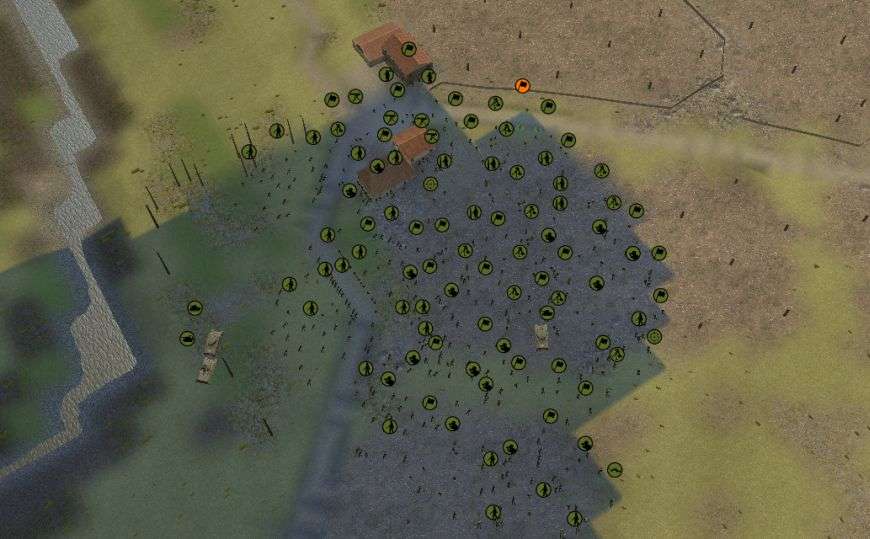
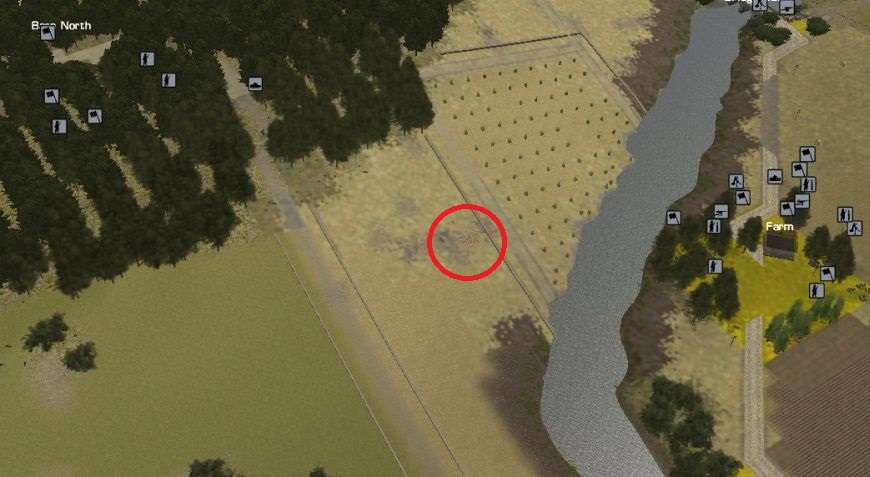
Turn 4
Four minutes in and finally my guys get into the battle.
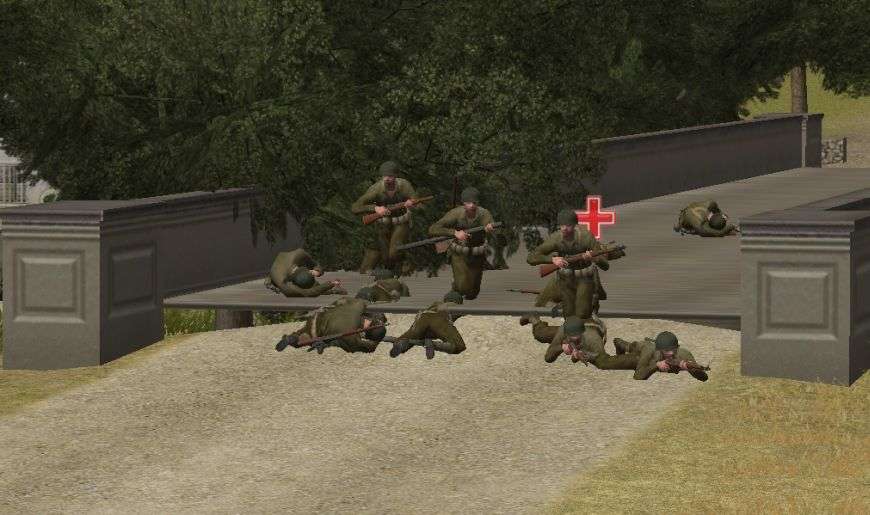
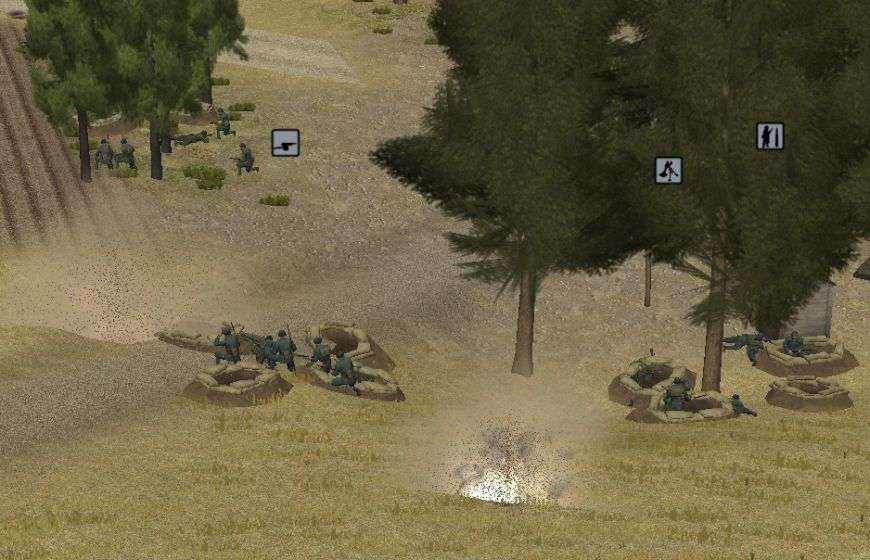
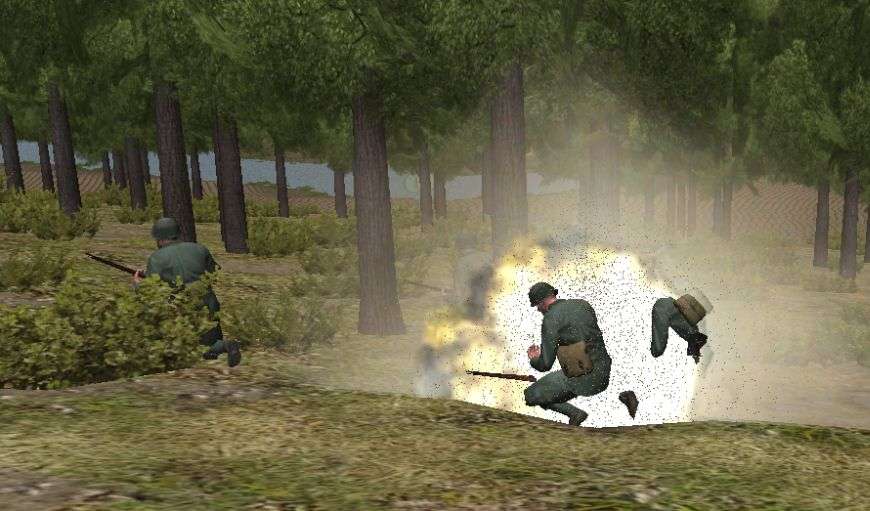
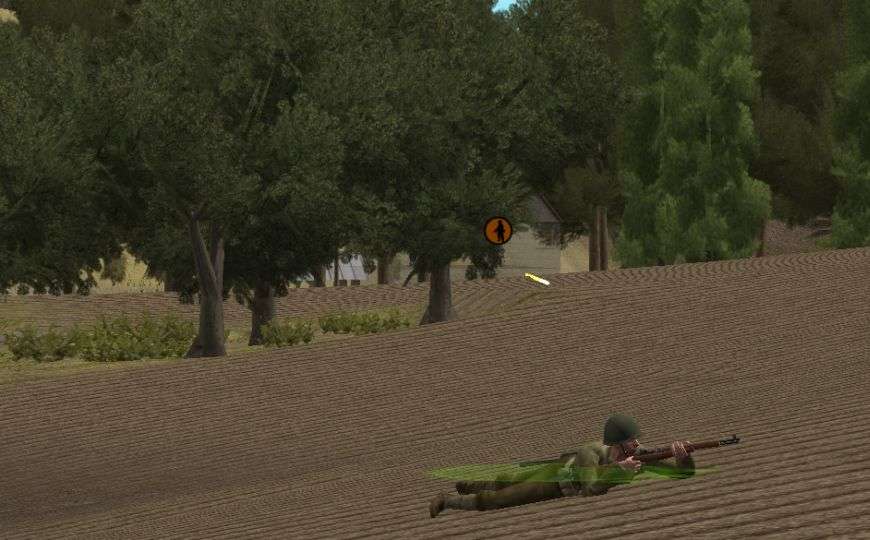
As my recon team approaches the house on the ridge they spot movement on the second floor. As they get closer they ID the German and it looks to be a forward observer! As they get within a few feet of the house the Bren gunner opened up, taking out the spotter.
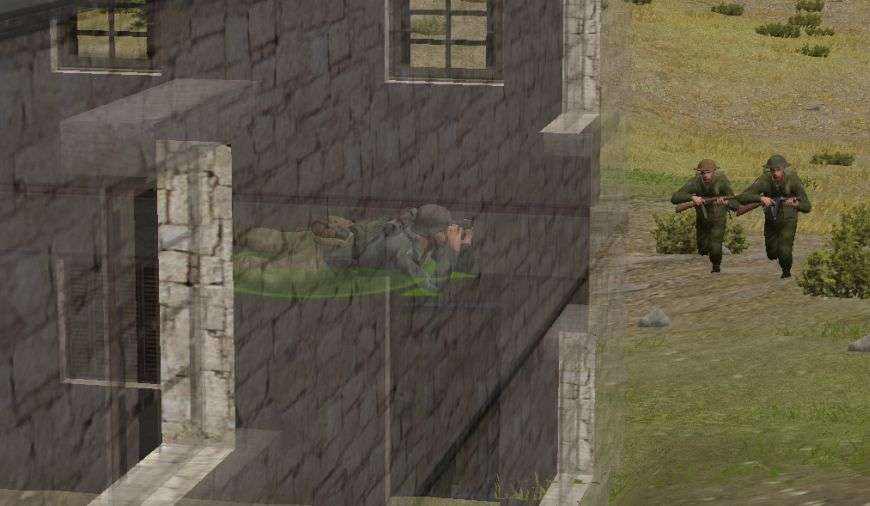
A few moments later after we stormed into the house the radio operator tries to make his escape. As he comes down the stairs he's met by the combined fire of a Tommy and a Bren. A huge early battle victory for me. If Tiresias only had one FO and any arty that was dependent on that unit, he now has no access to it. And even if he just has some smaller stuff, having to use HQ units instead of FOs is still better for me.
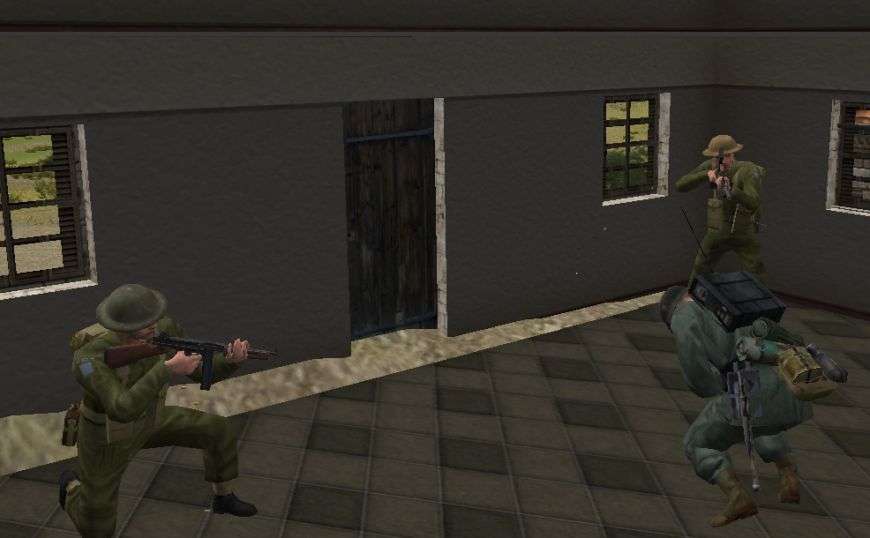
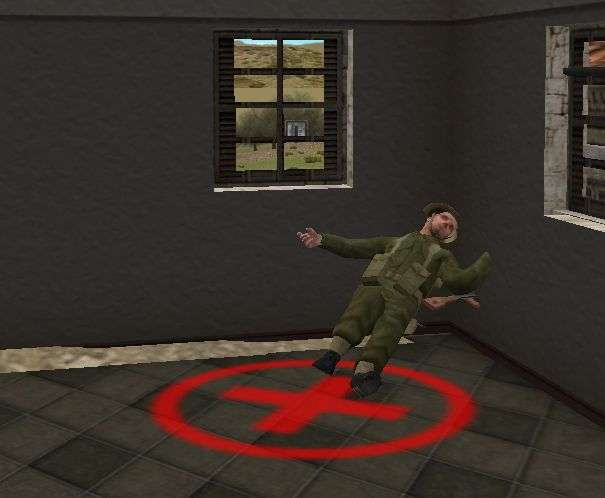
Unfortunately just as my men were having a quick celebration for clearing out the house a whiz of bullets flies through the window taking out my Bren gunner. At first all we have is some sound contact from the trees beyond the ridge.
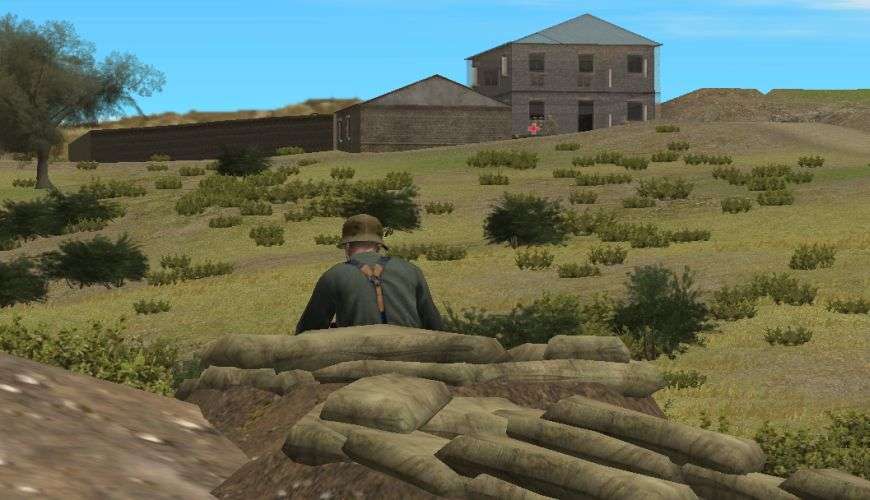
As the surviving team members take cover and collect themselves they spot a MG42 team well entrenched in foxholes and well placed on the other side of the ridge line. Tiresias put them in a great position to make any move I want to make over the ridge to flank the village difficult until they are neutralized. Thankfully for me I am in no rush to do that. For now I need to set up a perimeter.
-
Thanks Nik! I'm glad you are enjoying it.
 Penry and I get about 5 turns or so a week. I try to update the same day I do the turns but I've got a 6 week old who doesn't care about AARs. I need to teach her some.
I'm pretty sure this is just vanilla FI. I do have GL as well so it is possibly from the expansion but I don't think so.
-
Turn 3
At first I thought things were over and my men were momentarily safe. Then I heard that damned plane off in the distance. I was certainly nervous as it got closer and closer. Was this a strafing run or was there going to be another large explosion? Was I about to lose one of my tanks? I was most concerned about my Wolverine. I have 4 Shermans and while the loss of one would hurt, I have others. But the destruction of my single M10 would be hard to deal with.
I saw as the bomb fell from the sky. I breathed a momentary sigh of relief as I saw it heading for my Shermans instead of the Wolverine. I was elated when I watched the third bomb fall harmlessly between my two tanks. I think Hitler needs to check the eyesight of his fly boys.
Orders
That was all the excitement this minute. Other than that it was another 60 seconds of my men moving forward. 2 of the 3 platoons of Bravo Company have made it to some relative safety and will take a breather before moving out. The straggling platoon should join them next turn. I've also dispatched one of the Shermans that was acting as overwatch to move forward and set up for the next leg of my advance.
Near the village, my recon units and one of the platoons of Alpha Company continue to expand my perimeter on my side of the hill. I only want them moving a little more forward for now. They will have to wait on Bravo Company to do a lot more marching before I'm ready to try and push around that ridge line. In the mean time I just need to hold ground and stop Tiresias if he tries to go on the attack.

-
Turn 28
For the third minute artillery falls and my men die at the Farm. Penry really opened up on the objective. He almost got a lucky strike in as one shell fell far and near my R35 and my StuG. But luck is with me right now and this was only the beginning.
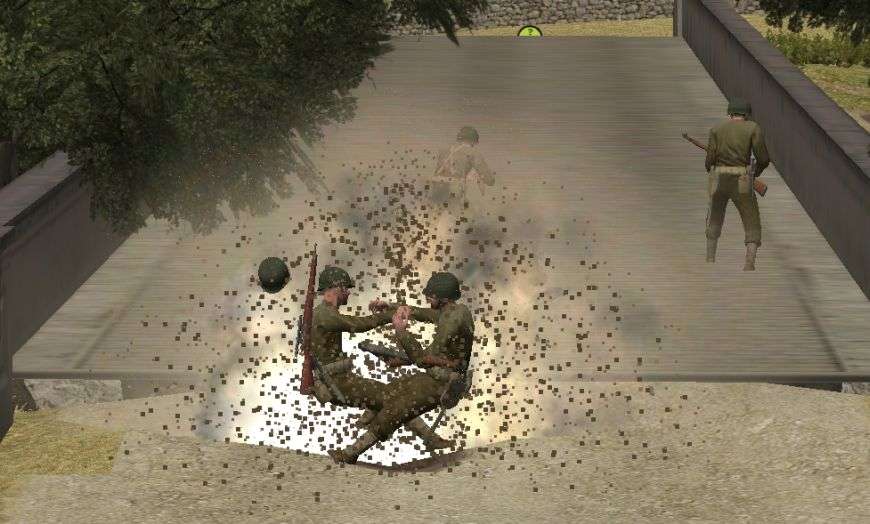
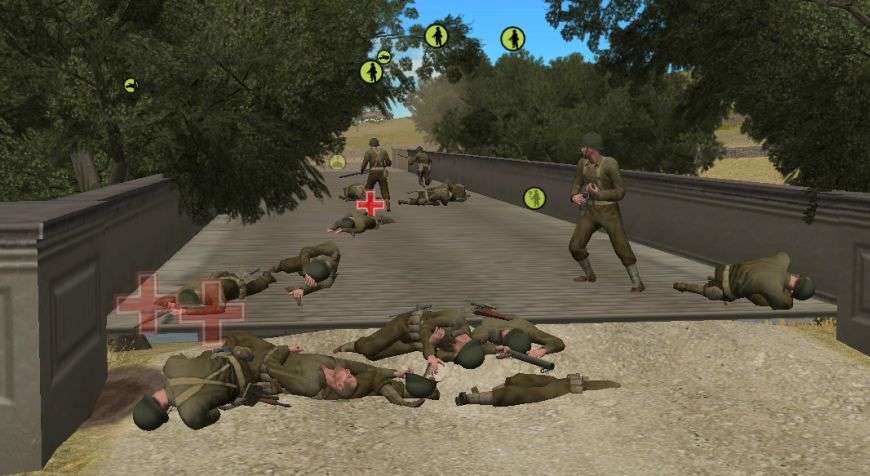
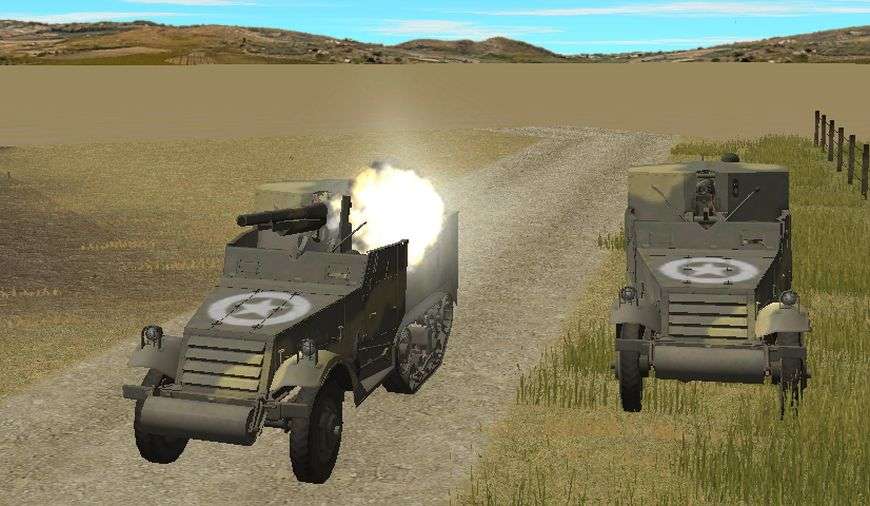
The arrival of the StuGs on the battlefield changed things significantly. The R35s were a nuisance for the most part. My assault guns are a threat as these Joes crossing the bridge found out. Until Penry can find a way to take out my StuGs he's going to find it very difficult to move his men around on the map.
My R35 up at BS started taking a beating from some .50 caliber MG fire and started to panic. He must have back into the sight of a GMC because something impacted my tank. But again luck is with me this turn and despite the penetration there were no casualties and minimal damage. The crew is panicked and backing into the woods as fast as they can. I'm going to let them collect themselves and then push them back into the fight. That tank is integral to my defense of BS.
The attention from the StuG and gunfire coming in from my infantry at BS proves to be too much for the Americans trying to cross the bridge. Having watched several of their comrades fall and not feeling like they have the support they need to advance the Americans break and retreat. This is the break I needed! Now I should have time to move the Germans forward into the Farm.
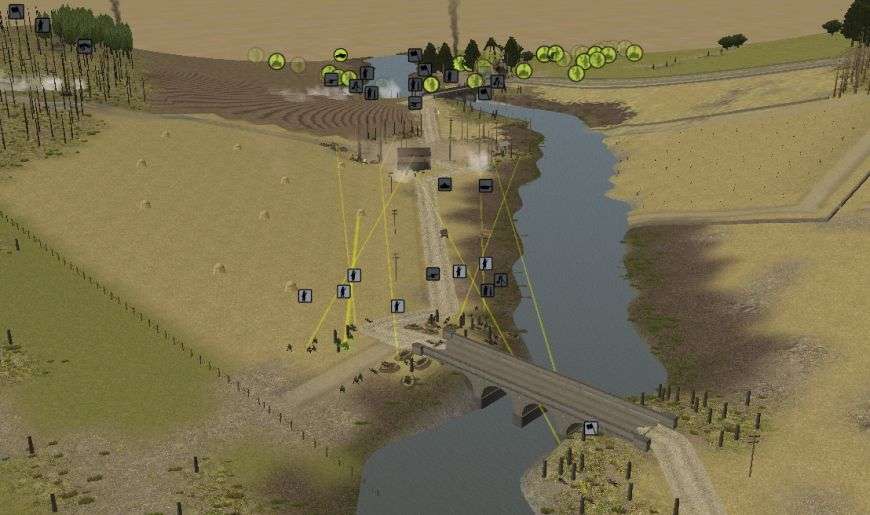
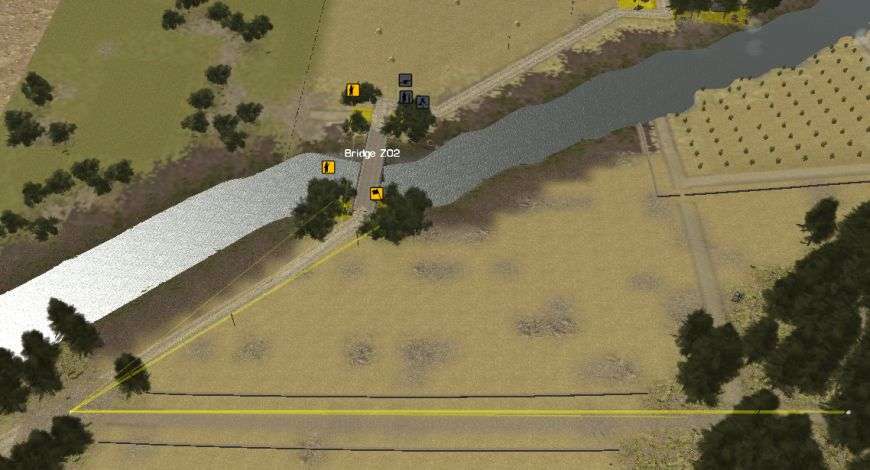
Orders
The Germans are over Bridge Z02 and moving towards the Farm. The artillery has stopped falling so it should be safe for them. With the American push halted for now they should be able to make it mostly unscathed. I've ordered them to rush into the foxholes left by their fallen Italian allies. From here I'll assess the situation and maybe push forward and try to retake Bridge Z01. That will be a few turns down the road though.
-
Turn 27
The Farm continues to get brutally pummeled with artillery. I don't even know the number of casualties but it's high. Basically every unit inside that zone is broken and useless... those who survived that is. But it's not only my men who are suffering, the farm itself cannot withstand the beating.
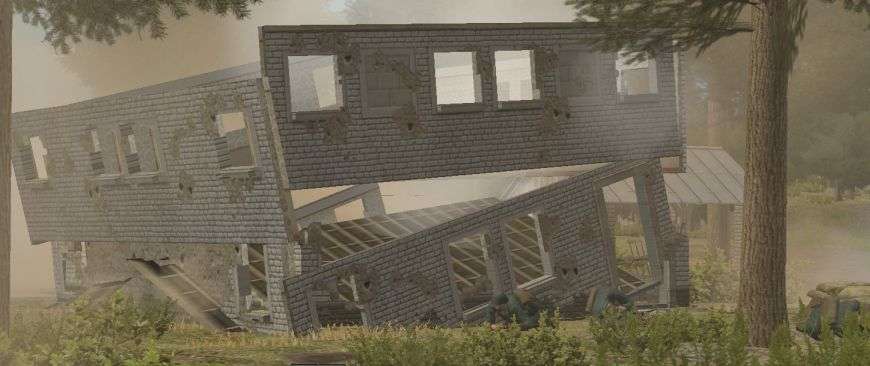
I caught glimpses of Yank infantry last turn. This turn... here they come! Penry is taking advantage of the units in the Farm being neutralized but trying to push his men over the bridge. Some of my infantry in the woods near BS is doing their best to slow the advance.
Orders
As you can see below the Americans are pushing forward towards the Farm. However my Germans are on the move too. If I can hold the Yanks off for a couple minutes I should be able to bolster the defenses and hold the objective.
-
I've never really set house rules before a PBEM. I never been in a circumstance where I felt it was necessary. Even this bombardment doesn't change that. We also didn't say anything about purchases so for all I know there's a platoon of Tigers waiting for me over the hill. Part of the game, part of the war.
Tiresias actually hasn't done this before. He said he was trying some different stuff this time. The CAS and the 1st turn arty was a bit of a gambit. Honestly the bombardment didn't do a lot of harm but that could be because I was anticipating it. Those are shells that he possibly could use later in the battle to cause some hurt. The CAS has proven a bad purchase since so far it's only caused one infantry casualty. Of course if those bombs had hit it would be a totally different story.
-
Turn 1
The battle begins with the screeching of incoming artillery and the unmistakable sound of the Luftwaffe overhead. Not how I wanted to start things off.
During setup I had some concern over a first turn artillery strike so I had spread my men out some. I'm thankful I had the forethought to at least do that. It may have saved some lives but there have been some casualties this first round. The worst was among my mortar teams. Thankfully none have been eliminated but there have been losses.
Suddenly the scream of a diving plane drowned out the artillery falling. I winced in anticipation of the explosion. It was a big one! God was on my side though. Despite impacting only a couple meters from my Wolverine there was no damage. I would have been very upset if I'd lost my only M10 in this battle. I don't know what kind of armor Tiresias has and I'm not sold that the Shermans would be enough.
My biggest concern was over Bravo company. They have to cover a lot of open ground and a well positioned tank or gun could really wreck havoc on my infantry. At the end of the first minute there hasn't been a single shot fired their way.
Turn 2
When setting up my mortars I intentionally put this one team in a different location just in case Tiresias called in a barrage like the one we're facing now. It was a great idea in theory but in practice... fail. This barrage is basically impacting the entirety of my setup area and no one is safe.
The Luftwaffe pilot comes around for another run, this time targeting one of my Shermans. Again it's a near miss that does not take out my armor. I'm feeling extremely fortunate and lucky that I didn't lose a tank to that plane... yet. I'm not sure if there are any more bombs or if it will come around and strafe. My Shermans might be able to take a strafing run but the Wolverine would be done for.

Orders
Bravo company continues on over the open ground. I'll continue to push them until they can get behind some terrain to catch their breaths. The first platoon of Alpha company is moving along the river scouting ahead to ensure things are clear for my armor. I'm also continuing to move my recon forces along the hill and into position in case Tiresias tries anything cute.
-
Turn 26
Germany to the rescue! Some of Hitler's finest finally show up knowing we could use the assistance. A platoon of infantry and two StuG III should do a lot to help keep the Americans out of the Farm and away from the barns.
The infantry is being sent up to BN along with one of the StuGs. I'm going to use these newly arrived Germans to try a rush down the hill. Where a single Italian infantry unit failed I'm thinking a platoon of infantry supported by a StuG will succeed. The other StuG is being sent towards the Farm to shore up the defenses there.
Orders
Everything is going badly at the Farm. The entire area is covered in a haze of smoke and dust and the artillery keeps falling. My infantry there have suffered serious casualties. The gun is knocked out and one of the mortars is soon to follow. I've changed course for the German infantry and they're being dispatched across Bridge Z02 and into the Farm. I'm already seeing some American infantry creeping forward waiting for the barrage to end. Without some infantry there to fight them off I could possibly lose the Farm.

-
Sorry for the delay all. I've got a newborn in the house who is making timely AAR updates a bit of a challenge.
Turn 24
While there is still little movement on the American side of the battlefield my R35 does spot some infantry running around and sends a HE round their way. It's not a big explosion but when it's basically a direct hit on a Joe that doesn't matter.
And finally my mortar barrage begins. The first few impacts seem to be landing a bit short but there is still plenty of HE goodness to fall. I'm hopeful that this barrage catches a bunch of Penry's men in the area. The delay to whatever he's planning would be beneficial to my cause.
Turn 25
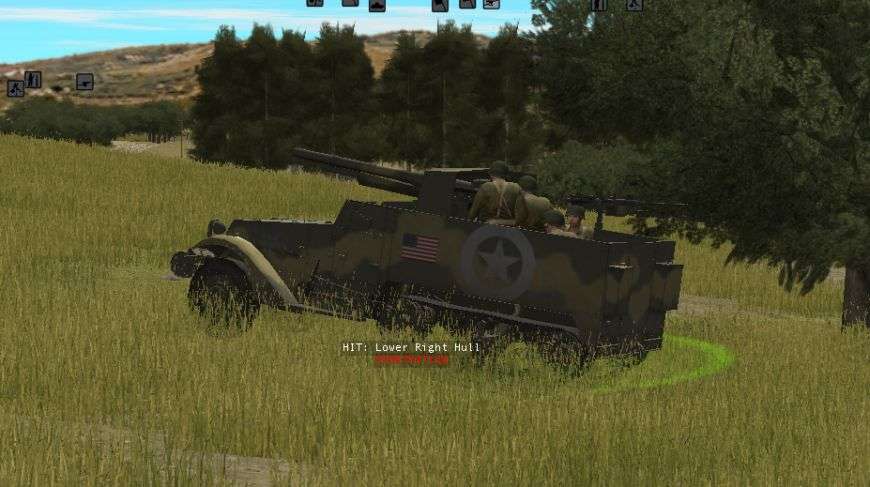
Reports of the destruction of the M3 GMC were highly exaggerated. As my Breda MG pumped some bullets into the GMC trying to knock it out for good the halftrack started moving forward. I was definitely surprised to see it moving. I was happy to see at least one American taken out of the fight.
I got a little big more luck out of this little encounter. The GMC drove forward just enough to enter the line of sight of my R35. And what's this... he used an AP round! The round impacted the halftrack but didn't knock it out. Probably because it went through both sides of the rear area. The AP was followed up by a HE round that didn't seem to do much damage. I cannot imagine the halftrack can take much more punishment and knocking it out would be huge for me. That 75mm gun definitely is a concern of mine.
I cannot judge how well my barrage did but I think it went pretty well. Not only were there impacts around the buildings I was targeting but the woods around Bridge Z01 as well. If Perny had any men in there they would have taken some casualties.
As my barrage ended the American barrage began. Penry must have a good spotter because they are dropping the artillery right on target at the Farm. The first two shells imact around my 47mm gun and my mortars. Thankfully there's no harm done but this is only the beginning. I have a feeling this is going to hurt... a lot.
Orders
I'm pulling the R35 at the Farm back while the American artillery strike occurs. It's probably too late to pull anyone else out from the Farm so I'm hoping they hunker down and ride it out as best as they can.
-
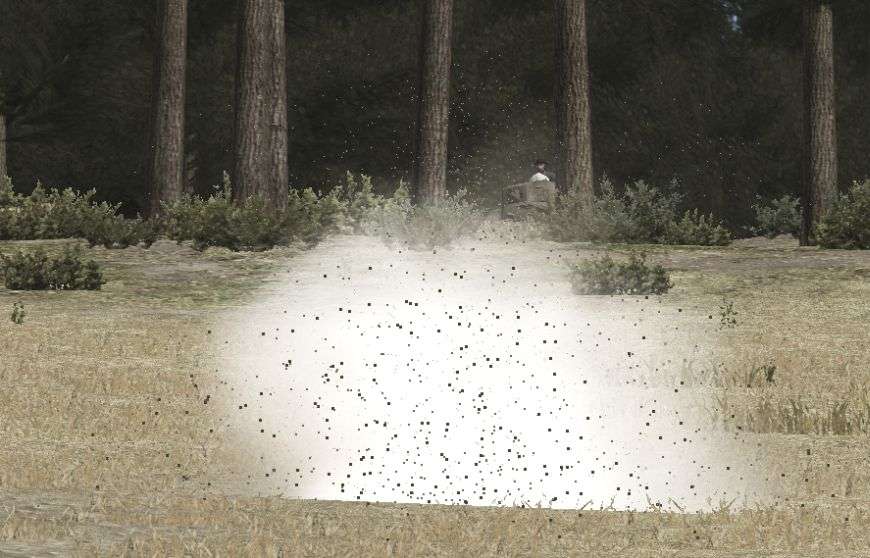
Here's a picture showing where all the mortars struck. We're talking at a range of about 195 meters. I suppose once they have it dialed in it wouldn't be too hard to just keep lobbing mortars at the same spot but I'm far from an expert on these kinds of things.
-
Turn 22
The action in this battle has definitely been going in waves. Some minutes are hot, some are cold. This was a cold minute. The only real thing of note that happened was another spotting round fell in the plowed field near the bridge. I'm still unsure if it's mine falling short or Penry's.
As the turn ends I'm able to capture another round falling. So now I'm left wondering, is this American or Italian/German?
I also did not something peculiar as I was telling my men to keep doing what they've been doing... this GMC isn't manned! This is the vehicle that got shot up in turn 20. Is it possible I did more damage than I thought? Maybe the crew panicked and abandoned the halftrack. Guess I'll find out.
Turn 23
The spotting rounds that have been falling are definitely American. I actually think that Penry has two different mortar missions called in right now, one on BS and one on the farm. Two rounds land in front of each respective location as the turn plays out. The one near the farm unfortunately caused a couple more casualties. Penry is slowly chipping away at my men and if my reinforcements don't show up soon I may end up losing something.
Orders
I've ordered my men in BS to pull back closer to the barn. I'm hoping to avoid the brunt of his barrage there. The guys in the farm don't really have anywhere to fall back to so I'm just going to pray very, very hard for their well being in the coming turns.
-
BigDork,
Does CMFI have the somewhat defanging direct fire mortar tweak in it that tones down the otherwise fearsome accuracy? Seems to me either Penry's mortars are way too accurate, your foxholes are too close together, or both. Console yourself with the knowledge treebursts would be even worse!
I do think it might be worthwhile notifying Phil or someone else about what looks to be an ammo selection glitch for the R35. If HE doesn't work, then the AI should switch forthwith to AP. Otherwise, your already delicate R35s are likely to be massacred when facing anything with a cannon, even when they hit first!
Regards,
John Kettler
Both are probably something that should be looked at honestly. It was mortar after mortar landing basically in the same location. I also definitely agree that the R35's use of HE against halftracks needs to be looked at. It's frustrating as a player to see the same results happening over and over when an AP round would have done the job far better.
Edit: I was going to go back in and do a bunch of screenshots on the mortars landing in turn 20 but I have H2HH set to Tidy and so it deleted that save. Fingers crossed Penry still has it.
Edit 2: Penry had the file! I'm on my way to bed but tomorrow I'll take a bunch of screenshots of the mortars impacting and we can have a good discussion about if it is too accurate. My vote is yes but I'm kind of biased as it's my guys getting blasted.
-
Turn 21
Turn 21 turns out to be very explosive. Unfortunately most of the explosions are happening on or near my men.
One of the Yank M3 GMCs takes aim at my infantry near Barn South. Those 75mm HE rounds pack quite the wallop and my men pay the price for it. By the end of the turn this infantry group is reduced to only a few broken men.
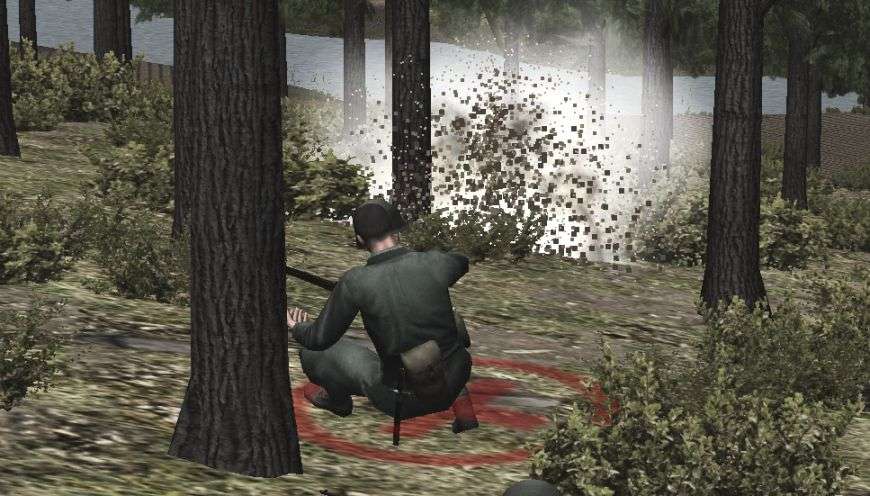
At the Farm, Penry's mortar crew continues to rain down 60mm pain. Instead of firing on one of my infantry groups though the Americans started targeting the commander. If it's any solace to the family, he didn't feel a thing.
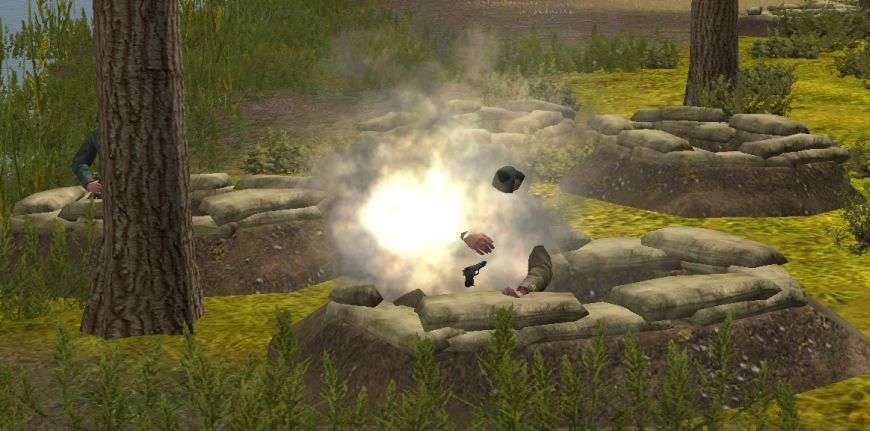
I almost have my chance for a big explosion but it wasn't to be. My luck in this battle has really changed. Penry definitely has the momentum at the moment. If this HE round had not soared just a bit high it would have been a bad day for Penry.
And just as the minute was ending there was the scream of an incoming round followed by an explosion near Bridge Z01. I'm unsure if it's one of my spotting round or a badly aimed spotting round of Penry's. Time will tell.

Orders
Caffè break! Wait, the American's don't stop for cappuccino? Alright then, neither will we. We hold the line and wait for reinforcements.
-
Turn 19
The minute passes with little action happening. The expected attack on Barn North never materializes. Penry's halftracks sit in the same position, prepared to roll out but not. What could he possibly be waiting for?
Orders
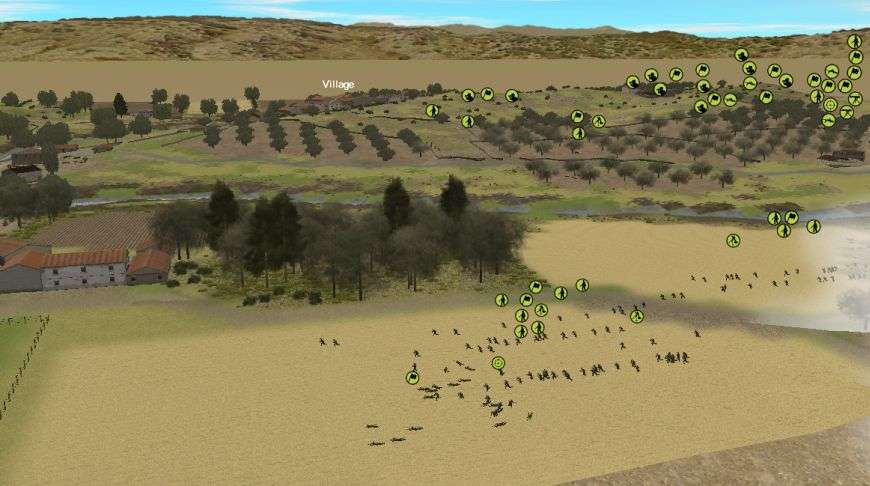
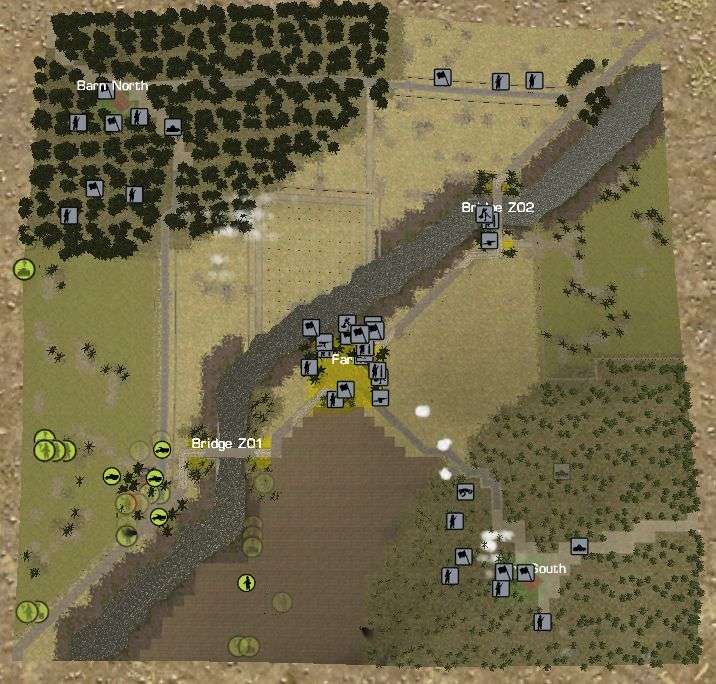
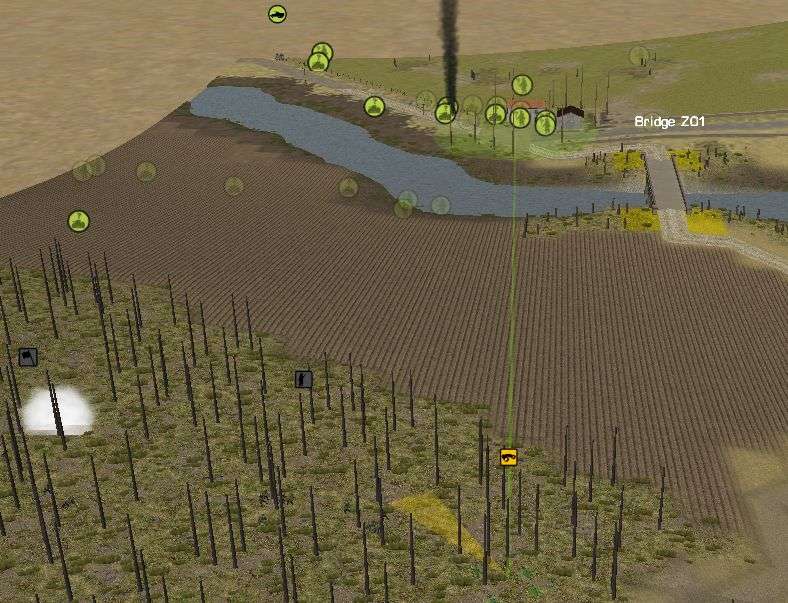
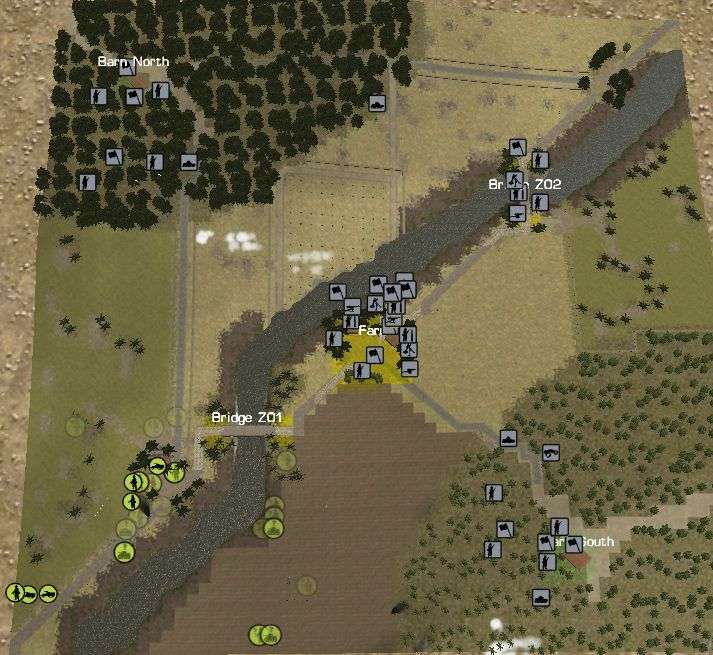
Here's the overview of the battlefield. As you can see the smoke in front of BN is drifting off so whatever Penry hoped to gain from that is lost. The smoke near BS that would have obscured the infantry that made it in is likewise dissipating.
At the top of the map you can see my infantry that is relocating to BN from Bridge Z02. I'm thankful for Perny's delay because it gives my men extra time to get into position. They are going to be tired from the run up the hill so any extra time I can get to help them recover will be beneficial.
I've ordered my R35 near BS to hunt forward into the trees looking for American halftracks. I've not had great success against the halftracks with my tanks but in theory a R35 should be quite the menace.
Turn 20
1/3 of the battle is gone without much gain for the Americans to show. Penry did have a decent minute. He caused some pain and had a lot of luck.
The mortar unit I attempted to assault a while back came into play this turn. They started raining direct fire HE on one of my infantry teams at the Farm. With horrifying accuracy the landed round after round amongst my men. By the end of the turn my group was down to four broken men.

Two of Penry's halftracks come under attack by my forces but both survive unscathed. At the beginning of the turn one of my Breda MGs opens up on the M3 GMC but causes no casualties or noticeable damage to the halftrack. Near the end of the turn my hunting R35 spots one of the halftracks sitting near Bridge Z01. My tank scores a direct hit but again the TC uses a high explosive round which proves ineffective.

Orders
For the next turn I'm going to continue to have my R35 harass the Americans. If I can delay them another turn or two my barrage should catch them in the danger zone.
-
SETUP
I've taken command of some brave Canadian lads who's job over the next hour is to assault a German held village. Once again my frequent foeTiresias will be commanding the Germans.
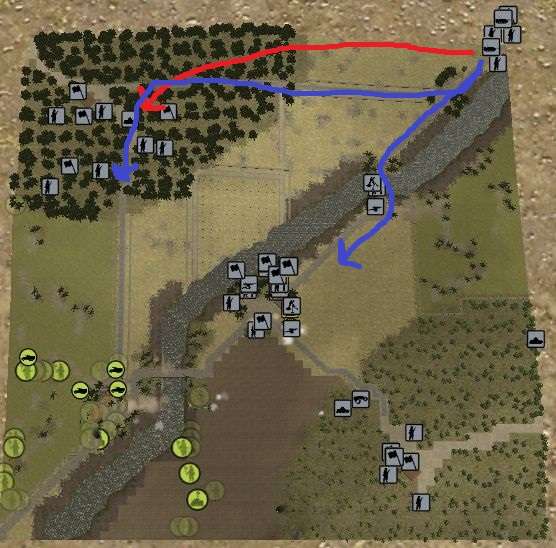
This map is great and challenging. Separating the setup zone and the village is a large hill covered with orchard. If I was to just charge straight at the village I am pretty sure I would suffer horrible losses. So I've had to figure out another approach.
The plan is to break my forces up into three parts. One company (purple) will swing wide using the land to keep hidden from the village and attack it from the left. This force will lend support to my main force and hopefully provide some distraction and force Tiresias to split his men some. Another company (orange) will follow the road from the setup zone and push in from the bottom. My armor will be close behind in support of this main push. The red force is a recon platoon that has been charged with holding our side of the hill. If I've learned anything from my previous battles with Tiresias it is that he's not afraid to go on the attack while playing defense. I need them to keep my mortars (green) safe so they can be available to rain HE down on whatever the Germans have waiting for me.
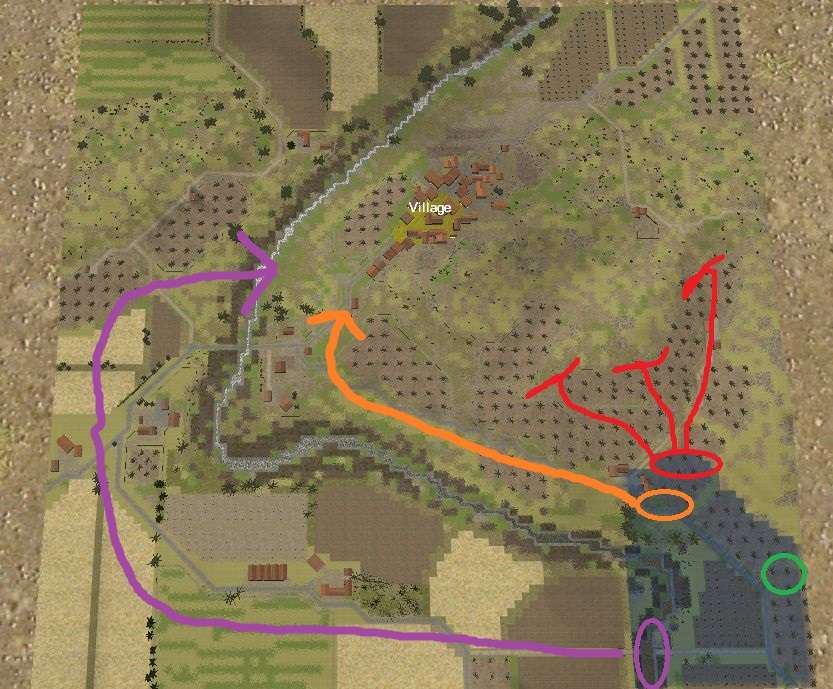
The link below is a video I made of the battlefield. The first pass shows the route Bravo Company will take. The second pass is Alpha Company and the final pass shows where the recon platoon will be heading. If anyone wishes to check it out closer it's map 044 in CMFI.
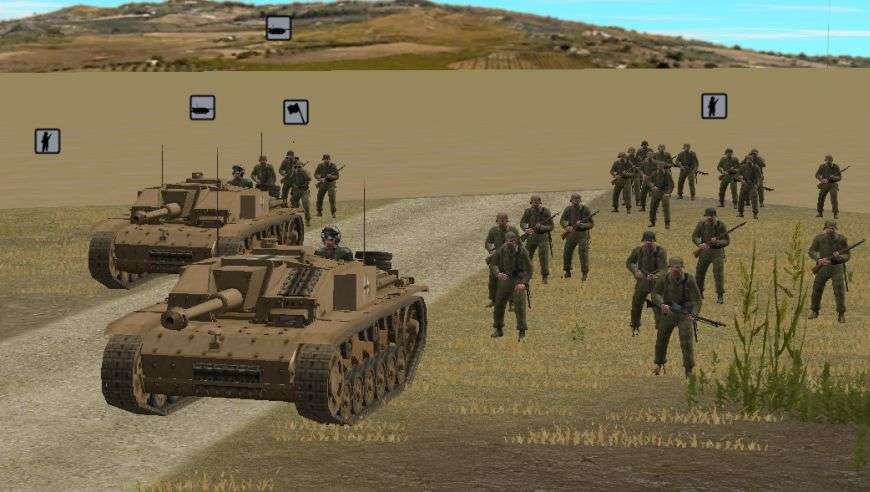
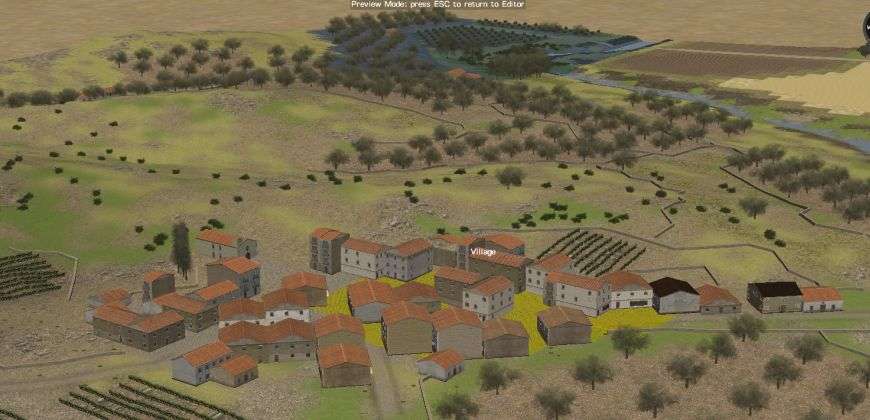
Here's a view of the village I'm tasked with taking. The close in buildings are going to be difficult to take. My tanks and their high HE loads are going to be key in flushing out the Germans.
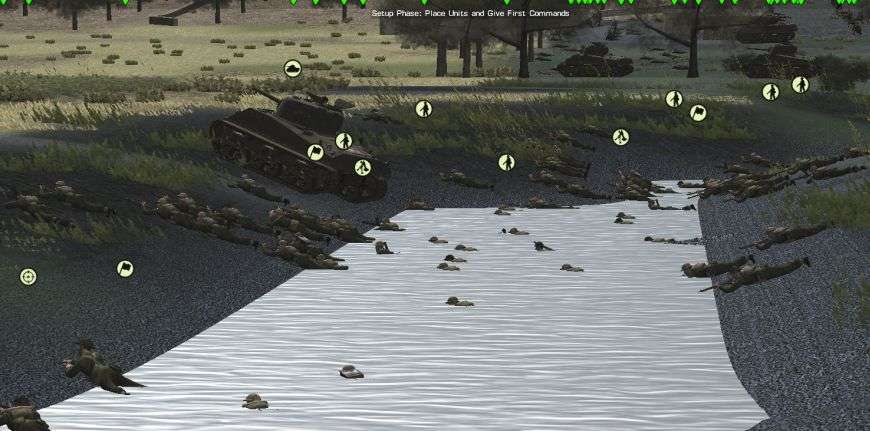
My force is a reduced infantry battalion with 2 companies, a pioneer section, mortar section, and MG section. I also have a recon platoon I've added for more infantry support. Backing them up is four Sherman V tanks and a M10 Wolverine.
Here's a look at the spaghetti that is my turn one orders. I have a lot of men scattering everywhere. I do have a slight fear of a turn one barrage aimed at the front of my setup zone. If he does do that this will be a quick battle.
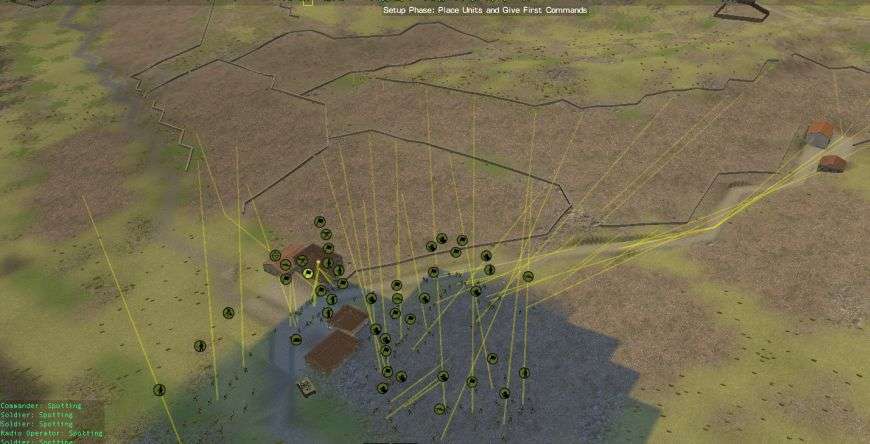
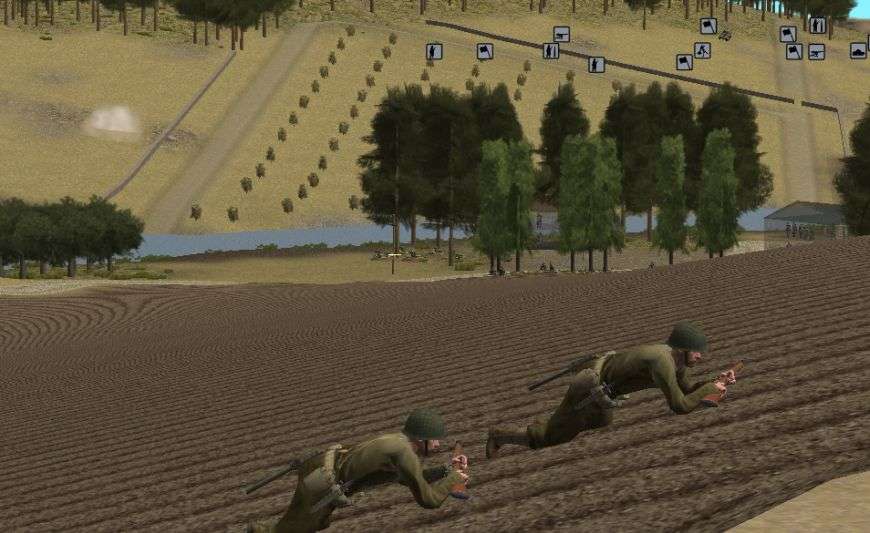
And here's Bravo Company laying in wait for the order to charge forward.
-
Once again my armies are about to go to battle against Tiresias. I've done my setup and the battle is soon to begin.
-
Turn 18
I definitely made the right decision in moving that extra infantry into BN. The Americans are a-comin'. It wasn't a full on rush but I spotted several halftracks and infantry maneuvering themselves in prep for the rush up the hill. I'm pretty sure it's going to be next turn and there's not a whole lot I can do to stop them.
My Breda team in the farm spots another infantry unit trying to sneak their way up to BS. However unlike the one squad that made it up these guys aren't as close to the edge of the map and have less terrain to hide behind. Unfortunate for them.
Orders
I have one more R35 at BS I'm going to try and move so it can provide some cover for BN. It's unlikely to make it in time though. He's deep in the woods at the moment and way out of position. About all I can really do right now is push that infantry from the bridge into BN as fast as possible and prepare to slog it out in the woods.
-
Turn 17 Orders
My FO is in place and calling in a 81mm mortar strike where some of the Americans have gathered up. It's a 6 minute wait though and I'm not sure they'll still be there by then. If I have to I can shift the fire if Penry starts going on the attack.
I have this bad feeling BN is soon to be attacked. The smoke is starting to get thick and with those halftracks now on the battlefield to suppress my men it makes sense. I've decided to relocate the infantry squad from Bridge Z02 to BN. They aren't doing much good so far back in the battlefield and the extra firepower could really make the difference when the Americans attack. They will be using the terrain and a stone wall to hopefully stay out danger as they make their way up the hill towards the barn.
-
Turn 17
Well this was a painful minute though it could have been far worse.
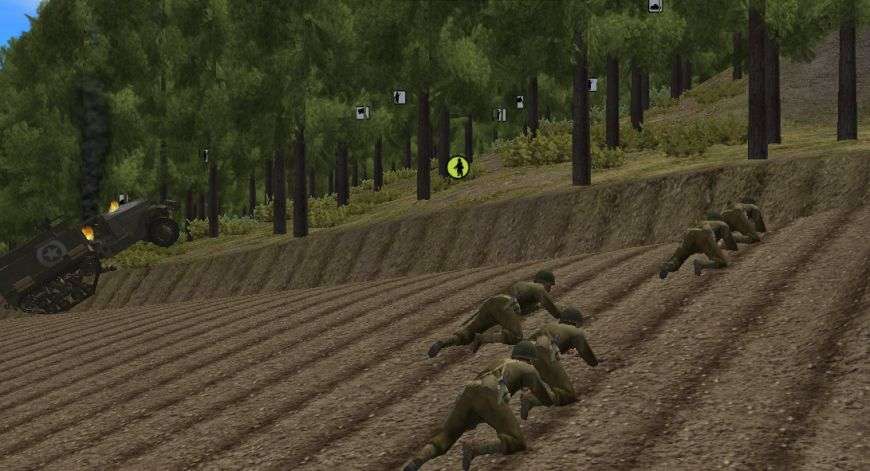
The American halftracks started proving their worth to Penry. I had foreseen the danger to my commander-less tank last turn and tried to get him out of the line of fire. Unfortunately the driver didn't get out of there fast enough.
Over at BS my R35 is only slightly luckier. It suffers two hits but the tough little bugger keeps running. Unfortunately the optics are completely destroyed. Considering these tanks aren't all that great at spotting already, I'm considering this tank a loss. I'm going to order it to reverse deep into the woods where it should be safe. No sense in Penry getting free points.
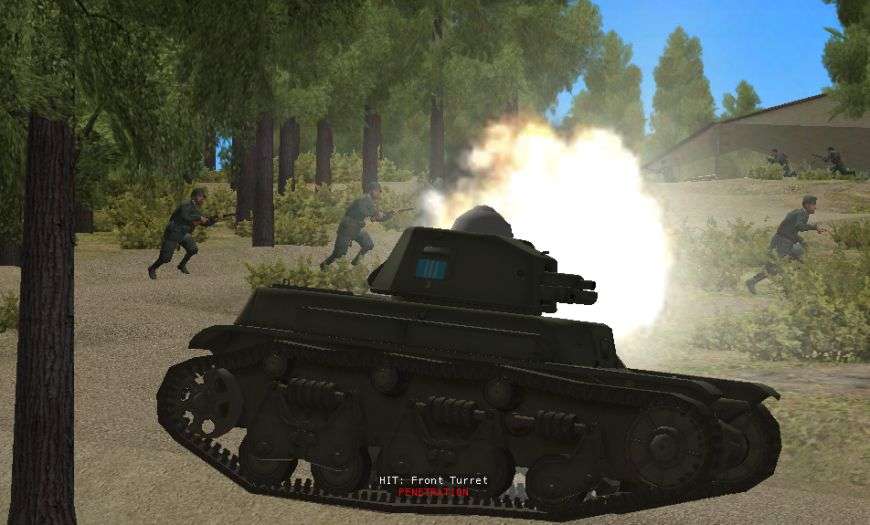
The infantry right behind the tank is my FO coming into position. The infantry further back is my infantry team repositioning to the other side of the barn
My other R35 can be seen being knocked out in the background
Talk about a lucky smoke round! One of my men in the woods near BS just happened to be in the wrong spot at the wrong time. I hate casualties like that... it's such a waste of a life. He could at least have been laying down some fire on the Yanks or something.
-
There's no point. The "damage" isn't to the tank itself, it's to the commander. The commander does everything in that tank except drive it, and the driver can't/won't switch positions to perform firing tasks. The only reason BD left it where it in position was to draw fire from ineffective platforms, as it seemed to be doing. As soon as effective weapon systems can bring it under fire, it's just free points for Penry. I'm sure BD won't neglect its potential for disinformation if the situation becomes fluid enough for the toothless one to pretend to be effective in order to cause confustion at some later date.
Exactly womble. Without the TC it's just a glorified paperweight. After the first couple turns it wasn't even drawing any fire from Penry, just sitting around looking menacing. I would have loved the chance to drive it around out of sight and let Penry guess if it was an operational tank or the useless one but that's not going to happen as you'll find out in my next update.
 BigDork,
I thought your R35 got halftrack kills before with HE? Why would it suddenly become the wrong choice? I'd think AP would be likely to go clear through the halftrack, hurting only people and components more or less in the direct path. Bad "die roll" under the hood, perhaps, for this latest hit?
Is there a place you can put your damaged R35 so as to catch the American infantry coming out of your side of the smokescreen, yet not be under the guns of the halftracks?
Regards,
John Kettler
From the way it looked, my HE hit the gun shield or the armor protecting the driver. Since the blast from a 37mm round isn't that big it just left a scorch mark. Back on turn 11 I hit a halftrack with HE and didn't knock it out either. MGs have proven far more useful and efficient. Considering the shot that hit the halftrack last turn was coming straight on, an AP round would have run through the length of the vehicle probably destroying it and causing some pain. Oh well. I'll find another way to get rid of it.
-
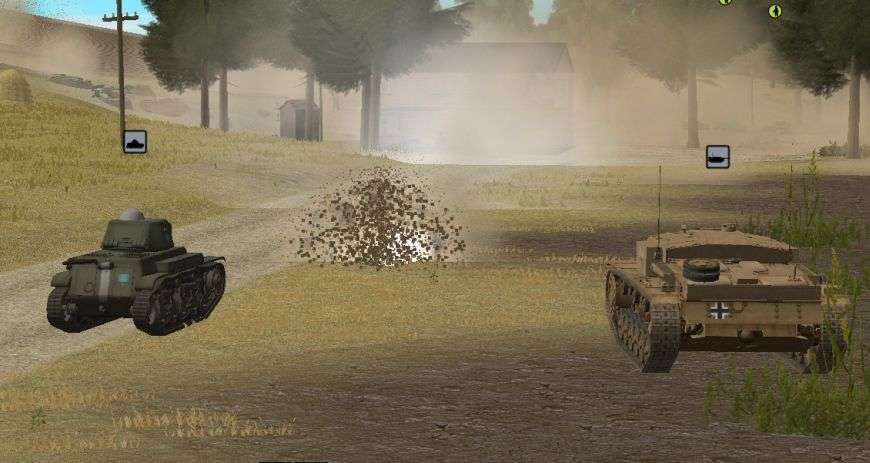
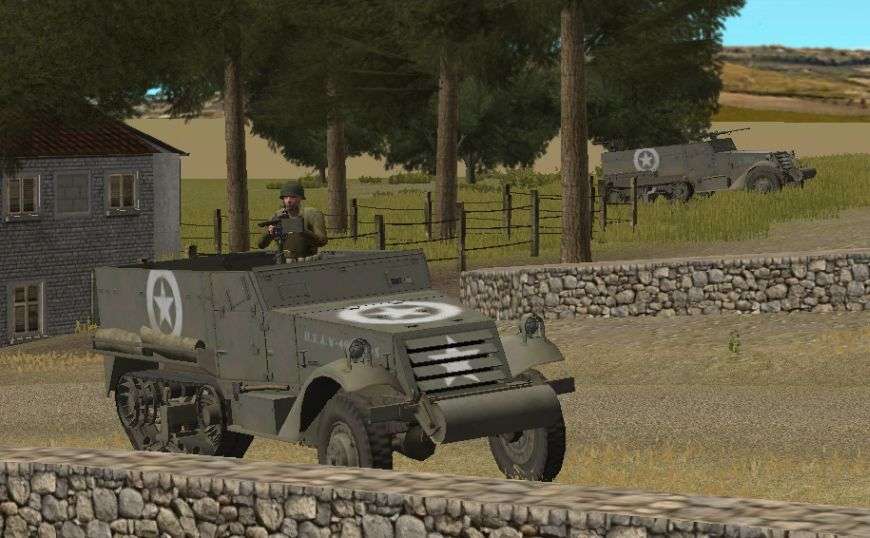
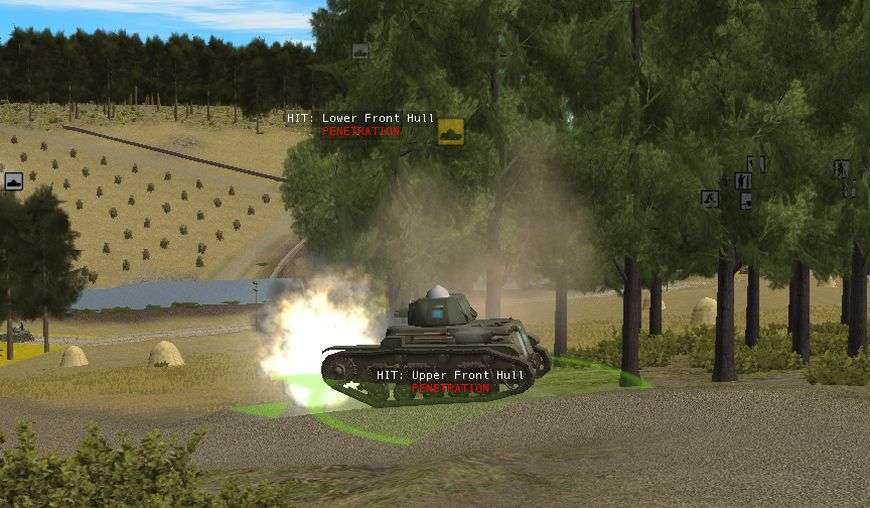
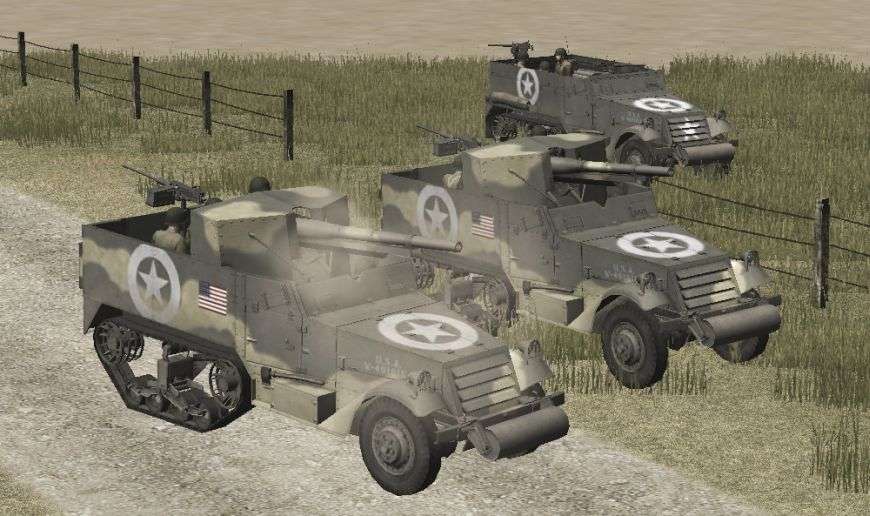
Turn 16
Here comes the cavalry! Instead of the thunderous charge of horses though it's three halftracks. It would appear that Penry has some help. I'm definitely concerned about the halftracks with the 75mm guns. Suddenly my R35s are in some serious danger. Also the HE from those guns can cause some serious problems for my infantry.
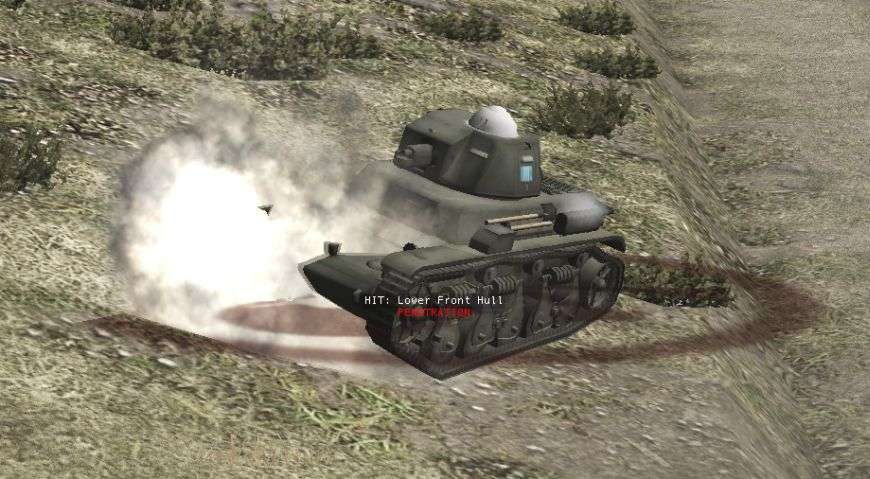
To their credit my R35 crew near BN doesn't panic. They know they have the drop on the newly arrived Yank vehicles and that while the gun is a threat the halftracks themselves aren't well armored. Unfortunately the commander decides to use a HE shell instead of AP. Despite the direct hit there's no noticeable damage. Very disappointing. Later in the turn I do manage to cause one casualty from my MG before the halftrack drives out of sight of my tank.
Orders
I order my crippled R35 near BN to reverse out of sight. There is nothing he can do in this battle anymore and with the arrival of the halftracks it's time to retreat. I'm leaving my other R35 where it is for now. He's still in an excellent position to fire on the Americans. Until Penry gives me a good reason to retreat I'm not going to.
Of more concern is the smoke screen Penry is laying down in the woods near BS. That smoke is going to make it even more difficult for me to spot the infantry he's managed to move in. I've decided to reposition one of my infantry teams from near the barn over to the left where they can hopefully prevent the Americans from getting in behind my men.

-
Turn 15
The Americans have definitely infiltrated the woods near BS. Throughout the 15th minute of battle I watched as a full squad of American infantry slowly crawled their way into the woods. Despite my machine gun team's best efforts they only manage to cause one casualty. The entire squad isn't in the woods yet but the majority is. While 8 to 10 GIs won't be able to take BS by themselves they can cause some problems. Also they just proved to Penry that he can somewhat safely move men forward. It's slow going but it worked.
Another interesting development occurs this turn. Another spotting round lands in front of the woods near BN. At first I thought it was just another mortar round but then it started smoking. Ah-ha! Penry is planning on laying down a smokescreen in front of BN. It looks like things may be getting exciting again very soon.
I'm actually kind of confused and slightly worried by the smokescreen. Why is Penry putting smoke near BN but moving infantry towards BS? He should be focusing his efforts on one location or the other. If he's splitting his forces I can weather this rather well. Of course as of right now I've only spotted a single squad making its way towards BS and I have no clue what he has laying in wait for the smoke to form. So for all I know I am about to get overran.
Orders
I have tweaked the covered arcs for my infantry in the woods of BS in reaction to the enemy that are approaching. I'm not really sure what can be done about the approach the infantry took to get to BS. And the more I think about it the more I may not do anything. Penry cannot quickly move men up through that field and if he wants to spend long minutes slowly crawling his troops into the woods where they will take several more minutes to recover from that crawl I'm going to let him. Those are minutes and turns he's not attacking me.
I'm not reacting to the smoke just yet. I want to give it another turn or two and see how he's going to move his men in reaction to the smokescreen.
-
Turn 14
INCOMING!!! Well, not yet but soon. The first spotting round from the anticipated barrage lands in the open between BN and the Farm. I actually hate where this landed because it leaves me guessing which location Penry is aiming for. I'm putting all my lira on the Farm being the target. It makes the most sense if he wants to have freedom of movement to hit either barn.
As the turn is just about to finish up my Breda spots a couple Americans sneaking through the plowed field towards BS. My men get a shot off but it misses. Unless my gunner turns into a dead shot from 200 meters away I have a feeling I'm about to have some Yanks making trouble in the woods. Unfortunately for them I have some infantry laying in wait.
Orders
My FO continues to make his way through the woods towards BS. Since I don't know for sure the artillery is coming for the Farm I'm holding off for another turn before I decide if I want to pull some men out temporarily or not.
-
BigDork,
Your turn 13 pic confused me until I read the text. At first blush, I thought I was looking a a jeep or something hit by HE, with its front heaved momentarily skyward (a fate my jeeps have had before), but it turns out to be a man. Wasn't expecting that. Recent lumps aside, I think you're doing very well against Penry and have hurt him badly.
Regards,
John Kettler
Yep, that was direct hit on some poor Joe. At least he didn't feel a thing.
I think I'm doing very well too. This is Penry's first time attacking against another human and I think this is a difficult map to do it on. He's shown a few moments that have me worried though. His reinforcements could change things up a lot.
Our next battle is on the same map with me attacking and I have a feeling it'll be me desperately trying to figure out a way to get my attack started.
 Penry and I get about 5 turns or so a week. I try to update the same day I do the turns but I've got a 6 week old who doesn't care about AARs. I need to teach her some.

Canadians Attack! - BigDork vs Tiresias AAR
in Combat Mission Fortress Italy
Posted
Don't miss turn 4 on the bottom of the last page!
Turn 5
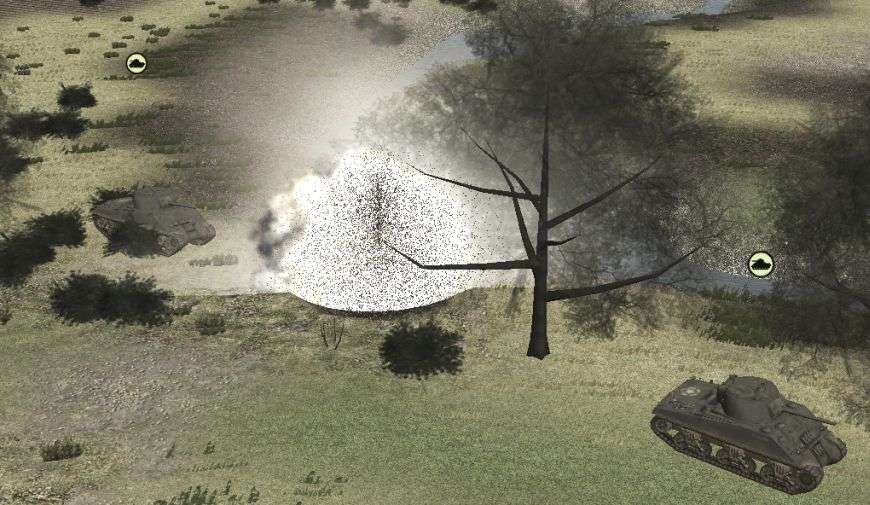
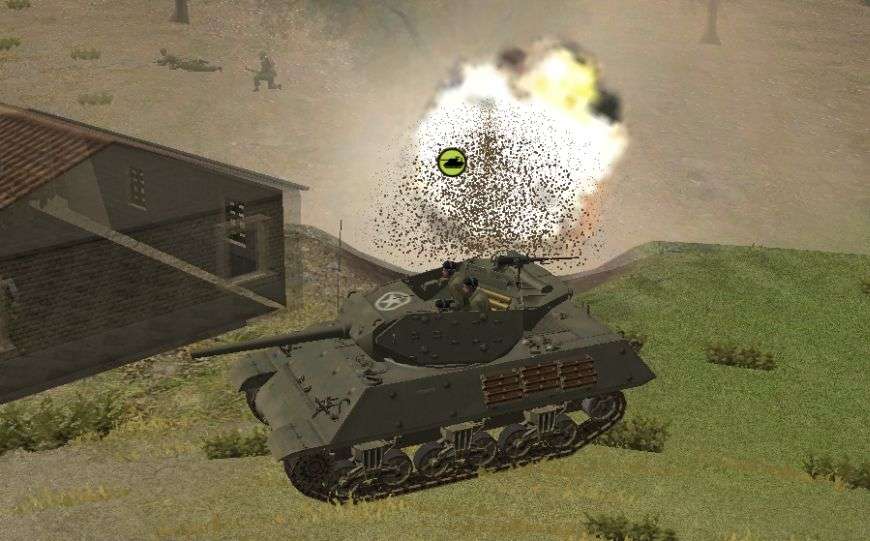
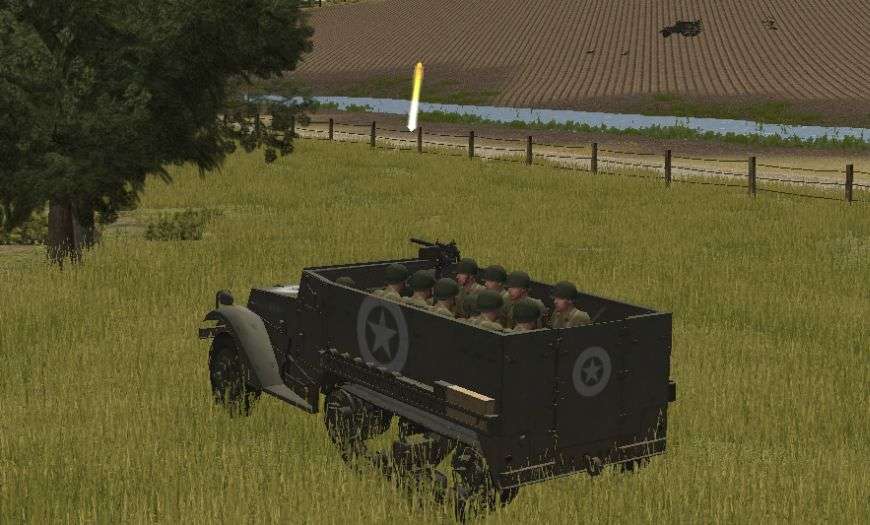
As the 4th minute ended the unmistakeable sound of a Luftwaffe plane in a dive could be heard. The suspense of knowing what would happen next is one of the awesome things of this game. Thankfully for me, what happened next was much like the other 3 bombs to be dropped. The German bomb landed near my tanks but not on them. This last one impacting in almost the same location as the one before it. The Nazis are 0 for 4 on bombing my tanks. Maybe they should invest some research in GBUs.
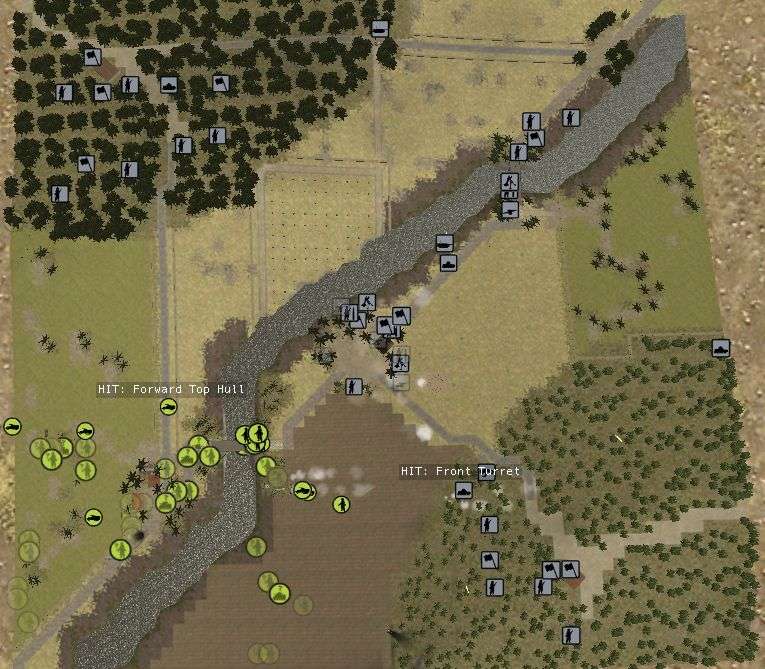
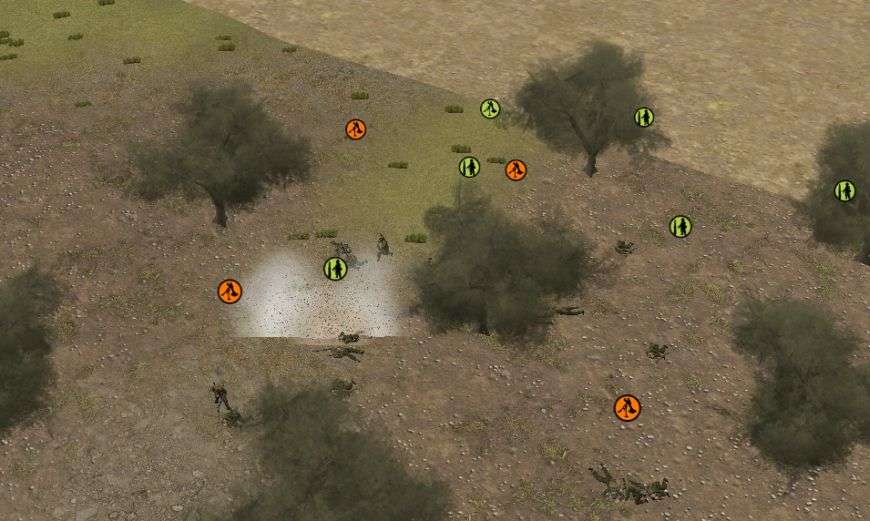
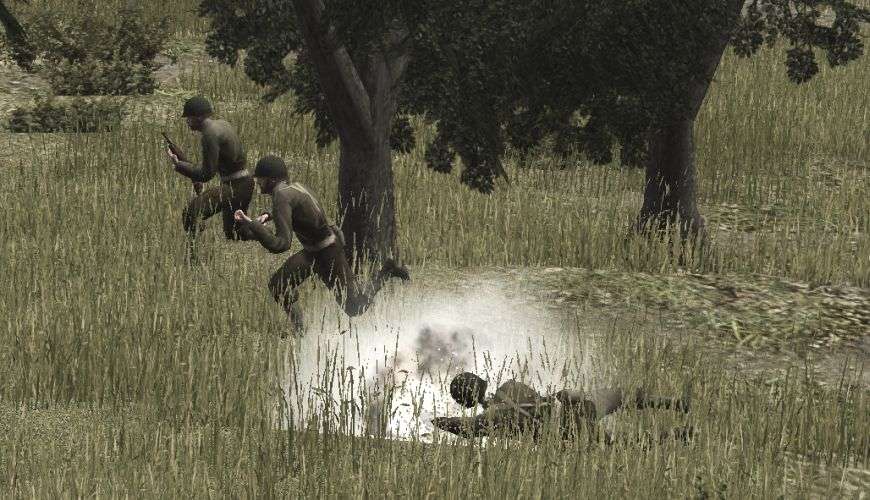
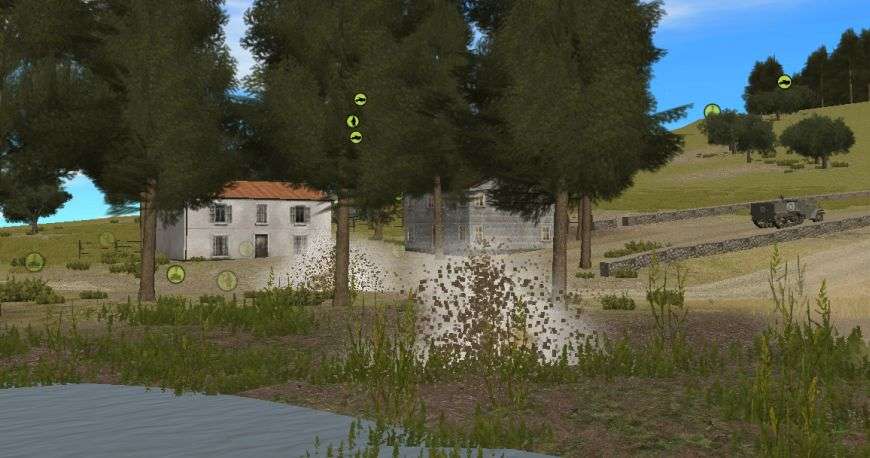
As the minute goes on there are two explosions that have me slightly concerned and curious. The first happens near Bravo Company. I spot a larger sized explosion in the woods near where my men are taking a break. Thankfully for me I opted to hide them on the other side of the hill and not in the trees themselves. This seems to be too quick to be from a spotting round unless Tiresias judged what I was doing on round one and called in arty then. My guess is it is either a field gun or a assault gun of some sort. I'll have to be cautious. That size of HE could cause some pain.
Another explosion happened in front of the lead elements of Alpha Company near the village. Again I don't know if this is a spotting round or something shooting at me. Since I'm not pushing forward here yet I have time to suss out what is going on and deal with it accordingly.
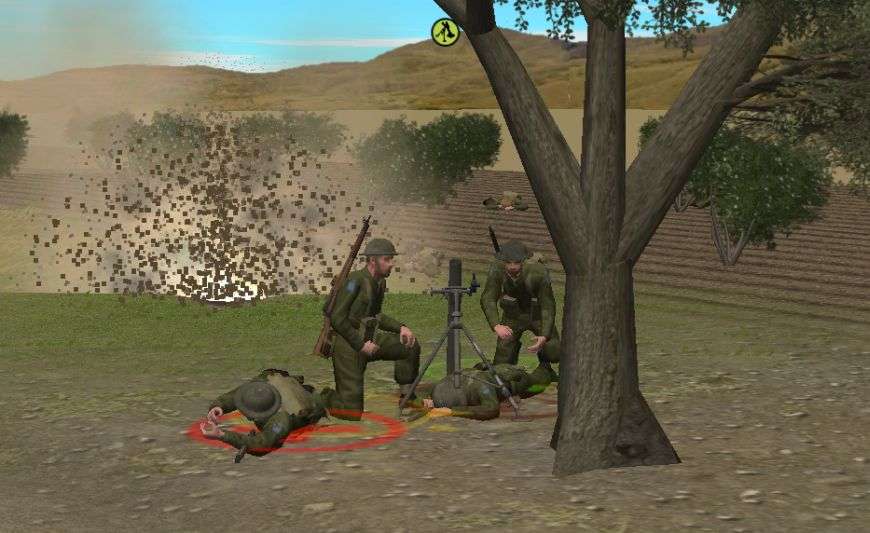
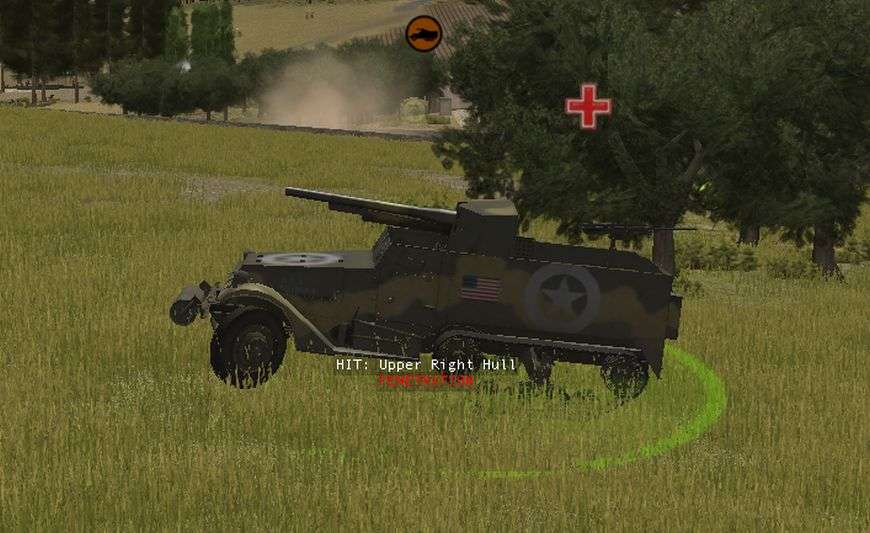
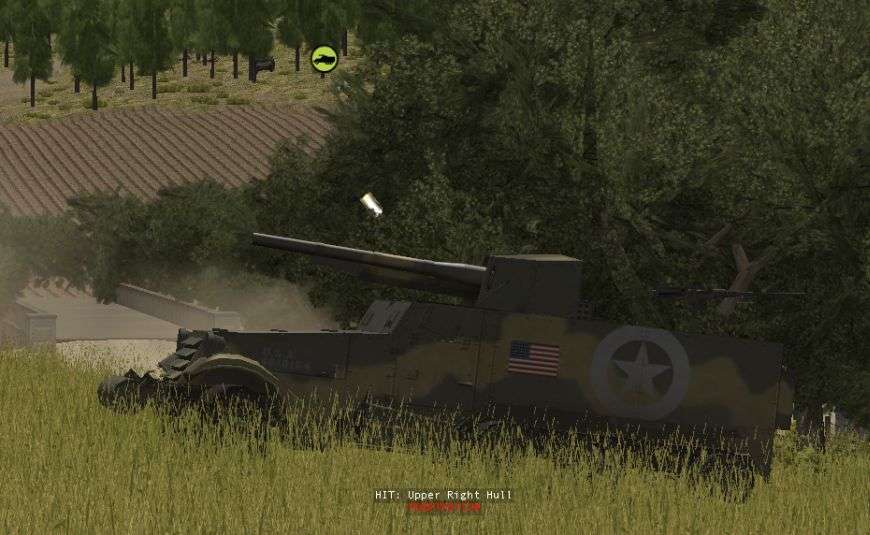
The German plane had time to swing around for another run before the turn ended. Out of bombs the pilot switched to his cannon. My heart stopped as I heard the plane diving in and the guns open up. For some reason unknown to me the pilot fired on my weapon team HQ instead of the Wolverine mere meters away. The only casualty was the HQ commander but in the scheme of things I got of very, very lucky. I only hope this plane is running low on fuel and has to leave soon. My luck cannot hold out forever.
Orders
I've ordered the HQ unit for the recon team to take up position in the house on the ridge. I have them sneaking in with the hope that the MG won't spot them. I want to try and call in some 81mm pain on their location. Other than that I am moving the second Sherman from his overwatch position along the river to catch up with Bravo Company. They are starting to recover and I need to get them moving in the next couple turns. This broad flanking maneuver is going to me time consuming and I want to have enough time left to still assault the village and not just banzai in.