

BigDork
-
Posts
589 -
Joined
-
Last visited
Posts posted by BigDork
-
-
Hey... you're getting a blind rush into the orchard. For all I know Tiresias just pulled back enough to be out of LOS and is waiting in ambush for my guys to run forward to their death.
I've got turn 12 in my inbox. Just need to wait another 9 hours to get off shift and we'll all find out.
-
Ha! Way to call me out on it Vulture.
 You are correct though. I remember now. It's a pity all those AARs are lost now.
 Thanks for the recommendations all, I've got all sorts of great stuff to waste away the slow times at work.
I had no clue about the Wehrmacht graves here on post. I'll have to go check that out sometime soon.
-
TURN 11
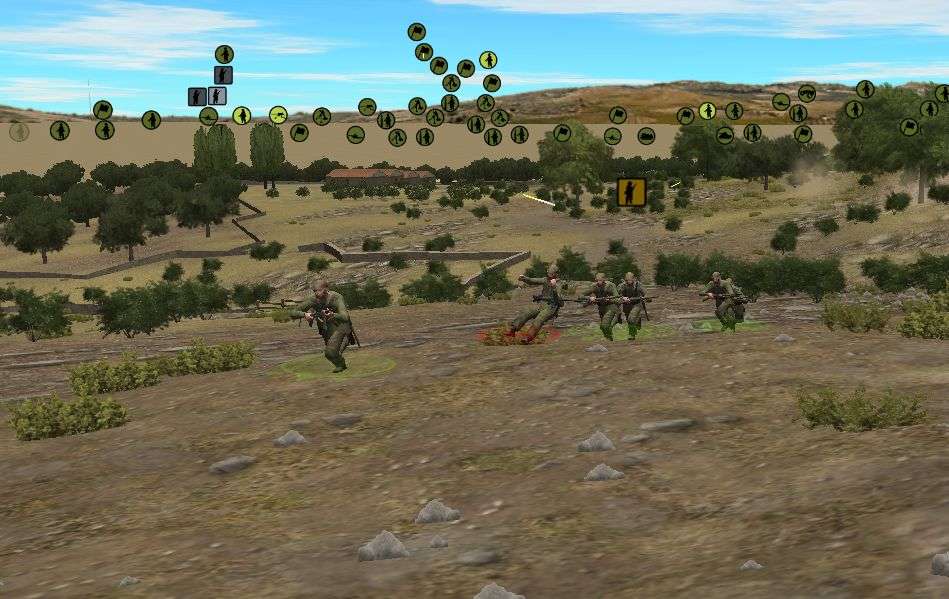
The battle for the orchard is quickly coming to an end. As the minute passes by many of the German units break contact and start fleeing back towards the village. It's a costly retreat though as Tiresias suffers four casualties this turn. In a boost to the morale of my men and I, I don't suffer any casualties.
I let Tiresias get away in the center and that's going to cost me later in the battle as I have to re-engage his men in their new line of defense. My plan on the right is to apply pressure as the Germans pull back and make them bleed. They have a whole bunch of open ground to pass before they are in the safety of the village. If I can take out some of his infantry as they pull back I may be able to turn it into a rout.
Another reason I'm ready to push forward in pursuit is that I don't want my guys sitting around if the artillery starts falling again. I'm hoping if Tiresias was trying to pin down my forces to make them vulnerable for a barrage he mistimed it. Regardless, I'm not going to leave my men static for too long. It's just too costly.
I'm starting to push forward in the center. Unfortunately 2nd platoon needs some time to rest before they can really move forward. Also, once I have settled the situation on the right flank I can shuffle some of my support weapons and 1st platoon back to the center.
-
Awesome! I'll have to go check that out next time I'm on that side of the post.
-
Yeah that might keep me busy for a few hours at least. And since it's .mil I have no worries about accessing it. Thanks!
And because it's topical, I think I'm gonna check out Sicily and the Surrender of Italy
-
Grogs, I need your help. It's a slow day at work and I would love to spend the downtime reading and learning all sorts of interesting things about WWII. West Front, East Front, Italy, North Africa... I'm not picky. All I ask is that it's safe for work and filled with interesting, informative grogginess.
-
That poor crew member. He was probably thanking God he just survived and then... BOOM!
That's one heck of a crater.
-
First, I want to say how impressed I am at the maturity of all the AARs I have seen on this board.
Playing H2H takes a lot of maturity in and of itself. Particularly in a game with as much FOW as this, one sees one's own casualties, may not see what is being inflicted, and that can be demoralizing. Withstanding a mortar barage, dealing with friendly fire--all are things that us that only play against the AI would be tempted to "redo".
Then to put yourself in a public AAR for all to see--again very impressive.
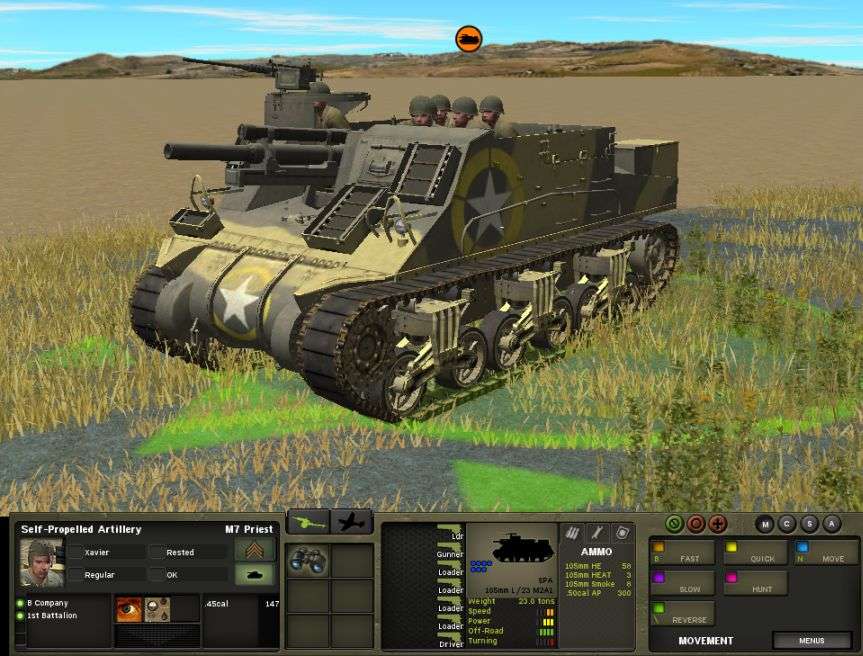
Now, to my comment: putting so many points into buying a Priest would just make me nervous. It might be a game winner, but it is just so fragile in this environment. It is not quite like having a half-track with a 105 on it--but it is not that different, either.
On the other hand, it will be very interesting to see if those two AT guns turn out to be a blessing. Two small to be terrible if you lost them, they might turn out to be vexing to your opponent. Maybe they are small enough not to be spotted easily. Or maybe they will be spotted, and draw fire and attention beyond their importance to you.
His attacking you is bold. But he risks having all the units on your left flank killed/crippled. He is, after all, attacking blind as to where you are.
Thanks for reading and your comment. I agree that playing H2H can take some maturity and commitment. If I had been playing against the AI on my own without an AAR and my guys got blown up by a barrage, I can't guarantee I wouldn't just thrown in the towel and start over or reload. One thing I love about PBEMing this game is that you have to go on and it forces you to commit.
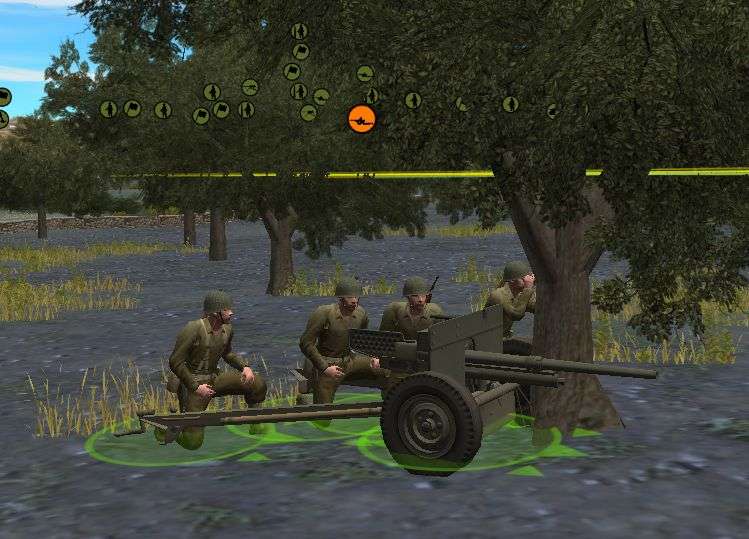
I actually have 4 ATGs though one is down to only two crew members after the barrage of 2nd platoon. They could prove to be a game changer assuming I can bring them into the fight. Sure the HE of a 37mm shell isn't much but it's something. And if I lose my Sherman somehow, having any sort of anti-armor assets could make the difference.
I'm babying the heck out of my Priest. Especially since I haven't seen any ATG or armor from the Germans yet. Tiresias is definitely playing that conservatively this game. I'm afraid to bring the Priest too far forward and worry about mortars/artillery because it's so fragile. But the 105mm gun can really make a difference for me.
Big D,Excellent action going on here. I am enjoying it a lot.
Don't let all the chat on Tiresias' side spook you. You've got plenty here.
I've been in your spot as the spotting rounds come rolling in. I managed to scramble everyone in all directions with fast and quick moves. It does tend to nix up the orderly advance though. Hearing the screams is tough.
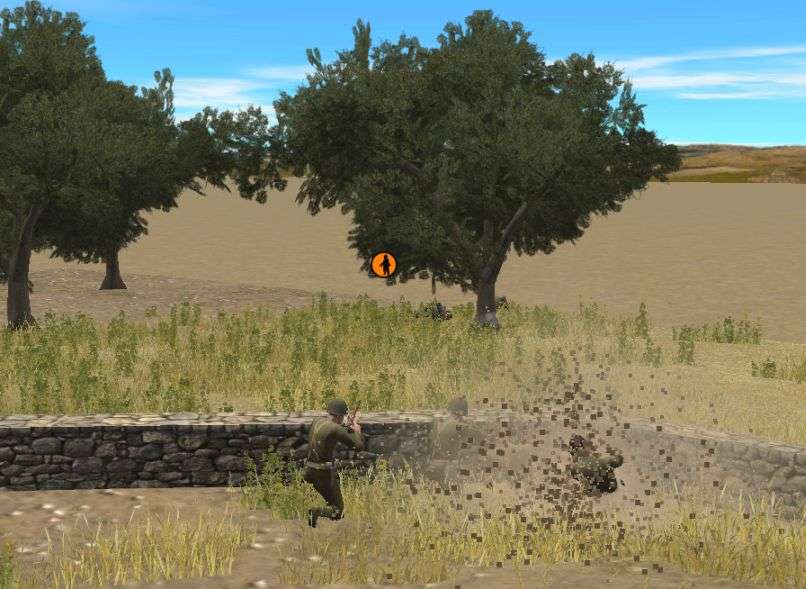
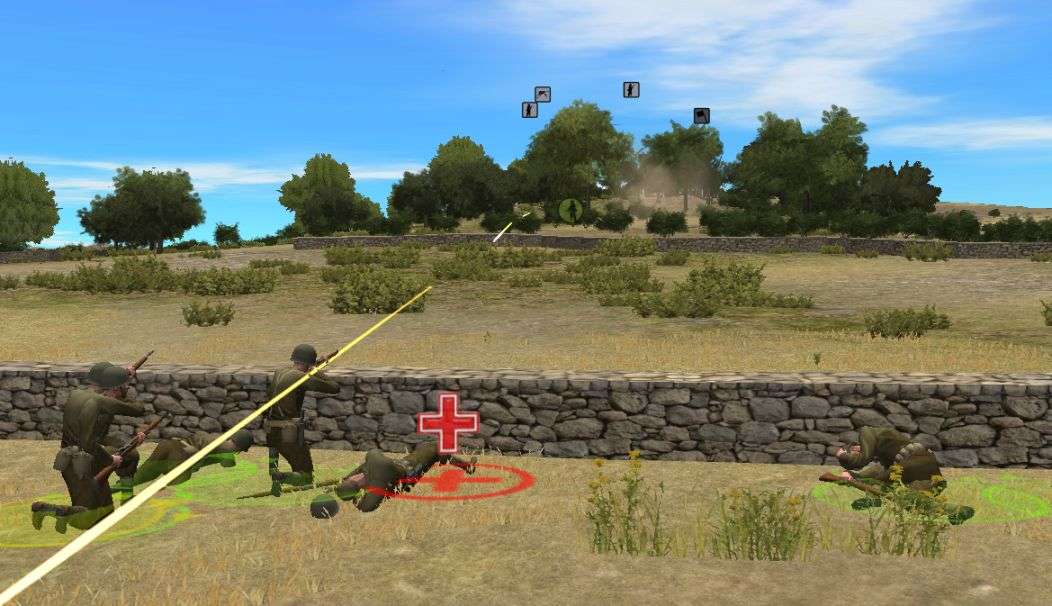
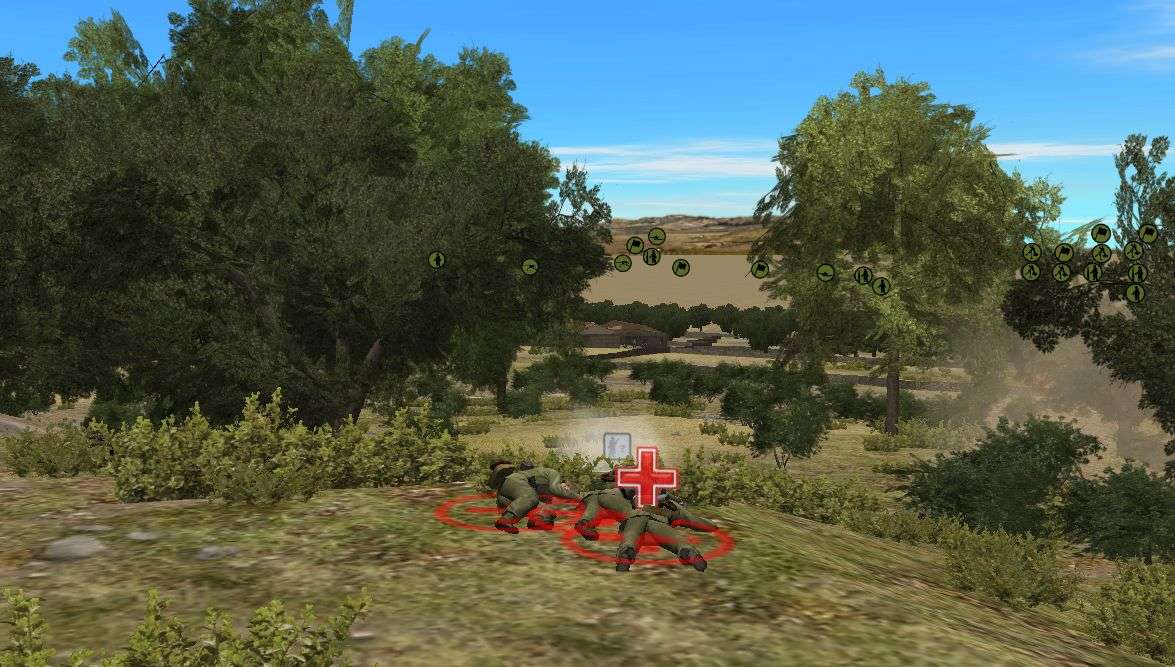
I love the ground-level screen shots. They are really giving us a clear picture of the sparce terrain cover. I'd say you are doing a very good job of using what little cover and concealment there is available. Just looking up the hill from the screen shot with your men behind the wall gives me the creeps. There is practically no cover and your men are going to have to rush up that. I can just imagine what is going through their virtual heads.
This is a great AAR and very much appreciated.
Heinrich505
Thanks Heinrich. I'm glad you're enjoying it! I'm having a hard time right now feeling optimistic about my performance so far in this battle. I have zero motivation and am letting Tiresias dictate how the fight is going so far. But it's still early and I want to preserve my forces as much as I can for later. I'm hoping that in a war of attrition I can wear him out.
heh heh psychological warfare? I'll have to remember that if I ever do a DAR. Post a lot of random stiff to make the thread look really busy.
Sounds like a plan to me.
Yeah, I thought that was funny. Instead of a snarky comment, I'll post a commiserating comment. I'm in a pbem and am getting STONKED by some good artillery. I am, of course, asking my opponent why he feels the need to bombard an empty field. (I'm hoping he doesn't see the dozens of crosses sprouting in mid-air, or my broken remnants fleeing, or hear the screams of the wounded.) If I can convince him he's wasting ordance, maybe he'll stop...Ken
Maybe I could tell Tiresias that he's mostly just killing my conscript Americans and should really be saving those bullets for the elite paras that I'll be bringing up to the front as soon as he's low on ammo.
-
TURN 10
On the plus side there was no artillery falling on my head this turn. Unfortunately there were some casualties.
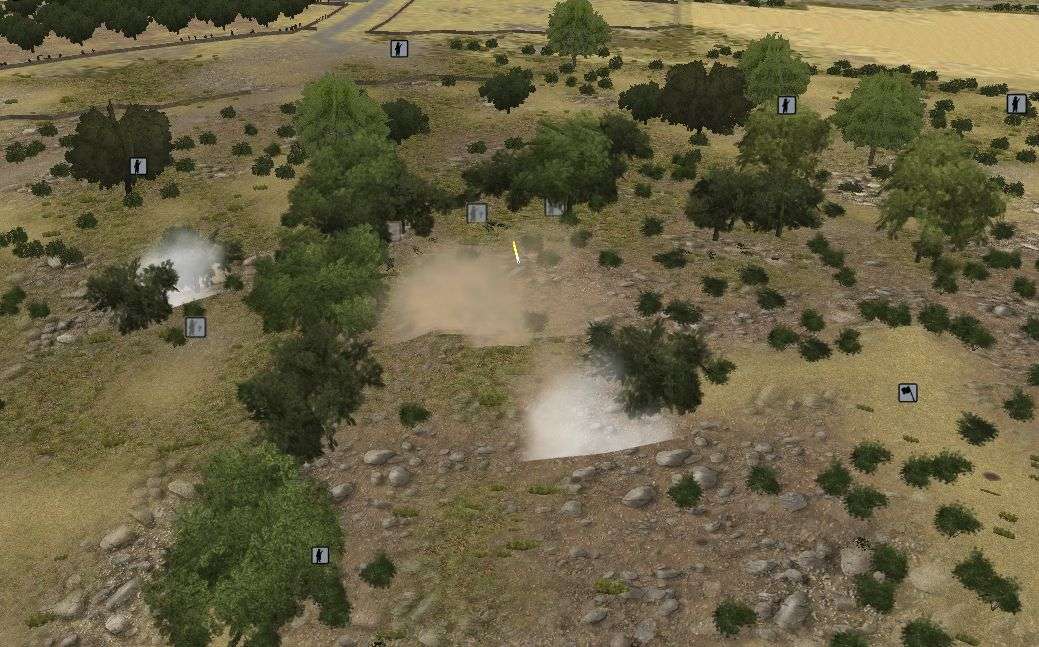
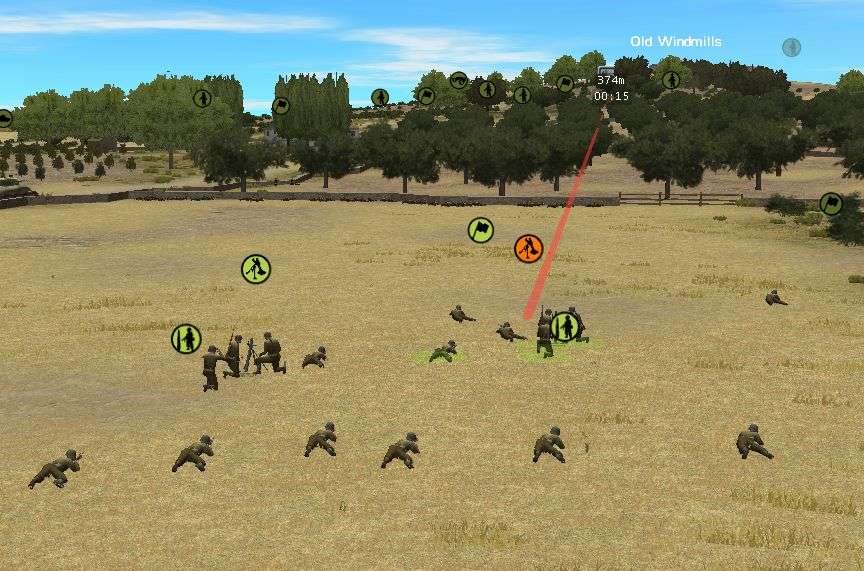
The battle in the orchard continues. The assault team of 2nd squad, 2nd platoon was in a great place behind the stone wall to engage a team of Germans as they rushed up the extreme right edge of the map. As the Germans got close my guys opened up and forced the Germans to find what cover they could behind one of the trees.

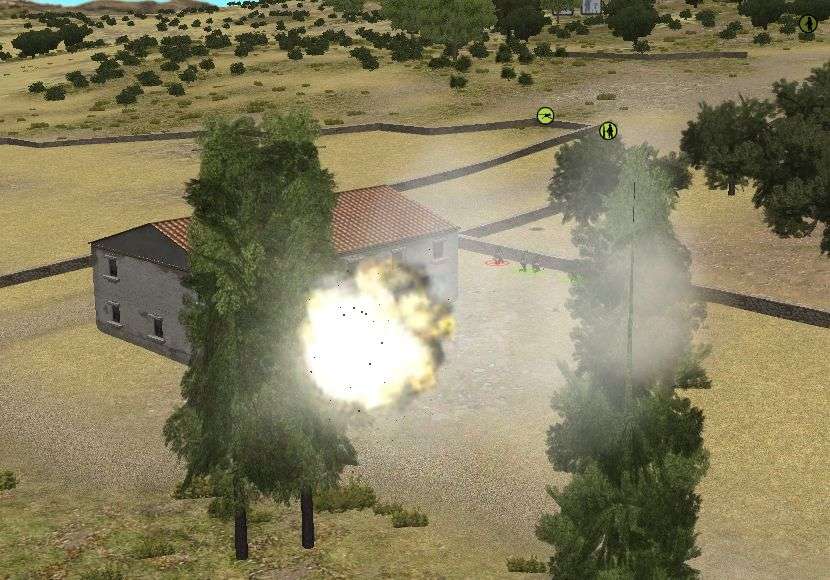
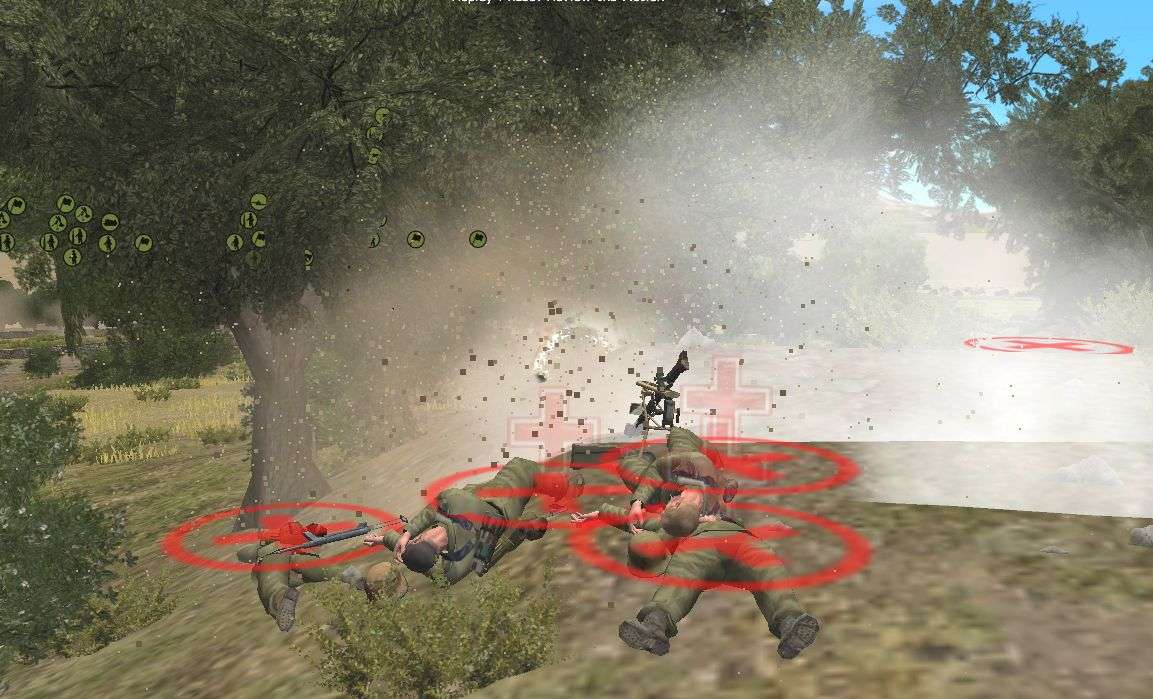
Unfortunately my guys were unable to quickly dispatch the Germans. Despite being under fire and pinned down one of the Germans lobbed a potato masher over the wall. Right as it went off he was hit in the chest with a bullet. His sacrifice cost one GI his life and another is out of the fight. The other two men of mine on the assault team are slightly injured and panicking.
Things are still relatively quiet in the center. With the exception of a pinned down MG unit the Germans seem to have faded away into the sparse cover on the hill. About half way through the turn though a squad of Germans is spotted running in the open between the junction and the windmill towards the back of the map. My guess is it is Tiresias falling back some of his men to his new defensive line. Several of my units open up on the Germans and at least one will not make it to the final defense.
-
I'm totally nervous by all the chat going on in my opponent's thread.
-
TURN 9
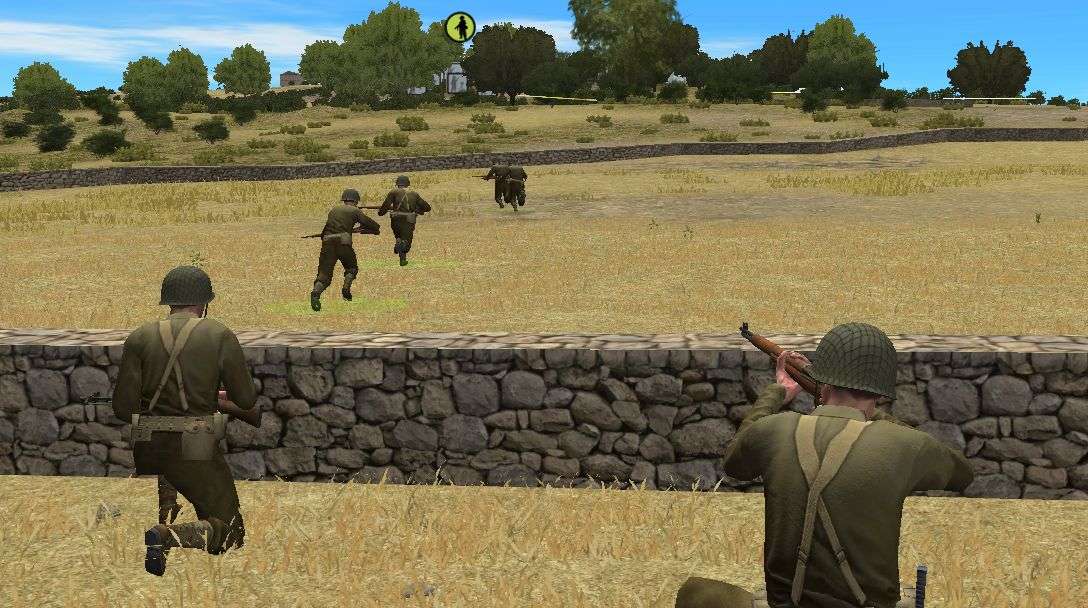
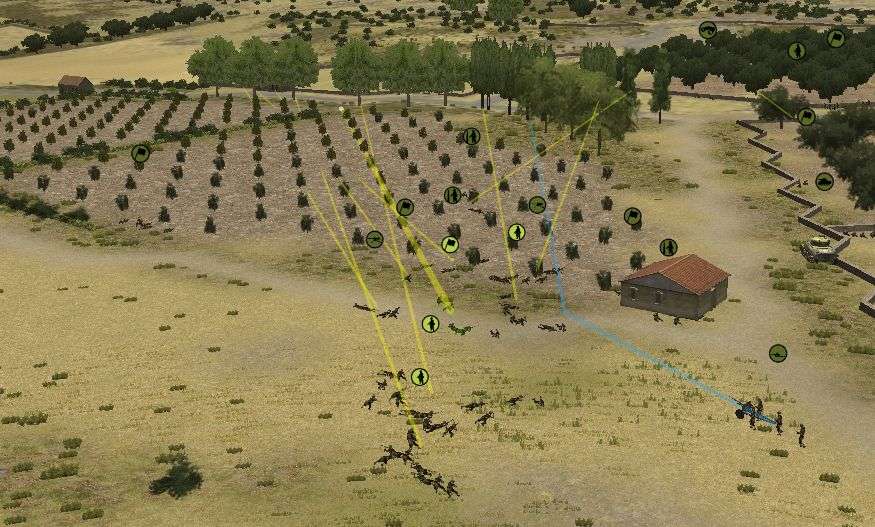
Things kick up quickly in the orchard. The German infantry I'd only heard so far makes a dash forward to take up position along the stone wall and starts firing on 3rd platoon, 2nd squad. I had ordered an assault team from 2nd squad to move right to take up position along the wall but the rest of the squad was only in light cover in the orchard. I quickly realized my mistake as 2nd squad lost two men in quick succession.
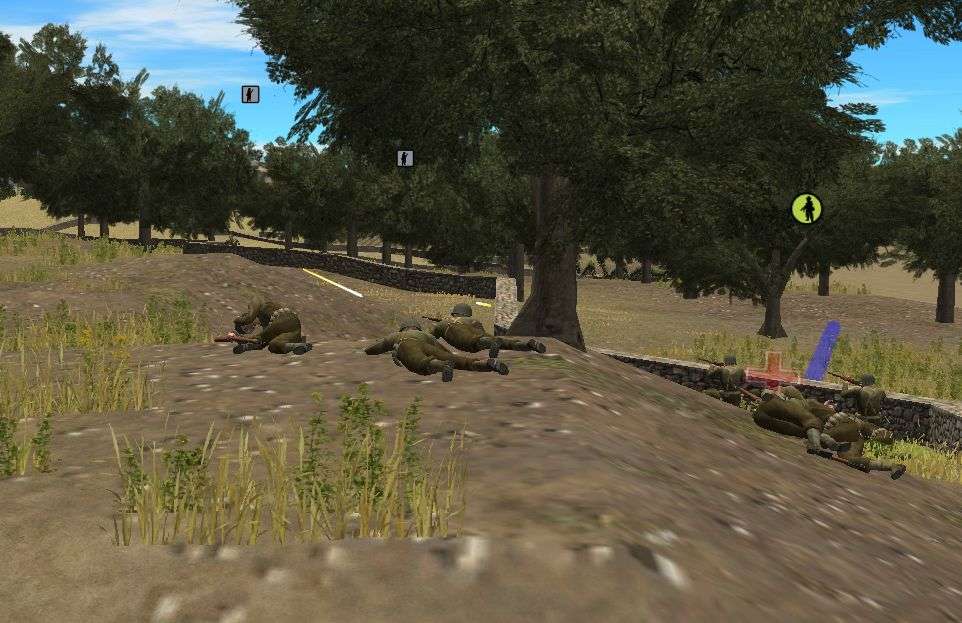
Losing two of their men in a matter of seconds was too much for 2nd squad and in a panic the rushed back below the hill they were taking cover on to get out of German fire. In their haste to get away they left their assault team behind to fend for themselves. Thankfully with the protection of the stone wall they are holding their own and holding the flank.
3rd squad of 3rd platoon is doing a far better job of holding the orchard. They have engaged Germans behind a stone wall about 50 meters away from them and so far have shown no signs of worry or panic from the incoming fire.

I will not let my men get bogged down in the orchard and open themselves up for annihilation by an artillery barrage. I am moving support units and one squad from 1st platoon into position to begin overwhelming the attacking Germans and pushing them back. I plan on being forward of where I am now before the German artillery starts to fall.
The center has gone quiet as Tiresias has pulled back all his men. I've already begun moving forward to start taking the hill. Things are a bit dicey right now due to the lack of MG support. I'm debating bringing the Sherman forward but am worried about the fact I haven't located any anti-tank assets yet.
I'm losing the battle so far but we're only 9 minutes in. This is a marathon not a sprint. I need to give some serious thought as to what to do to turn this around but rushing headlong forward and letting my guys get chewed up isn't it. I don't have a ton of infantry so I can't afford to lose them needlessly.
-
TURN 8
The next minute is by far one of the most painful I've had to sit through. The minute passes by with the scream of incoming artillery shells, the boom of explosions going off all around 2nd platoon, and unfortunately the cries of my dying men. This artillery barrage hurt me so much more than the initial one because I let it happen. I left my guys in one place too long instead of pushing forward. I let Tiresias bog down my attack and give him a great opportunity to blast away at my guys. I failed.
Thankfully I was able to get two of the squads mostly out of the danger area by pushing them forward. Other units were able to take cover in the buildings that were near. 2nd platoon's HQ and one of their squads was not so lucky. While they weren't totally wiped out, they sustained heavy casualties.
2nd platoon weren't the only casualties. In one blast I lost an entire HMG team. It also took out all but one of the supporting ammo bearers next to them. The loss of this MG will be felt as I regroup and push forward. I intend on letting the remaining ammo bearer buddy care his unit and the HMG team and then join up with my remaining HMG. Any ammo he is carrying will help that team.

As the turn comes to a close, on my right flank 3rd platoon moves up far enough to begin engaging the enemy. Besides the German infantry I've already identified I now am getting some sound contacts on the extreme right edge of the battlefield. Next turn the fight in the orchards will really begin.
-
TURN 6
The scream of an incoming artillery round fills me with a momentary dread. I cursed as I watched the shell impact the stone wall right next to the Priest. Thankfully despite landing mere feet from the Priest and near one of my ATGs there were no injuries. I have a healthy respect for mortars and artillery where my Priest is concerned. That open top makes them highly vulnerable. As soon as I can I'm giving the Priest a reverse order to get him clear. It will take him out of the action but better that than destroyed.
The round proves to only be a spotting round. 30 seconds later a second spotting round lands just in front of my Sherman. It would appear that Tiresias is trying to target my AFVs. I don't know if he's just trying to spook me into moving them or is hoping for a lucky hit. If it's the former, mission complete. I'm moving them out of the area.
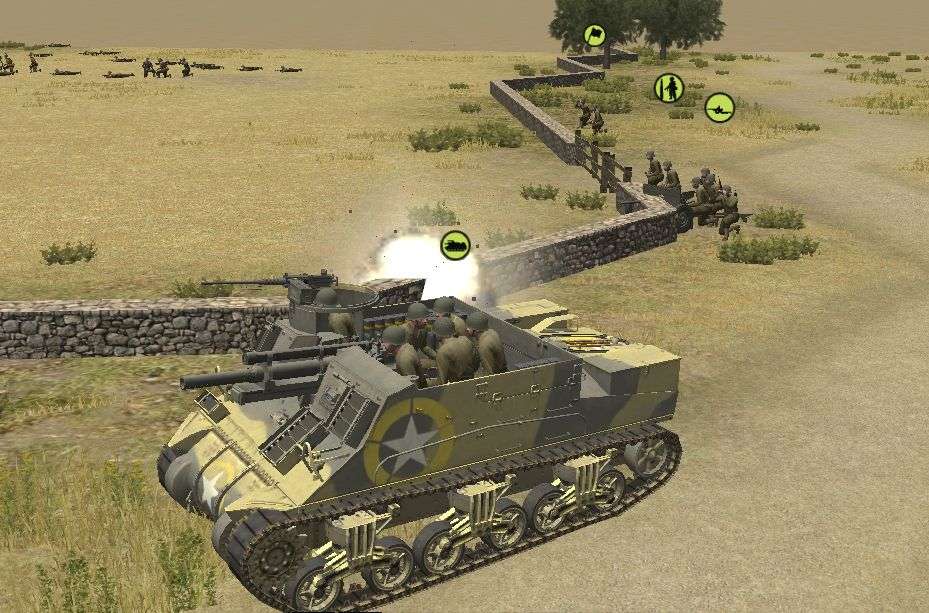
This minute is not too different from the past couple. My infantry mostly just trades fire with the German infantry in the center of the map. Lots of bullets are fired but few casualties occur. I had ordered my Priest to area fire on the Germans and while a few rounds land near them I can't tell if it killed anyone. And then, an unlucky shot. The Priest fires a round that impacts a tree in the midst of my men. As the 105mm HE round hits the tree, the tree explodes adding deadly wood splinters to the shrapnel of the shell. Being just in front of the tree, one of the men in my HMG crew is taken out by friendly fire.
TURN 7
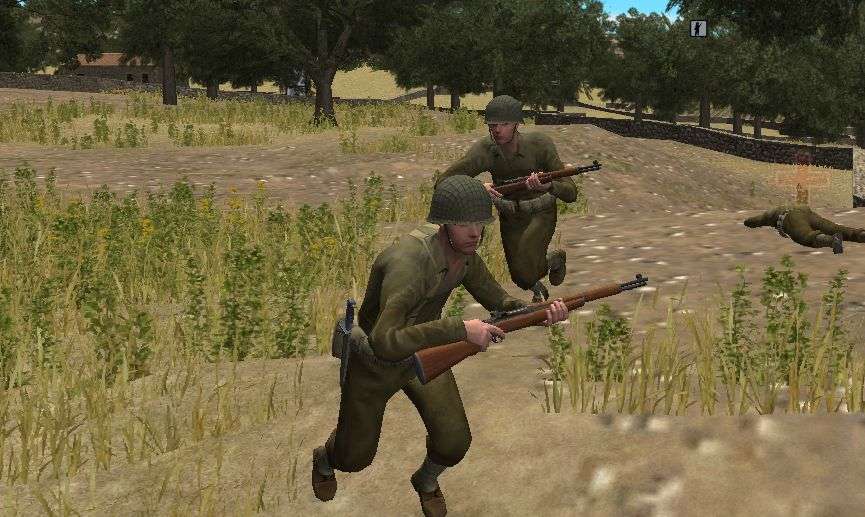
After several minutes of sitting still it was time for the Americans to move forward. I ordered an assault team from one of the squads of 2nd platoon to push forward up the hill towards the Germans. There had been a noticeable drop off in German gunfire from the hill and I wanted to see what sort of response I would get from my infantry rushing forward. The answer was not much at all.
It would appear I'm timing my push up the hill well. Even as my assault team moves forward I spot several German units running up the hill towards the windmill. I know I've done some damage and have just subjected the Germans to another turn of HE and gunfire so it's possible that these units are breaking and running. I think though it is Tiresias trying to pull back his men. In the next couple minutes I am now planning on pushing aggressively up the hill. If Tiresias is trying to pull his men back I have a chance to inflict some serious casualties as they rush in the open and possibly destroy any chances of a secondary defensive line. Or Tiresias could be luring me into a trap and I'm going to lose 2nd platoon. Also, there was a third spotting round that landed close to 2nd platoon. They can't sit where they are much longer anyway. I think Tiresias was not aiming for my AFVs but for my men. They need to bug out anyway... might as well go forward.
Things are heating up on my right flank and I'm not in position yet to do much about it. 3rd platoon is still rushing forward and is about a minute away from being able to do anything about the German push. The MG I repositioned made contact but instead of take out Americans they are pinned down behind a stone wall doing little. My XO team is down to 2 men, the XO himself becoming a casualty. I really need that platoon to hurry.
I'm gonna use the pic from turn 5 for reference. I anticipated the Germans to come from the road junction and meet my men along the very edge, near where I'm sending the "red" squad. Instead Tiresias has pushed straight forward from the junction and is now in the small orchard between the village and the buildings where my MMG team. I've given a slight adjustment of orders to "blue" and "yellow" squads and they should come into the fight next turn.
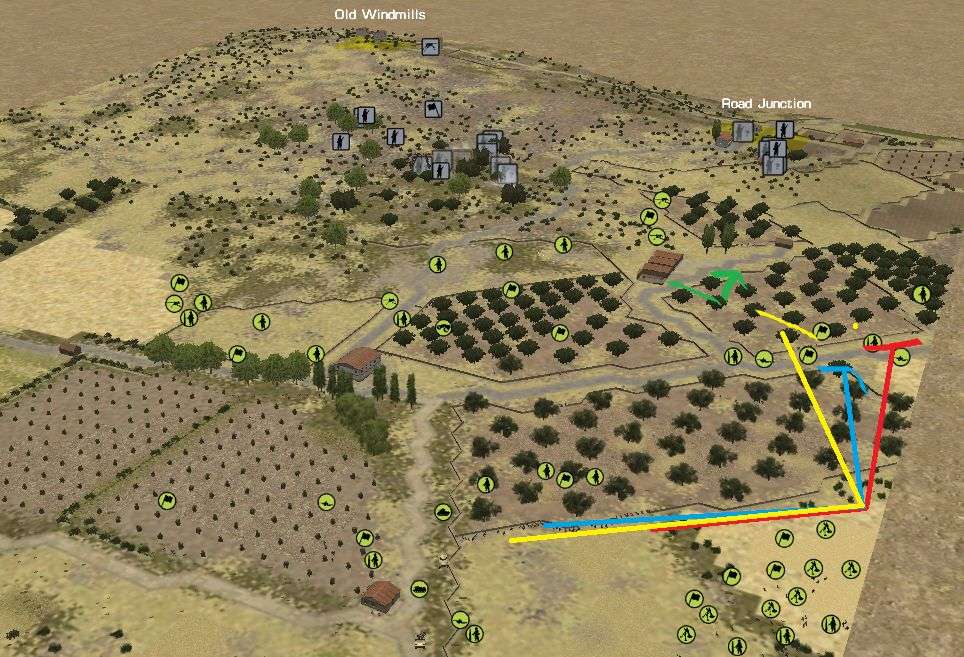
2nd platoon on my left flank is going to start pushing up the hill in an attempt to cause casualties and maybe break the Germans as they pull back towards the windmills. In 2 - 3 minutes after 2nd platoon has cleared off the hill I am going to order 1st platoon to move forward and hook right to engage and break Tiresias' new push forward. I just need 3rd platoon to hurry up and get into place and hold the Germans for all the pieces to come together.
I'm feeling pretty good that things are going my way. While I may not have had momentum yet in the battle, Tiresias has suffered some casualties without much to show. Yes I've lost probably 25 men or so but I've still got all three platoons ready to take the fight to the Germans with all my support behind me.
Though I am worried about one thing... where is the armor and/or ATGs? I haven't seen any German tanks or ATGs as of yet. I am afraid to move my Sherman and Priest around too much until I know its safe.
-
woot! Thanks for another AAR! Give em hell Tiresias!! oops sorry wrong thread
Oh he's giving me hell. A whole lot more hell that I ever anticipated.
I'm digging this, love all the action shots, keep 'em coming! Thanks for this. AAR's are a hoot to follow.
Thanks guys! Glad you're all enjoying it so far. Tiresias is definitely making it an interesting battle from the start.
-
TURN 4
As more and more Germans appear on the hill I start to think that maybe I'm the one defending instead of the other way around.
I'm feeling good as the 4th minute comes to an end though. While casualties have been high I think I've gotten my forces into a good position to start taking the fight to Tiresias. His men are pretty bunched up in one little area and I've got them somewhat surrounded in a horseshoe of Americans. Next turn the HMGs and MMGs set up and they'll start laying down some good suppression. I've ordered my mortars to do another brief barrage on the hill. I've given my Sherman orders to fire briefly as well. He has LOS on the hill but has yet to spot any Germans. Lastly I've ordered my Priest to come forward, next to the Sherman. The 105mm gun will break the Germans and send them running back up the hill towards the windmill.
TURN 5
Turn 5 starts off with more fire being traded between 1st platoon and the Germans. 2nd squad continues to take the brunt of the German firepower. I'm concerned that if they suffer a couple more casualties that they may break in a panic.
The boom from my Sherman firing signaled the start of my short pummeling of the Germans. The first shot from the Sherman actually went high, sailing over the hill and impacting the largest of the windmills. I hope that got someone's attention in there. Soon mortars were falling and Tiresias' men stopped firing momentarily.
As soon as the mortars stop, the shooting starts back up. I think I may have erred in trying to conserve my mortars. It's apparent that a significant part of Tiresias' forces are engaged and I am missing a good opportunity to inflict some serious damage by not really letting them have it.
As the seconds tick by my XO confirms my biggest fear, the Germans are attempting to flank me on the right. The XO spots German infantry hopping over a stone wall and rushing forward towards my position. The 4 man unit fires off a few shots but they do nothing to stop the Germans from advancing.
I've ordered 3rd platoon to maneuver right to meet Tiresias' new push. I also have one of the MMGs repositioning just in case Tiresias is trying to come up behind the buildings where my MGs are located. If the Germans get too close they are in for a surprise from the right-most ATG. He has 9 rounds of canister ready to go.
I've also ordered the Priest to start firing on the German position. Because I need to break up the Germans I've ordered him to area fire for the entire next minute. With a complement of 58 HE rounds I'm not worried about them running out too quickly.
-
TURN 2
My reserve platoon has becomes my lead platoon as they continue to engage the German forces. On the hill where the MG42s are/were more infantry appears. 2nd squad takes the brunt of the German fire since they are the most forward American unit. I need to put some serious fire on the Germans before 1st platoon is rendered useless.
I order my 81mm mortar units to briefly target the German's forward position. While I have plenty of 81mm HE I don't want to expend it all this early in the battle. I have a feeling this is just an initial screen and that I will have to blast my way through some dug in Germans as I get closer to the objectives. For now I want to try and break up some of Tiresias' momentum.
While 1st platoon keeps the Germans occupied, 2nd platoon along with the HMG section is rushing forward on my left flank. Once they take position along the treeline and stone wall I think the added firepower will be enough to drive off the Germans and let me start pushing forward.
TURN 3
Things slow down as the mortars start to fall on the German position. The Germans are too busy hugging the ground to keep shooting at my men. It was good timing too as 2nd squad of 1st platoon was coming close to breaking. The momentary break was enough to let them regain composure. The brief mortar barrage also bought 2nd platoon some more time to move forward on the left. While I don't think the mortars caused too many casualties it did have some success.
I am slightly worried about a lone German my XO team spotted running into the village where the crossroads is. If Tiresias is moving men to my right flank I could be in trouble. Not only do I not have many units on my right but it would be hard to shift my already engaged forces to that side of the battlefield without incurring some additional casualties. I'm going to have my XO keep his eyes open and I'm going to hope it's just a scout.
-
TURN 1
My men rush forward signalling the beginning of the battle. Almost instantly, contact is made. Two MG42s are spotted on a hill between my position and the windmill. They take aim at 3rd platoon and open up. Thankfully none of the initial bursts of MG fire hit home or do more than encourage my men to move faster. The MG42 fire was a minor nuisance, the mortars that started to fall were a nightmare.
Less than 30 seconds into the battle a mortar falls beside my FO team, wounding one member. Thankfully the observer himself is fine. That single mortar is instantly followed by a second and a third... an accurate barrage of German mortars starts raining down on the land 3rd platoon and the supporting units are ordered to run through. Men hug the ground and look for cover but casualties start to mount.
Even as the German mortars are falling around my men, the MG42s continue to fire upon any targets they see moving around. Luck was on my side though. Apparently one of my 81mm mortars had LOS on one of the MG42s and sent a few rounds their way. With awesome precision they silence the machine gun and take out the entire crew.
It was a painful, frustrating minute to sit through. It was hard watching explosions go off all around my men and there was nothing I could do to save them. As the first minute ends I do a quick count of the damage... 5 injured, 4 wounded, and 6 KIA. This is going to be a bloody, costly battle.
While this turn hurt, it also gives me some hope. Judging by the pre-planned mortar barrage and the placement of the MG42s I think Tiresias has misjudged where I'm going to make my big push. While the mortars are causing casualties he's hitting my reserve platoon and some support units. The other 2 platoons, and the HMG team is fine so far. I'm optimistic that I will find his defenses weak on the left where I intend on going. I guess we'll find out in the next few turns.
-
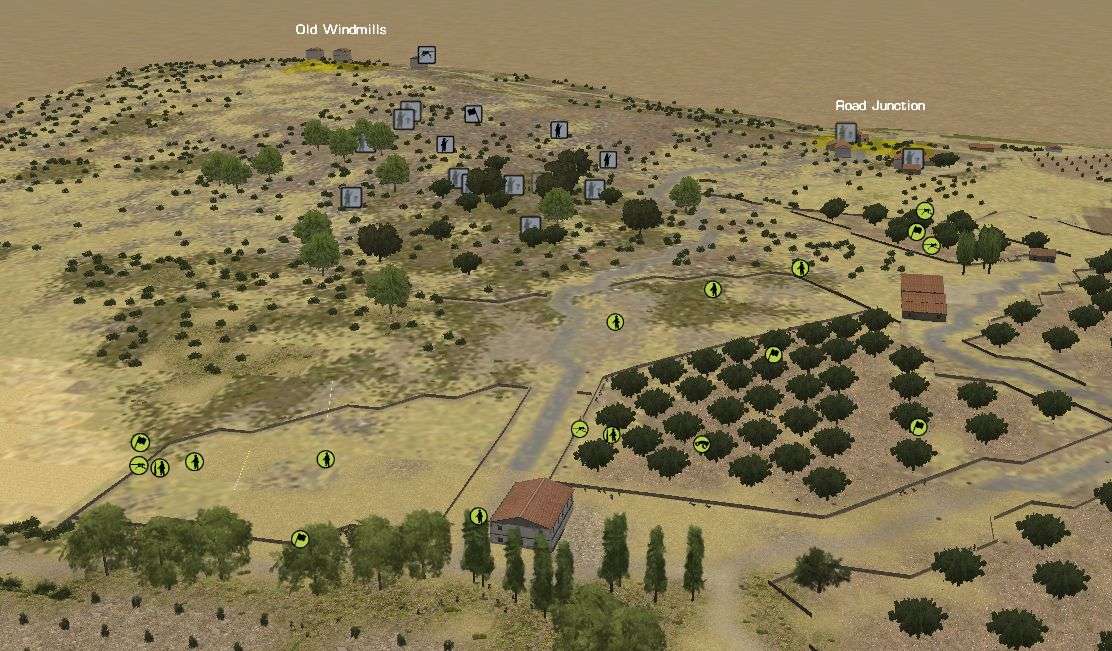
Tiresias and I have begun a new PBEM and we are both doing AARs for our side of the battle. I hope everyone enjoys the read and provides some helpful comments and criticisms along the way.
SETUP
The Americans have landed on Sicily! The Italian and German defenders are being pushed back as the US and their allies land more men and material on the island. I've been tasked with leading a rifle company and some support units in capturing an important crossroads and a windmill situated on a hill overlooking it.

At my disposal is:
1 rifle company
1 M4A1 Sherman
1 M7 Priest
1 MMG team
1 HMG team
2 37mm ATG teams (an "oops" buy)
1 81mm mortar platoon
1 60mm mortar section
Upon seeing my forces again I have two thoughts... Why didn't I buy more infantry? Where'd those ATGs come from?
I will lead the way with 2nd platoon supported by the HMGs. 3rd platoon will follow behind once 2nd platoon has engaged the enemy. 1st platoon is going to move forward between the windmill and the junction and sit tight. They will be kept in reserve for when it is time to take the crossroads.
There will not be much cover for my men to use as they assault up the hill. To limit the danger my infantry will be in, I plan on moving my main push on the other side of the hill from the road junction. I will go slowly and as the Germans make their positions known I plan on suppressing them with my 81mm mortars and HMGs. 1st platoon and my MMGs will be in position to stop Tiresias from moving reinforcements from the junction to support his men on the hill.
Three of the ATGs have LOS on the largest windmill. While their HE round is small it should do a decent job of forcing any Germans hiding in there to keep their heads down. I have little doubt that there is a unit or two in there keeping an eye out over the battlefield.
I intend to keep my armor back until I have assessed the situation. The loss of my only tank would severely hamper my ability to assault the German positions. I would hate to have to pit my M7 Priest against a Panzer IV or worse, a Tiger. Of course if there's a Tiger about, this is probably a lost cause from the start.
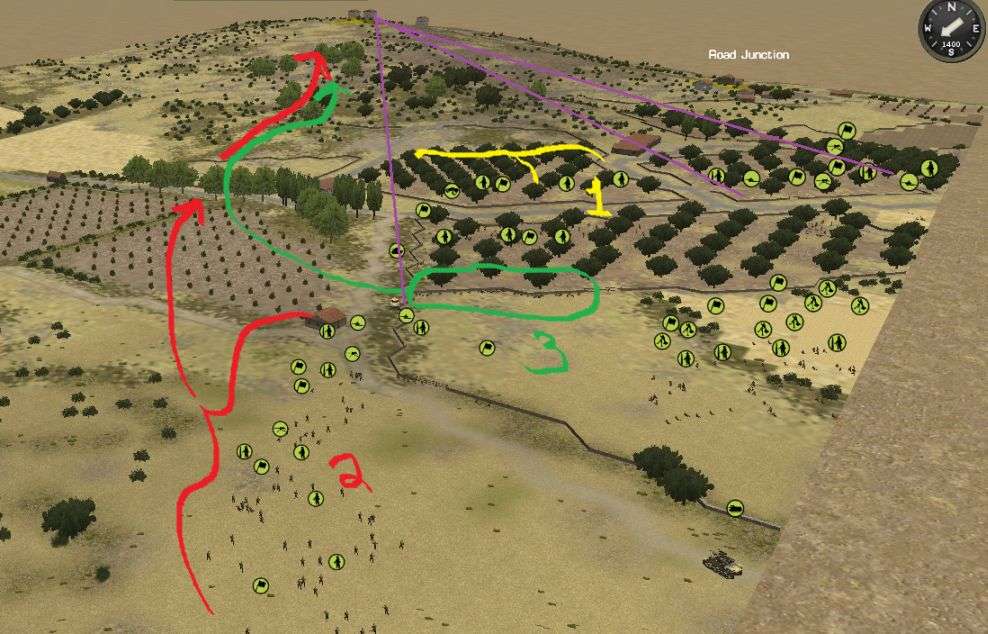
On my extreme right I have ordered the company XO to take up an observing position along a dirt road leading towards the junction. I have a slight worry that if Tiresias tries to probe forward he'll discover that I'm pretty weak on that flank. All I have protecting it is the two MMGs and an ATG section. A platoon of infantry could cause some serious issues for me. While the XO team wouldn't be able to slow a German probe down too much they will at least give me some warning.
This baby is going to be key to my success. A mobile 105mm howitzer I can bring to bear whenever I need to drive off some dug in Germans. I plan on keeping it far back in order to minimize the danger it is in. As long as my Priest is driving around the map my chances of success are pretty good.
And here is my random element. When I purchased some anti-tank teams I mistakenly thought I was getting bazooka teams. Still, these guys can serve a purpose. My initial use will be to suppress enemies in the windmill. However if I lose the Sherman it will be nice to know I have at least a small prayer of taking out German AFVs.
Everything is in place and the battle is about to begin. Considering the lack of cover and concealment of this battlefield I think things are going to start off quickly.
-
I was just playing out a hard fought battle where my battalion of Blackshirts was liberating a village from American armored infantry. Things were going well and I was rolling up the GIs, pushing them into the woods outside town. I had about 3:30 left in the battle when suddenly my laptop freezes up. NOOOOOOOOOOOOO! Of course I hadn't saved at all. 2 hours of my morning gone and I don't he the victory screen.

-
The part I find most worrisome about the whole story is the crew calling in an accurate strike. I cannot even get an elite FO team to do that. I swear I never get arty/mortars to fall on target.
-
All in all I think the German player had the initial advantage in force composition by having a 2:1 superiority in tanks. And he used them correctly by placing them in positions where one could support the other.
I had a second Sherman in the way back on my left flank. I didn't bring it forward until the very end of the battle. For most of the time it was in a hull down overwatch position waiting for the Germans to rush the village.
I think other than putting his Panzer in a position where it couldn't reverse his placement wasn't that off. His tank had a decent view down the road. I just got the drop on him.
-
I do give Tiresias a lot of credit for fighting on after the loss of his tanks. Before we started we agreed we would call it a any time if it got no fun for someone. I would have not blamed him at all for wanting to cease fire then. Glad we kept going though. Hopefully he picked up a bit more experience because of it.
-
TURN 24 & FINAL
The fire from my soldiers coupled with accurate mortar strikes is too much for the Germans. Many German soldiers are left bleeding on ground and those that are somehow unscathed turn to flee. Even as they retreat they continue to be fired upon by my men.
25 minutes after the battle began, the cease fire went into affect. As the guns fall silent Tiresias and I care for the wounded and count the dead. I get off extremely lightly with only 8 dead and 9 wounded. Being able to get into good cover positions unmolested and wait for the Germans to come to me resulted in a very one-sided battle.
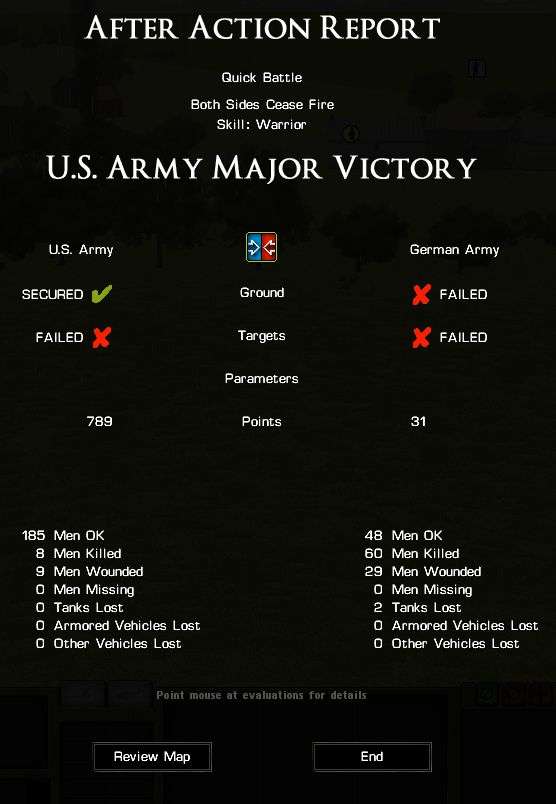
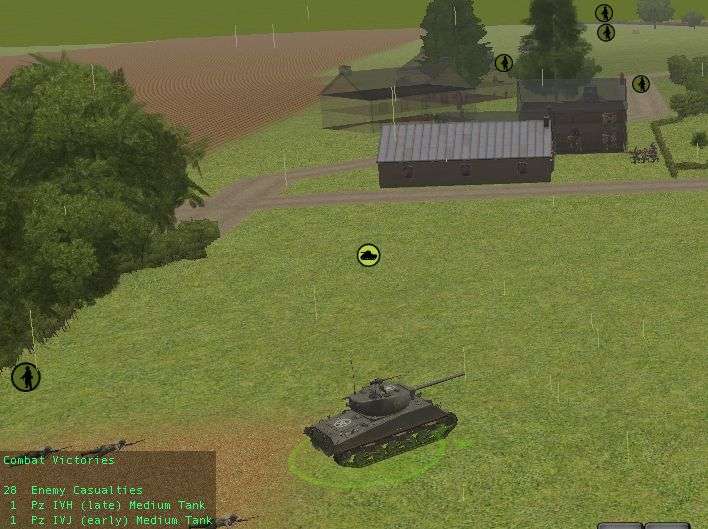
The hero of the battle isn't in doubt. Lieutenant Colonel Deerskin in the M4A3(76)W not only took out both Panzers but also killed or incapacitated 28 German soldiers. His domination of the battlefield made the battle itself that much easier for me. He proved why he was in command of the armored battalion.
Overall I think it Tiresias did a good job for his first PBEM outing. I've already provided him some thoughts of my own and hopefully he'll be along soon to give us some insight on the battle from his side.
Most of my casualties came from the platoon on the right flank. As the battle was coming to an end, I got a bit sloppy and forgot about them for a couple turns. By the time I came back to them they'd run into some trouble with a MG and a squad in a building. It didn't change the results in the battle at all but I do feel bad for all the pixelated families who lost loved ones due to my oversight.
Thanks to everyone for reading. Hopefully I was able to provide an enjoyable read.
-
1.10 is the latest.
 You are correct though. I remember now. It's a pity all those AARs are lost now.


BigDork vs Tiresias - Seizing the Windmill - American Version
in Combat Mission Fortress Italy
Posted
TURN 12
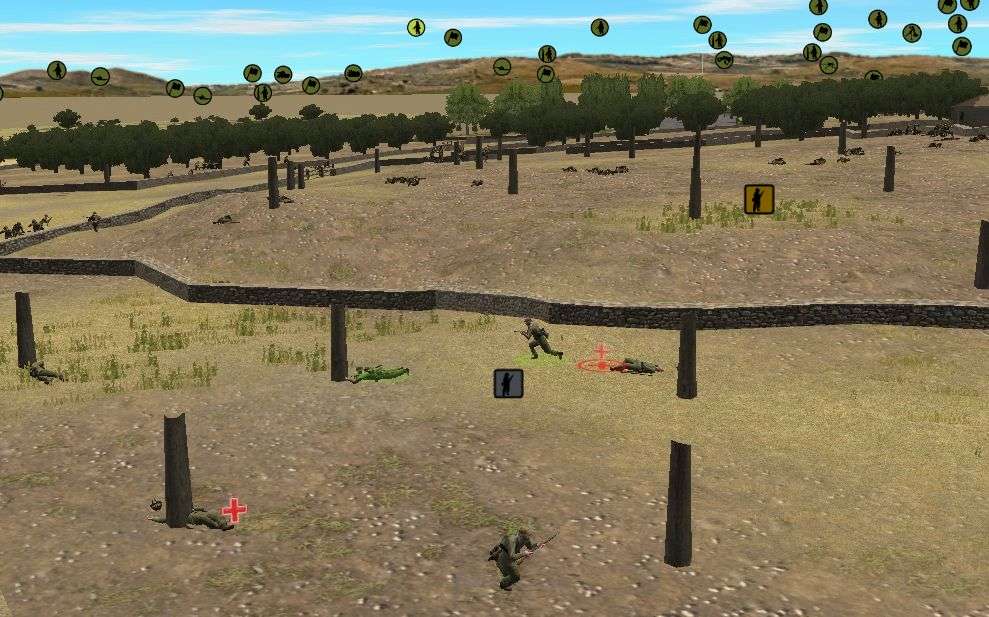
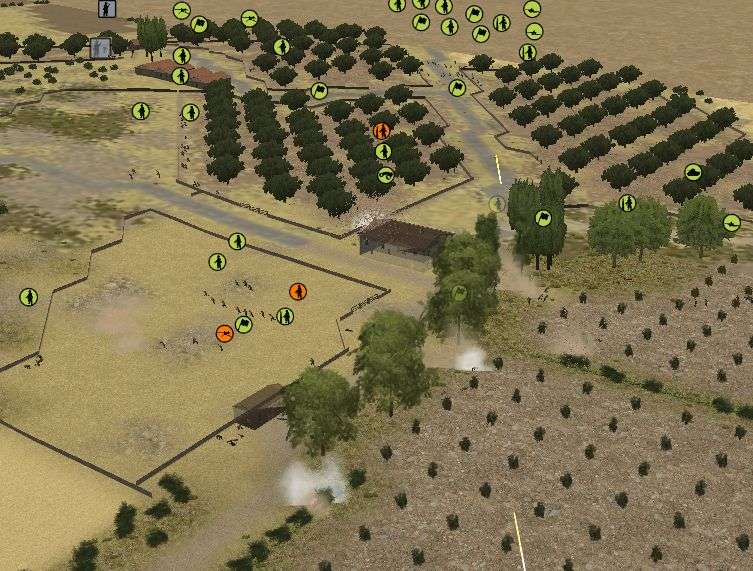
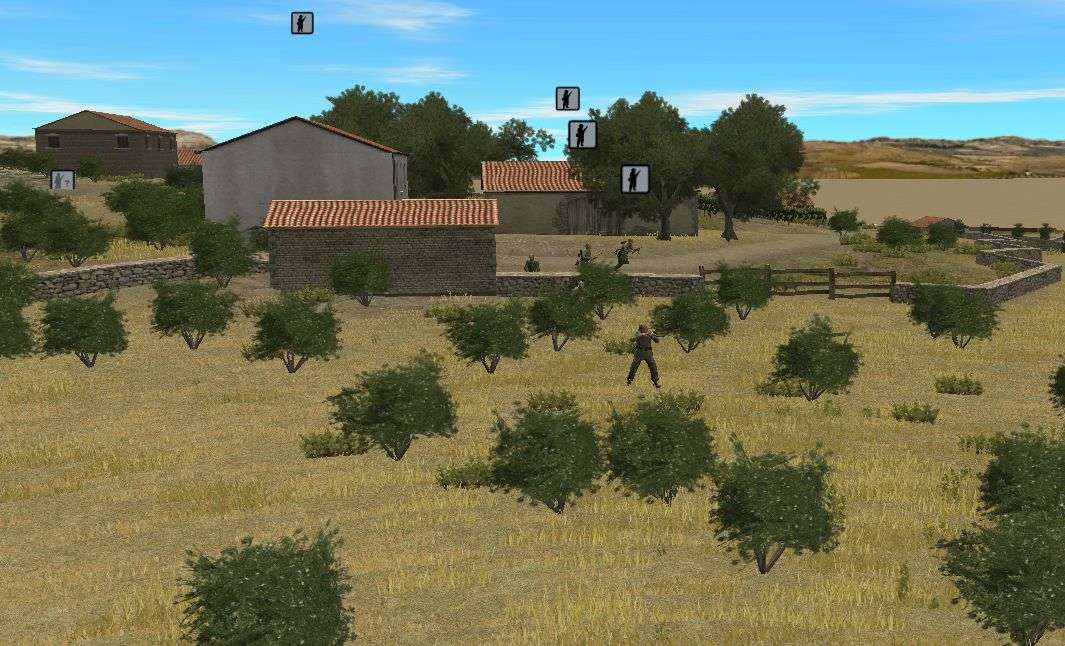
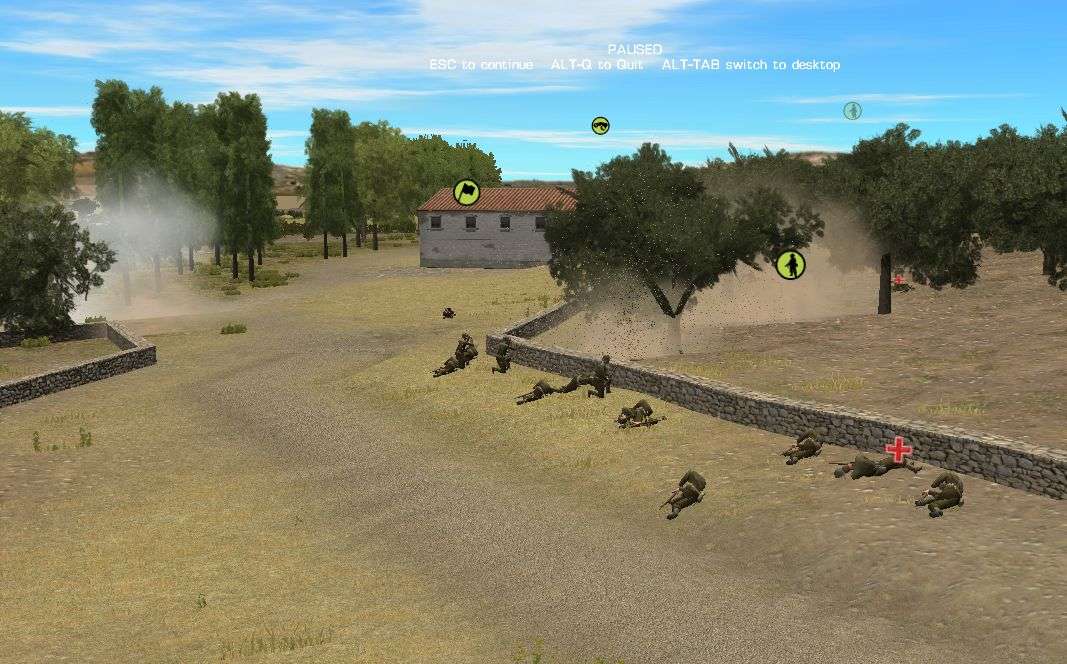
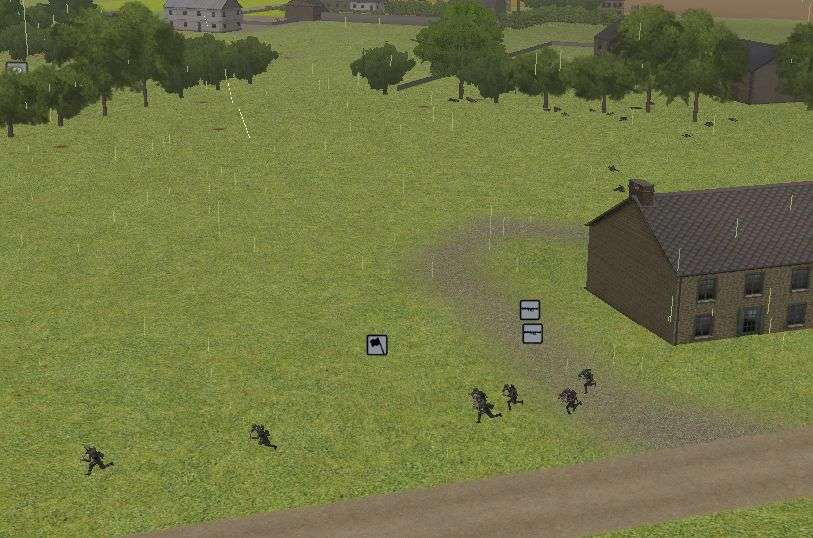
My men quickly find out that the battle for the orchard isn't over yet. I misjudged Tiresias' actions and the Germans are not pulling back the way I thought. Some GIs find themselves in some very up close and personal fights.
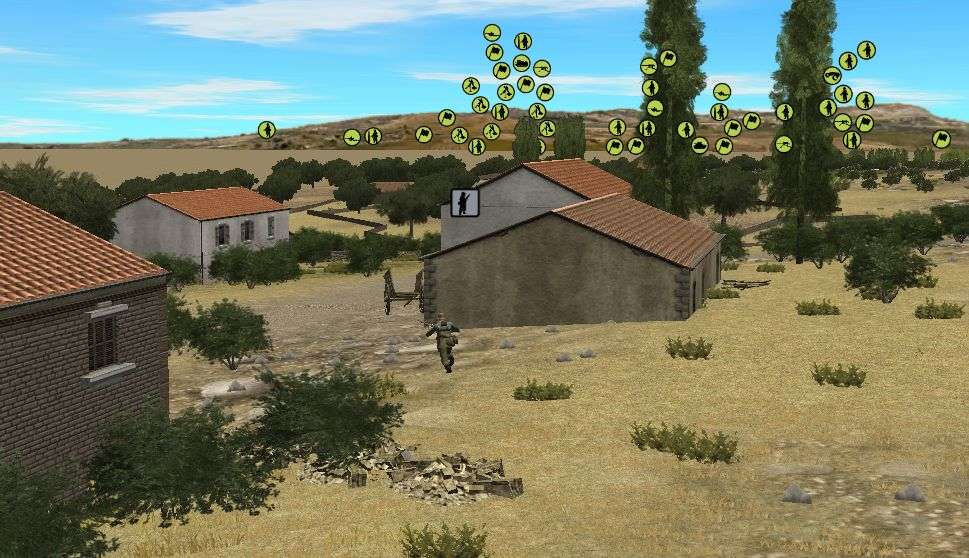
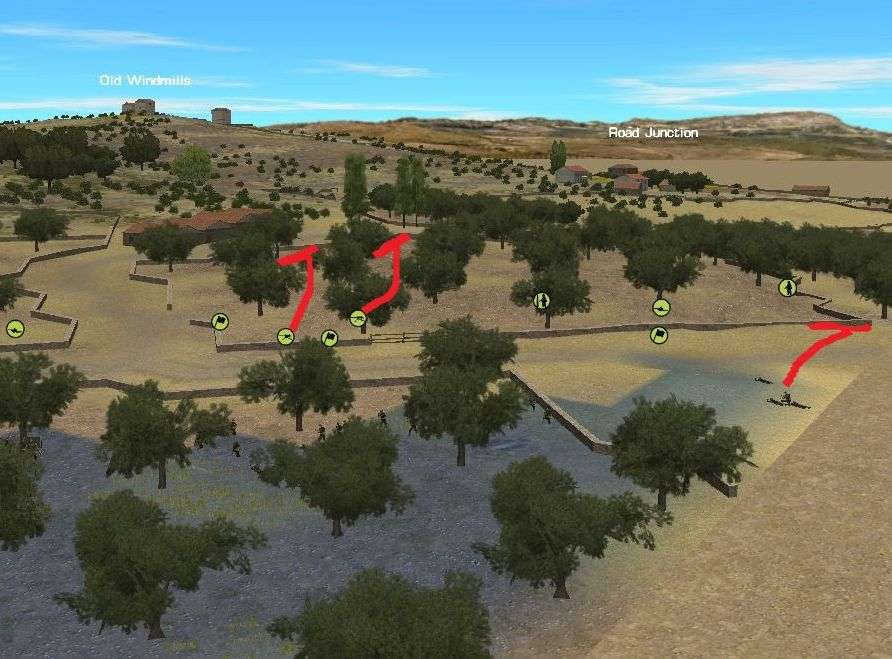
Here is how my right flank is positioned at the end of the twelfth minute. The team at the top center, 1st squad A team, is in the most danger. They are being fired at from both sides and have just taken a casualty. I intend to push up on the extreme right and drive off the Germans there. From off screen to the left I will bring in a squad from 1st platoon to help engage and rout the German platoon.
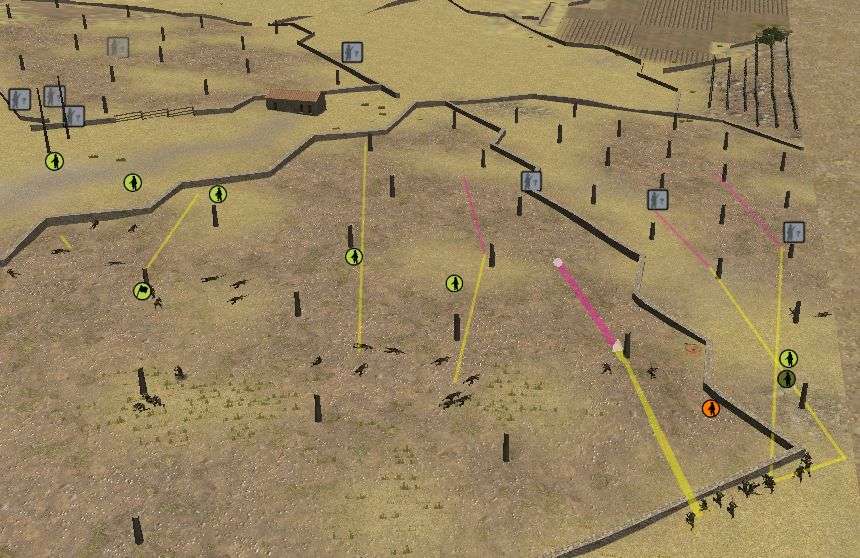
A few minutes ago I ordered Lt. Gable and his HQ unit from the machine gun platoon to scout out to the left of the battle field. After the Germans in the center broke off I got concerned they may try to loop around and come at me from that direction. While they didn't spot any approaching German infantry they ID'ed a Pak 40 on the hill.
Much to my annoyance the Lt orders his men to open fire from an extreme distance. Their shots are ineffective in causing damage but do let the gun crew know where they are. Soon 75mm HE rounds are being fired at my men. I'm hoping I can have them break off contact without loss of life and remain in LOS. I will have the Lt call in 81mm mortars to take care of the gun.
Well I'd been worried about not spotting German anti-tank capabilities. I guess I can start putting that worry to rest. I've spotted the ATG and now I've got reports of armor noise coming from the road junction. I think things are about to get a lot bloodier on the right flank.