

GreenAsJade
-
Posts
4,877 -
Joined
-
Last visited
Posts posted by GreenAsJade
-
-
-
I took my eyes off how this is working in the PC.
Can you clarify: if you name the install path differently, on the PC, for each CMFI variant, do you get separate Game Files/ directories?
Or do CMFI Game Files (Incoming Email etc) end up in the same place as CMFIGL ones?
The latter would be a mess for H2HH...
On the Mac, if you rename the install to something different, then everything is under that install - they are completely separate...
GaJ
-
Actually, I have been pondering a couple of counter attack plans.
One is to wizz the M10s up the centre left and pop over the top side/rear of the fast advancing PzIVhs. This is open to the risk of being counter-counter-attacked up the centre left from behind the Spur. The risk is I may have miscounted tanks, and that he does have more than a single Brummbar to foil this plan.
The other is to push up the right flank. Now that the Elefant and the PzIVHs are gone from the Tits area, there's a whole lot less reason not to do this. The major risk of it then being snakes with Shreks in the grass...
GaJ
-
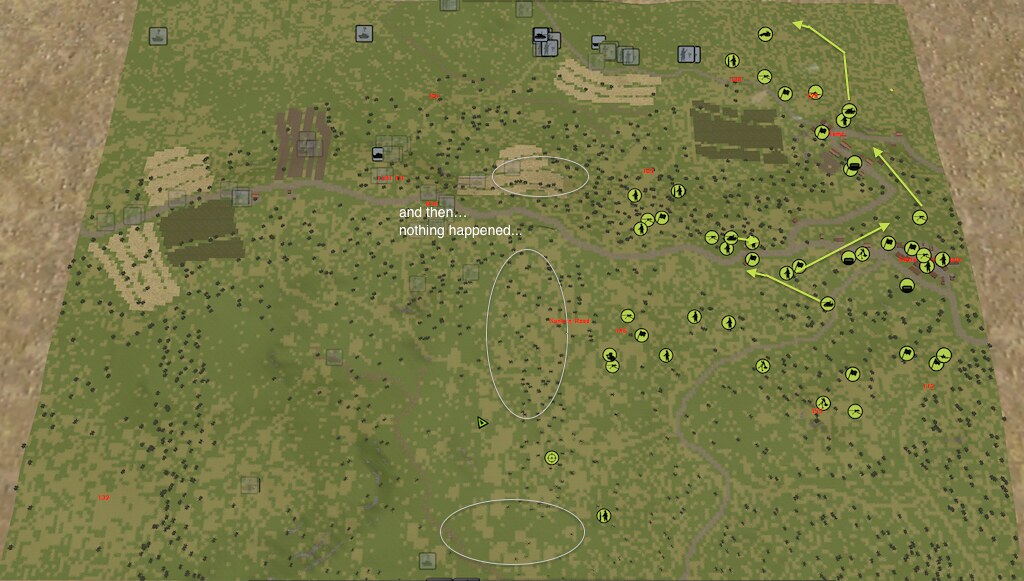
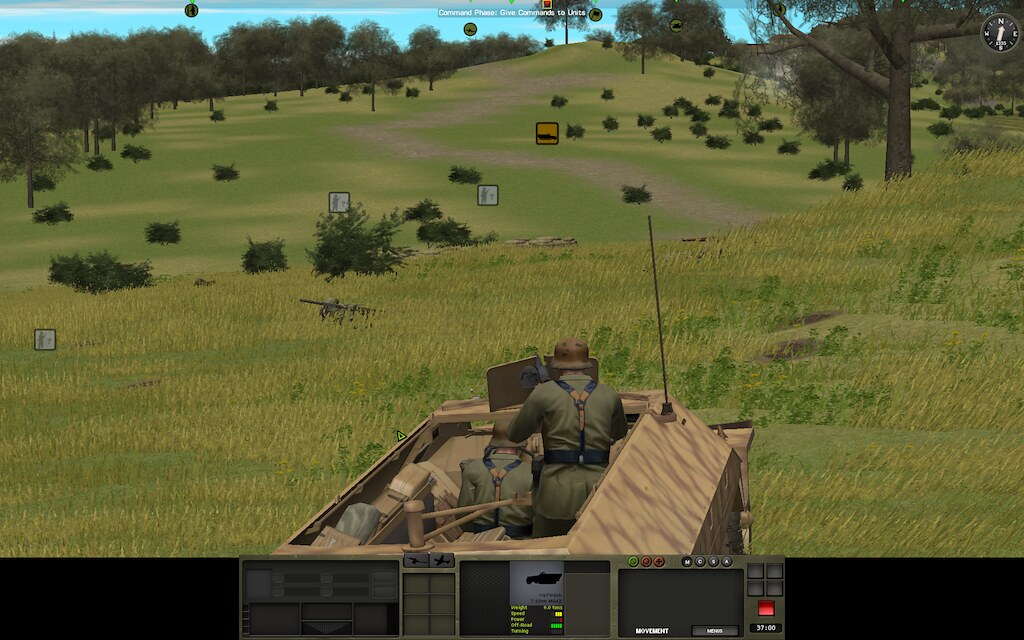
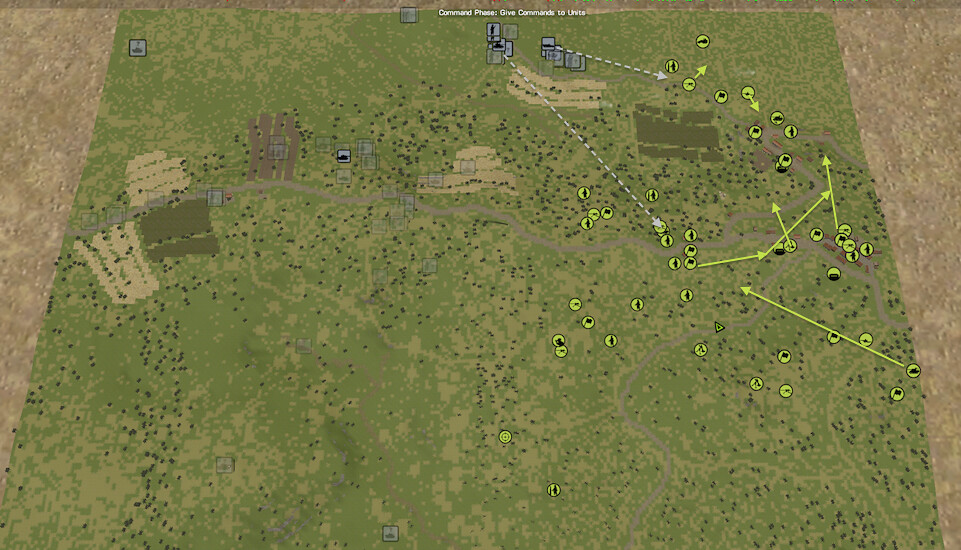
Movie 37, 0:34-0:33
Bil is now seriously on the move on the right flank

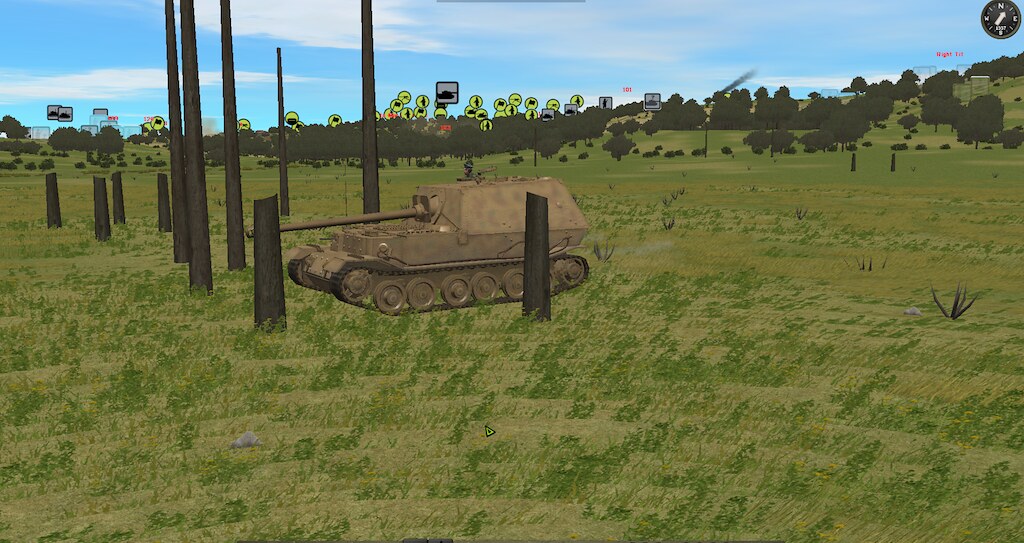
He has shifted the Elefant, heading to a position where he'll be able to see the centre-right ridge far more easily ... something he can do with confidence now that my ATG is gone from there, and he knows where my two centre M10s are. He must feel sure that I have no unaccounted for guns, because it was a bit of a dangerous side-on dash:
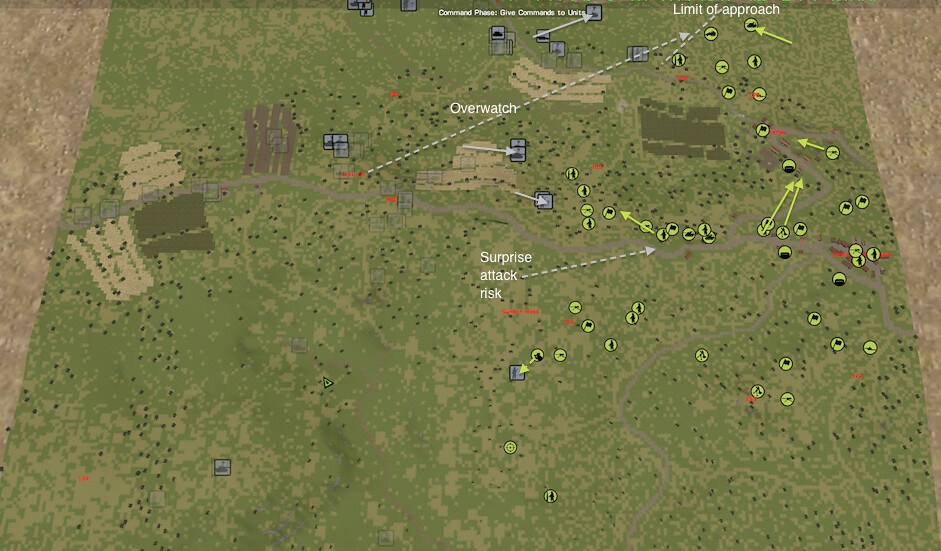
The two sound contacts coming up the centre ridge were indeed the two remaining PzIVhs, and they have come on very strong. They are almost overtaking Bil's infantry scouting in that direction... I doubt whether he'll be careless enough to let them within anti-tank personell range, but I can hope
 The bulk of that screen is going to try to pull back "be like water" now, though... they can't possibly hold out against two tanks at this point. The whole centre right valley is now completely undefendable, really, with the amount of big guns overwatching it. So I will have to let Bil flow through there, harry and hassle him, and try to be ready in a more secure last-line-of-resistance.
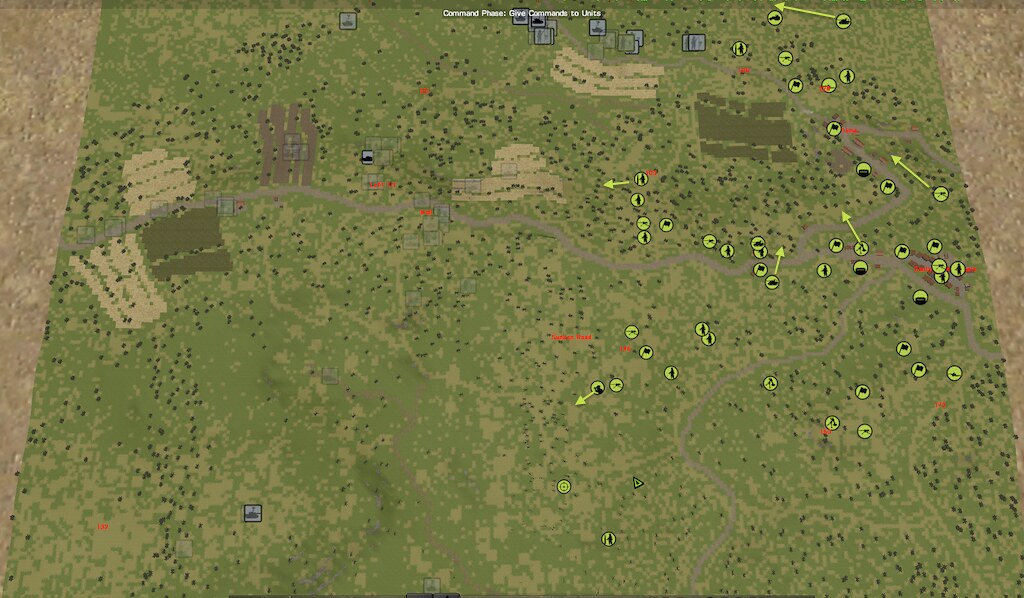
If I have counted right, he still has two tanks - Brummbar and JgPz - to play with on the left as well, so now would appear to be a very likely time for him to turn up the heat on that side. I've lost sight of the JgPz - I'll try to inch the sniper back in that direction to find it again.
On the far right, Bil's approaching infantry took out my far right forward eyes, so it's down to the reverse slope guys. (In less concealment situation, my forward eyes would have hoped to spot Bil's initial advance, fire on it, then run back ... but in this case Bil's men were right upon mine before mine spotted them!)
Heavy artillery continues to fall behind Hill 126, and an HT appeared to scoot for the far far right edge of the map ... where AATH and M10 #3 are waiting.
GaJ
-
Don't forget our illustrious beta-tester and AAR author Green as Jade's website.
Indeed .... "use it or lose it" - a phrase the medical profession uses, but equally applicable when it comes to thinking "is it worth the time and money?"
GaJ
-
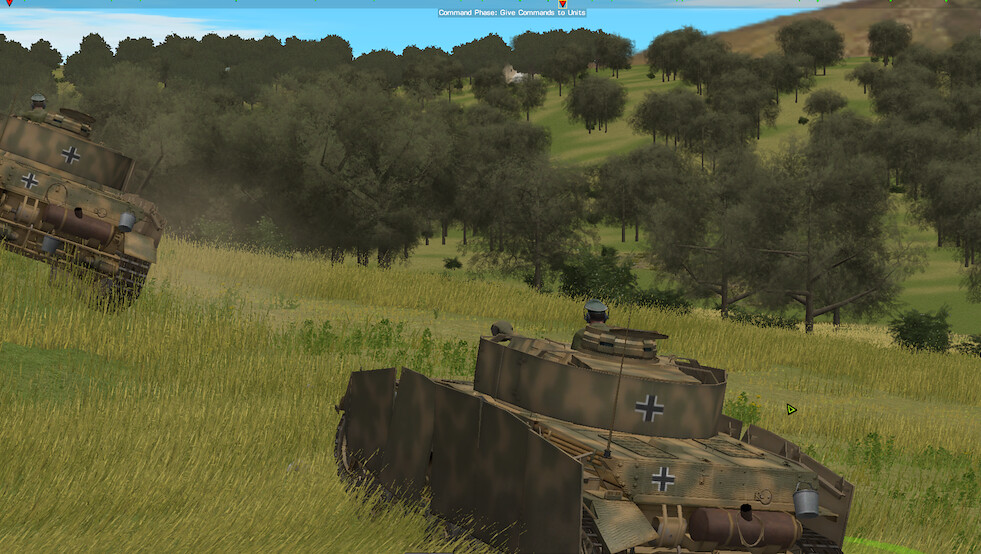
Movie 36, 0:35-0:34
I wonder if you guys are still reading, now you have your own Gustav's to play with?
Bill seems to be making a serious push on the right. I think the two new armour contacts in the middle right are the other two PzIVhs. In addition, his Elefant moved this turn. It's all a bit tense, because at the same time I contacted his inf on the centre right ridgeline (in full view of his right PzIVhs) and inf on the left near the Spur. It will be interesting to see if his PzIVhs get distracted by the infantry game, allowing me some free shots at them...
GaJ
-
On the Mac, it's important to install to the default location - it's OK to rename afterwards.
This applies to patches as well: always have the target being named the default way.
Therefore, for two installs, install the first to the default, then rename it, then install the second to the default location, then rename it.
If you need to patch either, rename it back to the default, apply the patch, and rename it back to whatever you like afterwards.
Hope this makes sense.
GaJ
-
Ah yes - looking forwards to putting mods back in
Particularly that one GaJ
-
I'm always up for a lesson on CM... how do you check that sort of thing?
-
The centre-right M10 will stay put for one more turn where it is - since Bil knows that it is there, he has to start thinking about how to get rid of it, and that presumably will be mortars, because I'm pretty sure the Elefant and its friends can't find an LOS into here, and it seems unlikely he'll go into a direct face-off hoping his PzIVhs can manouver and re-spot me before I spot him. That means I have at least a turn (of mortar aiming etc) where I can sit menacingly over the HT route to Hill 126 before I have to move again.
I am also pulling the second M10 over to support this action. It is looking for another path through the trees that can see the HT push route, but is shielded from the current PzIVH location.
This may force the HTs to go further out towards the edge of the map, where the ground falls away, and the west spur that they are on will block LOS from the centre ridge. That would be a good thing for me, because it takes them further away from Tit overwatch, and into the teeth of the right M10.
I have some other minor tweaking going on, including a couple of minor units moving forwards once again to try to re-connect with Bil's centre and left forces, which have been uncomfortably out of touch for a while...
GaJ
-
Movie 35, 0:36-0:35
Not a lot to report this turn.
The centre M10 reversed into it's new position as planned, but none of Bil's forces made a move on the right flank, so he didn't get any HTs to fire at.
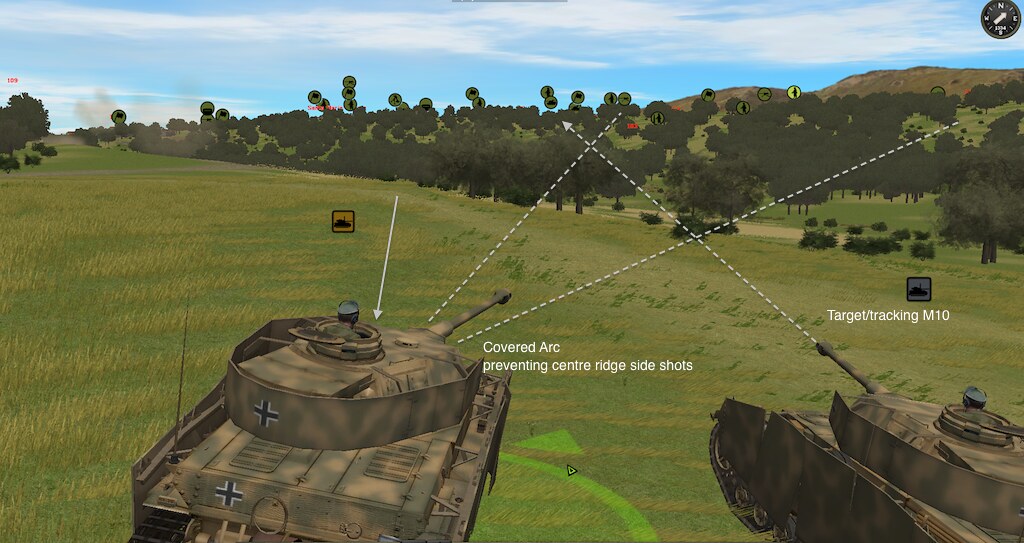
As you can imagine, I was watching the PzIVhs closely throughout this. The rear one was definitely tracking the M10 between the trees - it's aim adjusted 2 or 3 times, but apparently he couldn't get a lock as the M10 moved.
The other PzIVh reversed back into very close proximity of the rear one, and took up station guarding theirs sides that are exposed to the centre ridge. Wise move, because my other M10 had been psyching up for a push over the ridge for just such a shot. The good thing about this is that Bil therefore really only has one barrel, not two, facing off the centre right M10.
-
Elsewhere, further adjustments continue...
I've been resisting committing an M10 to the deep right, but I realised that the compromise positioning was the worst of all worlds - face on to the line of approach, and exposed to the centre ridge overwatch. So he's going deep.
The centre freed M10 is now heading forwards, with a choice of going right over the road/ridge to have a go at PzIVHs, if they move forwards and expose sides, or of continuing to watch over The Spur, on my left. There has been no noise from there for a while: I guess Bil is making sure I have nothing lurking over there. It's strange that he'd pause his push on this side, though, because that frees me (at least creates an impression of freedom) to use resources on the right, wheras if he were coming at the same time on the left it'd be ... more pressured. Maybe he's ready for full attack, behind The Spur, and is waiting till he gets properly engaged on the right before making a nasty move on the left? Who knows but, I need to keep an eye on there for sure.
GaJ
-
In other good luck news, the centre right M10 reversed successfully out of the line of fire of the two far-right PzIVHs.
I'm moving it back, now, to a position that has some teeny view holes near to where the PZiVHs are...
... and a good view of the next little valley that Bil has to cross on the way from Hill 109 to Hill 126....
-
LOL I could do no better.
I was actually rather proud of that little simple hackerooney recovery job
GaJ
-
Sorry for the delay - Friday night camping outing with the family intervened. I'm on the turn now and .
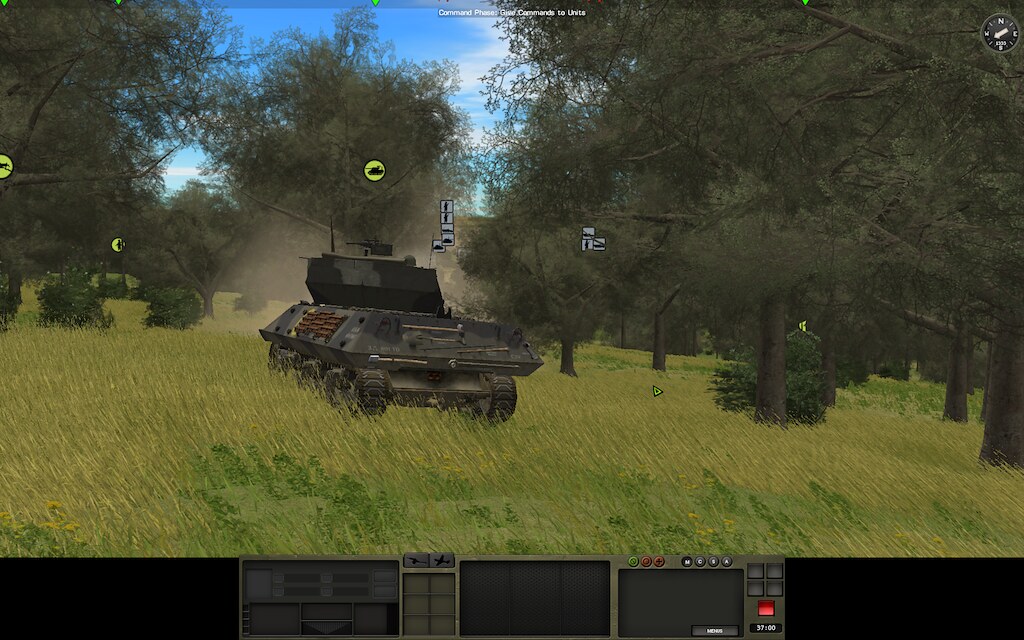
Movie 34, 0:37-0:36
I'm really quite relieved to report that the trapped left rear M10 ran the gauntlet of the Hill 130 JgPz succesfully: it is still alive and now free to roam the midfield with far more options.
Here we see it rushing past one of the openings that the JgPz had to spot it (the worst one).
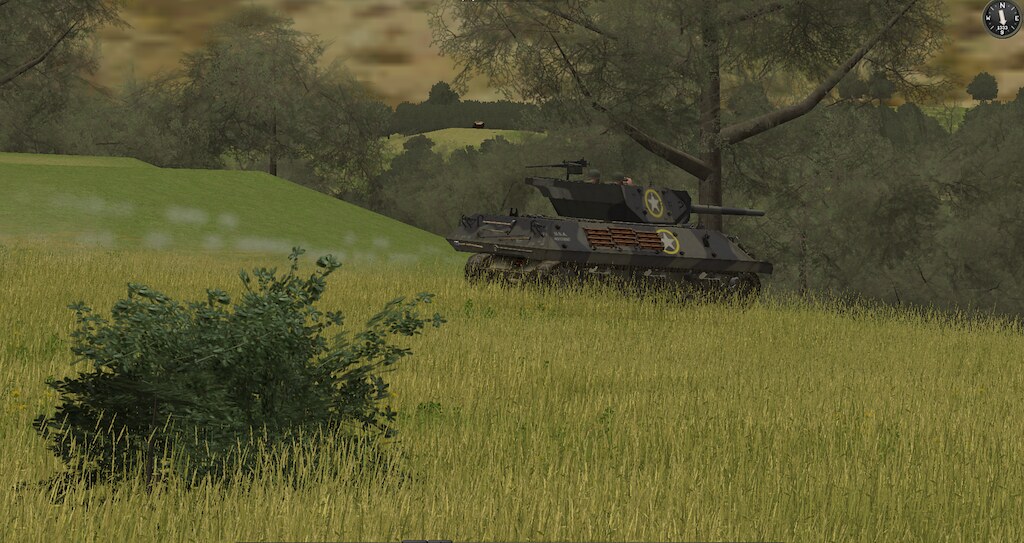
Incidentally, that outcrop is what is shielding the ATG in that area from the Hill 130 overwatch.
This is the sort of move that I would normally put in the category of "crazy, don't risk it, you think it's a calculated risk, but it will go wrong". I've lost track of the number of times I've said to myself "I'll chance it, it's worth it", and then wished I hadn't.
I got lucky this time. I did consider smoking this path before running, but I'mm seeing 81mm smoke being totally ineffective for Bill due to the wind, and also the sheer number of little holes that the JgPz might see through ruled this out as an effective measure. Although realising that this was one of the "it's crazy to take a chance" risks, there was actually little to loose. I knew, pretty much at the moment that the sheer extent of Hill 130 overwatch became clear, that this guy behind the ridge was pinned. Then I found out Bil probably knows it was there (shelling in the area) ... so it was effectively useless anyhow. I needed to get it out at some time, and Bil was showing no signs of taking away the JgPz (why would he).
So ... yay. What a relief.
I actually watched the JgPz closely the whole movie, and interestingly it didn't show a sign of spotting. No adjustments to take aim, not a thing.
However, I have to assume that Bil saw it, and actually I don't mind. Before he had the comfort of knowing he had a pinned asset of mine. Now he has to wonder what I'm up to
Here is a more zoomed out picture of the same moment, for orientation. You can see my left rear ATG, that watches the centre approach, shielded from Hill 130 by the outcrop that the M10 is driving past.

-
-
Packed up and repositioned! That's thinking!!
It's perhaps making the best of a not-ideal situation
It would be easy to say "Geez, GaJ should have brought a more mobile force - he already knew that fixed fortifications are a monument to the stupidity of man, so why did he bring bunkers and ATGs? Now he has to lug ATGs around by hand!"
This comes to the question of "how does the defender make up for the force imbalance that he faces?".
Although Patton thinks that they are stupid, bunkers (in theory) give you one up over an attacker because they are an almost-invulnerable asset and (in theory) force the attacker to place an AFV in a narrow area in order to take them out: a positioning that you can take advantage of. I thought it was worth exploiting this - though as it turns out to mixed success so for. The invulnerable claim is holding up well, but the effectiveness of the asset is greatly reduced by it not being able to see the inf that it is supposed to be interdicting.
ATGs are another "tool" for a defender to get a one up. Due to the force imbalance, a defender needs every gun that he has to have a chance of taking out more than one equivalent gun of the opponent. An ATG offers this possbility through keyholing and concealment (and possbily low vulnerability through entrenchment), and also provides extra guns-for-the-money, being cheaper.
With a wide area of attack paths to cover, a combination setup was worth a try - using the ATG to hit the tanks that would be forced to take out the bunkers that were blocking infantry approach routes. Unfortunately, as I learned painfully, the concealment of ATGs was not up to scratch for this plan.
This was the thinking that lead to ATGs being there. Once they were there and not functioning as intended, a desperate move to make them a bit mobile was the remaining option
GaJ
-
This is the best I was able to do:
- - -
After some research into the matter at hand, I discovered Mr. Emrys is absolutely correct.
唯ergerbitz
Ah, yeah, you're absolutely right.
庸ytinghellfish
...Michael's assessment is quite right.
輸ndreas
And after some thought, I decided that Emrys is absolutely correct.
溶oxnoctum
... Michael Emrys is absolutely correct.
蓉ser38
Michael Emrys seems to have nailed it.
優Laurier
...and Emrys' view on the subject is spot on!
謡olf66
- - -
(Courtesy of google cache... why it has Japanese characters in it, I have no idea! If you think you can delete something from "the internet" ... think again
 )
)GaJ
-
I just looked at the pack up and deploy time (a total of 9 minutes) and thought to myself "just maybe, I have that much time before Bil gets into the midfield", so I have the guys pushing it. It doesn't need to go far to get out of range of targetted mortars that are hunting for it, and what I like about this is that if I escaped unspotted as I moved, then Bil thinks I have a hard-to-kill gun at the old location, which is almost as good as actually having a gun there, in terms of holding back his armoured advance in that old FOV.
A "Baldrick Plan". Well. That might be best answered by google
In summary - a cunning plan devised by the fictional-comedy character "Baldrick", very unlikely to actually succeed GaJ
-
Nice work, Ian, with your home-crafted ATG emplacement ... that might be a winner.
I had not mentioned that I was packing up the ATG... it's been kind of a little Baldrick plan (Baldrick manouever?) I had going on in the background
 (they are pushing the darn thing!)
GaJ
-
Michael Emrys was right to truncate his sig at this time.
GaJ
-
Over at the now-conquered Hill 109, one of Bil's HTs started laying down fire on the next ridge that he needs to take, behind Hill 126
I do have eyes in that area, though not right where his gun was pointing this turn, happily.
Bil has now conquered the three "I don't care" zones - those VLs that I simply did not intend to defend. If Bil were not such a meticulous player, I could start hoping that he is getting restless with the lack of opposition - even over confident perhaps. I guess I can always hope a little for this ... though a wise person once said don't plan your success based on other's mistakes.
Anyhow, Hill 126 is the first actual reverse slope opportunity that I have had to defend, and it does have defenders.
A HMG and the AAHT are back behind likely shelling zones (in fact, I'm moving the HMG further away from the crest that Bil can easily shell).
It was clear that Bil had spotted the Hill 126 ATG that fired on his Elefant (or guessed precisely its location), because he is now shelling the area where it was. Happily, I packed that thing up after it fired, and it's now moving back a little further reverse slope behind the Tame spur, where it can cover Hill 126 without being exposed to the Tits etc.
Another HMG and Bazooka are also moving down to help with resistance at Tame.
I have also decided I need to get my left read M10 out from behind that big ridge. So much of that ridge is controlled by the JgPz on Hill 130 that he is pinned too badly if he remains in that location. There will be a moment, as he crosses the ridge, where the JgPz may see him briefly.... I'm holding my breath that he makes the crossing OK!!
GaJ
-
Movie 33, 0:38-0:37
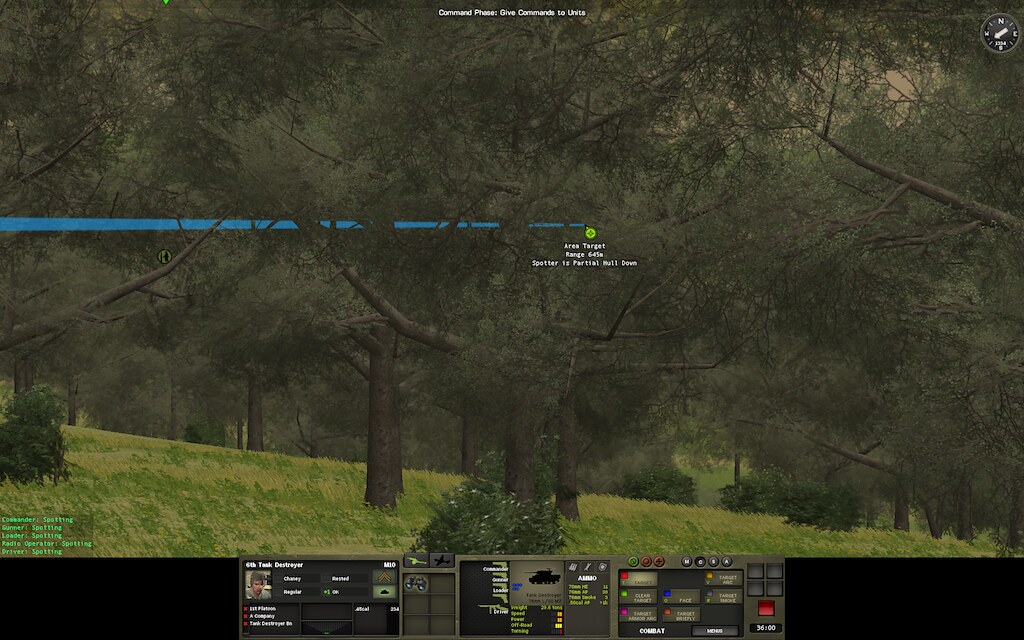
As you may recall, I decided last turn to push one of my M10s up the centre right, to try to find a place where they could catch Bil's right flanking PzIVH's with a side shot.
Thankfully it is not dead (yet) as a result, though all did not go to plan entirely. Just as it arrived at it's parking spot, it spotted an HT. This caused it to button up and start aiming at the HT. At the same time that it had been moving up, so had Bil's PzIVHs. I can see them from spotters in Tame and further up the centre ridge. They spotted my M10 quickly and opened fire...
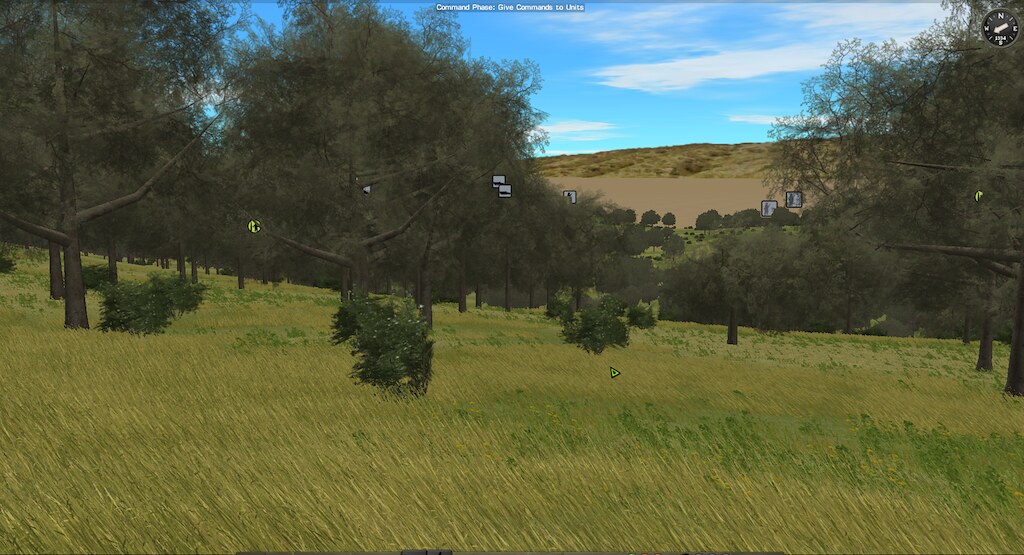
The M10 did not spot the PzIVHs in return - as soon as their first shell arrived, it's smoke burst obscured that path. Here's what it looks like, more clearly, to the M10:
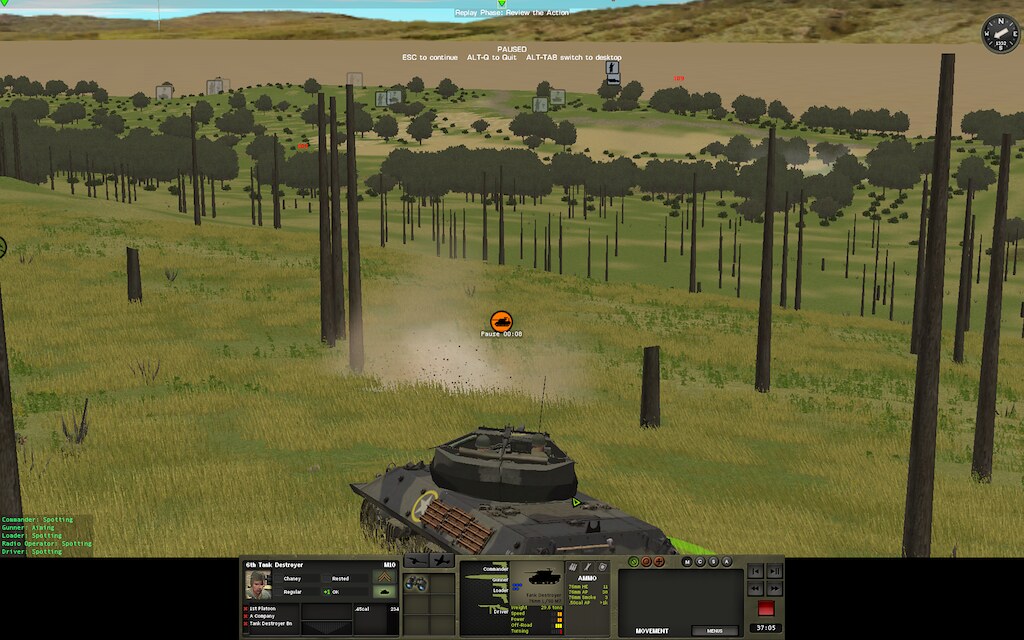
Here's what it actually looks like:
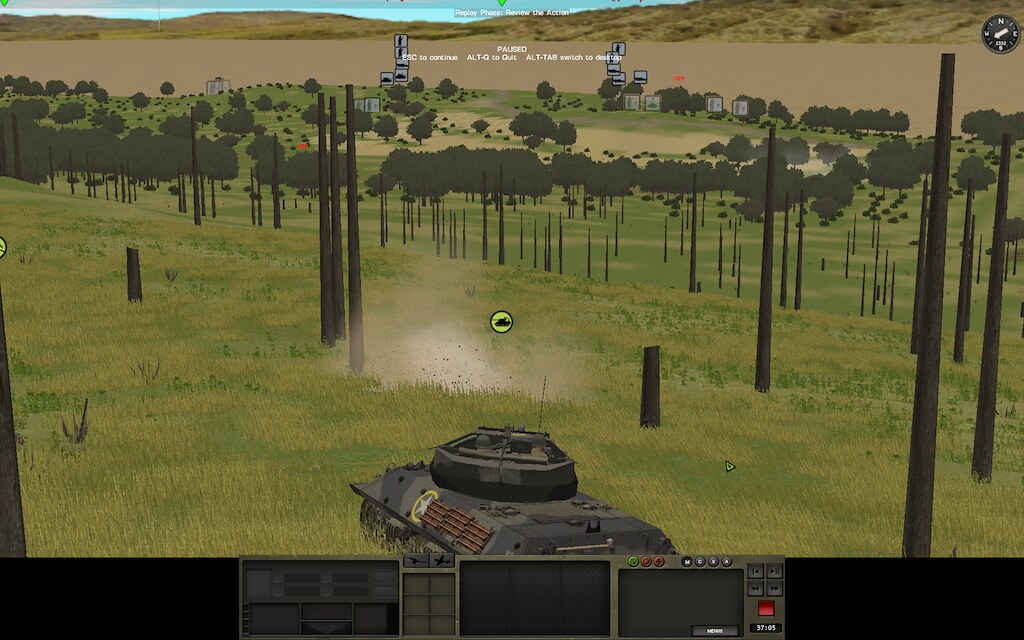
Needless to say, he'll be reversing back the way he came far enough to be sure that the PzIVHs can't see him any more. I'm hoping that the smoke-burst that obscures the PzIVHs from him is also obscuring him from them. Their turrets rotated away in the last seconds of the turn, fingers crossed.
-
I agree. I ran a test on this same map with a JgPz parked where Bil parked his, looking at an ATG where I parked mine, and I got sick of hitting go before they spotted each other!
One could say that Bil has been lucky with his spotting, but you make your luck. Put eyes in the right places and the spotting will come. My impression remains that the grass is providing more concealment that feels natural, but it's easy to form that impression when you're on the receiving end of some bad luck in that respect - I have no real complaints about the grass.
I do think that ATGs should be able to be 1) Camoed and 2) Emplaced. Without at least one of these two things, I won't be using them again through choice. Although it's clear that it _can_ be hard to spot an ATG (based on my test), it is not reliable enough that it _well be_ hard to spot them when you need it to be.
GaJ

 The bulk of that screen is going to try to pull back "be like water" now, though... they can't possibly hold out against two tanks at this point. The whole centre right valley is now completely undefendable, really, with the amount of big guns overwatching it. So I will have to let Bil flow through there, harry and hassle him, and try to be ready in a more secure last-line-of-resistance.
 )
) (they are pushing the darn thing!)
How do I install two copies of CMFI/GL?
in Combat Mission Fortress Italy
Posted
H2HH fundamentally assumes that games for a given installation are in their own folder.
It will present a strange picture when it finds all the games for all your installs (CMFI, CMFIGL, future ones) in the same Incoming Email folder...
Edit: actually, maybe it will all just work, but one thing is for sure: I have no real idea what will happen, because I hadn't thought about this scenario... so "Oh, man, I haven't thought about this"....
GaJ