

~Viajero
-
Posts
319 -
Joined
-
Last visited
Posts posted by ~Viajero
-
-
I was hoping the CW module will make you forget, for awhile...
I think it´s kinda the opposite actually!
-
I ran some tests several months ago on the value of buildings for cover...
Results summary somewhere we can see?
-
When CW was released I found that I was staring to spend so much of my time issuing orders on pause that I might as well play WEGO.
This.
Once I find some enemies I do my best to keep the scouts out of combat and keep using them to find a weak point in their defense. At this point is when I move a platoon or two up to where the enemy was located, trying to maintain C2.I keep much of my force back as reserves (might be one of my problems). As I usually only send 1-3 infantry platoons and an HMG up along with a tank (if I have one) which I keep back in case of AT guns.
Once I make contact with a platoon I concentrate my fire on the enemy (for fire superiority) and split off an assault team to try and flank (or charge if I'm forced due to terrain or other enemies) once the enemy is pinned. This most of the time results in a notable amount of causalities (4-7) on my side (not sure if that is an acceptable amount for such action). This seems to be what I have the most trouble with.
I ve selected this bit for discussion, because is typically where the "meat" of the issue is on attacks.
Keeping "much" of one´s forces back as reserves or not is an art and it may depend on lots of factors. The main one for me is the knowledge or lack thereof about enemys artillery and HE options and how open the terrain is on approach to the objectives. This due to the fact that soft units are the ones typically doing most of the most exposed manoeuvering, and also need to invariably go first before armour can go.
In many ocasions terrain will limit you on how much of your force you can effectively send out to supress defendants anyways. I.e. There is only so much area with LoS to where you need it... What I try to find is approach avenues that would allow me the maximum concentration of firepower from overwatch if contact was made (which actually means that sometimes the open ground avenue may be the best!). I dont succeed every time obviously but that is the aim. Good players recognize those avenues better than others.
Flanking while supressing is risky unless you are 100% sure there are no other units in the area other than your current target(s). My flanking attempts always end up badly because of unexpected new contacts. Much better I think to try and eliminate/fully supress all defendants in a given spot before moving in, unless you are sure no other support is in the area. To ensure full supression you need to apply firepower during enough time. In the old forums there were a few posts about how long it took for a certain amount of firepower to supress certain units, but for the most part we will have to learn by trial/error. In some cases it will be obvious in others we will have to make a judgement call.
In rural terrain positioning of infantry overwatch is much more easy than in urban terrain nowadays with CMBN. Urban inf combat with CMBN is much more difficult nowadays I feel because the ackward virtual tile system used in CMBN that limits where your squads can be placed and therefore there is a big impact on their LoS at short ranges in and around buildings. This has prevented me in many ocasions to be able to set up a fire superiority position across buildings whereas in the old CM it would have been a much more natural process. As it stands, and all other things being equal, urban infantry combat feels a bit of a lottery to me in terms of being lucky enough to have access to the right tiles that would allow you that fire superiority.
Since you ask about attacking through open ground, enemy´s HE capability is key. If this is limited or non existant then you can afford to set up a fire line backed up by your own armour, use your scouts as stated and then concentrate firepower on detected defendant units as you go (many good posts about how to advance infantry in open ground with no HE present at the old CM forums). If your opponent has decent artillery or HE at hand, then you may not be able to afford exposing your own infantry and need to either use smoke and/or have your own armour as exclusive overwatch. While your scouts are used as sacrificial bait until you can flush out enemy artillery and or detect the location of his armour/AT. The goal here would be to find a weak or blind spot in the defense line and concentrate there with a combo of overwatch and smoke to be able to send in your spearhead.
-
And in my last ten years of playing PBEM I met another very rare but likable kind of player: "The Unbroken Ignorant".
This type of player never wins a battle (or only very very seldom), he doesn't seem to know anything about tactics,
combined weapons and gameplay and he is resistant against any good advice but he always stands up again and is
asking for revenge.

Yup, that would be me.

-
I'm working on it. It's quite a lot of work and I wasn't able to start sooner because I was doing textures right up to the deadline.
I hope to have it finished by the end of the week, but no promises.
OMFG, We love you man!!!!

-
+1 to the OP, not that happens in every game and if you are careful in your orders, but still when it happens it tends to be quite silly and with dramatic outcomes.
I just had a kubelwagen wandering off to my own minefield because the AI decided the path I ordered (a straight line by the way) in the first place was somehow blocked (maybe by another vehicle) and chose a completely different rout. I know the route was possible because a few other vehicles had gone thorugh it before (cleared bocage). Not only the kublewagen ignored the route (not even pauses) but as I said it decided to drive into my own minefield...
In the same scenario one of my spw also decided to ignore my route and go through the same minefield. This time the vehicle sutvived but it was eliminated by my opponent troops happily waiting for it at the other side of the minefield...
As I said I know the path was possible because plenty other of my vehicles had used it already.
I have the turns if someone is interested...
-
Does anyone know if Marco´s excellent mod for armour and penetration data (http://www.battlefront.com/index.php?option=com_remository&Itemid=314&func=fileinfo&id=1084) will be updated or has been updated for CW forces?
It does not seem to display such data for CW forces so far for me...
 any idea?
 -
What considerations for the CW module? I mean we need to have the same version of the game to play a pbem, correct? Do we just arrange bilaterally with our opponents whats the best way to proceed?
-
Is it just me or this P thread is going as slow as Mr Emrys brain? At this rate it will be relegated to the second forum page (shock! Horror!). You re welcome.
-
Havent been able to go through the whole thread yet so I am going to ask in the hope you bear with me on this little silly question:
If my opponent has upgraded to the patch and/or the CW module, and I havent, can we still proceed with our ongoing pbem game? Or do we both need to be either patched or with the CW module?
-
Fair question indeed, but when you see these posted it can only be a sign of an otherwise excellent game!
-
Yes to both of your questions. .... but an occasional bitching & moaning session never hurts to remind them that feelings on the subject haven't changed!!!
True that! Armor cover arc now darn it! Or else!
-
But, but... hasnt this issue being discussed many times over and hasnt battlefront already stated that an armor cover arc feature would not be implemented at least until the next game series release (i.e. The Bulge)? Or maybe I remember wrong?
-
Sami Eskimo here. There are actually 100´s of different snow types and we have as many words for it. I wonder how many of them would get modelled into the game.
-
My game is done, does that help you?
erm... sort of, kind of, almost. no.
-
That's what, about 8/day between now and the deadline? That's a pretty tall order.

Man! Stop posting completely useless posts or the average will increase!
-
I have estimated that I need 357 more posts like the ones above with slight innuendo and/or clues about the scenario so I can have a fully 100% accurate picture of what and where my opponent troops are.
-
--------------------------------------------------------------------------------------------------------------------------------------
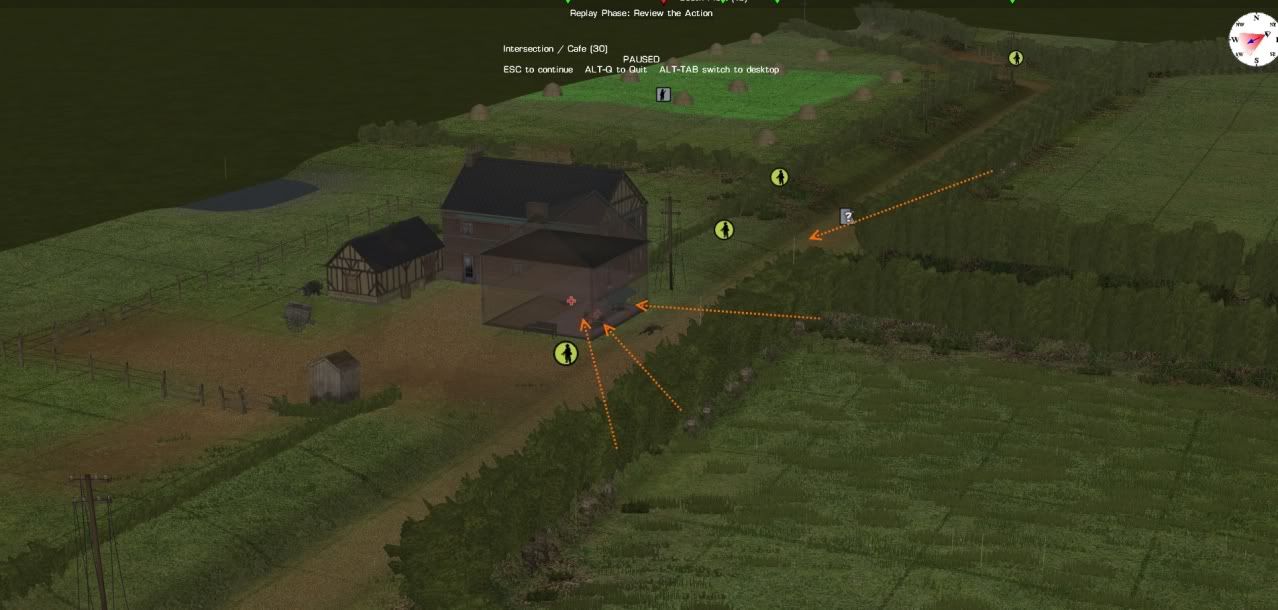
In deep $#&% now. The AT team move over near the gate to put their rounds into the bocage at the T intersection. The remainder of 1st Sqd run to where the Americans lay. From here they go around the back of the NW Barn and collect another 10 points. Then move to the back of the Farmhouse for another 10 points. Only to be blown away by a group of hidden Americans. The sole surviving German starts retreating to the back left corner of the map.
19 to 6
Yeah, the hidden Americans were my 2nd Squad split team taht you can see on the bottom right corner in the pic above. I saw sound contacts around the far and kew oyu were going to the tag points. Could not stop you but at least I could kill you
 .
.At this point with a fairly balanced distribution of objective zone points I started to wonder about the weight of casualties on the final score. I mean, all things being equal and most tag zones being tagged by both teams, it was going to come down to most kills. So having tagged the objectives, defending them was pointless anymore, so I decided to concentrate on focusing fire.
One of the things I think I have learned so far with CM:BN is that unless you are 150% sure of what you are doing, he who moves first usually dies. I guessed my kills so far were tipping the balance for me so I decided to place my troops in good spots for LoS, stay put and shoot anything that moved.
--------------------------------------------------------------------------------------------------------------------------------------
1 man from HQ and 4 men from 3rd Sqd are in position behind the right building at the (Intersection / Cafe) they are hoping that some Americans try to move into the building. (2 MP + 3 rifles should give them plenty of close range fire power)
AT team (out of ammo) has run back to the bocage where 2nd Sqd’s dead are trying to pick up at least 1MG.
The lone 2nd Sqd soldier (broken) is trying to move back to the SW Barn to try and cover the South Orchard.
Still 19 to 6 – 8 men left
--------------------------------------------------------------------------------------------------------------------------------------
1 American moved right into my trap and was killed by the 5 men hiding out the back of the building.
19 to 7
I was getting low on amo so I was hesitating between continue the area firing the inn with my two squads or not. Area firing the buildings would make sense only if you were actually IN the building (albeit hidding maybe) so I moved my loner sacrificial troop to check if that was the case or not
As it was you were not in it but behind as you say so I hold onto my area fire.--------------------------------------------------------------------------------------------------------------------------------------
12 minutes left
Collected rifle for AT team and moved 2nd Sqd soldier to Pick up LMG now with a little extra fire power I may be able to try for the east field.
Still 19 to 7
--------------------------------------------------------------------------------------------------------------------------------------
2nd Sqd soldier moves to gate to lay down fire on the bocage near the Cafe, While the 2 AT guys run down the bocage and onto the road to get into a flanking position. Meanwhile 3rd Sqd and the HQ hunt into the Cafe to take the Americans from the front.
Still 19 to 7
--------------------------------------------------------------------------------------------------------------------------------------
The men hunting into the Cafe may as well been standing in the road all 4 go down and the HQ breaks to the rear. The man from 2nd Sqd is pinned and 1 of the AT guys goes down without even see an enemy marker.
24 to 7 – 3 men left
My 2 squads behid the bocage saw your men advancing in the Inn and just started shooting. Concentrated fire from around 10-13 men across the road.
 --------------------------------------------------------------------------------------------------------------------------------------
Time to go all gamey run down the road into the field grab some more points. AT guy runs out into the field gets to the magic green land and drops dead. 2nd Sqd is finally totally wiped out as our fearless leader hides behind the bodies of his dead fiends.
26 to 7 – only me left now
--------------------------------------------------------------------------------------------------------------------------------------
8 minutes to go may as well get this over and done with HQ hunts up to the second story of the building next to the Cafe and is given his final wish.
All gone now
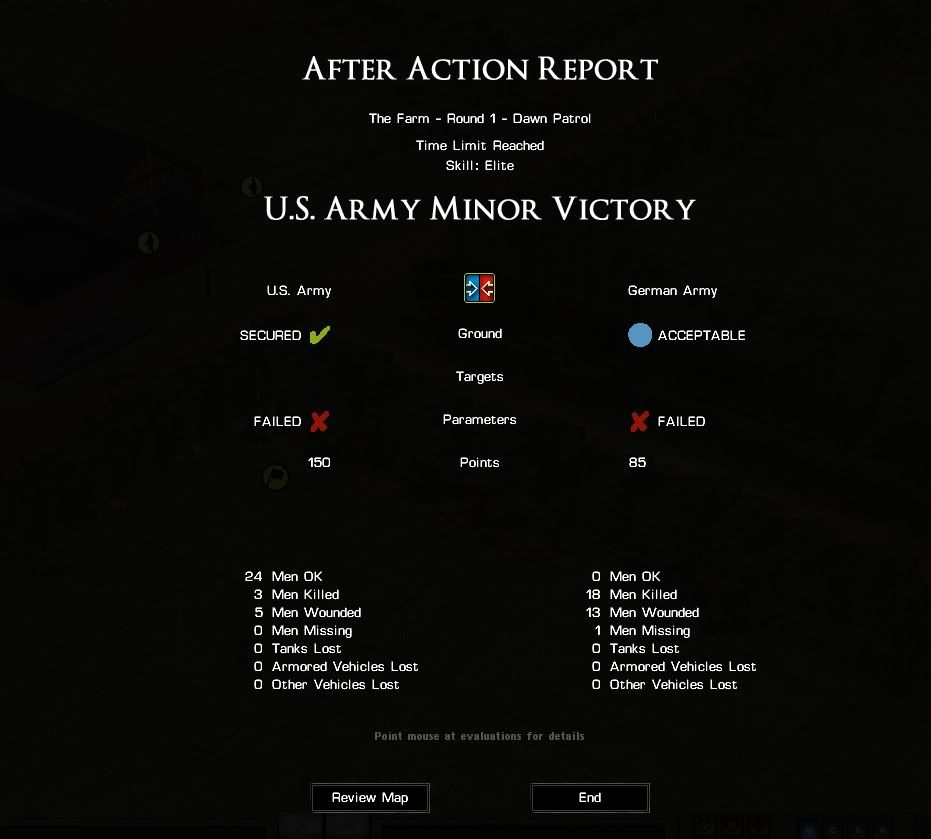
Wash up:
U.S. Army Minor Victory 150 to 85
Somewhere I must have miss counted my dead as in the end it was 32 to 8.
U.S. Army did not secure South Field(10) or Friendly Casualties(50)
German Army failed to secure SE Barns(15), North Orchard(10), Friendly Casualties(50) and Friendly Condition(50).
Bad plan + a little bad luck, getting half your force killed in the first 5 minute, never a good idea. Went for a fast land grab and ran straight into an American kill zone. I should have been happy with the touch and retreated back to the left. Then used all the remaining troops to over power the farm and made him come to me.
Things I noticed:
* Spelling mistake “farmnhouse” objective name
* I had 1st Sqd rout out into the South Orchard and then the last man from 2nd Sqd rout to the back left corner. There may be something wrong with the edge ownership.
* I think if I had of been more gamey at the start I could have maybe won this one. Lots of spots where I could have run out and then back into cover with just the AT team and lots of cover fire.
Difficult to say, even with hindsight, what coluld have been done better with both sides. But I guess I was a bit surprised of not having seen you grab the SW of the farm earlier. Your starting position was much closer. But as it happened I got there first and you were forced to cross open fields under my overwatch, both at the Orchard (My HQ and Team C) and the Farm inner yard (LMG). At the inn I believe you exposed yourself in 2 key moments, one when you tried to surround it by the South East and the other in the ocassions when you moved in the main building, both spots fully under the LoS of the bocage across the road.
The result screen also shows how the kills accounted for the result. If I understand this correctly, kills were only worth at most 50 points. All 32 germas were either killed, wounded or missing. For only 3 of may men killed and 5 wounded. All worth 50 points "only". Only main comment is that it is a bit strange that having eliminated all the opposition with only 3 killed/5wounded of my own I have failed the secondary objective (parameters)!? I guess the only way to get those points was to kill all the opposition while not getting yourself a single man lost?
Playing with StoneAge was a pleasure and we have started playing a new scenario as we speak :-)
-
Ok, just so you have both side stories in the same post I have decided to post along side my opponent AAR. In quotes his moves and then just below each of them, my own AAR comments.
The Farm AARStoneAge (Axis) vs. ~Viajero Allies (Allies)
Pre Planning:
No movement of troops in set up zone. (Not much room to move anyway)
The troops I have to use 3 Sqd's, 1 AT , light MG and HQ (The inclusion of the AT makes me think he may have at least 1 light vehicle, HT or MG jeep)
Victory zones, look's like there are three touch zones (North Orchard, East field and South Orchard). One main occupy zone at the T intersection (Intersection / Cafe) and a few occupy zones in the farm complex (SW Barns, SE Barns, NW Barns and Farmhouse and NE Barn).
Buildings in the farm complex have very few windows facing my direction. The building do have low walls added most likely making for extra cover for the men inside.
From reading the brief I get the feeling that I should destroy any isolated units that I find but a direct assault on the farm may be a bad idea.
The Plan:
Part 1). The start of the plan is to move and move fast. I want to capture the buildings at the T intersection in the first few minutes and get a quick 30 points as I suspect that the allies will have this as one of their VZ's. Everybody will move quickly to take up their start off positions for part two of the attack.
Group 1. is made up of the LMG, 1 Sqd and HQ. Their first move will be across the open field and take up positions in and around the Intersection / Cafe. Positioning the Sqd to cover the T intersection from the left of the building behind the low bocage. HQ and LMG will then take up positions in the (Intersection / Cafe) objective. Their job is to try and prevent Allied units from moving left to right across the road.
Group 2. The AT team will move quickly to the centre of the map behind the low bocage. From here they can reposition left or right depending on enemy troop/vehicle’s spotted.
Group 3. 2 Sqd’s, 1st Sqd moves directly forward and then sneaks up to the high bocage to put the farm in overwatch as 2nd Sqd move to the left and sneaks into position in the small lane also putting the farm under overwatch.
Part 2). Group 3 1st Sqd is to keep the allies pinned down in the farm area. While Group 3 2nd Sqd moves right and touches the VZ in the Trees. Then moves over further right to the intersection. To help defend and set up a base of fire to either side of the road.
Group 1's Sqd will travel around the back of the buildings at the T intersection and try and take the VZ's on the far right. Depending on resistance they may cross the field to try and hook in behind the allies in the farm.
The most dangerous time for me should be in the first 5 minutes. If there are any allied troops already at or near the T intersection, this could be a very short recon.
Given the briefing, map disposition and Brimmer´s own comments that the map had been design for rough balance I immediately asumed that my opponent also would probably have a similar force (i.e. a platon plus lmg) and that his set up zone would probably be precisley opposite. The only key piece of info that no one knew was if the objective areas were "preserve" or simply "tag".
If they were "preserve" then, actual distance to them would matter less and the game would probably be decided by the best manouvering and use of terrain. If the targets were just "tag" things could be a bit tricky.
For "tag" objectives I was also unsure if the tagging could only be done by the the first side getting to it, or if both sides could actually tag the same objective. As it turns out it was the latter but in my mind by default I considered the former (i.e. the first side tagging a zone gets the points).
With that in mind, my first objective was to confirm the tag vs preserve. Given the distance to my opponent´s corner I concluded that I could probably "safely" reach the bocage just before the inn. So I dashed Squads 1 and 2 through the first zone objective and up to the bocage line to the south, confirming my worst fears that the objectives were in fact "Tag".
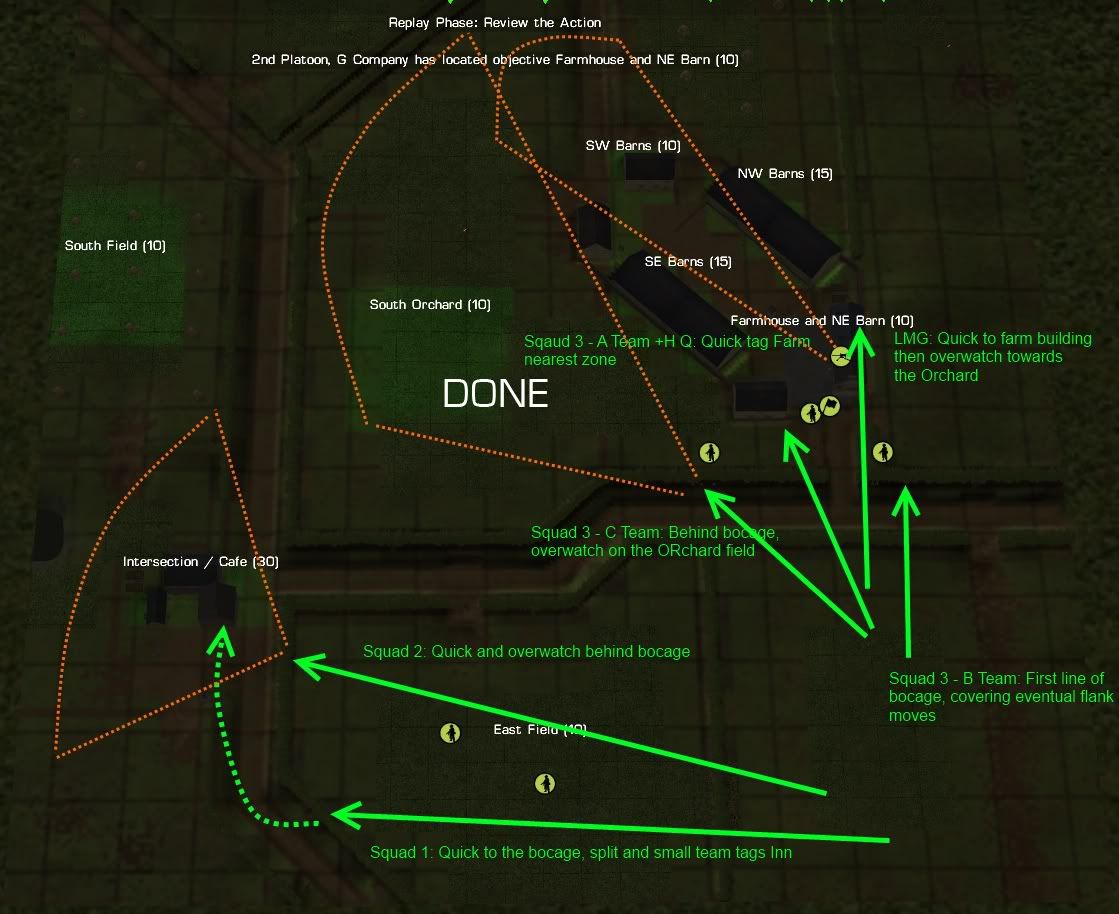
Here below my base plan:
Inn side (Squads 1 and 2):
Squads 1 and 2 would move to the bocage line in front of the inn, and a split team (2 men) from squad 1 would tag the Inn from the south east covered by the rest of Squad 1 and Squad 2.
Since the inn and the field before it, from the German point of view, yielded 40 points with just 2 zones I also asumed my opponent would send a sizable amount of forces there, in case the objectives were "preserve". Also the Inn with his 30 points in one go was much more closer and of easy approach to the German, so I had no ilussions in terms of being able to ocupy it first at all. Once I realized the objectives were "tag" there was actually no point at all in assaulting it. And that is why I only sent a split team of 3 men, for tagging, covered by the rest of the 2 squads behind.
Farm side (HG, Squad 3 and LMG):
Squad 3 was split in 3 teams. Team C was sent behind the bocage to cover the Orchard field. Team A and the HQ were sent to the first objective zone farm building with the intention to have Team A continue to the edge of the farm. LMG was sent to the NE barn farm building in a "Keyhole" posiiton so to cover the Farm yard and the approach avenues from the South West. Team B was sent out east to protect from any eventual flanking attempt and also trying to reach the North West and South West Farm objective zones from the outside (much less exposed than through the middle of the farm).
The Action:
Troops moved out smartly and are taking up positions
--------------------------------------------------------------------------------------------------------------------------------------
A single shot rings out from the far side of the T intersection as the LMG runs for the Cafe. Looks like only a single man covering this area, the race is on.
Actually 2 full squads
As the LMG runs into the café to set up their LMG they are blasted by an American standing just out the front. The HQ hunting into the building right next door do no better, as they get to the front of the building the soldier holding the MP is shot dead.
2nd Sqd turns and starts firing at the two Americans lying in road in front of the café hitting 1. 3rd Sqd who can’t see the men on the road start moving to the back of the Café to hook around behind the guys in the road. As they get to the gate a single shot kills a soldier
4 to 1
Since I imagined you would be probably about to enter the building from the South West I decided to tag the objective from the East side but without entering the building. As chance had it my three men were still and laying on the ground while your LMG team was entering the adjacent building and therefore my men spotted you first.
Your guys sent around the South East of the Inn were about to be spotted by Squad 1 behind the bocage.
--------------------------------------------------------------------------------------------------------------------------------------2nd Sqd losses 2 men (1 with the MG). I am losing the fire fight against 2 Americans in the roadway. Needless to say the plan has gone to hell. 3rd Sqd has split up ½ join the HQ in the first building the second group move around behind the small building at the back and start hunting towards the Café. Where they all die as 2 Sqds of Americans open up on them.
1st Sqd have 3 Americans in view near the SW Barn and decide to take them out.
New plan retreat and move the attack back to the left and go straight at the farm. I have spotted 2 Sqd’s near the Café and only 1 near the farm. I expect to find a HQ and LMG somewhere.
9 to 1
You were receiving fire at the Inn not just from those 3 men on the road, but also the 2 Squads behind them who had clear loss on the Inn. My 3 men on the road received a casualty and were pinned at this stage, but their job was done at this stage by having tagged the 30 points :-)
On the Farm side, everyone was in position. Team A had tagged the South East Farm objectives and Team B had already surrounded the farm and tagged the NW and SW farm objectives and settle in a small depression by the SW barn so to cover any approach from the SW. While Team C was covering the Orchard.
So at this point I only had 2 remaining areas to tag: the Orchard and the South field closest to the German corner. Since I ahd not seen you through to the Orchard and/or the farm my plan was to seat tight and see you coming through the open fields.
--------------------------------------------------------------------------------------------------------------------------------------1st Sqd open fire killing all 3 Americans in the opening volley. 2nd Sqd is down to 4 men and start to rout out into the field near the South Orchard, right into the guns of the Americans in the front building of the SW Barns and the rear building of the SE Barns (looks like I found the HQ). Lucky for 2nd Sqd, 1st Sqd lay down some covering fire and save them.
9 to 4]
Yeah, the small depression really did not work out very well and I was quite surprised to see the 3 men in Team B be killed so easily and fast. They never saw who killed them!
Your 2nd Squad at the West end tip of the road was being "pummelled" not just by my two remaining men in the road (veteran by the way) but also by the rest of my forces in the Farm area. Team A had gone throught he farm yard and entered the southermost building of the complex with direct view to the bocage where your squad was at the end of the road. My HQ and Team C were also at LoS of that bocage and I set all 3 to area fire the bocage by your squad. It seemed to work and your squad routed. The routing itself was weird indeed, as they run into the orchard, and into the hands of my HQ and Team C, not before tagging the objective though
--------------------------------------------------------------------------------------------------------------------------------------2nd Sqd moves 1 square to touch the South Orchard VZ (woohoo 10 more points in the bag). At the same time ½ of 1st Sqd run for the SW Barn where the Americans died just a few minutes ago.
Still 9 to 4
--------------------------------------------------------------------------------------------------------------------------------------
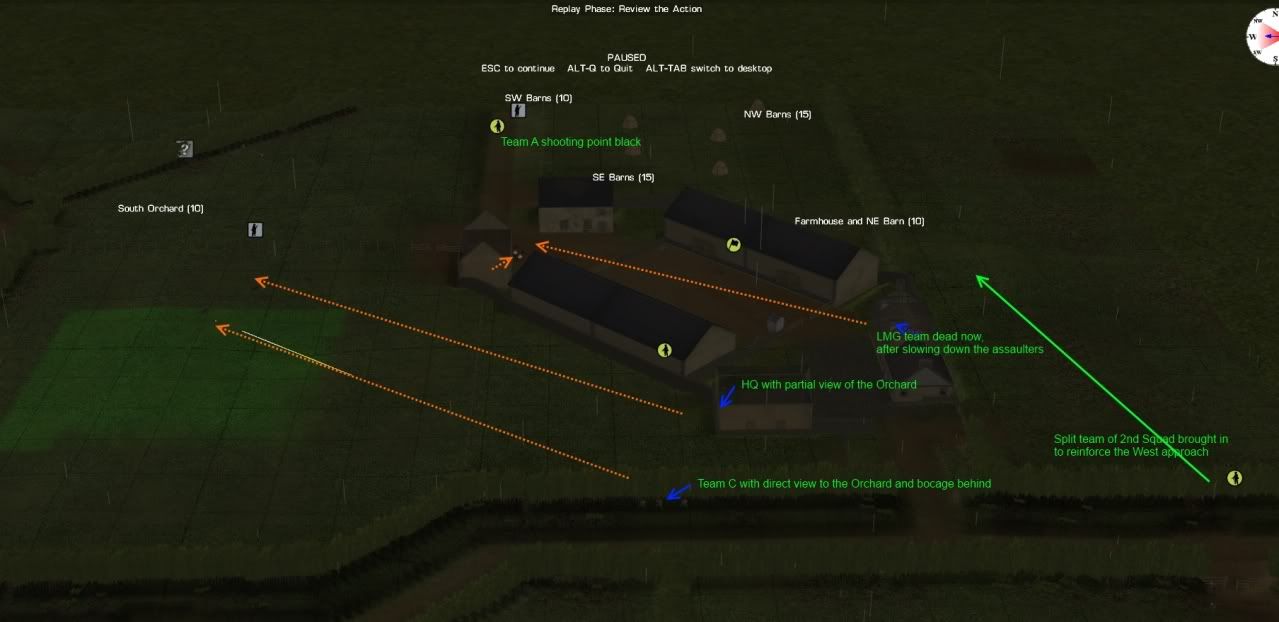
With the small amount of fire coming from the front build 2nd Sqd decide to wait 30 seconds then rush the front of the building as the 1st Sqd MG gives them covering fire from the bocage. The other part of 1st Sqd hunt into the back of the building to kill the cowering American’s. Just as they get to the back of the building a LMG from the Farmhouse/ NE Barn starts to shot at them. One of 1st Sqd returns fire taking out both Americans firing at them.
9 to 6
--------------------------------------------------------------------------------------------------------------------------------------
2nd Sqd does not make their attack as they rout again. The 4 men out the back of the building instead of charging in and killing the American’s, they hit the dirt when a stay bullet comes their way from the building the LMG was in. At this same moment 2 Americans stick their heads out of the back of the building and proceed to kill all 4.
13 to 6
My 2 men team in the South building were not cowering aymore when your 1st Sqd gets around the building. My HQ and Team C had been also returning fire to your bocage line and the orchard and I guess that somehow limited the amount of supression you were trying to achieve on my 2 men in point.
My LMG also went out a tad too quick, but just in time to stop for a few seconds your 1st Sqd. Enough for me to give the order to my 2 men in the South building to shoot on them point blank!
Your men in the Orchard had no chance really, at LOS of my HQ and Team C all along.
--------------------------------------------------------------------------------------------------------------------------------------
2nd Sqd is totally gone now as 1 is killed and the other 3 surrender. A few minute later they put their hands down and the Americans kill 2 more before they can put them back up.
16 to 6
This was the critical moment for the Farm battle. Your assault stopped cold and the orchard well covered by my HQ and Team C you had limited room for manoeuver. My weak spot there was the West avenue around the farm, completely unprotected since you had killed Team B a few turns before. My position in the South Barn was very precarious before that and if your Squad 1 had successfully assaulted it and kileld my 2 men there you could have easily progessed into the farm though.
To be continued
-
Yeh, some of us were probably quite lazy, didnt take notes, and are now faced to having to recollect and or re-view some of the turns we did so to prepare somehting meaningful!
-
Do we have a final tally about how many wins for each side?
-
Now, I haven't seen the results yet but it felt pretty lopsided in terms of casualties inflicted. Will be interesting to see how much the objectives affect scoring in the end.
Now that is indeed an interesting discussion that I actually briefly queried Bimmer about (by e-mail) after my game. Let´s talk about it after all games have been played!
-
Ive had my hopeless ammie pixeltruppen neutralizing Tigers with rifle grenades from the side...
On an very open map, it coud be very difficult to get that Tiger, agreed. This games are to be avoided unless they are Nabla based or similar, or you have other type of advantage.
But if the map is very hillie/woodie or urban then its a different story. As for the grenadiers, that is much more feasible, depends on positioning, approach, map etc.
Here I quote a post from JasonC regarding how to address an enemy force with superior armour:
...As for how to attack against superior armor, obviously it is the most difficult of all tactical combined arms tasks. And the attempt presupposes you have offsetting advantages in other arms, along with numbers. If the odds are only even and the enemy has superior tanks, you have no business attacking them. So I will assume you do have odds, including in the artillery and infantry categories, as well as more total AFVs, just less capable ones.And the main method there is to lean on the soft firepower, first and foremost. That means you intend to destroy the defense by killing its infantry, not its tanks. Instead of "drawing trump" by first engaging tank to tank or trying to locate and destroy the enemy AT network, and then leaning on armor for fire support, you reverse that relationship. The soft firepower attack is the main thing, and the threats it creates want to expose the enemy armor on favorable terms.
This means artillery barrages lead, again. It means your own tanks keyhole to isolate on only forward positions of the defense, infantry outposts, which they hit with HE. The idea is to give the defenders no shots at your armor from his tanks, unless he moves his tanks to hunt yours. Your tanks should not move to any location your infantry hasn't passed over, to see what enemy vehicles are visible from that specific spot. Your infantry attack should be wave like rather than a concentrated fist, probing for weakness and grabbing terrain the enemy doesn't occupy strongly. Nibble a way in with keyholed firesupport plus these probes.
The idea is to present the following dilemma to the defense - either let the infantry battle be lost, or escalate and intervene in that battle by moving the defending tanks to get LOS to the attacking infantry.
Now your infantry threats are "bait", and your TDs, bazookas, and lesser AT weapons are the hunters. Everything but the TDs needs to cross fire with another weapon - a zook close from the northeast and a 75mm Sherman far from the northwest, for example. The idea is to force the Panther to face one or the other, and bag it with the one is doesn't choose. Naturally, the less he knows about where such threats are, the more likely you are to bag something, which means tanks are conceal whenever possible, and zooks are advancing slowly inside cover, behind a screen of the squad infantry.
It is a positional battle. You don't try to razzle dazzle your way in. Let him do all the razzling, you focus on safe moves, moves by modest infantry elements covered by AT threats. Do not rush. If he stays in his lair keyholes with nice covered flanks, stay in the LOS shadows created by his lair and leave him alone there. He is irrelevant unless he comes out.
See the idea?...
-
When was the deadline for the second group? Our game is going at good rythm, 1 or even 2 turns a day etc but we still are 18 turns from the end.


 any idea?
 .
.
PBEM Man and other creatures
in Combat Mission Battle for Normandy
Posted
Lol, no complaints here on our Farm tournament game. Maybe finally men are learning to multitask (i.e. securing that nappy while zooming in to ground level to assess LoS on that goddamned AT).