

Rake
-
Posts
346 -
Joined
-
Last visited
Posts posted by Rake
-
-
Finally, here are the pics:

-
If you want the pictures to appear paste the IMG code of each picture in with your post.
Thanks, but I tried the img code...typed in as:

^^^Trust me, I tried it again in this post^^^
Thanks for your reply, but I have no clue what I'm doing wrong.
-
So far as I know, to be removed they have to be "captured" by one of your squads.
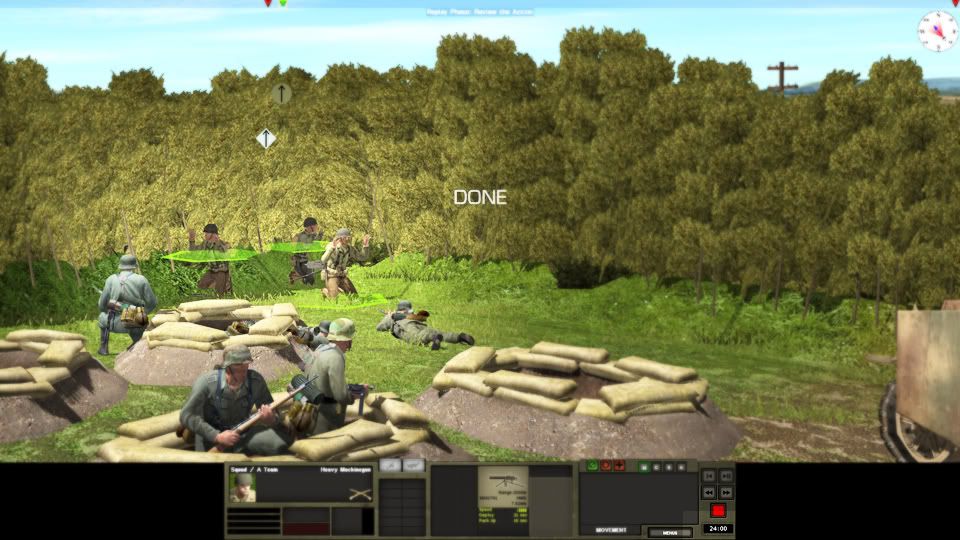
The ammo bearer (2nd picture) is kneeling atop the zug commander. Before I moved the HQ into the building, there were three smg-armed scouts in a triangle around the guy. I don't know how much closer they can get. .
In the other picture, I've ordered the squad into the same action square, had them surrounded on three sides and I've tried to get multiple teams to fire on them... all to no avail obviously.
Unless a friendly unit makes contact and rallies them, I think they will stay that way, and not pose a threat to your troops.Either way, they haven't posed a problem for me yet, and I tend to ignore them.
I doubt there's much chance they'll be rallied. Guess I'll ignore them, too. I've more pressing needs than babysitting POW's.

-
The pictures show two U.S teams with their hands in the air and friendlies adjacent. There are now 24 minutes left in the scenario and they've been this way for at least the last eight minutes and possibly longer.
How long should it take for these guys to give up? The HMG team still has possession of the MG and I don't really want to leave them to run around free behind my lines.
I can't get the pictures to post...
 here are the url's:
http://s1176.photobucket.com/albums/x333/mjt1229/?action=view¤t=HMGSurrender.jpg
http://s1176.photobucket.com/albums/x333/mjt1229/?action=view¤t=AmmoBearerSurrender.jpg
-
Well it is not free but I just started using Vegas Movie Studio HD. It costs me about $50 but so far I'd say it was well worth it. So many features and easy to use templates, including tutorials which walk you through what you want to do.
$50 doesn't sound too bad. I just don't want to lay out the 350 bucks it will cost me to upgrade to CS5 Extended, at least until I know if this is something I'll enjoy.
Thanks to you & Sergei
-
I've just Dl'd the full version of Fraps and made my first video captures from the German campaign in CW. While I'm fairly proficient in Photoshop and image editing (I own CS5, but not the extended version). I know very little about video since it has never really been of interest to me previously.
Can anyone recommend a decent (and preferably free) editing program? I'm running Win7 on a pretty decent computer.
-
Arggghhhh! How come you haven't got it? I know it seems like a few extra units and different missions but it really has been improved, in my opinion anyway. It reminds me when the NATO module was released for SF with all the bells and whistles. That offered a huge improvement over the base game too. If it's a financial reason I think maybe we should buy it for you? I'll chip in some paypal cash. You deserve it.
Who's handling the money? I'd be happy to toss in some cash for an update to this mod... and some select others, too (like a building mod?)

-
Trying to defecate this strange message with the machine enigma, but, but... I can't!
Yeah, that too...:eek:
-
Why, can't you read this? Then try ctrl and + to enlarge it.
I did ctrl/+ ..... and + and + and +. The web page size increased, but not the manual
-
It would be really nice if one could actually read the thing... since it won't resize with the web page :confused:
-
Gents,
A big weakness in CMx1 was the engineer/pioneer play. Obstacles were very weak and basically you didn't really need engineer/pioneer support to play.
CMx2 goes a very long way to changing this. In the scenario above the defender could blanket the map with wire but he would have little else to cover them by fire with. This means pioneers could execute multiple breaches and kill the few defenders left.
Play balance now goes four ways. Armour, infantry, artillery and pioneer support/obstacles. IMHO this makes for a far richer and realistic wargaming experience.
In order to allow infantry to cross unsupported I think we would need to delve into the world of wire obstacles. We would need Light Wire and Heavy Wire, properly QB cost balanced. Someday but we are not there yet.
Capt,
I don't wish to seem argumentative and I really do appreciate your responses and the clarifications provided by yourself and others. I also greatly appreciate all the time, effort and research that the beta team, along with BFC, has put into this game. For the most part (still anxiously awaiting the patch), this game has met or exceeded all my expectations.
Now that I understand what the "rules" are, I'll adapt my tactics accordingly.
My frustration with regard to this issue is the wording in the manual. When I first observed the wire and realized that without tanks or breach teams to open the wire, I was confronted with a situation which I had not previously encountered.
I went to the manual and read the section which I have twice quoted. It implied to me that it is possible for infantry to cross wire, albeit slowly. I think that implication is a reasonable assumption based upon the wording. Nowhere does it state that tank or engineer support is necessary.
My only other thought on this going forward would be to suggest that the manual be clarified. I realize that the change would never make it into a printed copy, but it seems this could easily be done to the digital version and included with the patch. I've only opened the manual that came with the steelbox long enough to realize that the print was far too small for my ancient eyes to read. I immediately printed out the pdf and placed it in a three ring binder... for me, errata could be handled by removing pages 194 & 195 from the binder and inserting the new sheets or by including an errata sheet a la SL/ASL in the olden days. Of course, this particular item is one thing I'll never forget in the future.
-
Based largely on the fact that troops cannot pass thru unsupported in-game, I would say that the ingame wire is at least Cat II (double row of double high) or higher. In CMx1 I think it was Cat I or a low wire entanglement (as described above) as troop could pass thru unsupported but very slowly.
Okay, I understand now that wire is impassible without assistance. My confusion was primarily with regard to the statement in the manual which I quoted in my OP.
"Barbed wire consists of a barbed wire fence on a wooden structure, and is meant to slow down (not stop) infantry movement".My next question is, besides the obvious "gameyness" and lack of any sense of fair play, what would prevent an unscrupulous defender from purchasing a multitude of wire fortifications and completely blocking off any access to VL's? Of course, few would ever play him again, but the question remains.
For 1250 points, a German defender could run a continuous line of barbed wire across a 1 km wide map. Without tank or breach team support, the attacker is screwed.
I think there really should be some way for regular infantry to cross wire, even if it takes quite a long time. Barring that, the manual should be changed to reflect the reality that wire does indeed stop infantry movement.
-
What if you gave them a Slow move order, i.e. crawling under it ?
Actually, I think I did have a slow order in there someplace... I'll have to check tomorrow
-
Run over it with tanks. If you find some other way, let us know.
There are no tanks in this scenario... there is nothing to be used in this scenario that I've used in others. In CMx1, crossing wire took an eternity, but it could be done... as in RL
-
I'm playing the first scenario of the Road to Montebourg campaign and I had planned for my assault platoon to advance from the second stream in conjunction with an artillery barrage. Well, unbeknownst during my planning, there is wire along the left side of the field.
I moved the first squad up to the wire and gave each team a "hunt" order to cross to the other side... they decided that the best course of action was to walk along the edge of the wire a take the long way around.
The turn ended and I cancelled all the moves that the AI had rerouted and "quicked" the teams back to their original starting points. I gave one team a "move" order, another a "quick" order and another a "fast" order. Again, every one of the teams began to move off to the right to go around the wire instead of through the wire.
The only thing I could find in the manual about movement through wire is on Page 194 and states "Barbed wire consists of a barbed wire fence on a wooden structure, and is meant to slow down (not stop) infantry movement".
Granted, forcing my teams to circle 300 meters around the wire is slowing down infantry movement, but I don't think this is what is intended to (or should) be happening.
I felt like the assault was going to be timed as well as my tactically-challenged brain will allow. The assault platoon just needed to cross the fence and wait for the barrage to begin. After the 81mm's were through, I was going to follow on with the on-map mortars on the hedgerow in front of Beau Guillot while the 81's dropped WP in the faces of the bunkers on the right. The overwatch platoons were in place in the best cover I can find. But, now the barrage is nearly over and the assault platoon is wandering all over the countryside. Once the barrage lifts these guys will be sitting ducks for anything left in the bocage.
How do you get troops to cross wire without hiking around like they're looking for a hole in the bocage?
-
"There must be a few old 'uns on this site who remember using slide rules.
I still have my old K&E trig slide rule in my work truck... still use it occasionally, too.
I ran a quick volume computation for a concrete placement the other day. The contractor's field engineer (recent graduate) had never seen a slide rule before and was amazed that I was able to calculate the volume to within a tenth of a cubic yard in not much more time than it took him to punch the numbers into his calculator.
Now, could I still do the survey calcs that I used it for in the days before pocket calculators? Not a chance!

-
-
Clearing out the order won't work because the other two team members just move off to join the leader... so instead of one guy off looking for breakfast, now there are three.
-
Yeah, the gunner and the loader are just standing around waiting while this other guy is hightailing it off to godknowswhere.
As i mentioned, the leader shows an order line back to the remainder of the team, but appears to be ignoring it. I'll go back in and clear the orders for the team and see if this clown turns around and comes back to battle.
The team was well rested prior to the move. They'd been in overwatch while the rest of the platoon moved up and the MG was supposed to move up to support the next phase of the attack.
-
I'm playing the La Meauffe scenario against the AI. I had given an MG team and its Ammo Handlers a "Move" order with several waypoints along a road and left the teams to their own devices for a couple of turns.
A few minutes later, I noticed that the MG team was lagging far behind the Ammo Handlers and that there was a movement line for a "Quick" order for the MG Team that I had not given to the team. I also noticed that the team leader was not present in the group. The MG icon was in the middle of a field near the beginning of the "Quick" line, but I could not see the leader... I thought maybe he'd gone to take a leak? It took some searching, but I finally found the leader several hedgerows away walking off into the sunrise.
Not having saved the preceding turn, I loaded up a turn saved just after I'd given the original order and hit "Go" for the next three minutes and watched the leader separate himself from the team. This time he walked off approximately 180 degrees from the direction he went in the first time, even walking through a hedgerow at a point without an opening. He continued moving until he wandered into LOS of an MG34 and was killed.
I have the turn saved from the initial game (walking toward the morning sun) and also the turn where the leader begins to move off on his own. I'd be happy to send them to whoever wishes to look at them.
-
I think that "fine" and "big enough" are very subjective terms.
I'm with you, Clark. My monitor is 24" @ 1920x1200 and I have to lean into the screen to read the UI. And, while playing the game on my TV? Forget it! I've got to walk over to the TV to read it.
There really needs to be some way to enlarge the text size.
-
Argh! The muttonheads who made the Green Book map I showed in the OP mixed up feet and meters when they did the altitudes. The detailed 1951 map (a copy of a German Heer map) and Google Earth both agree -- all my contour lines are worthless. Have to start over again.....
Yeah LLF, I'd noticed that a few of those maps have horizontal scales in yards and the vertical scale in meters. A bit of a pain, but the conversion is simple enough. The worst part is just having to start again from scratch
-
I just split them, gave them a couple of move orders (quick with a slow to the bocage) and then, not liking exactly where the waypoints were positioned, I backspaced out of the order. When i went to give a new path to the AT Team it was combined with the BAR and a Garand. The split team is the two remaining guys with Thompsons.
Now the AT team will have to drag the BAR with them. Funny thing is, several times, if I haven't given a split team an order fast enough, they will recombine immediately. If this were a game against a human opponent, I likely wouldn't have a turn to wait for them to recombine... It's broken, they're in the same action spot, they should either recombine into the entire squad or stay split into the teams that I ordered them into.
-
Capt. - The tank that finally shot showed a clear LOS for the entire time during the turn that he finally fired. LOS line was blue and the German marker indicated a vehicle (not a question mark) for the whole turn.
On another note, I restarted the game and encountered another glitch. After my tanks ambushed the PzIV, they failed to penetrate the tank and it boogied on down toward Fauville. I then split the AT team from a squad and plotted a move to target the tank. Unhappy with what I'd plotted, I backed the move out. When I went to replot, the AT team had recombined with the heavy weapons leaving the assault team as the separated team. Because they would not recombine into the full squad (and there are only 6 squad members due to losses from the earlier scenario), I am unable to send the AT team out by itself... it will have to drag the BAR and another guy with them.
I've had several occasions where teams will not recombine into the squad despite being in the same action spot.

 here are the url's:

Surrender Question
in Combat Mission Battle for Normandy
Posted
Ken, the guys in the foxholes are one action square away from their HQ unit in the building picture. I just went back and checked; they are in voice command.
Maybe that's why they wouldn't shoot the pow's when I ordered them.