

A Canadian Cat
-
Posts
16,511 -
Joined
-
Last visited
-
Days Won
55
Posts posted by A Canadian Cat
-
-
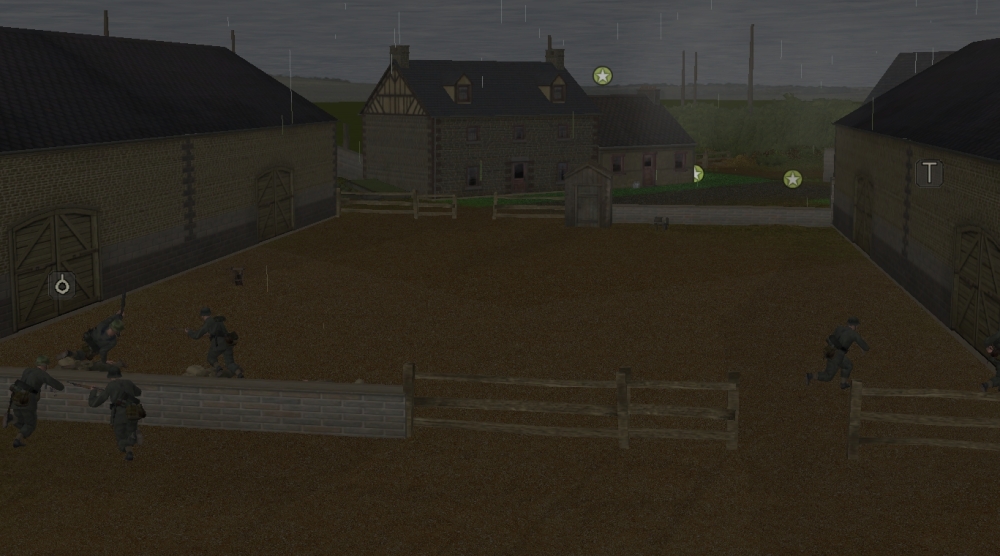
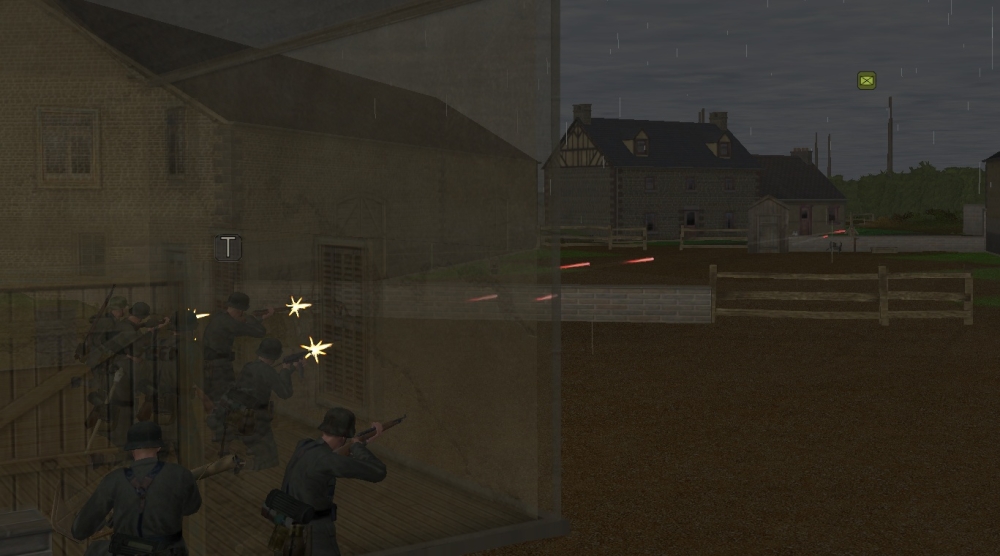
Minute 22-21 Action:
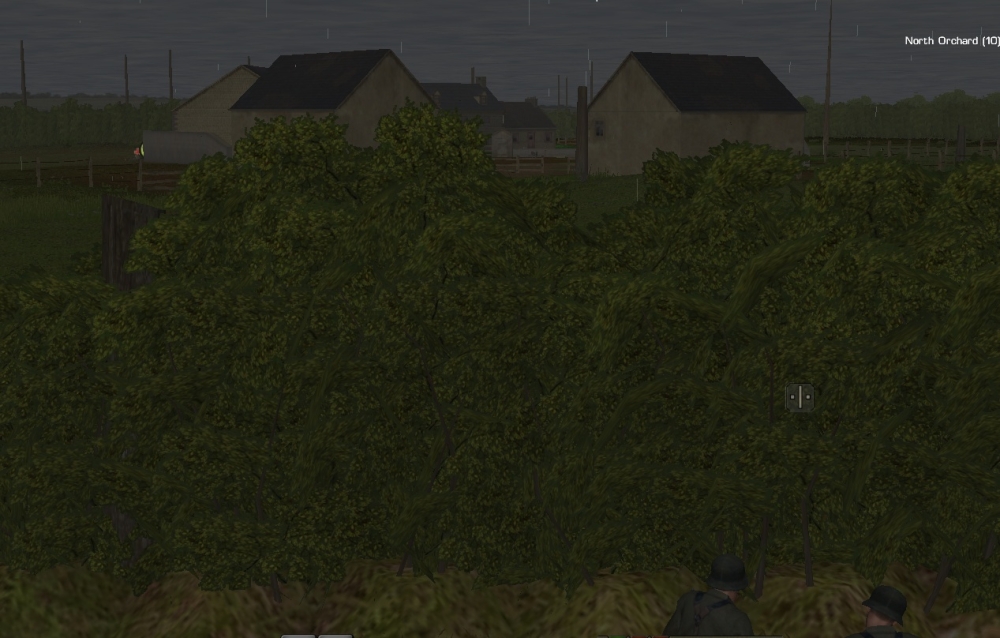
Steiner makes his way to his team mate while the assault on the farm continues. Still no return fire from anywhere in the farm.
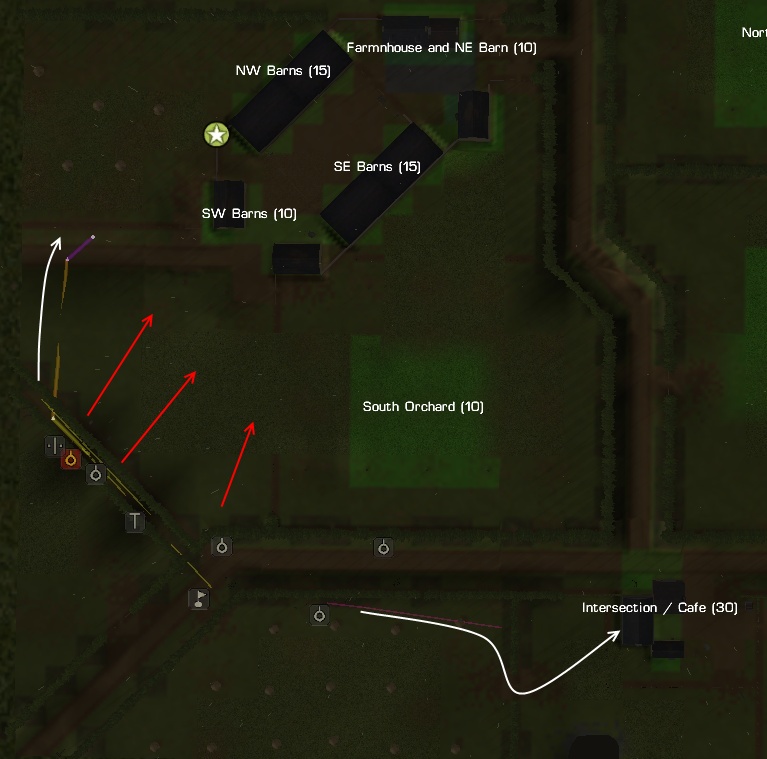
Minute 21 Orders:
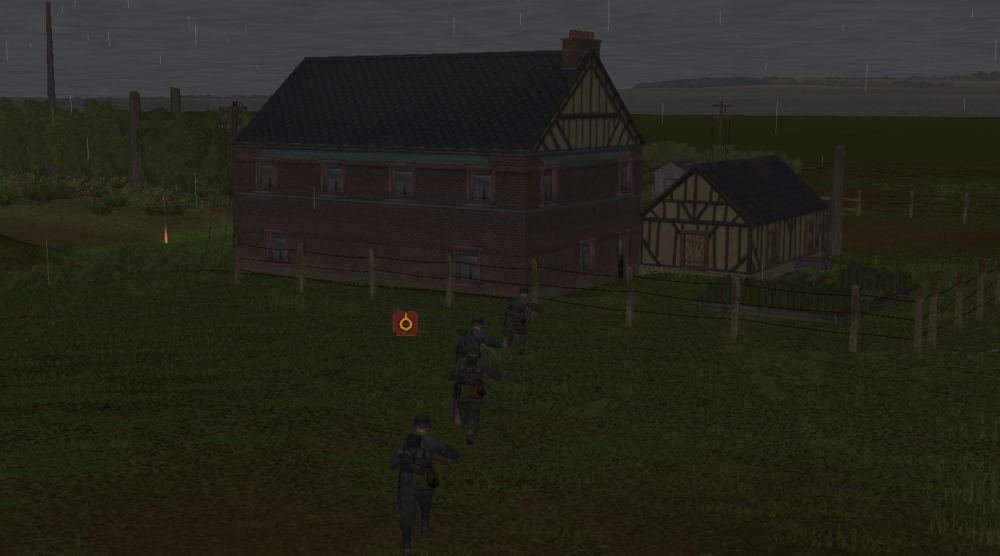
Frobe's team make their final move on the barn and Harmel's team are just about to enter the farm house. This is either going to be really exciting totally boring. Meanwhile Steiner is still heading to attend his team mate under the covering fire of Fitzemeyer's command team.
Minute 21-20 Action:
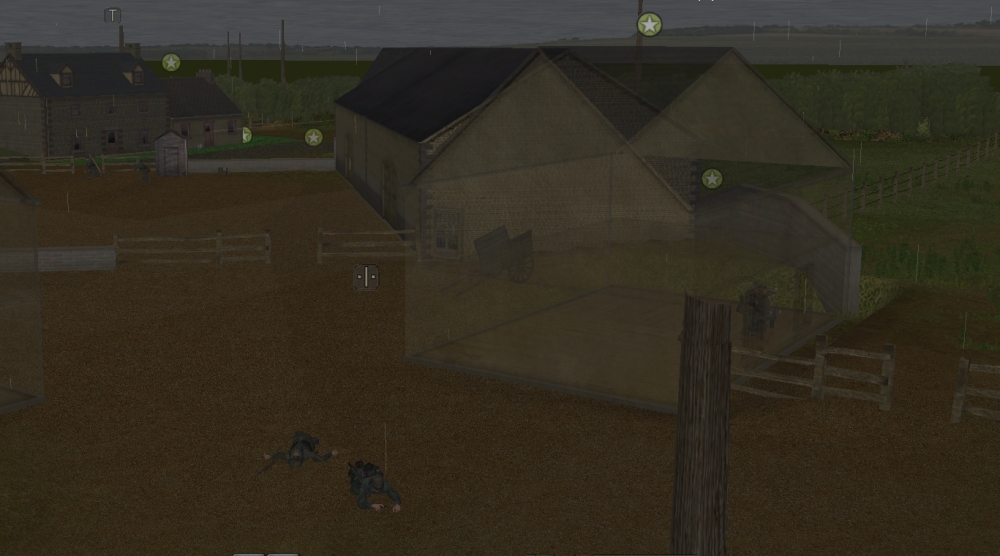
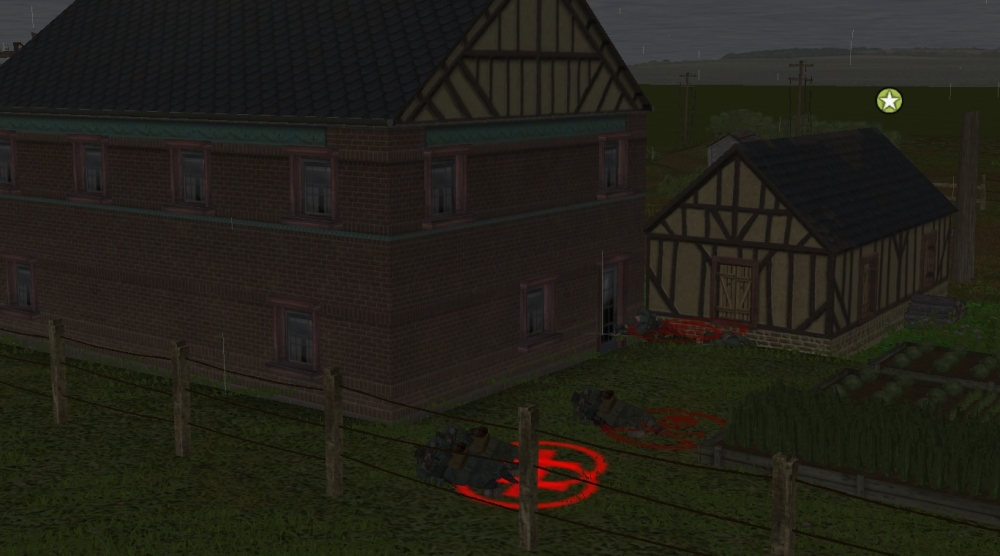
Disaster strikes! Meissner's squad takes four casualties including Meissner himself. They break and run into the open. Clearly Fitzemeyer team's suppressive fire to the south is not nearly enough. The GIs across the field send a hail of lead Meissner's way. This is likely the end for me here. I might take the farm but there is no way I can muster the strength to push into the fields and head south to the cafe. My opponent has touched all the objectives now. I'll see how the next turns go but I don't see a way out of this after loosing Meissner's squad.

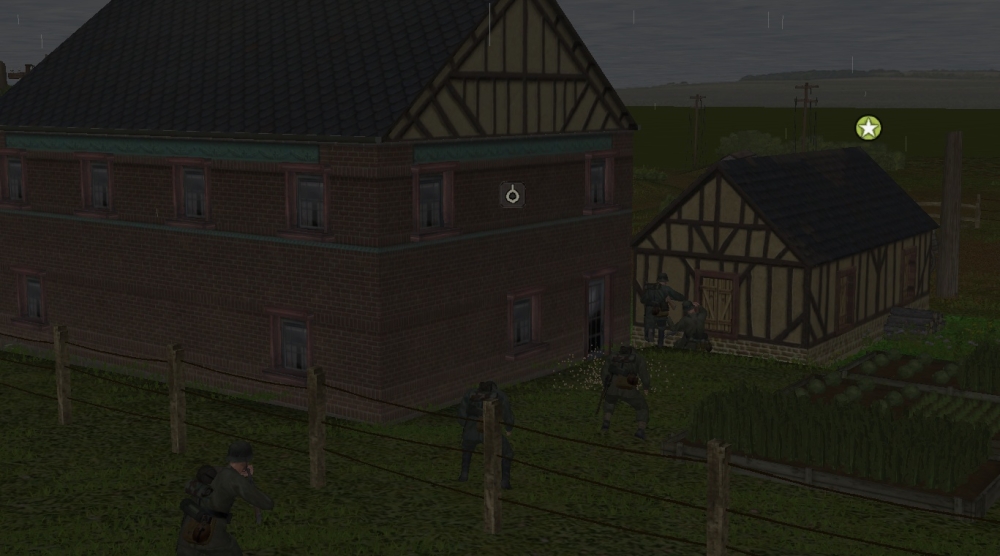
The platoon does have some success this turn – they capture the farm. Frobe's team make it into the barn and Harmel's take the farm house.
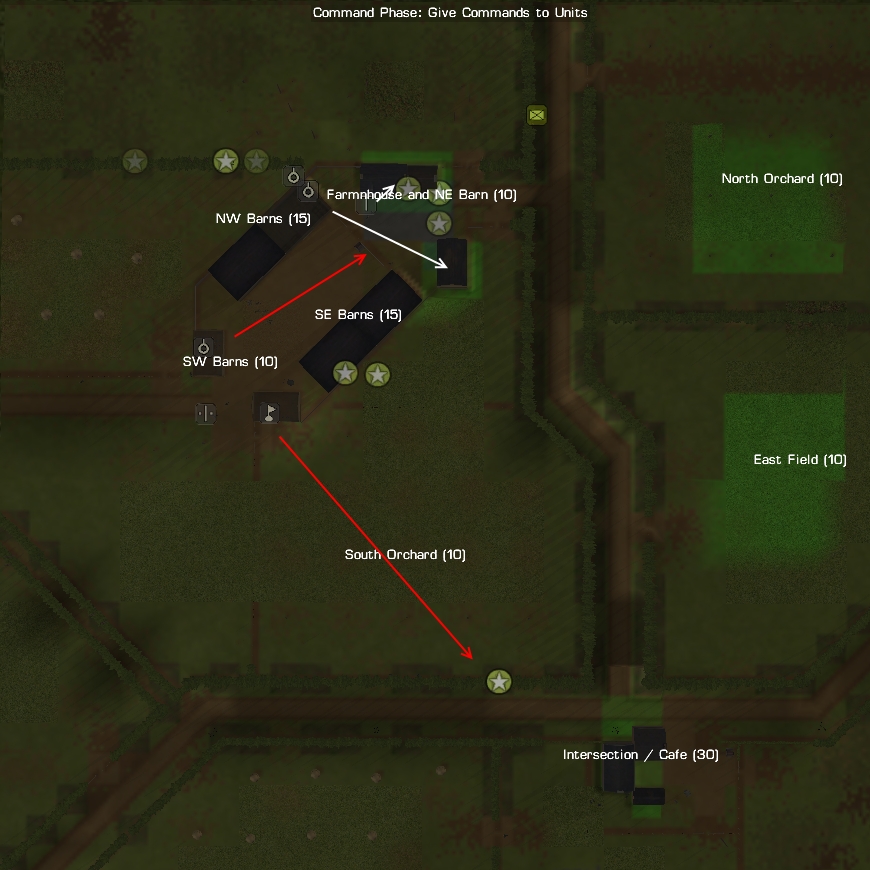
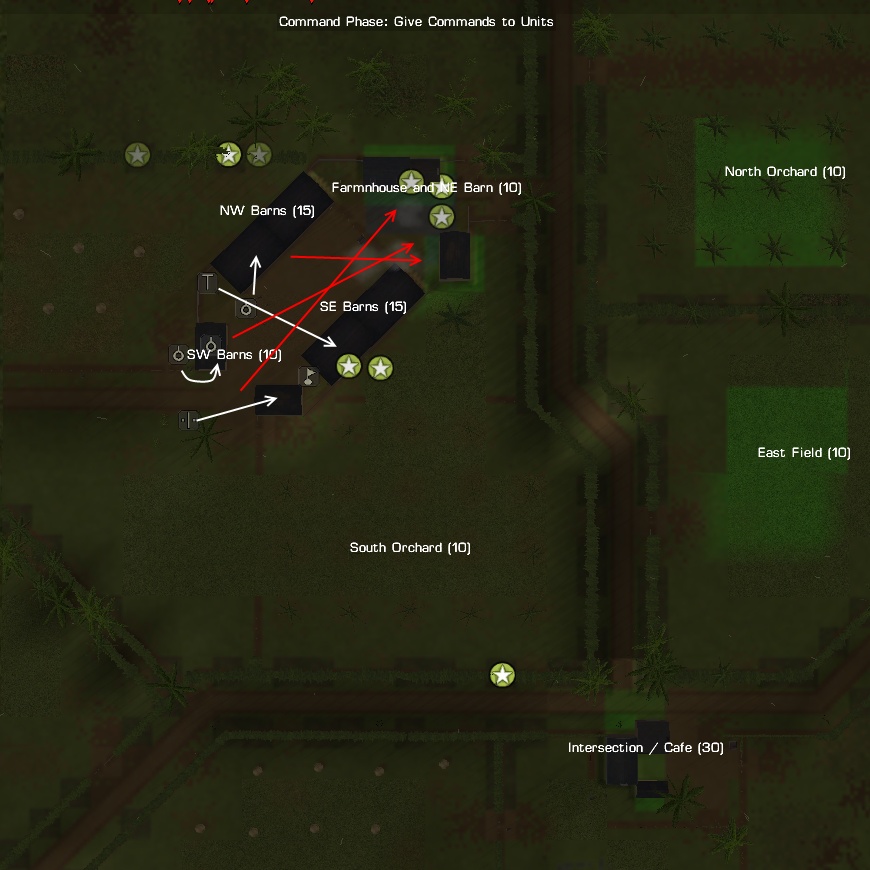
Minute 20 Orders:
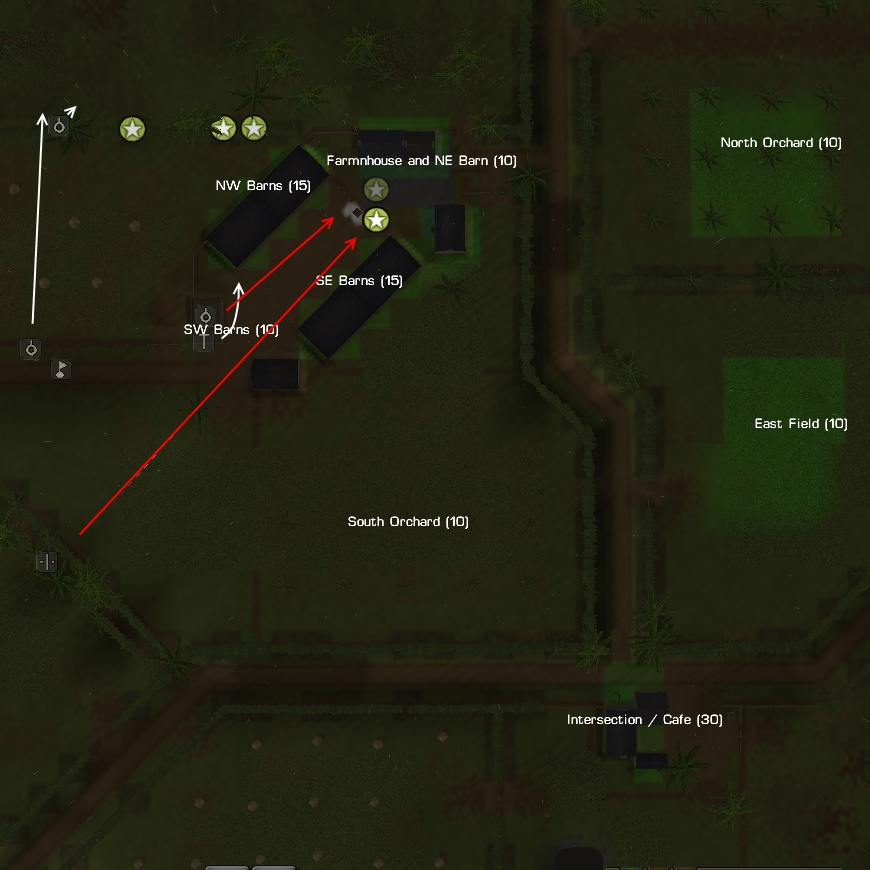
Fitzemeyer move to the barn so that he can bring Meissner's broken squad under command. If I can rally them and get some fire support form them then perhaps they can be useful. Meanwhile I see an opportunity for Frobe's squad to catch some GIs by surprise. I order his team to go to the south corner of the barn and target the GIs by the wall. With his MP40 they might get a surprise in against the GIs. Meanwhile I will leave Steiner's MG team where it is to make sure the GIs do not make a move against the south end of the farm.
-
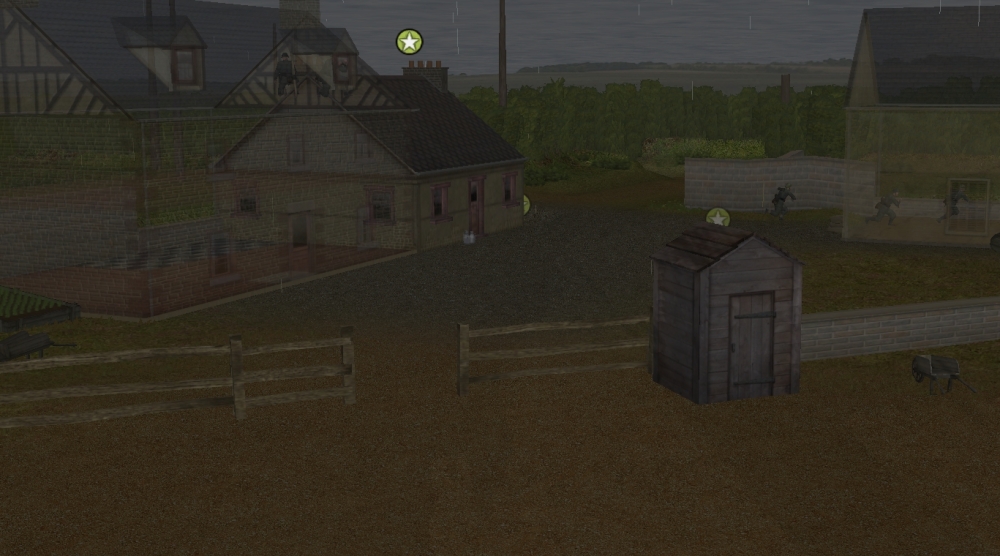
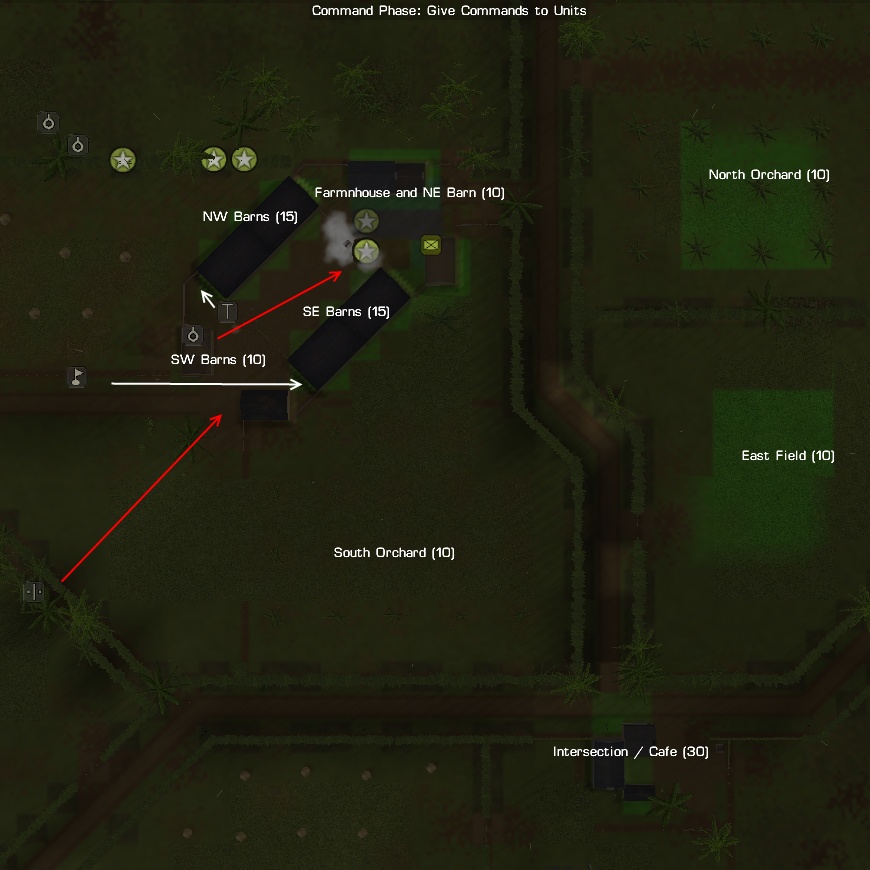
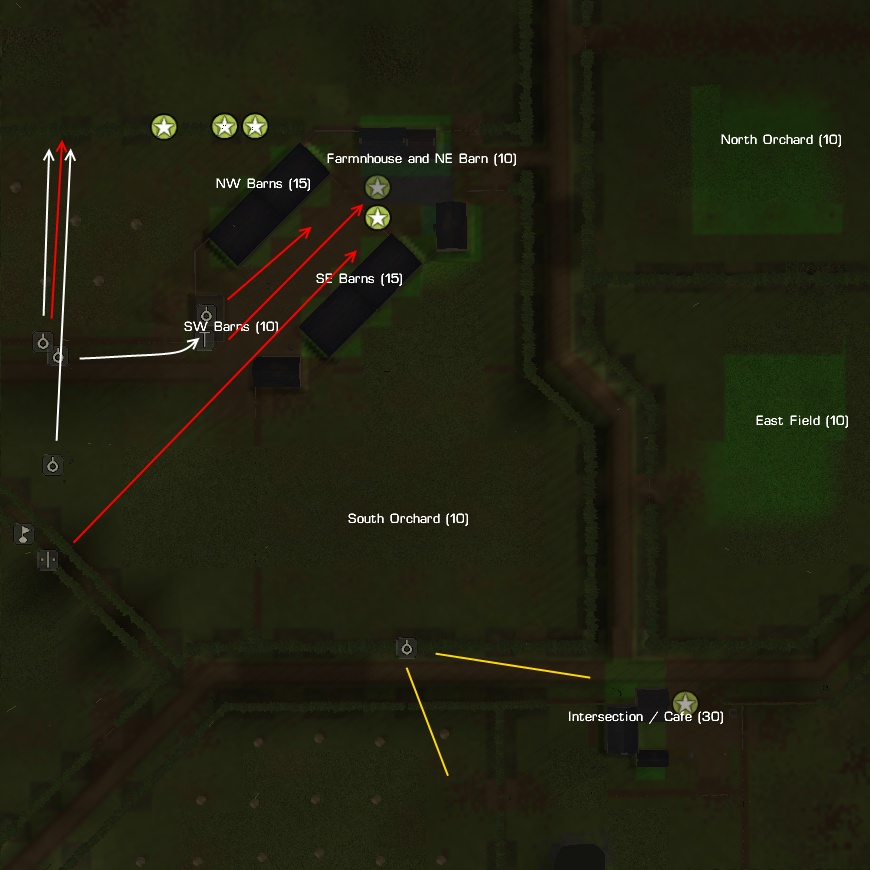
Minute 25 Orders:
I decide to take advantage of the dust and smoke and rush Fitzemeyer's command team forward and tuck them behind the SE barn and shift Harmel's team behind the NW barn. They will also check into the barn buildings to see if any GIs are there. Meissner's squad are getting tired so I will let them sit still this minute. I have not decided what direction they should go yet either. On the one hand they could continue and flank the GIs from the other end of the farm but I am concerned that they are and would continue to be out of command if I go that way. Plus I need to maintain fire supremacy in the farm and I am afraid that with the arrival of the additional GIs I might be loosing it. So, the other alternative would be to bring them back into the farm the safe way under command and adding to my firepower in the farm. I'll have to consider those options after watching the next turn.
Minute 25-24 Action:
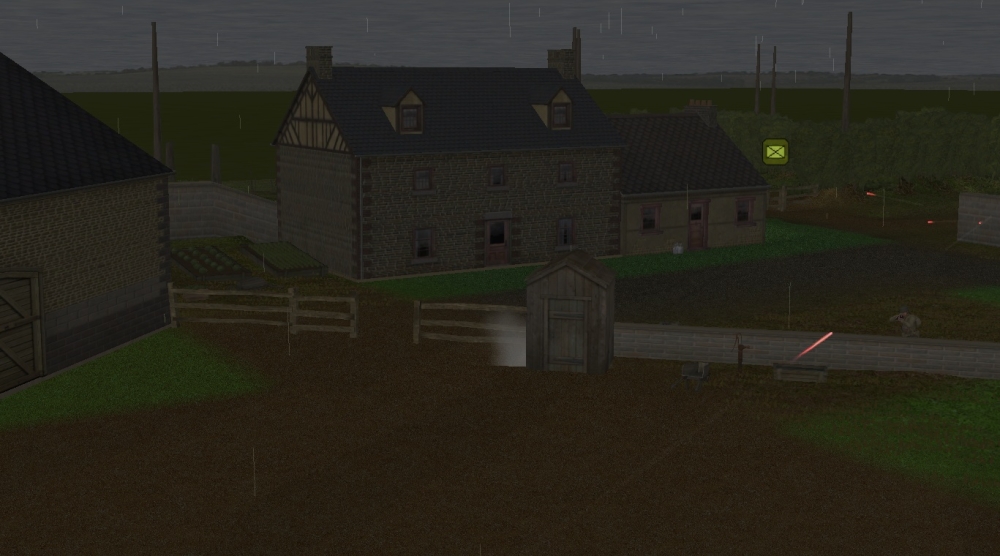
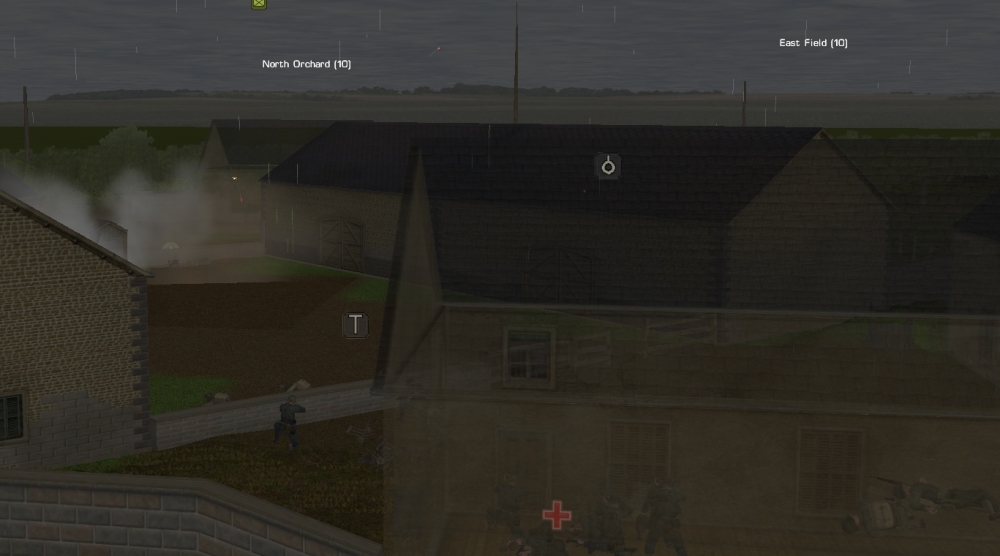
The smoke in the court yard meant the fire fight in the farm quieted down. Fitzemeyer's command team and Harmel's shrek team managed to touch their objectives and I think indicate that there are no GIs in my ends of the barns. Meissner's squad spotted some GIs by the farm house and sent some rounds there way but to no effect.
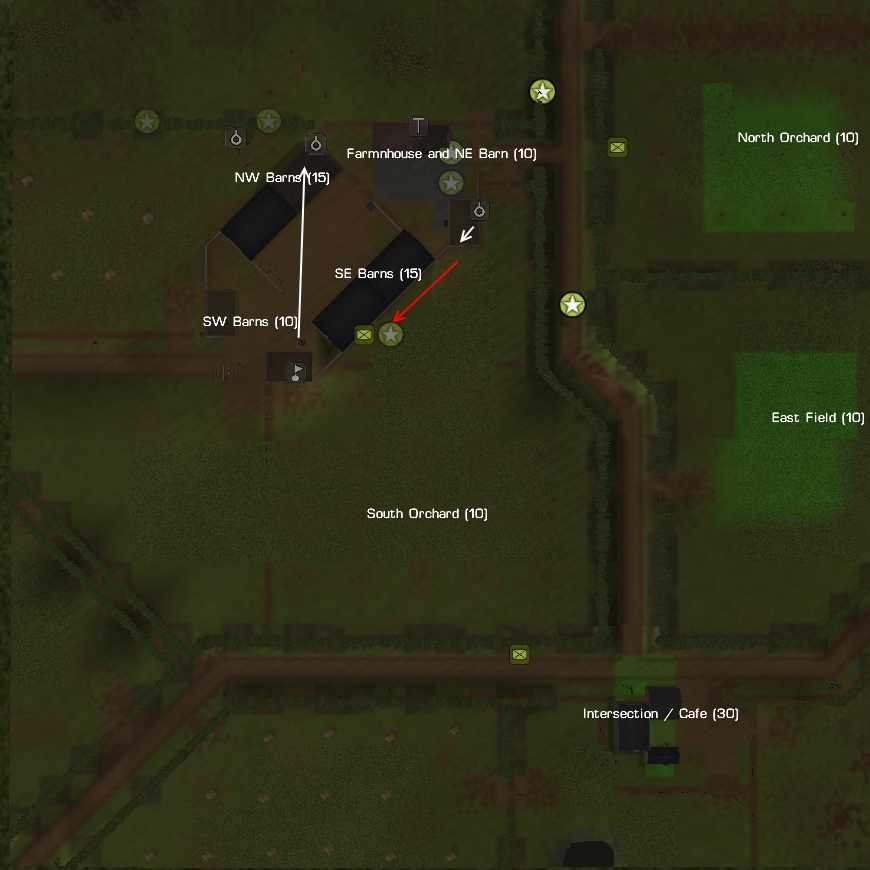
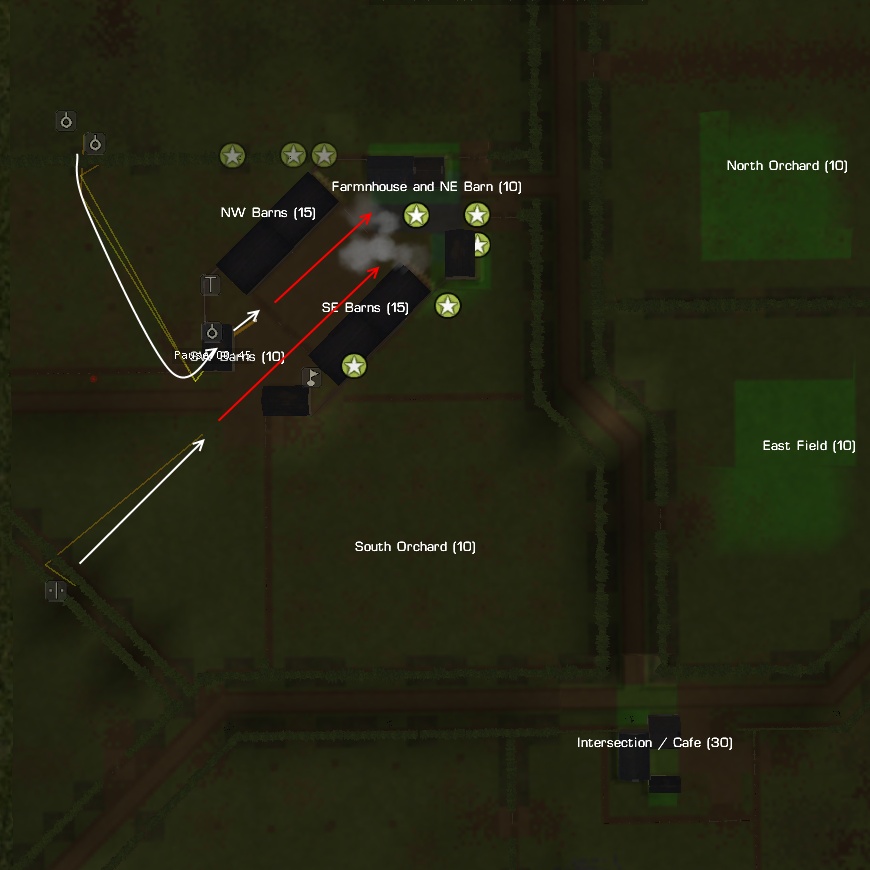
Minute 24 Orders:
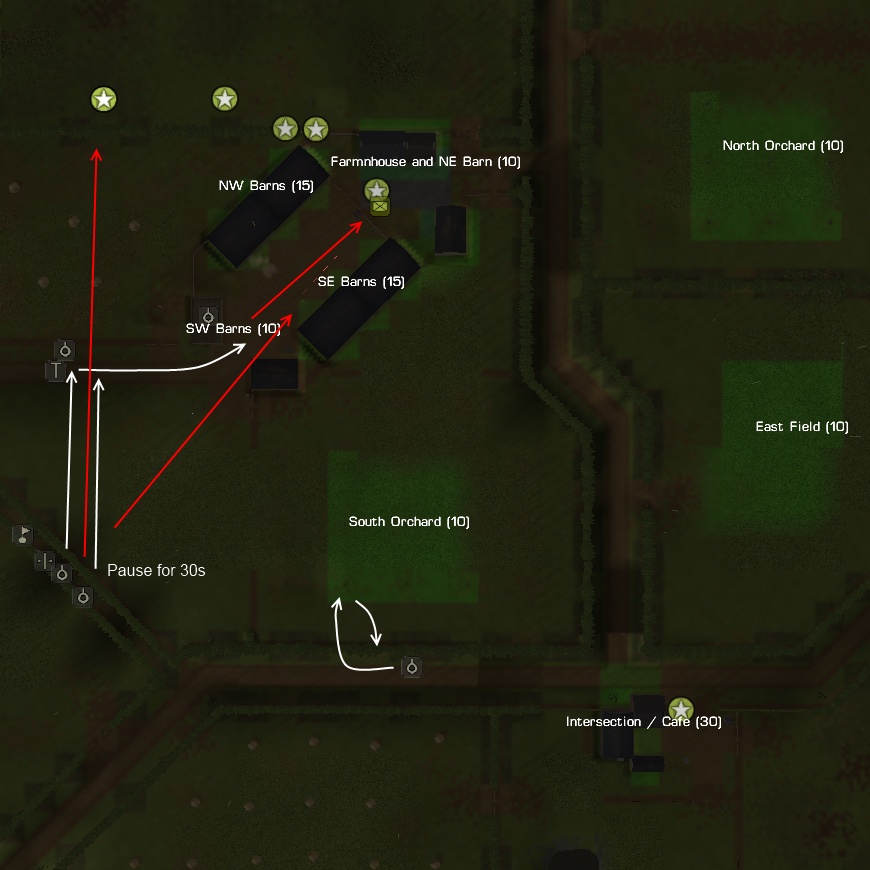
I have decided to move Meissner's squad back into the farm. They will join Frobe's squad in the SW Barn just as Frobe's more rested squad move out into the court yard to take cover behind the wall. I also moved Steiner's MG team closer to the farm as well so they can see more targets. This is in preparation of having Frobe's squad assault the NW barns with the plan to then take the SE Barns and the remaining buildings after that. For all that to work I need a hail of bullets to be flying first. One step at a time. This step is get Meissner's squad in place to cover the next move.
Minute 24-23 Action:
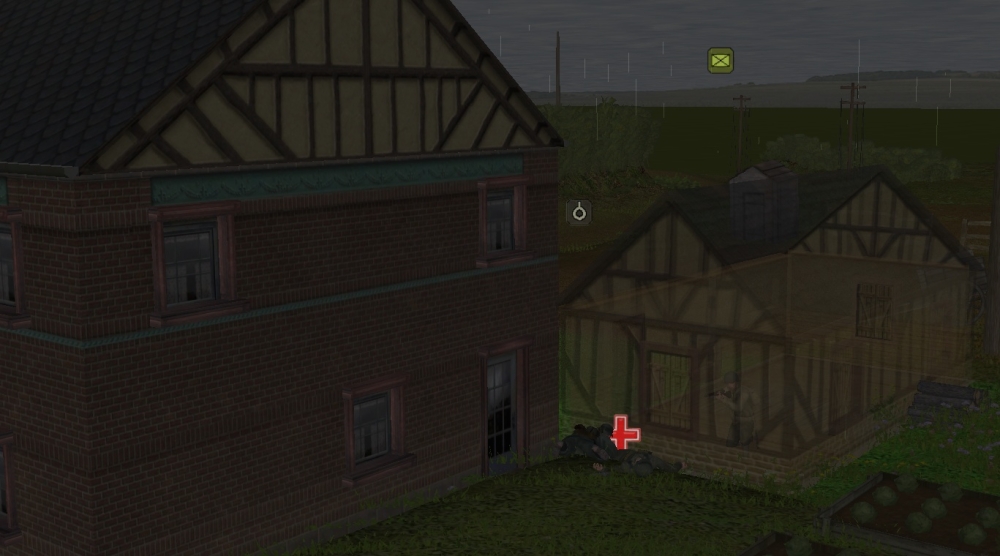
Entering the farm is almost accomplished. Meissner's squad did loose another man to fire coming from the direction of the Cafe. Thankfully all will be behind the farm walls in a few more seconds – hopefully no one else will get hit. While Meissner's squad was on the other side of the bocage they saw the GI team that had been pinned down behind the wall in the farm court yard escaping – rats. Perhaps the farm has been abandoned? We will see.
Minute 23 Orders:
The plan is to finish entering the farm compound and with a few pauses start assaulting the barns while covering fire criss crosses the court yard. The smoke has almost cleared so it will be interesting to see what response I get from the Farmhouse.
Minute 23-22 Action:
The barn assaults went well and I received no return fire from the farm house or the bars. I still believe the GIs have evacuated the farm. Unfortunately Steiner lost his team member and therefore a whole lot of ammunition. The GI's from the Cafe are now taking pot shots at the back of the farm. I guess I did not get everyone into the farm fast enough.
Minute 22 Orders:
Steiner is not mush use as an LMG with only 30 rounds so I have sent him back to tend to his team mate and hopefully get back the over 300 rounds his team mate was carrying. The HQ team has moved back to provide covering fire. I hope I don't loose Steiner but he is also not much good with only 30 rounds on him. Meissner's squad will continue to provide covering fire for Frobe's squad and Harmel's Shrek team as they assault the barns and farm house.
-
Minute 27-26 Action:
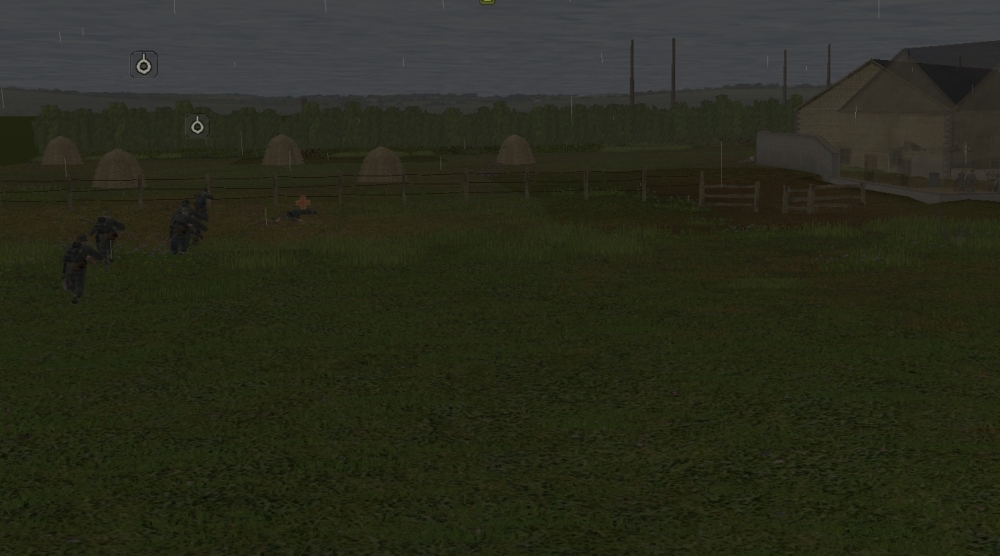
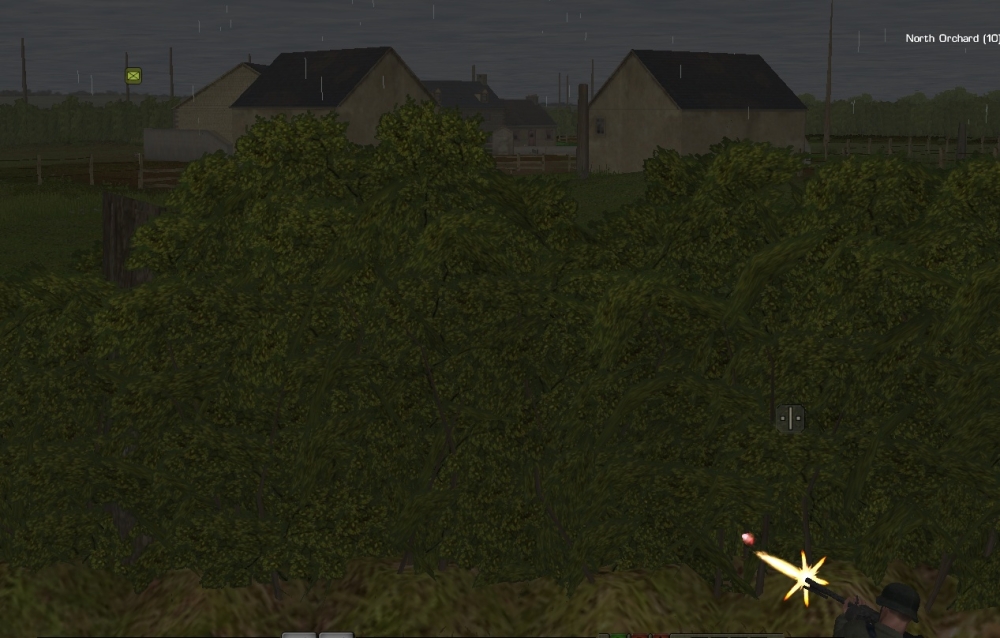
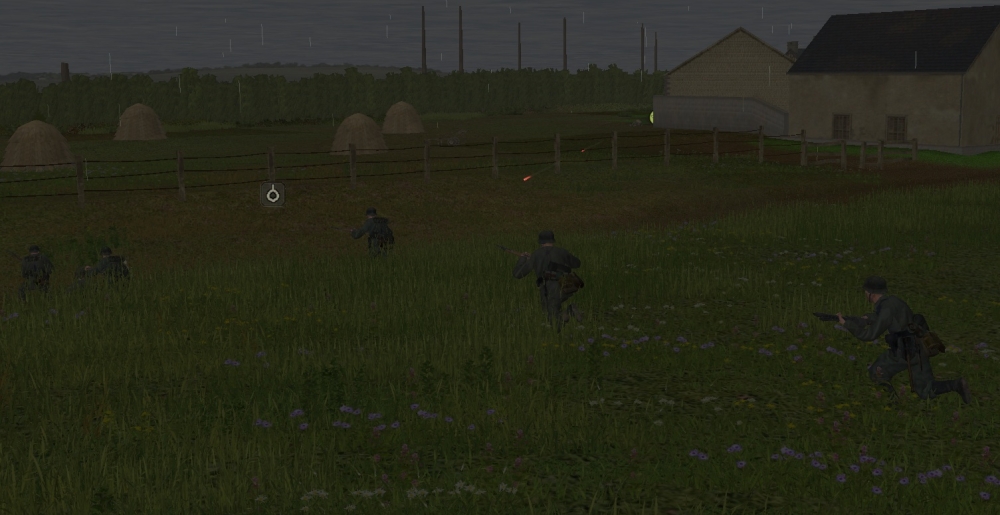
The farm / bocage assault continues. The first team from Meissner's squad reached the bocage under covering fire and all in one piece.
In the farm the fire fight continues and I think my guys scored a victory.
However all was not perfect. The final members of 3rd squad (Heuer's scout team) were caught from behind and both killed.
Minute 26 Orders:
No real change just keep up the fire in the farm. I am getting Harmel's Shrek team to move up to the wall so they can get a clear shot at the American team across the court yard. Meissner's squad will continue to protect the bocage flank by assaulting towards the enemy that was there. I was intending to move Steiner's MG team into the farm but given what happened to the rest of 3rd squad I think they will stay where they are in case the GIs that took out 3rd squad try to move into the Orchard.
Minute 26-25 Action:
More GIs appeared in the farm buildings behind the ones trapped behind the wall. These new arrivals caused casualties for Frobe's squad but I am pretty sure they hit back too. Harmel's shrek team put some rounds onto that wall and caused a lot of smoke and dust. Meanwhile on the bocage line Meissner make it to the other side without incident.
-
Minute 28 Orders:
Frobe's squad triggered a touch objective for the SW barns. Now that I see these are touch objectives I think I am in trouble. The Americans have made it all the way to the Cafe and into the whole of the farm (remember there was a team inside the SW barns). That means they have probably touched all of the objectives and I have only touched one. Right now we have taken about equal casualties. So as it stands now my opponent has the win in hand and only has to defend it. Not a good situation to be in but no sense crying over spilt milk. Time to clean it up – if I can.
My plan will be to continue assaulting the farm and if that goes well then I should be able to swing back for the rest of the objectives. This will be touch and go. Inside the farm there are several contacts towards the farm house. I have to assume there are men in each of the barns and I can see soldiers behind the wall at the opposite side of the court yard. The biggest threat is to get flanked from the bocage line to the left of the North West barn. If the enemy can secure that field then I will not be able to get the rest of the platoon into the farm area. First squad under Meissner have started advancing towards the sunken road I will get them to leap frog the teams and assault the bocage line. At the same time I will continue to fire suppressive fire into the farm court yard – Steiner's MG team plus Fitzemeyer's team will target areas inside the farm. At the same time the Harmel's Shreck team will target the visible infantry on the other side of the court yard. I will leave Frobe's squad to them selves in case the enemy start moving around. Meanwhile Heuer will head into the orchard to touch the object there and then double back to the bocage line near the cafe to protect against the GIs flanking me from there.
Minute 28-27 Action:
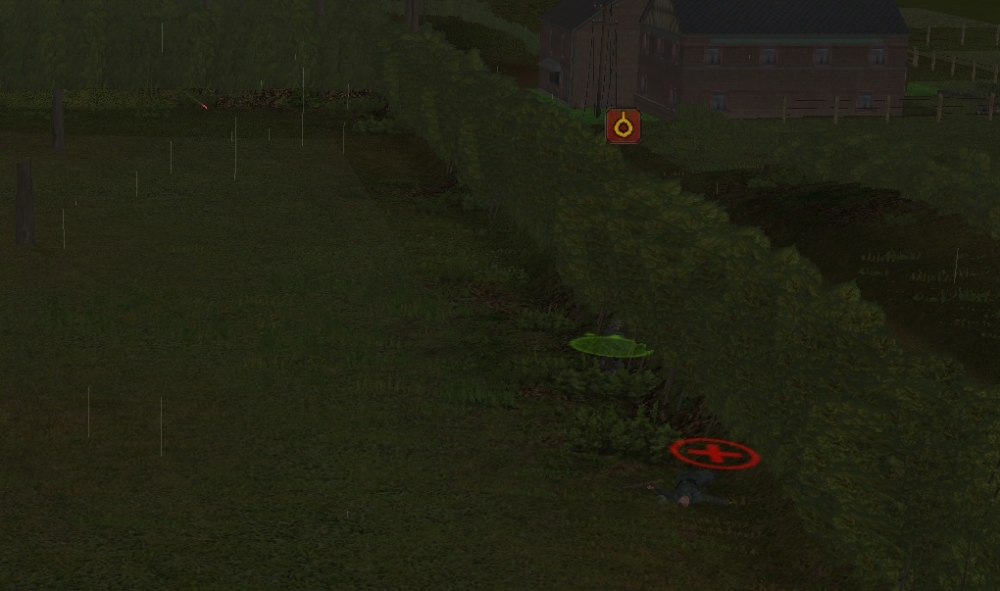
Things pretty much go as planned. Frobe's scout team lead, Jork, gets hit but that is the only casualty this turn.
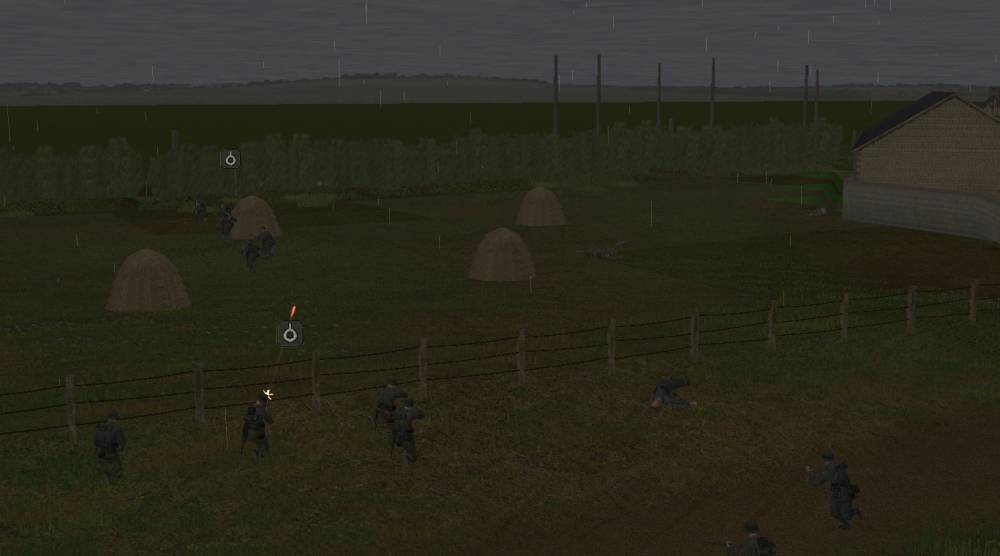
Meissner squad leap frogging towards the bocage.
Fire fight in the farm. Harmel's Shrek team did not get into a good position so no HE was sent towards the spotted GIs on the other side of the court yard. I don't think my guys hit anything this turn.
Minute 27 Orders:
Orders pretty much stay the same. Keep up the fire in the farm, assault the bocage line and cover the rear with the last of 3rd squad.
-
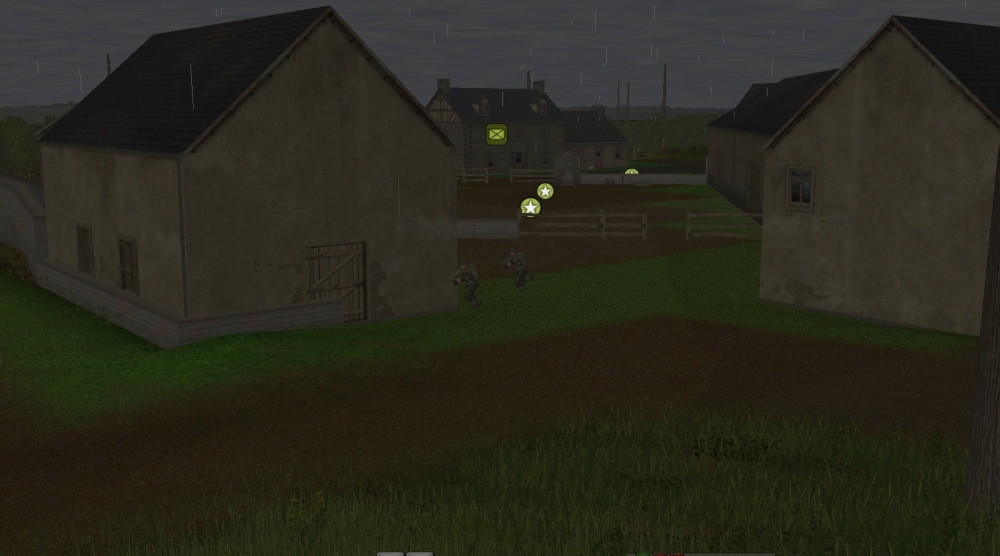
Mean while at the farm the rest of the platoon is doing it right.
With supporting fire from the MG team and the Platoon commander into the court yard plus Harmel's Shrek rounds hitting the farm building, Frobe's squad advances. They take no return fire and arrive in good order.

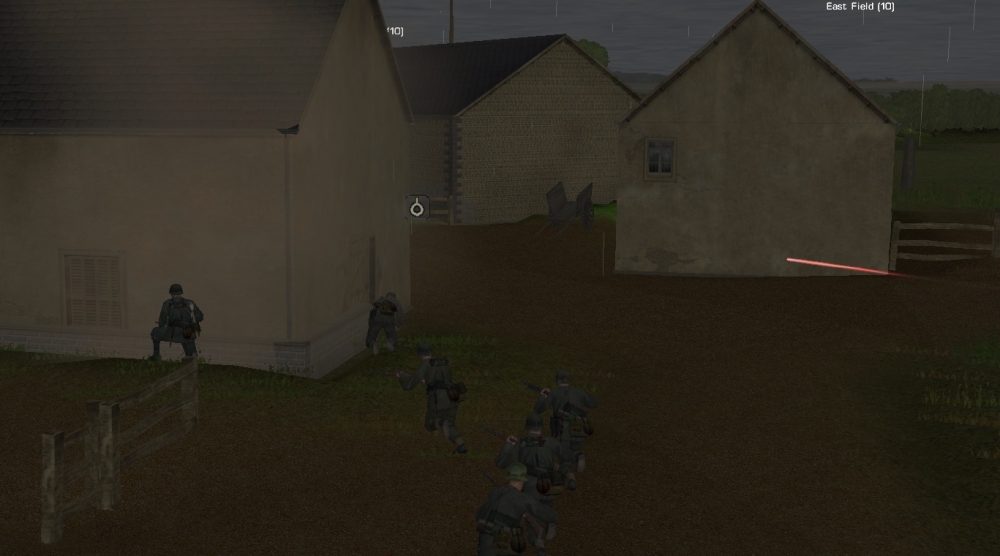
When they storm the building they find the two GIs already dead (a bit of luck that happens when you have covering fire) and no one else inside. The wall outside has a team of GIs firing at them but some small arms fire and two grenades later they are all gone too. Below you can see two Americans have already been hit and the first of two grenades is just sailing over the wall.
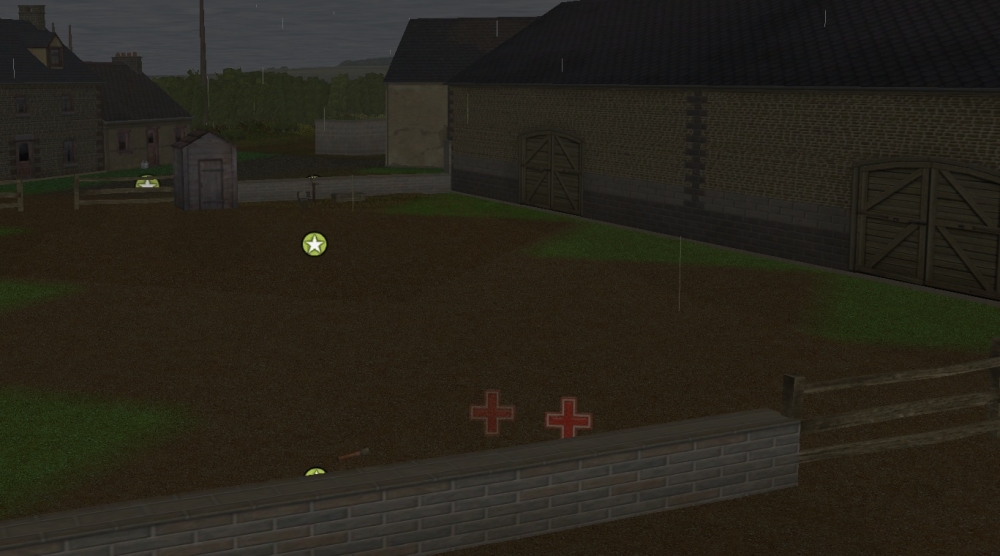
That is how a building assault is done right – covering fire on the approach and after. I had no casualties at the farm and managed to inflict some significant casualties on the Americans.
-
Minute 29 Orders:
Lammert's 3rd squad will rush the back door of the Cafe with the scout team trying to cover the road. Hopefully no other GIs will try to cross it.
Meissner and Steiner's MG team will lay down suppressive fire into the farm and the bocage while Frobe's assault team will try to follow those GIs into the barn and eliminate them. This is a bit of a bold move since the GIs are already in the farm but if I don't move now the field between the farm and my guys will be covered by the bocage line and the farm will be firmly in the GIs hands. This way I hope to get a squad into the farm and keep the GIs down with the MG team. I hope it works out but we will see.
Minute 29-28 Action:
The action was heavy this turn and it can be summed up in one word “grenades”. This is also a case study in how to assault a building the right way and how to do it the wrong way. Lets start with the wrong way.
Lammert's 3rd squad rushed the back door of the Cafe with no direct support at all. The scout team simply was cover the road but no one was firing into the building they were assaulting or the near by buildings. Things start off well enough with the squad crossing the open space only taking a little fire from across the road.
But once they are about the enter the building boom – two grenades hit and all hell breaks loose.
They they are finished off by some small arms fire.
The result is a total loss of Lammert's squad (save the two scouts)
What at total disaster. I wasted the whole squad and should never have made that bold (aka stupid) move. This is the wrong way to assault a building and my men paid the price for my mistake. The best I can do is promise them I will not do that again and do my best to keep their platoon mates safe and successful.
-
Minute 30 Orders:
My orders remain the same: The rest of Frobe's squad (Jork's scout team) will join the squad in the sunken road. Steiner's MG team will cover them. Fitzemeyer will move closer to ensure everyone remains in command and Meissner has split his squad so they can leap frog into the lane while the other team covers the field in case any GIs try to come through or around the other side of the farm.
Minute 30-29 Action:
The Steiner's MG team and Fitzemeyer spot a whole bunch of movement in the farm's central courtyard. They open up.

Two GIs make it into the barn.
They also spot some movement in the bocage behind the farm. This is trouble the GIs are here in strength and have made it to the farm first.
Meanwhile at the Cafe some GIs show up there too. Heuer's scout team opens up but they make it across the road and into the Cafe buildings. Lammert's team also takes some fire but no one is hurt.

-
Minute 32 Orders:
No change in the orders 3rd squad moving to wards the Cafe everyone else moving towards the farm.
Minute 32-31 Action:
First contact made! Steiner's MG team spots a lone GI behind the farm walls.
They score their first victory
Minute 31 Orders:
The question is was that GI part of a scout team or a larger force. Given his position behind the farm buildings I believe he is a scout team.
It turns out that Meissner's squad and Steiner's MG team are in a perfect position to cover Forbe's squad as they move across the field. I decide to take advantage and rush the natural depression next to the farm. Forbe will lead his assault squad across the field to the sunken road and take up a position on the reverse slope facing the place the GI was spotted. If all goes well I will be in a position to move the rest of my main force towards the SW bars in a minute or two.
Minute 31-30 Action:
Frobe's assault squad makes it across the field but not without taking some fire from the farm wall.
The MG team does a good job of suppressing the GIs and none of Frobe's men are hurt. Lammert's men are getting close to the Cafe and will soon know if it is safe or not.
-
Prologue
As requested here is the long version of my AAR. This is the file I kept turn by turn as the game played out. I have only proof read for spelling and grammar which I am sure are still not 100% correct.
Since the cat is already out of the bag I will start by saying I lost. Big time. I made my plan based on incorrect assumptions then changed my mind part way though executing the plan. After a poorly executed building assault and some bad luck my small number of victories could not make up for my mistakes.
The teams
Platoon: Fitzemeyer
1st squad: Meissner
2nd squad: Frobe
scout team: Jork
3rd squad: Lammert
scout team: Heuer
MG team: Steiner
Shreck team: Harmel
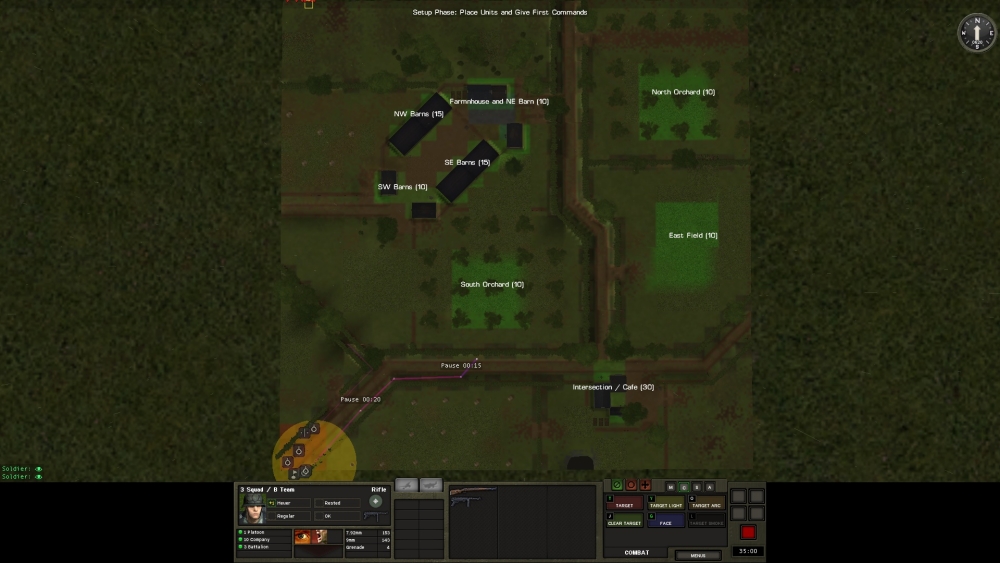
Minute 35: Setup and initial orders.
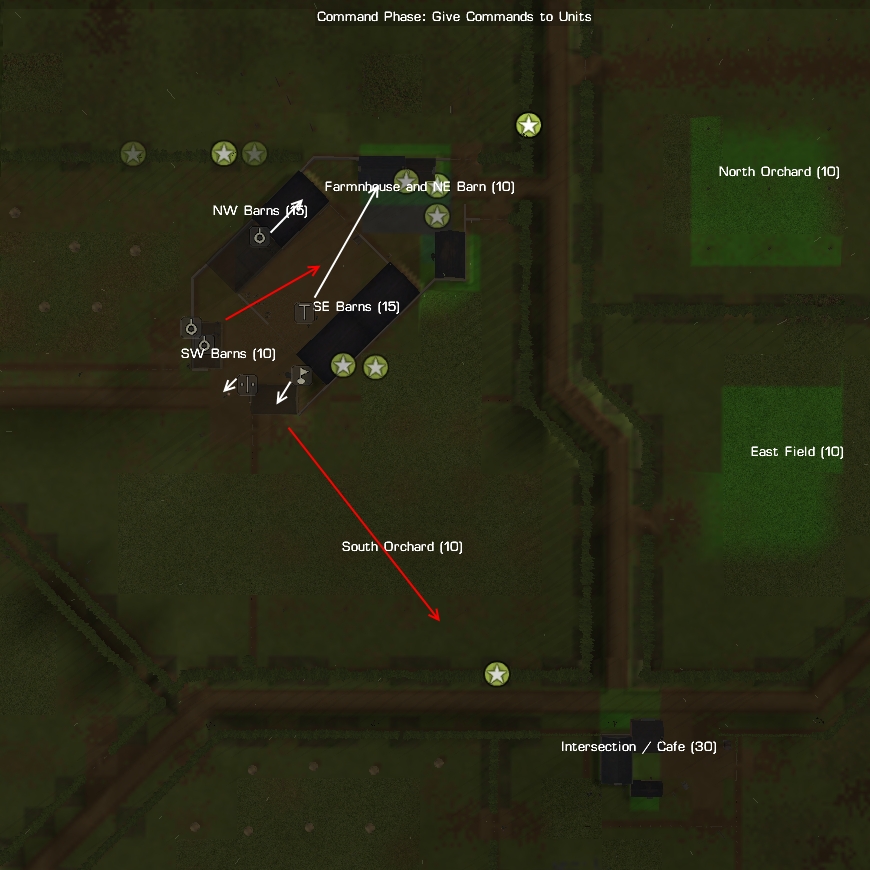
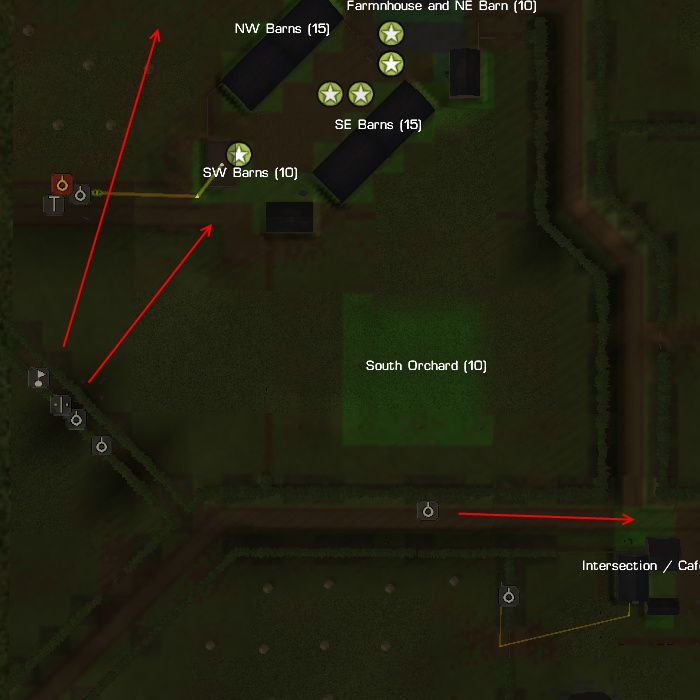
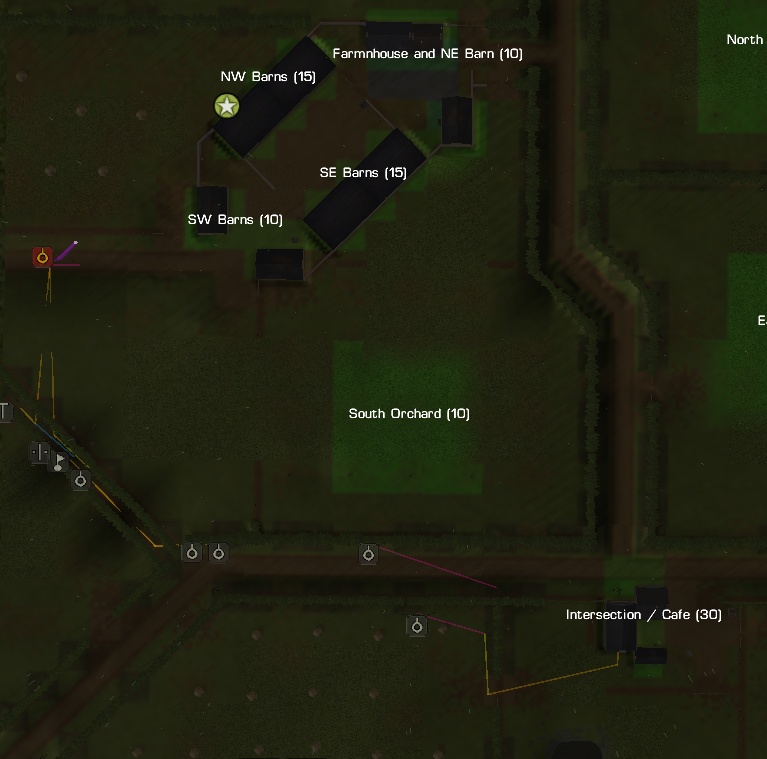
The briefing says this is a platoon patrol and I am to seek out any enemy in the area and destroy them only if tactically possible. It further states that I need to keep my casualties low. So, sounds like I am either out gunned and I will need to be very careful to keep my casualties under control and spot as many enemies as possible. Or, I am the stronger force and I will need to find and destroy the enemy. The map has several objective areas with point values. There are a lot of objectives on the map and many of them have low point values. I am not sure how important these are compared to the briefing objectives of spotting and destroying enemy units.
Clearly holding all these objectives will be difficult with such a small force so I think I will start by trying to get to the cafe at the intersection the the south east and use that as a base of operations as I head north. That will give me the most points for a single objective and the ability to get eyes on the central road the orchard in the west and the field in the east.
My initial orders look like this:
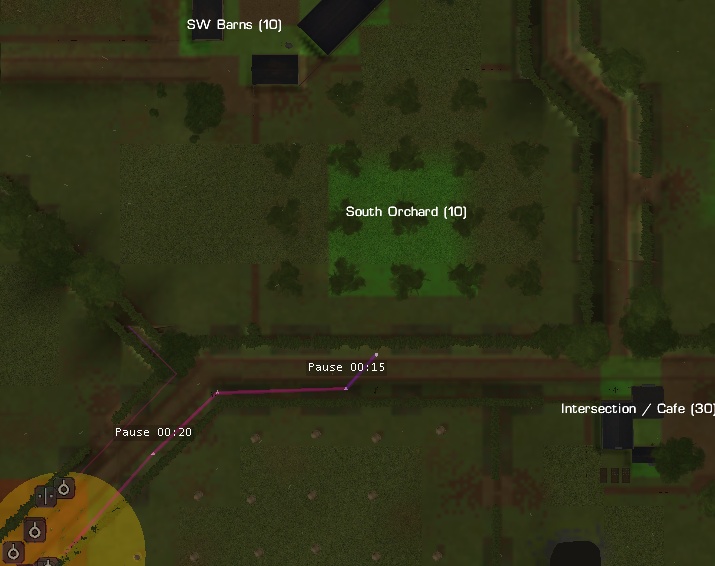
I have split off a scout squad from 2nd and 3rd squad. I will be sending Heuer's team east along the road stopping to check the safety of the field and eventually the South Orchard. Jork and his team are tasked with verifying the lane to the west of the orchard is safe. Once I know the road is safe I'll move the rest of the platoon at least part way along it towards the Cafe. My plan is to keep the scouts close enough that if they get into trouble they will have support.
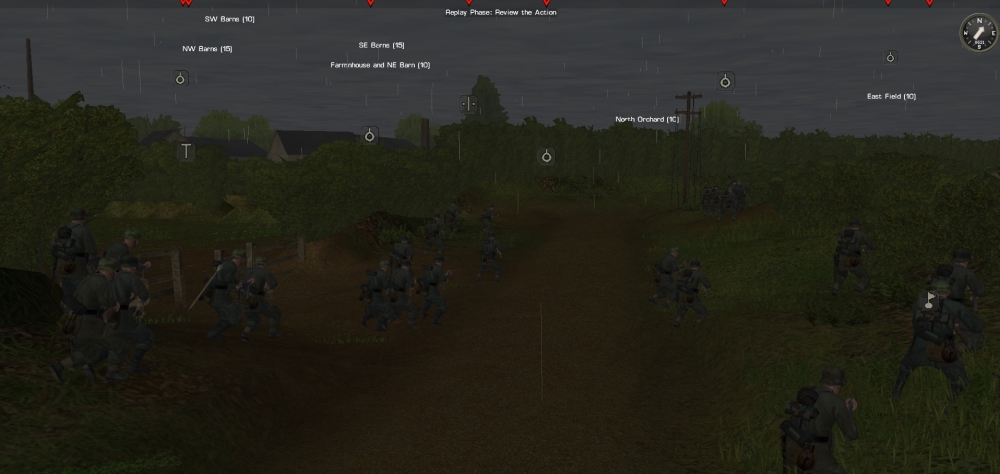
Minute 35-34 Action:
None – the scouts moved forward and around the corner without incident.
Minute 34 Orders:
I decided to move the platoon up behind the scouts.
Minute 34-33 Action:
Again not much – the scouts now have some view into their assigned fields. The platoon did start moving up behind the scouts:
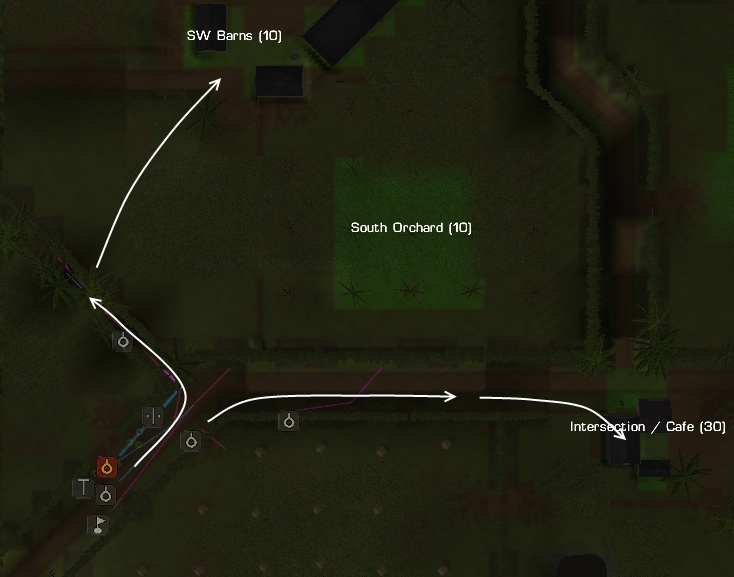
Minute 33 Orders:
After seeing how close the farm buildings are from the small lane I decided to switch plans. 3nd squad under Lambert will continue to move towards the Cafe while the rest of the platoon will switch and move towards the farm. I think I can get the bulk of the platoon into the farm fairly easily and since the farm buildings seem to have a variety of cover and walls if they meet trouble the will have a place to fight from. We will see how this plays out.
Minute 33-32 Action:
None – just a careful walk in the rain so far.
-
To Ian......you should definitely post your full AAR. I'd like to read it and I'm sure a lot of players would benefit from it.
I started to work on putting the full thing up but ran into the 5 images per posting limit. I defiantly will put the whole thing up but it might take me a while to assemble it all into chunks the system will take and then I'll post them.
-
I thought it mainly rained in Spain. Oh wait just because most of the rain falls on the plains does not mean it is always raining:) That would be a logical fallacy - my bad.
Seriously though, I think the announcements time out after they have been there awhile. I have not conducted an experiment but that is my impression.
-
Thanks for your suggestions Sgt Schultz but they are not working for me. I played around 7 turns over the weekend and the game "lost" two of them.
Looks at the chicken, shakes head "no way don't be silly".I am now back to saving each turn before I continue just in case the turn gets lost.

So, my original question stands are other people having this problem? Is it just me?
-
1. Covered armour arc
CM never had an Armour Arc to the extent that the AI could use it as well. Apparently, it's a snap coding in the rule but a bear to find a way to get the computer player to use it properly. BFC doesn't want any more half-*ssed solutions in CM2. So we have to wait.
This is the number one thing I would like to see added. I usually don't want my AT guns firing at the attacking infantry screen. Usually. I want control over that choice. A cover armor command will give me that.
2. Ambush command (your squad/team hides except for one guy who is a lookout, esp critical for successful AT ambushes)OK. Or one can use the 2-3 man HQ unit, with binocs, to do the spotting while the squad hides. Probably not a satisfactory solution for two man AT teams.
The trouble is the hiding squad does nothing until it is unhidden. So if your HQ unit sees a target enter the kill zone there is no way to automatically trigger the ambush. Without a command like this the target could travel right through the kill zone or worse stumble on your hiding guys and kill them before you have time to change their orders. Yes, I am talking WEGO here.
3. Enter building command (grenades get thrown in, rooms sprayed with bullets...)You can insert a movement break in front of the door and Target the building. Your truppen will toss grenades. (I think)
Yes, this works already there is *no* need for a special command for this at all.
4. Easier to see Bocage gaps, and the difference between bocage and hedges.This is the domain of the map designer. The good ones plop a brown dirt tile on the gap.
True about the gaps - please designers help us out here. As for low bocage / hedge differences I would like the game to be tweaked here. The low bocage just does not look imposing enough. I think that is the basic problem. If it looked imposing then we would get the feeling that it could not be easily crossed.
-
Prologue
During the game I kept a turn by turn record of the game and turned it into a 38 page AAR with lots of screen shots. I don't think it is fair to hog this thread with that volume of content so I am going to do a one page version here and if people want I'll post more in a separate thread.
Since the cat is already out of the bag I will start by saying I lost. Big time. I made my plan based on incorrect assumptions then changed my mind part way though executing the plan. After a poorly executed building assault and some bad luck my small number of victories could not make up for my mistakes.
The teams
Platoon: Fitzemeyer
1st squad: Meissner
2nd squad: Frobe
scout team: Jork
3rd squad: Lammert
scout team: Heuer
MG team: Steiner
Shreck team: Harmel
Minute 35: Setup and initial orders.
The briefing says this is a platoon patrol and I am to seek out any enemy in the area and destroy them only if tactically possible. It further states that I need to keep my casualties low. So, sounds like I am either out gunned and I will need to be very careful to keep my casualties under control and spot as many enemies as possible. Or, I am the stronger force and I will need to find and destroy the enemy. The map has several objective areas with point values. There are a lot of objectives on the map and many of them have low point values. I am not sure how important these are compared to the briefing objectives of spotting and destroying enemy units.
Clearly holding all these objectives will be difficult with such a small force so I think I will start by trying to get to the cafe at the intersection the the south east and use that as a base of operations as I head north. That will give me the most points for a single objective and the ability to get eyes on the central road the orchard in the west and the field in the east. I proceed with caution just in case my assumption that I am outgunned is correct.
My initial orders look like this:
I have split off a scout squad from 2nd and 3rd squad. I will be sending Heuer's team east along the road stopping to check the safety of the field and eventually the South Orchard. Jork and his team are tasked with verifying the lane to the west of the orchard is safe. Once I know the road is safe I'll move the rest of the platoon at least part way along it towards the Cafe. My plan is to keep the scouts close enough that if they get into trouble they will have support.
Over the next few minutes I slowly moved the scouts and platoon forward. A few minutes in after seeing how close the farm buildings are from the small lane I decided to switch plans. 3nd squad under Lambert will continue to move towards the Cafe while the rest of the platoon will switch and move towards the farm. I think I can get the bulk of the platoon into the farm fairly easily and since the farm buildings seem to have a variety of cover and walls if they meet trouble the will have a place to fight from. We will see how this plays out.
This was my first mistake. Not the changing plans part (although in hind sight I think starting from the cafe and heading north to the farm would be the superior plan). No, the mistake was splitting the platoon up. As my guys moved into position they spotted movement in the barn and across the road to the cafe at the same time. I decided to move fast at this point against both the cafe and the farm. This is where I make my really big mistake. The squad heading for the cafe is totally unsupported and I have no business ordering them to take the cafe. The rest of the platoon are in a good position to assault the farm. That was a good move. So, in Minute 29 saw a great victory and a disastrous defeat. The disaster at the Cafe was my undoing. Here is the entry from that fateful turn.
Minute 29 Orders:
Lammert's 3rd squad will rush the back door of the Cafe with the scout team trying to cover the road. Hopefully no other GIs will try to cross it.
Meissner and Steiner's MG team will lay down suppressive fire into the farm and the bocage while Frobe's assault team will try to follow those GIs into the barn and eliminate them. This is a bit of a bold move since the GIs are already in the farm but if I don't move now the field between the farm and my guys will be covered by the bocage line and the farm will be firmly in the GIs hands. This way I hope to get a squad into the farm and keep the GIs down with the MG team. I hope it works out but we will see.
Minute 29-28 Action:
The action was heavy this turn and it can be summed up in one word “grenades”. This is also a case study in how to assault a building the right way and how to do it the wrong way. Lets start with the wrong way.
Lammert's 3rd squad rushed the back door of the Cafe with no direct support at all. The scout team simply was cover the road but no one was firing into the building they were assaulting or the near by buildings. Things start off well enough with the squad crossing the open space only taking a little fire from across the road.
But once they are about the enter the building boom – two grenades hit and all hell breaks loose.

They they are finished off by some small arms fire.
The result is a total loss of Lammert's squad (save the two scouts)
What at total disaster. I wasted the whole squad and should never have made that bold (aka stupid) move. This is the wrong way to assault a building and my men paid the price for my mistake. The best I can do is promise them I will not do that again and do my best to keep their platoon mates safe and successful.
Mean while at the farm the rest of the platoon is doing it right.
With supporting fire from the MG team and the Platoon commander into the court yard plus Harmel's Shrek rounds hitting the farm building, Frobe's squad advances. They take no return fire and arrive in good order.

When they storm the building they find the two GIs already dead (a bit of luck that happens when you have covering fire) and no one else inside. The wall outside has a team of GIs firing at them but some small arms fire and two grenades later they are all gone too. Below you can see two Americans have already been hit and the first of two grenades is just sailing over the wall.

That is how a building assault is done right – covering fire on the approach and after. I had no casualties at the farm and managed to inflict some significant casualties on the Americans.
Frobe's squad triggered a touch objective for the SW barns. Now that I see these are touch objectives I think I am in trouble. The Americans have made it all the way to the Cafe and into the whole of the farm (remember there was a team inside the SW barns). That means they have probably touched all of the objectives and I have only touched one. Right now we have taken about equal casualties. So as it stands now my opponent has the win in hand and only has to defend it. Not a good situation to be in but no sense crying over spilt milk. Time to clean it up – if I can.
But I could not.
The Americas took out my scouts and flanked me in the south. After hitting me hard in the side my last casualty free squad was decimated and broken. I managed to secured the farm but that broken squad surrendered and never fired another shot.
And that is how it ended - a tactical victory for the US.
Congratulations to eniced73. I will be rooting for you in the next round.
I have a more detailed version of this AAR that I can post if there is interest. It documents the first 18 turns (last few turns are covered by one entry before we called a cease fire) with 47 pictures.
-
The Blitz also has most of what you are talking about. I guess the big thing missing would be a real time player finder.
It has a ladder system that includes a results based rank (ELO) so, over time, you can find players that have similar skill level to play:
Another opportunity for you to join forces perhaps.
-
Nobody will tell you you are wrong, just make it interesting.
Lots of good advice deleted. What I wanted to add was - make sure the fields are not billiard tables. Many topo maps show contour lines that are 10m or more apart. What that means is elevation changes that are less than 10m will *not* show up on the map. But changes in elevation of 1, 2 or even 5m will make a big difference to how real things look. Around here fields that are flat are few and far between and those that are are full of water:) Most fields have a roll to them with high spots and a variety of gradients, heights and shapes.
-
Yes, yes, yes... Now get back to work...!
Seriously, I second PP's sentiments. You almost singlehandedly have made CMBN look the way it should look. And done it with grace and good humor. I dunno how you do it.
I too was going to +1 PP's sentiments but then I read this and actually laughed out loud. So instead, nice one Erwin and thanks Fuser - I want to echo what PP said too.
-
I just would like to point out to you that another thing that is frustrating between CMX1 and CMX2 for many that have not liked the change is how one approaches the game. You will need to learn how to use your tactics within the game all over again. If you try to play units the same way you did in CMX1, you will find yourself in bad situations.
Agreed. I have one PBEM friend that has temporarily giving up CMBN. He is strapped for time right now due to RL and found that he could not just jump in and play CMBN like he was playing CMBB. So he wants to go dark for a while and play against the AI when his time frees up so he can figure out the new game.
-
And it's Commonwealth written together. Only poverty is common.
I stand corrected - about the proper spelling of Commonwealth. I *do* know that poverty is common and wealth is not.
-
First, will there be a demo for Commonwealth? Wondering more to see if it will run well on my laptop (A6 3410MX, Win 7, 4GB RAM, 1 GB 6755 G2 Vid). I'm assuming the changes aren't big from the original game, but weird things happen with PC's.
Someone else can correct me if I am wrong but I would suspect that the current CMBN demo would be a good test. If you are happy playing it on your note book then you will be just as happy with the Common Wealth module added in. Well more happy because you can play the Canadians:D
2nd, is there a download only option? Doesn't mention it in the announcement or show in the pre-order drop-down. Not interested in having it shipped.Nope no download only in the pre-order. Once it is released you can just buy it and download it.
-
You'll never see me playing RT either, for the reasons you mention. However: what about PBEM? With H2HH you can cut out the email and file copying.
<snip>
Just make sure to have something to do while your opponent does his turn. Surf the web or something. Bring a book.
And while the game loads - for that you need a book no web surfing while the game reads in the next PBEM file.
This will be the number one issue for people who want to do WEGO over TCP/IP. Every PBEM turn will cost them 3 to 5 minutes just for the game to load. That long load time is my least favorite part of PEBM but at least at a turn per day rate there it is not a significant time compared to the 24 hours in a day. However with TCP/IP support there would be no need to reload the game every turn - what a time saver that would be.
-
Ian posted some the answers but I feel I have to chime in because I don't quite agree with everything he says also.
What!!! unacceptable
 Artillery in this game is modeled very well. It's lethality is exactly what it needs to be. My only beef is the reality of accuracy when requesting a "line" barrage. This just seems too easy to do IMO.
That is a good point. It does seem from the artillery discussions that things could be tweaked in terms of targeting and accuracy. I have no knowledge of that. What I do know is if your guys are under an artillery barrage it is a bad thing. In game and out.
I agree but BFC has stated that they are looking in to adding this. Nobody is sure if it's going to be in the Commonwealth module yet.That would be awesome - it would make me so happy.
I guess I have to agree with this. I'm not a big fan of the action spot system but the enemy has the same issues, so it's not like it's a handicap.True what you say about both sides suffering. I would really like to see some improvements here. Like GreenAsJade's (I think it was him) recent postings about wanting infantry especially AT teams look around corners more. Right now it seems you can either have your guys snug against the wall and able to see anything past the building. Or away from the building totally exposed. I would love to have the tube guy poke his head and weapon around the corner.
Almost every map I've played has been a bocage map where the longest possible engagement ranges have been maybe 500m but often much closer. I would expect one shot hits in many of these cases. I am not seeing to many one-shot one kills. I've had many cases where there are penetrations that did little to no damage and often do some damage or injure to crew.Misses do happen. The more I think about this the more I think people are forgetting about the misses. Why just this morning I was playing a turn (in Carbide Carbide) and noticed a Sherman burning. So I looked to see who got the kill and found both my Stug and an At gun took shots. Replay showed two shots from each down range. Both missed high with their first round and found there mark with the second. The AT gun got the first hit but no idea which will get credit for the kill. This is in the 400 to 600m range. The Sherman was invisible behind bocage and came through an opening and suddenly appeared. It was moving at the time.
Perhaps the complaint will come from my opponent "No fair my Sherman never got to shoot" but hey they came zooming around the corner right into my pre determined kill zone for both AT assets. What happened is pretty much what I would expect.
PS. I know my opponent. He will not actually say that and he probably knew that tank would flush out something. I just hope they did not see wht hit them before they brewed up or else...
-
Most, if not all, buildings are impervious to small arms fire. The lethality issue is due to men bunching up in the windows.I did a test of this last night. Summary: men hiding in buildings are practically immune to small arms fire.
Thanks to flamingknives and Wreck for this information. I will be applying it to current and future games for sure. This is an example of why I read these forums. Dealing with buildings have been giving me fits and I hope your information will help.
Incidentally, one other thing I discovered that is not that obvious is that area fire is per-floor, and that area fire on a second floor does not have any effect (except suppression) on men on the first floor even if they are "up". (I had to re-run the "up" test after I discovered this.)Yeah that is very important. One thing I am getting good at is clearing buildings. The fits come from my guys inside the buildings. Area fire by supporting units on upper floors is important. Before sending the assault squad in the door the supporting units have been blasting away at *all* floors for at least a turn (for un confirmed enemies) or longer (for confirmed enemies). OK OK with an 8 story church tower I usually cannot target all the floors so I'll try to hit ever second one and mix things up each turn but you get the idea.
-
flamingknives
Interesting experiment with buildings, very interesting indeed. I like your explanation of the difference between Veteran and green troops better too.


"The Farm" Tournament - Round 1 AAR Thread
in Combat Mission Battle for Normandy
Posted
Minute 20-19Action:
I was right Frobe's team did surprise the GIs outside the farm wall. They were looking the other way totally unaware of the Germans behind them. I thought this is going to be a sweet victory in an otherwise loosing effort. One of Frobe's men fires a rifle shot and misses, the GIs turn around and open up on my guys.
No GIs go down and Frobe's team takes another casualty. It turns out I was not paying enough attention. Frobe was out of 9mm amo. So the hail of bullets I was planning for the GIs never came. With the MG42 still in the other barn all Frobe had was two rifle men and only one of them moved to the south window to fire on the GIs. That is not the taste of victory it is the taste of blood.
Minute 19 Orders:
Not a good situation. I get Frobe's remaining team to hunker down in the barn away from the GIs. Fitzemeyer moves closer the broken squad to try to rally them. Meanwhile Harmel's team finish clearing the last farm house – no GIs were home. There is a light machine gun across the road from the farm that is making it difficult to move in the open around the farm. I have also ordered Steiner's MG team to move into the cover of the barn.
Minute 19-18 Action:
The remnants of Meissner's former squad rally somewhat under Fitzemeyer's command but immediately come under MG fire from the bocage. They start returning fire but by the end of the minute they are panicky again and half of them surrender.
Minute 18 Orders:
My orders are to hold tight and hope for the best.
... post 11