

Andrew H.
-
Posts
1,446 -
Joined
-
Last visited
Posts posted by Andrew H.
-
-
That being said, at some point I'd like to try and figure out some other way to hamper operational action without also screwing up reasonable tactical freedoms. But I already know it's a tough nut to crack. Nobody else has cracked it as far as I know.
Steve
I'm sure there are many more elegant solutions than command delays. But they did a pretty good job in CMx1 of making you feel like you were commanding a bunch of conscripts.
Which I think is what the real goal should be - if I have a company of Soviet conscript infantry, what I can do with them should be realistically limited; which would mean, in turn, that I would be forced to use many of the techniques used in the war historically. Not because they are the best techniques to attack with overall, but because they may be the best techniques to attack with with these particular forces.
Which makes things more fun as a player because you have to use a completely different style with different types of troops.
But this was done pretty effectively in FI - playing the Italians was not at all like playing the US or Germans; you had to use completely different tactics. (Or at least completely different tactics from those I used when playing Italian; I sucked...)
Maybe the conscripts should have unsplittable platoons...
-
I really love the idea of huge maps, particularly if they are *not* crammed full of troops. Like a recon battle on a 4km by 8 km map where you have maybe a company are are probing for weak spots.
(Maybe followed up by larger battles as both sides reinforce)
Battles where you have to protect your trucks and HTs because it would otherwise take an hour to move from one location to another. Battles where having reserves is important because the map is too large for you to just shift existing forces to cover. Maps where breakthroughs and strongpoints are signficant. Maps where artillery is important, but does not have the godlike power it has on smaller maps. Maps where extremely common things like dropping harassing fire on key roads/intersections is sometimes the best use of your arty. Maps where there actually *are* key roads and intersections...
-
Who'll make the first 100m x 300km map? A road...a very long road. Partisans may lurk along it. Good luck as you drive your convoy along it.
Or, 300km x 100m: You have to defend the entire width with one Italian battalion. The Soviets may enter anywhere. Good luck.
I would think there will be some limits associated with how "out of square" the maps can be. Just guessing, mind you.
500m x 60 km: I plan on refighting the epic (but tragically forgotten) battle in Spaghetti Factory Nr. 3 (завод по спагетти № 3).
-
I think the AI is pretty good, too - at least on the defense and without armor.
I prefer to play probes against the AI - I think that is easier for it than attacks and assaults.
-
I have called my wife. She will be home soon.
Why did you call your wife? Because 3-1 odds are better?

-
If CMEF - Stalingrad doesn't come with flaming Soviet SMG squads the game will be fundamentally flawed. There's all the proof I need.
-F
In Soviet Russia, flamethrower is YOU!
-
If you're going to split an AT team off, it should be the second split. If you split them first, they scurry off, giggling, with all the squad's grenades and sit at the back playing pass the parcel... Split off an Assault team which gets most of the grenades and short range autofire, then split either a scout team or an AT team off the rump, if it's big enough.
Cool; I didn't know that
-
The approach I take is as follows:
1. Split squads. Keep them spread out laterally maybe 3 action spots across. Have a second echelon of scouts maybe 3 action spots back. If your squads split into two parts, the "B" team follows the "A" team. (with the lead team being whichever team has the most automatic weapons). If your squads split into three teams, the squad advances in a line, with the second echelon being a second squad.
2. Advance across a broad front moving 3 action spots if you don't expect to encounter enemy, 2 if you think you might encounter some, and 1 or 0 if there is a high likelihood of encountering them (like a sound contact). I usually move forward in "hunt," unless there is a sound contact, in which case I'll use "slow". (Or area target).
Once the first echelon has stopped, I move up the second echelon (using "move"). Sometimes I stop them just behind the first team, other times to the side. I don't like to be on the same action spot. (I tend not to "leapfrog" because I want the group with the automatic weapons in front).
3. I usually stop as soon as I encounter a sound contact and area fire. Concealment is different from cover, so even if your targeting line stops one or more action spots in front of the contact, the fire may still affect the contact. I'll typically bring the second echelon team to the action spot next to the first team in this case - move or quick to the action spot behind where I want to end up, then "slow" move into the spot itself.
(If the first echelon team is wiped out, the second team will "slow" into the spot behind where the first team was wiped out).
4. Teams which have not encountered an enemy unit will keep moving forward. Part of the goal is to identify strong points and gaps in the enemy line. In some cases, it's fine to have a standoff where you've encountered resistance and move more troops through the gaps you've uncovered.
But typically, I'll move adjacent units (the ones 2-3 action spots away) around the discovered enemy unit, in an attempt to curl around and flank or surround them, usually using "slow" when I'm really close.
5. These are just miscellaneous bits.
If there's a gap in the woods, I like to bring both teams to the edge of the gap and then crawl one across. These are really dangerous because you're in the open and the enemy may be in cover.
It's hard to use US style MMGs/HMGs in the woods; you're usually dead before you can deploy them. So I tend to keep them back and try to move them through undefended gaps discovered by other units. But once I've reached the edge of the woods I'll bring them there and set them up to cover troops as they move through the open.
60mm mortars can be really helpful for area fire on suspected targets.
Depending on the situation, sometimes I'll separate out the squad's AT team before splitting the squad into teams if I think I'm going to need them. They'll stay back.
Being ambushed by 20 mm AA guns in the woods sucks. I'm just saying.
-
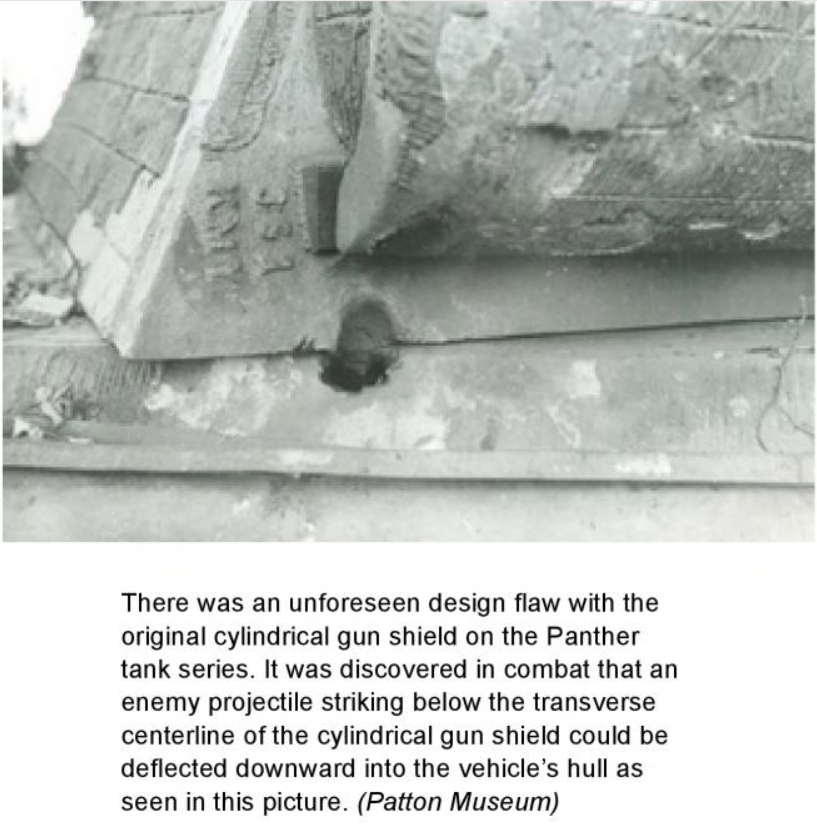
It is interesting that this ricochet would, in fact, be blocked by the mantlet "chin". The statement about hitting below the transverse centerline notwithstanding, I wonder if the shot trap only works if the shell hits the bottom 4" or so of the mantlet.
Edit: it also took out a chunk of the turret on its way through the hull roof.
-
So rare that I wouldn't even factor it in my decision making, I wouldn't ever bet any money against those odds, and I'm not surprised that I have never seen it in my games.
I wouldn't do either, either...but if my company of Sherms blundered into a pair of Panthers, I'd hope it was modeled. Overmodeled, even
-
It's interesting that your casualties are 71 killed, 34 wounded; but Bil's are 55 killed, 61 wounded.
Were you shooting to disable?
-
Given the forces and positions, it would more properly be awarded as a victory to Bil.
The battle took quite a turn away from what I expected early on. Okay, my tank debacle was NOT a highlight. (High payoff, high risk. Ooops.) Afterwards, I adjusted to the circumstances and tried to leverage what I had.
I disagree; I do think you deserve a draw based on the situation at the end. As you will now know having read Bil's AAR, his Panther was, well, a paper tiger
. IMU (In my usage), Jaggies don't work that well against infantry because they don't have a lot of HE and their MG is somewhat limited. His Moebelwagen, on the other hand, assuming it were working correctly, would be a real threat. But you do still have the CS tank, assuming you can avoid the Jaggie. And you also have a lot more infantry. So I'll call it a draw.
One of the biggest differences between this AAR and the last couple of Bil's AARs that I've seen is that you did a much better job picking your forces; I felt like in some of the other battles, the opponents had really lost before the opening turn. (I mean, possibly they could have won if they'd played a perfect game, but the deck seemed stacked against them from the beginning. You, on the other hand, were able to keep things competitive despite playing what I would not describe, particularly in the beginning
, as a perfect game).Even though you lost your MBTs pretty quickly and spectacularly, it seemed like you always had enough mortars and PIATs and mostly enough infantry to alter your strategy and put up a defense - I'm not sure that a turn went by where you weren't dropping mortars *somewhere.*
And of course it's not clear that you would have done much better with your tanks if you'd played more cautiously; fighting a Jaggie and a Panther is hard, even with a Firefly.
So, good job and excellent, entertaining AAR.
-
On the uncommon occasions when I do plot CAS area targets, I keep friendlies at least 400m from the edge of the target area.
I really like CAS area targets because they can attack units I can't see and don't know about, often while they are on the move. They also give me a clue as to where the enemy units are based on where they are strafing.
But I almost always do this as a preplanned attack (usually scheduled for 5 minutes in), and I will conceal AFVs and hide troops during the attack.
-
I believe it was the MFFB's that ended WW2 at a place called Hiroshima and Nagasaki and undoubtedly saved the lives of many Grunts and Jarheads because they did not have to invade Japan!
I think that had more to do with the scientists who designed the package rather than the FedEx men who delivered it!
-
It has made a significant change; more so that I was expecting.
I was playing yesterday and there was a Sherman about 10 meters away from a long rowhouse, lined up parallel to it and using it for flank protection. I moved a half squad into that building hoping that they could grenade or close assault the tank, but it saw them as they moved into the building, rotated its turret, fired the MG, and caused a casualty and a lot of cowering. Just as I was thinking I was screwed (because you can't close assault when you are being machine-gunned), I hear the Pssss!, and someone in the building fires a faust (30k) and knocks out the Sherman.
Troops were "rattled" afterwards, but I think that has more to do with being machinegunned. I was most surprised by how quickly the faust was fired; it was very fast.
I think that this has really opened up the usefulness of the 30k, which I was only rarely able to use with any success before - it was just too hard to get close when you had to fire from outside.
-
I knew the drinking game where you do a shot every time you lose a HT gunner was a bad idea.
-
Bah, 30's nothing.
I've got a guy with 30k panzerfausts! That's enough to take out every allied tank in NW Europe.
-
I always thought infantry was the Queen of the battlefield. Arty is King, because you know what Kings do to Queens...
I think it's Queen as in chess, not queen in any other sense.
-
She reads your posts, huh?
Michael
I think she's actually playing the game, which might explain the improvement we've seen in the second half of the game.
-
Bil's HT gunners are like Star Trek redshirts.
-
In case you're wondering if we, the (finally!) happy owners of market garden, are still watching..
YES!
And I, at least, have a greatly increased respect for Sten armed paras at short range.
And also for shrecks and fausts fired from inside buildings, although I don't think Ken is too worried about those threats in particular.
-
The kicker on the time may be that the map designer added overtime which can be anywhere from a few minutes to as long as 15 min. For your sake Ken I hope this is not the case.
I don't know - I think the chances of Bil knocking out as many tanks in the second half of the battle as he did in the first are vanishingly small.
-
Market Garden + Gustav Line = 2
And you know, for the first time I think that their new strategy (i.e., CMx2; I guess it's not that new...) is really working: Gustav Line still seems new to me...and along comes MG!
-
Great video!

Christmas Bone
in Combat Mission Red Thunder
Posted
There are also interesting spotting issues - if the infantry spots an enemy unit that the tank doesn't see, does this spot get conveyed to the tank? I.e., if there is infantry hidden in a hole 50 meters away, do the desantniks need to deal with it themselves, or can they say, "Hey, comrade tank commander, there are some fascists hiding in a hole 50 meters to the right; can you take care of them?"