

MethodGamer
-
Posts
53 -
Joined
-
Last visited
Everything posted by MethodGamer
-
That's my plan for the "1" team. That team's initial move was involuntary. I thought that trying to get them back into their fox hole was more or less suicidal, so I decided to pull them back and reposition them somewhere that they can delay the enemy again. As for team "6", they're still in good order, so they'll keep shooting from where they're at. I suspect they'll be running into problems next turn, so hopefully I'll be able to move them to a backup position where they can keep fighting, and if not, hopefully they run to a good position like team "1" did.
-
If I remember correctly, the mine was set in a fixed position by the mission designer. If I'd been up to me, I'd probably have moved 1-2 more from the north field into the road.
-
Minute 26-25 Allied forces continue to advance, although at a bit slower pace than before. The units that have made it to the southern hedgerow have stopped, as they're leaving cover for an open field, and they've hit their first axis units. The Allies and Axis have exchanged fire. One axis unit on the hedge row has fired a few shots, then started pulling back to the nearest cover (1). Other defenders on the line have also engaged the enemy. They're holding steady for now, but I expect them to move back next turn (6). Hopefully they'll be able to delay the advancing units long enough for the first mortar rounds to land, in about a minute (5). On the road, defenders have started firing (3) and and are holding up the advance; leading enemy units are cowering (4). The ATG (2), as in past turns (and past games for that matter), is completely blind and oblivious to everything going on the battle field. This is one of the things that frustrates me to no end about CM. The ATG at 2 is looking to the SW, and sees nothing. The ammo team that's 2m away from them, looking at the NW, has eyes on units to the SW. This defies all logic. Minute 25 Orders I don't think I'm going to change any orders this turn. Only a few units are engaged in the fight, the rest are just waiting for solid contacts once the enemy moves forward in their field of fire. For the units that are engaged, they're in good shape, no casualties, no morale issues, in good cover and in good firing position. I'm expecting that to change next turn, but I want to take full advantage of the solid situation I'm in right now. The only change I'd like to make would be orders to get that bloody ATG into the fight, but I'm not sure what I can do, other than leave it there and wait for something to show up. Suggestions?
-
Minute 27-26 During the turn, the existing visual and audio contacts remained as they were, and didn't move much. Looks like Ian is being careful as his units approach the hedgerows, or wait for engineers to clear the road. One audio contact did turn into a visual contact, and opened fire on my units in the foxholes, through one opening in the line (indicated by "1"). I took one casualty, and one soldier started running off. The remaining soldiers in the team stayed put. One unit further back took a couple of shots at an enemy unit it saw. I must have forgotten to give that unit a target arc. Minute 26 Orders Since not much has changed since the last turn, I think I'm going to limit my orders to telling the units at "1" to return fire on the enemy that started shooting at them. Assuming they can hold together for the turn, it might slow things down for another minute or two, buying me a bit of extra time that I'll need to hold on to the farm, as well as buying the mortars enough time to start falling (2 minutes left). The HQ will continue moving to the bend in the road, where it should be able to call in fire, although at this point, the mortars are busy, and the INF gun is waiting to see something for direct fire. The mortars may be of better use either through direct fire, or by dropping rounds on the road between the farm house and the trenches where the INF gun are currently located, as a last ditch effort to slow Ian down. Either way, I think they're well positioned: they're out of the way of the main advance, and they have a pretty good line of sight on things. Is there anything else I can be doing? I feel like the situation hasn't changed much since the last turn, and to me, that says that I don't need to change orders much.
-
Two weeks ago, Ian and I started a little experiment where we run a crowed-sourced DAR; we fight each other, but before playing our turns, we let everyone on the forums provide advice on what we should do. The learning experience has been incredible. While most of the learning for me has been around strategy and tactics, one of the things I didn't expect were all the little tips and tricks that make life a little easier and better in CM. For example, I learned that: You can click on a way point and setup a target from there, to get an idea of LoS from that spot You can give pause orders at each way point when moving, which helps with spotting While the DAR is great for learning, it does require a bit more time for analysis and writing. I thought it would be nice to have a thread where people can share their favorite little tips and tricks on the game. So have at it!
-
I finally had a bit of time to sit down and take in all the latest advice in this morning. Here's a quick update on the orders I gave for this turn. Narrowed but lengthened the target arcs of the rifle team looking down the road. They were initially set to 120-180 degrees, 30m, as I didn't know where they would show up, but now that I have a good sight on them, I changed the arc to cover just the road, but out to 80m. Similarly, the teams on ambush have had their target arcs narrowed and positioned so they're overlapping each other. A pretty devastating kill zone if anything enters there. I'll adjust if a different route is taken. Left the ATG's arc to armor only, fairly wide, 200m INF gun did not get orders. I'm going to try direct fire when they see something. They're on top of a hill and have good visibility on the field, so it seemed like a better plan. Called in mortars on the line just in front of 1. It might be too late, given how close Ian is, but at this point it's a learning exercise in artillery missions as much as anything else. Ian's artillery is usually pretty painful, I'm hoping to return the favor. Everyone else is left on stand-by
-
Yes it does. I switched to imgur, as delliejonut suggested. Hopefully imgur doesn't delete images after time, it's irritating to go read a post or thread and the screenshots are missing.
-
Ian and I decided on a short game since we knew turns would only be played every 2-3 days, given our little learning experiment. But I agree, 30 mins is a bit short.
-
The scenario time is quite short, 30 minutes. On the other hand, the map is quite small, I think just under 300m end to end. I don't know if that afford Ian enough time to probe the entire line and figure out his best approach to the farmhouse.
-
Minute 28-27 I was waiting for contacts, and I received plenty this turn. The first contacts were two armor sound contacts coming through the trees in southern section, within seconds of the start of the turn. Not too long after than, there were several infantry sound contacts. At the 30 second mark, there was a confirmed sighting of the first tank, followed by several visual contacts on infantry. They're close. The infantry can be heard at 30m in front of my line. In the road, the unit I moved in to check out what was going on with the mines is seeing an eye full, at least 15 men. They have line of sight on all of them, but they're 190m away. The HQ is close, but doesn't have LoS on them, so a fire mission isn't possible just yet. Minute 27 Orders I have a few options, and I'm not sure what to do at this point. But first, a question about LoS. The tank indicated by "4" is visible by the ATG's ammo team, but not by the ATG itself. How is this possible? Both have a clear field of view to the tank, both are roughly in the same position. I get that the LoS model wants to try and deal with borg spotting, but I don't understand how the ATG ammo team doesn't whisper to the ATG team about 2m away "pst, there's a bloody tank in the field 150m away from you!". With that out of the way, I have a few options that I'm not sure about. First, I have a rifle team with perfect view down the road, and they can see Ian's guys clearly. My HQ isn't quite in place yet, so I can't call down mortar fire. At this point, should I get the rifle team to start firing and pin the enemy down, to give time to the HQ to set into position and call artillery, or should I wait and ambush them, given that I have a few other squads near the road waiting on ambush? I'm thinking the latter, but I'm not sure. The enemy at "3" are visible by the ATG. My plan is to NOT fire the ATG at them, and wait for a shot at the tanks. The sound contact at "1" are within the target arc of the unit right in front of them. I take it the right thing to do is wait for them to become visible, rather than change their order to Area Fire? Also, the TRP is close enough that I can call in fire from the INF gun on those sound contacts. Should I do that? If I were not getting advice, I would. No orders given yet, waiting for the wisdom of the crowd!
-
Small side question: I played my turn and took a few screenshots, however, when I try to upload them, the system says that I only have 3.04kb left. What's the attachment size cap? And is it by by thread or by individual image?
-
Minute 29-28 Absolutely nothing happened, other than the few units that were ordered to reposition themselves did so. Minute 28 Orders None, just waiting for contact at this point. Questions: Is there any way to figure out what terrain type I'm dealing with in game, other than visual recognition? For example, in this thread, there's been mention of bocage vs hedgerows, and even experienced players didn't seem sure which of the two a particular hedge row was Similarly, is there anyway to figure out ahead of time if a piece of terrain is passable or not? One of the units I ordered to move had to take a long detour because I though a piece of terrain was passable, but it wasn't. It won't make a huge difference to my plan in this case (the unit isn't running out in the open or anything, it'll just take it two turns to get into place, rather than one). But in other games, a mistake like that could lead to a dead squad or worse.
-
And this is the dilemma: do I shift more forces to the road, or wait for more information. Given the small map and short distances, do I have time to move units in a position to defend if I get the initial call wrong?
-
Minute 30-29 This minute was completely uneventful, until the very last few seconds, when I heard a bang. I quickly scanned the map, and saw a little puff of smoke, at the end of the road. Someone or something stepped on a mine. This confirms what I already know: something is coming down the road. My initial assumptions were that Ian's main force is coming through the woods, a smaller secondary force is coming up the road, and no units are coming through the north sector. Orders Minute 29 The way I see it, I have three choices at this point: Move all units from the north sector near the road to cover/ambush it Move most of my north sector units near the road to cover/ambush it, but leave a few in the north sector, as reserves and as scouts just to be sure nothing come through there Move a few units from the north AND south sectors near the road to cover/ambush it I'm thinking option 1 would be the correct choice (assuming I didn't know what Ian's plan is). If that's correct, the question is now what do I move where, and how? Here's what I'm thinking: Now that he's mines in the road, my question would be, does he continue down the road, or does he change his plans and try to see if the north field is any better (indicated by "2"). Because of this, I'm going to keep the units near "3" where they are. They can spot and suppress Ian if he does come through that field. If he doesn't, I can shift them closer to the road. Units near "1" seem like good candidates to move forward to help cover the road. They're equipped with fausts, so they can deal with infantry and armor. Team team at "4" is in good position. They're likely to make first contact with the enemy coming up the road, so they'll stay put for now. I'm not sure what to do with the ATG and the schreck near "5". I right now, they're both facing the south sector. I can either (a) leave them as is for another turn, until my team at 4 can get a better idea what's going on, ( turn the ATG towards the road and leave the schreck as is or ©, leave the ATG as is, and move the schreck up closer to the gun, facing towards the southward curve in the road NW of the ATG. I'm thinking option ©. My last question is: what do I do with the units near "6"? They're my reserve. I'm thinking they hold tight for now, until I get a bit more information, then I'll send them where my defenders need them most. Is that how you determine when reserves should be activated?

-
Ok, I've made a few adjustments to my plan. One thing to remember: Even though I know what Ian's plan is, I'm pretending that I'm defending against the bulk of his force coming through the field south of the road, with a small harassing force coming through the road. Also note: I've rotated the map so that North is up. I was getting confused with "my left" and "Ian's right", etc. So now, North is up, East is right, etc. Here are the adjustments I made: I've moved the panzerschreck team up, closer to the front of the line, near the road. Their initial orders are to move into the road, between the two openings on the south hedge, and take up position there. From here, they can cover the road and the south field, or move to the north field if he does go north. There's also an assault team in that spot. They'll stay put for the first turn, and they'll move where they're needed as I get a better picture of the attack. I've moved trenches and an MG team. They have a pretty good field of fire here, especially just across the marsh and north of them. I've moved foxholes and an MG team just north of the road and west of the farm. Again, good coverage of the north field, but close to the road and the south field if they need to be somewhere else I've moved a few mines in front of the openings in the center hedgerow. It's thinned my mine field on the right, but the gaps are still pretty small, so if that's his main line of advance, they'll still probably do damage and slow his advance down. I moved the HMG team into foxholes just in front of the main INF gun trench network. They're still close enough to the road to displace if I made a mistake in where Ian's force is coming. I've moved trenches and foxholes, manned by MG teams, as far west as the deployment zones allowed All of this has thinned the amount of men I had in the two big trench networks in the back, so if arty starts falling into that position, there's a lot less to kill. That leaves me with two questions: Is the TRP in the right spot? Right now, it's just in front of the gap left of "4". I figure that would be an ok spot to start a fire mission, and I can adjust up and down the line, depending on where Ian puts his force in cover. Should I move units into the red zone left of "6"? I don't have many units eligible to deploy in the red zones, other than the teams in the farmhouse, and I'm out of fortifications that are eligible to move there, so I'd have one unit without foxholes or trenches if I do that. Thoughts?

-
Almost. I'm not changing my overall defensive plan now that I know Ian's attack plan. However, I will tweak a few things to better implement my original plan (moving a few defenders closer to the front line, not bunching up defenders so much, deploying my limbered gun, etc).
-
This thread continues to deliver. I'll review the information in more detail later tonight, but based on what I'm reading, I think there's one big change I need to make to my defensive game:be far more "aggressive" on defense. My general approach has always been to turtle up close to the objectives, but the consensus seems to be that it's the wrong approach, so I'll definitely stop doing that Two quick questions. I realized I don't understand how to plan and use reserves at all. What's their purpose? How big should reserves be? Can trenches be rotated? I tried moving trenches that were aligned east to west (top to bottom in the map), since they were empty and they could be more useful if they were close to the attack line, but I couldn't reorient them north-south, which would have made them parallel to the defensive line. Does it even matter? I'll have more tonight. But thanks for what you've provided so far, it's a huge help.
-
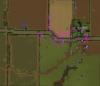
Sorry for the delay folks, Ian and I were sorting a few things out. Now we're ready to roll. Before I get into the details of my plan, here's how I created it: Read through everyone's posts to get an idea of what to do. Launched CM, and then put my plan together as though I was on my own, and we WEREN'T running this experiment, just to give myself a baseline to compare my strategic thinking vs more experienced thinking Compared my initial plan to what everyone suggested in this thread Made a adjustments Given this, here's what I came up with. The Objectives for this mission are: Hold up the Allies as long as possible (I took this to mean keep them away from the farmhouse for 30 minutes Protect the Heavy Weapons (ATG, INFG, HMG, Mortar) Kill Armor Assets Infantry Company 50mm AT Gun 75mm Infantry Gun 81mm Mortar Heavy MG Panzershrek Loads of fixed defensive equipment (mines, wire, trenches) Target Reference Point Expected Enemy: Infantry and Armor. Numbers unknown I've had to deal with Ian on the attack a few times, and everytime, he's followed the same basic strategy: focus the bulk of his force on one side of the map (usually the one with most cover), push that force to the edge of my flank, then roll my line all the way to the objective. That way, most of his firepower is concentrated on a small number of defenders the whole time. He'll usually have a smaller force take an alternate approach, I think to harass and occupy units in reserve (I've never asked about this, and now I kinda regret it). I don't expect anything different this time around. That means he'll be coming down either the left or the right side, so my big decision is which. As a few have mentioned, the tactical map suggests he'll be starting at the south-west corner of the map (top left in the image above). He could move his force to the north west sector (top right of the map), but that means he'd have to come down a flat and long open field. That's not Ian's style. So I believe he's coming straight down from his launch position (indicated by "1" in the image above). Given that, I've left the bulk of my infantry on my left flank. I moved a few teams up right against the hedges. They'll provide the initial eyes on the enemy, and harass them with fire. I've given them foxholes so they can hold for more than one turn. If they idea is to hold the Allies up, then one or two extra turns could do the trick. The plan is to move them back if they come under heavy fire; their purpose is to (1) spot the enemy early to confirm my plan and (2) hold them up for a turn or two. If they can fall back, then they can help hold the Allies back a bit longer later in the game (live to fight another day sort of thing. I've put a team on that hedgerow near the road as well, just in case Ian decides to move his secondary force down the road (indicated by "3"). In the offchance that Ian does decide to come down the north side of the farm, I've put two teams on the hedge row behind the wire. They can also provide a bit of fire two slow things down. If Ian decides to dislodge them before coming in, it'll take him a turn or two to setup. Once fire starts coming in, those teams will displace back to the farm, if they're able to (indicated by "5"). I've also put the mortar team and the company HQ on the north side of the farm. They'll provide harassing mortar fire. If it turns out that this sector is not under attack, they'll simply displace back to the farm and setup defenses there. At first, the AT Gun was a bit of a puzzle for me. But after reading some of the threads, I decided to be a bit less protective of it. I put it in the road, but against the hedgerow, facing towards what I think will be the main line of advance (indicated by "4"). From that position, it has almost a perfect view of the entire field behind the middle hedge row. If something should come down the road, it can turn and face that area. It'll be very close to whatever pops out there (about 50m), but if it gets the first shot, whatever is there dies. If Ian does head for the edge of my flank, that means he'll cross the road between the trenches and the farmhouse, I can face the gun east and take a few shots as he crosses the road. And finally, if he does come through the right side, I can redeploy the gun in the hedgerow beside the wheat field. The gun is currently limbered, so I'll need to remember to deploy it. I figure the Heavy Machine Gun team is fairly mobile, so it's on stand by in the road, undeployed (indicated by "6"). I'll rush them into position once I know for sure where the attack is coming from. I've setup the bulk of my infantry teams in the trenches. I've split the teams, so that I can get AT teams into position to take shots at the armor, with the MG teams ready to provide covering fire. They're also fairly close to the road, in case they need to fall back to the farmhouse for their last stand (indicated by "7"). The INF gun is also in this position. I've pulled it back a bit from it's original position. I find it had a better field of view, and given Ian's general artillery tactic of hitting the front of my line first, it should avoid the first shells that come in, and hopefully that will be enough for it to fire some shots into his line before he adjusts his fire. I've left the Panzerschreck team in their starting point (indicated by "8"). They're quite mobile, so I thinking I can get them into place wherever they're needed. The rest of the infantry is in the farmhouse. They'll move to reinforce as needed. I think I have two weaknesses in my plan, both exposed if Ian attacks to the center or the right. First, the Infantry gun is completely out of place. That means I'd have to rely on indirect fire to make it useful. Second, my trenches will be in the wrong position. My infantry may be a bit far from the fight, but hopefully, the infantry on the line and the Mortar will be able to hold Ian up long enough for me to reinforce my right flank. So that my plan. It's not been sent yet, so I'm able to make any changes you suggest, so have at it. Are there any major problems in my defense? Are there any tweaks I can make to mitigate weaknesses? Is there any additional information I should have provided? Do you have any general comments on my thinking? (Small note: I'm off to read Ian's plan, so I won't be making major changes to my strategy in the event that Ian is coming from the center or the right side. I'll just take it as a lesson on recovering from a bad plan, which I'm assuming happens often ).

-
I think that was the CMRT game we're playing. I haven't looked at Buying the Farm yet (it was still showing as yellow (1d+) in WTII this morning when I checked). If you want to restart to correct the wire placement, I'm ok with that. But I'm also pretty sure the wire won't make a huge difference for this fight, so I'm also fine if we keep going. Whatever's easiest.
-
This thread has certainly delivered a lot of knowledge and wisdom. And I haven't even posted my plan yet! This is amazing, and I'm glad we started this experiment. I have a lot of follow up questions on everything that's been said so far, but I think I'll wait until I post my strategic plan later today. That way, I think everyone participating will get a really good idea of what I mean by "understanding the strategy, but not being able to execute". I will go over every suggestion put into this thread so far, and apply it as best I can. Again, thanks a million to everyone who's taken the time to share their experience, it's much appreciated.
-
Wow, that was a great post, exactly the type of stuff I was hoping for. Hopefully you'll be around when I actually try to implement this type of strategy, since, as I've mentioned, applying strategies and tactics properly is a difficult task. Thanks for the information, I'll try to put it to good use.
-
Pure luck. I didn't give the order to kill that tank, and I don't even know who took the shot. I wonder what part luck has to do in proper positioning. In our last game, there were a few avenues of advance you could have used that could have been covered by my AT gun. But with so many choices, how do you decide? This is what I try to do, but some parts of my other game are too weak to put this in into practice. For example, in our last game, the attacking force was focused in one spot, and I had no defenders in place to slow them down to bring artillery in.
-
I don't know the exact number of times I've lost to him, but yeah, something like that. I've won once or twice, but my win rate is probably something like 5%. There was only one game where I misunderstood the objectives, so that's not the issue. I think it's really three things. 1. I don't understand many game mechanics. Line of sight and targeting has problably been my biggest problem. In many, many, many cases, I'll have a unit that can see the enemy, but as soon as I try to fire at it, I get the "Target out of Sight" or "Reverse Slope" message, and I can't fire. I just don't understand how to position my units to be able to target the enemy. Another example is action squares. 2. I don't know how to apply strategies and tactics effectively. For example, in one game I was the attacker. I know enough to not move units in the open, to have one unit on suppressive/covering fire duty so other units can move, etc. However, I failed miserably when trying to apply this tactic. Either I put my suppressing units in a position where they can't fire (see problem #1 above), or when they are in a place to shoot, IanL's defenders pound the crap out of them so they're the ones being suppressed. In another example, I was defending. IanL was using tanks very effectively by pounding a position before moving his infantry in to capture it. I couldn't get any AT units in position (tanks, AT Guns, AT Infantry, etc) to take a shot at his armor. I get that a large part of this was IanL playing the game well and protecting his tanks. But it was so one sided that I can't help but think that I was doing something completely wrong. 3. I don't use individual units effectively. For example, I've never been able to use artillery as a defender correctly. It seems that my artillery arrives after the attacking unit has moved on. Similarly, in my last game against IanL where I played the defender, I had an AT Gun so completely out of position that it didn't fire, and it didn't take any fire in the entire game. I might as well not have had it. IanL is definitely very methodical, and he's thought me a few things that have really helped. But like I mentioned above, even though he'll explain a strategy or tactic, and even though I'll understand it, I can't seem to apply it effectively. That, plus sorting out some of the game mechanic issues I'm having are the two big things I need to sort out. And while kicking his behind would be nice, I'm ok with losing, as long as I put up a good fight and have good stories to tell afterwards.
-
And yes, screenshots are definitely coming (we're still setting up the game).


