

A Canadian Cat
-
Posts
16,501 -
Joined
-
Last visited
-
Days Won
55
Posts posted by A Canadian Cat
-
-
Stop distracting him. I love what he has been doing lately but I do want to see more vehicles

Looking forward to installing your smoke mod...
-
Smoke looks awesome. And the dust too. I also installed your new terrain textures and horizon and very much like it. The pavement is just fantastic for example. Nice work.
The only thing I did not like was the cloud shadows. Previously I only noticed the cloud shadows occasionally, usually when things were quiet. But the ones that you just posted are very noticeable and distracting. I am not sure why that would be.
-
Do you recall which map it was, so that it can be looked at?
I posted more info in the CMFI forum - including the map. I am the one that created the initial turn and sent it to Weapon2010.
-
I was the other side of this PBEM problem. I sent Weapon2010 the turn file (which you can find here http://www.lesliesoftware.com/forforumposts/2012/Ian%20attack%20Ron%20v2.zip).
I am running the windows version of the game. This is CMFI with the patch installed.
I did not reduce the size of these pictures to be sure the text would be readable.
The QB screen:

Then the map picking screen:
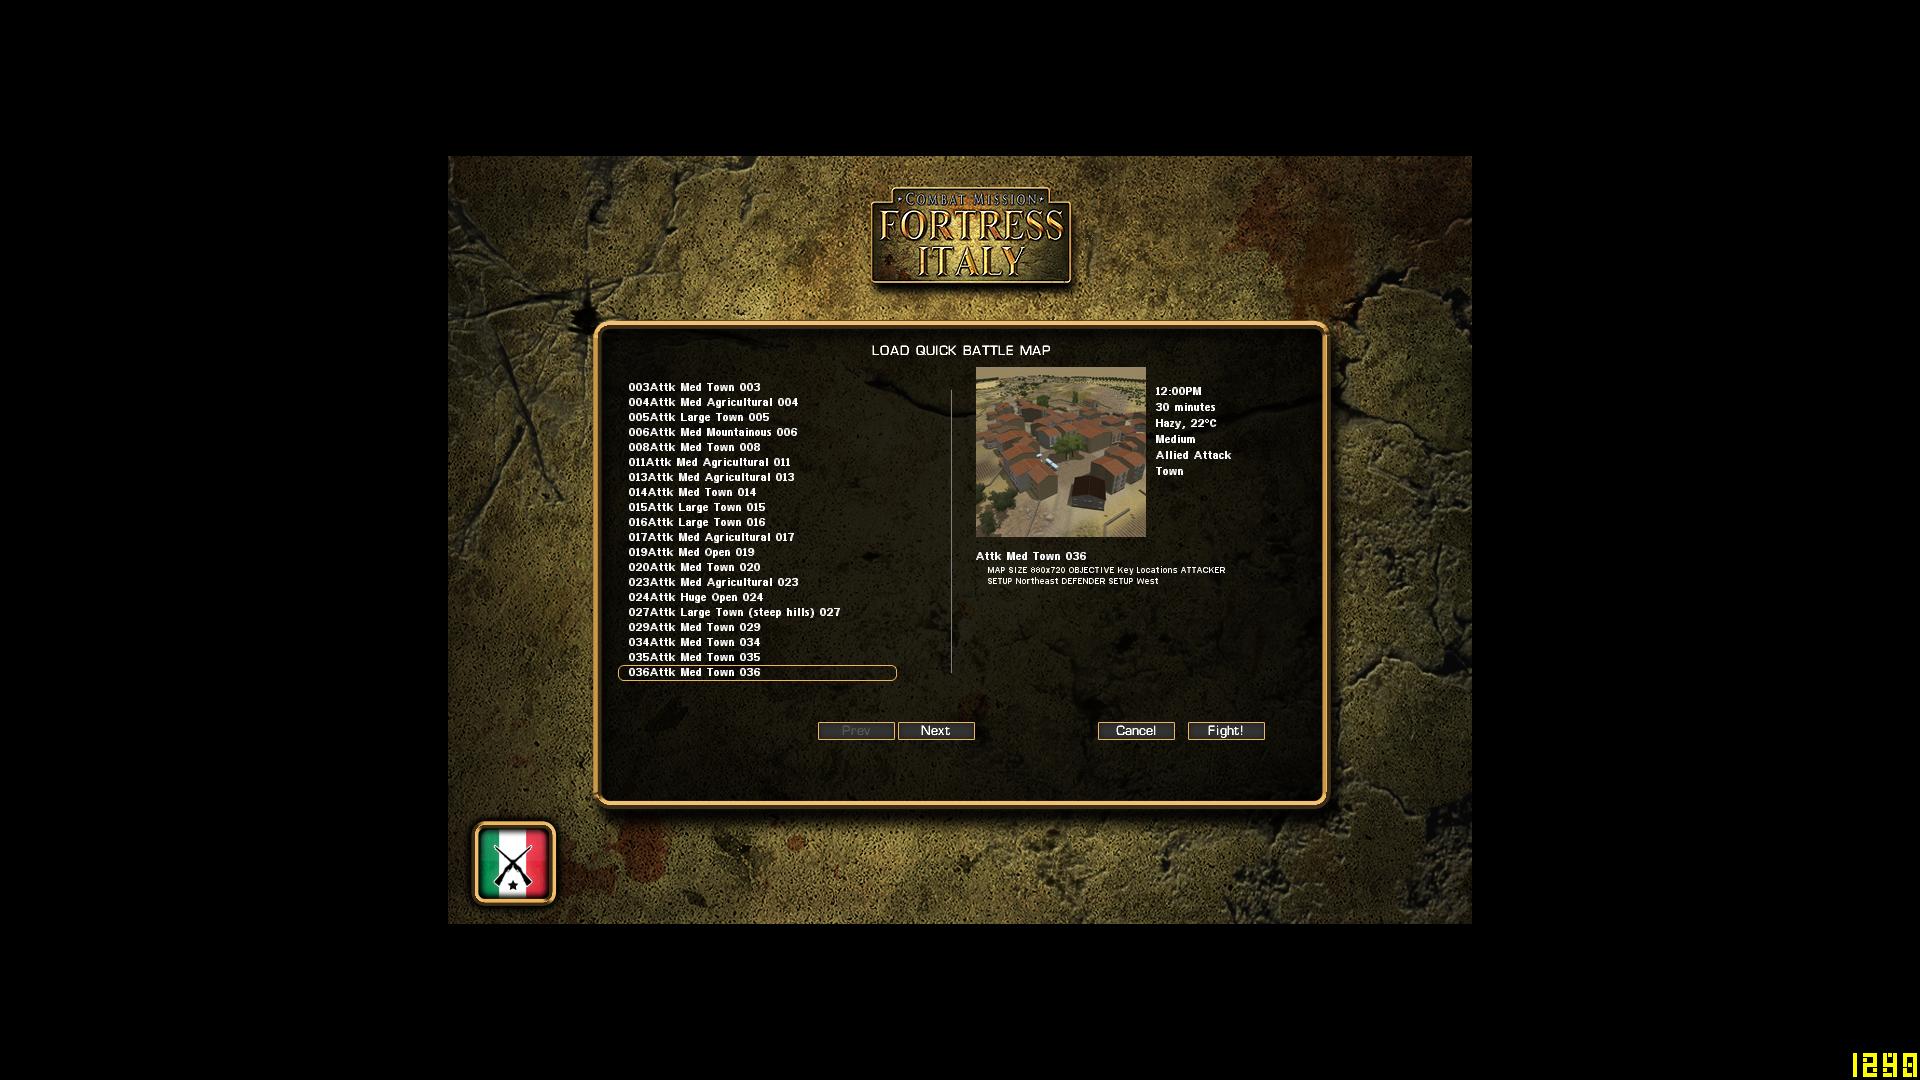
We tried this twice with me starting the game. This is the second time - the first time I left the map on random so I have no idea what map was used.
-
but in a 2 second lapse is very difficult to enjoy a Hollywood show, ;)/QUOTE]
True 2s is fast. Those of us that spend time pausing staring pausing to capture those explosions for screen shots would appreciated improved looking explosions.
-
<snip>
- Do jigger with your view when you're placing these two vital waypoints until you are as sure as you can be that your waypoints are not somehow occluded by the "hidden volume" of the bridge model. Looking at the bridge end-on, from whichever end is appropriate for which waypoint you're placing works, and looking at it side-on when trying to place waypoints at either end, can work if you're cautious and don't try and shave the placement too close to the bridge.
Excellent rules for sure. The one thing I would add, is that for setting those all important waypoints near the ends of the bridge being above the bridge looking down works consistently.
- Do jigger with your view when you're placing these two vital waypoints until you are as sure as you can be that your waypoints are not somehow occluded by the "hidden volume" of the bridge model. Looking at the bridge end-on, from whichever end is appropriate for which waypoint you're placing works, and looking at it side-on when trying to place waypoints at either end, can work if you're cautious and don't try and shave the placement too close to the bridge.
-
Ian,
Most of your tank engagements appear to be at knife-fighting range. If you run out of ammo your tank crews can just throw empty shell casings at the enemy. This is all pretty intense.
Yeah this map is very interesting. There are some opportunities for over-watch but once you close to contact most of the fighting is fairly close.
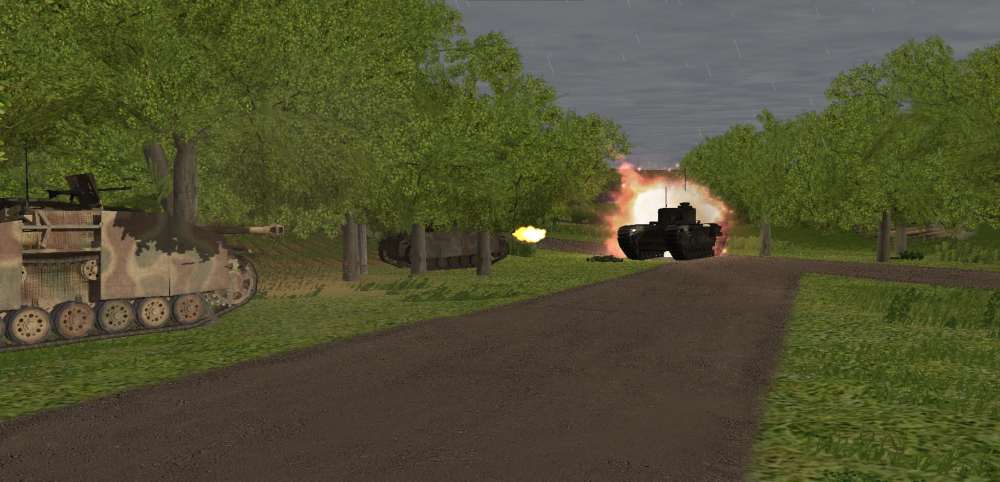
Your StuH commanders were probably shaking their heads in sad amazement when you ordered them up against those Churchills. The call goes down the line....Panthers Vor!!Probably
 Sorry guys!I am following all this with great interest. Good screenies.
Thanks.
Had coffee with Dungeon tiger this morning. He watched the turn but did not get a chance to play it. This last one took me an hour and a half to watch and play.
-
<snip>Expecting perfect behaviour all the time ("find the best possible cover") is not, I think, particularly sound.
Apart from anything else, it is usually extraordinarily difficult to accurately identify the source of danger, and to therefore find "the best possible cover". You can make a guess, and lunge for what looks like reasonable cover based on that guess, but even that assumes you're paying attnetion, and constantly updating your personal IA - "if a shot comes from my left right now I'll dive into that ditch. If one comes from the right I'll go behind that stump. Ok, now if a shot comes from my left I'll go behind that wall, but if one comes from the right that gutter is my best bet. Ok, if a shot comes NOW I'll ...". Sure; that's what soldiers are supposed to be doing constantly. But honestly? It's exhausting. And when you're already exhausted after some days or weeks in combat, meh. <snip>
I think JonS is right. While I have never seen combat I can tell you even after a few days of hard training on an exercise that is exactly what happens. You start off doing it right and end up doing it as best you can.
The funny thing about this thread is I actually do not have a problem with how my guys have positioned themselves for cover. Do you guys have examples of grossly poor behaviour? I have been pretty happy with my troops ability to hit the dirt and find sensible cover options.
-
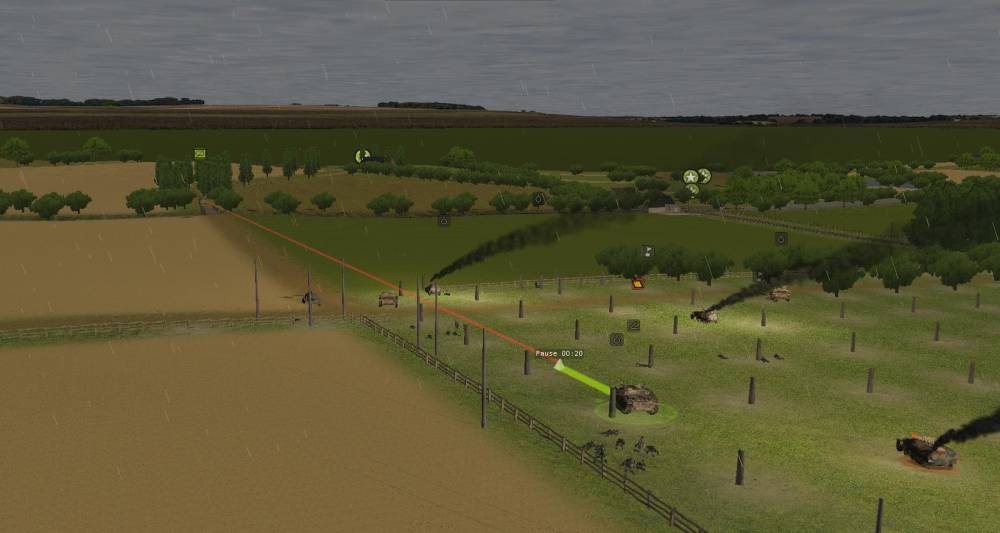
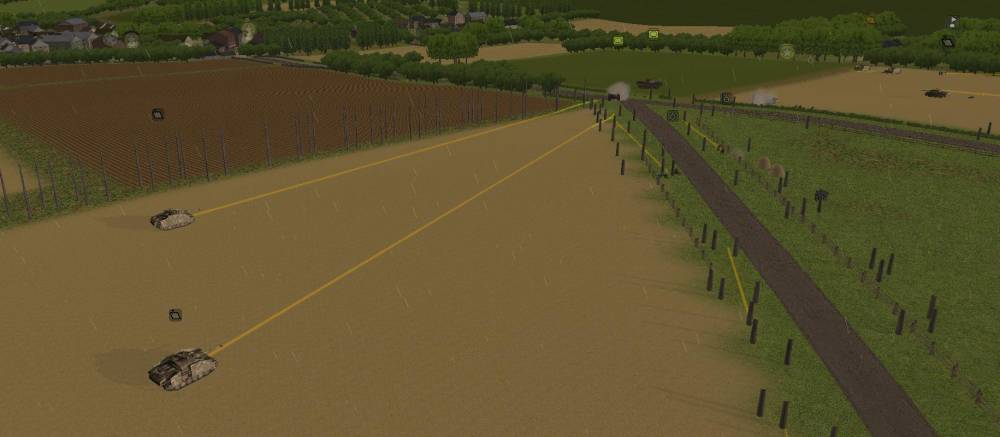
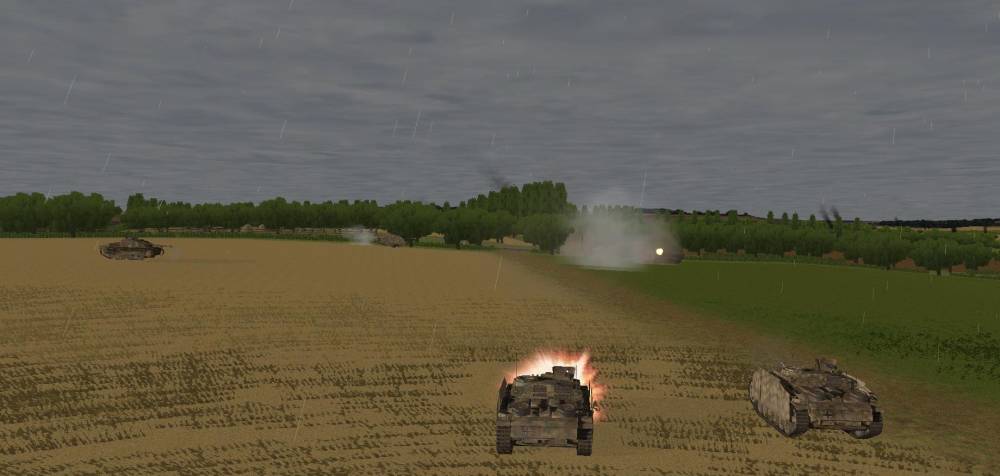
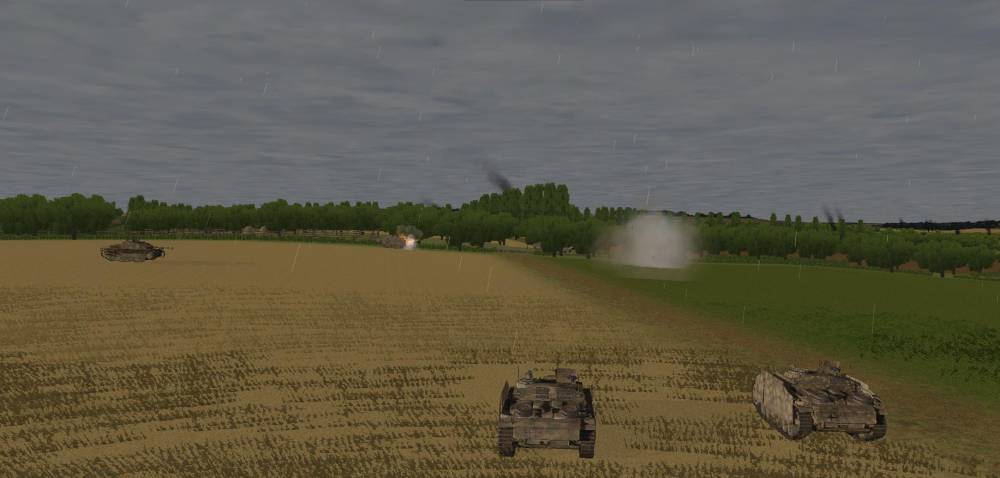
It turns out the Stuart has an armoured car friend behind it. I give the same Stug a similar shoot and scoot order again. Hopefully he can get that armoured car too.
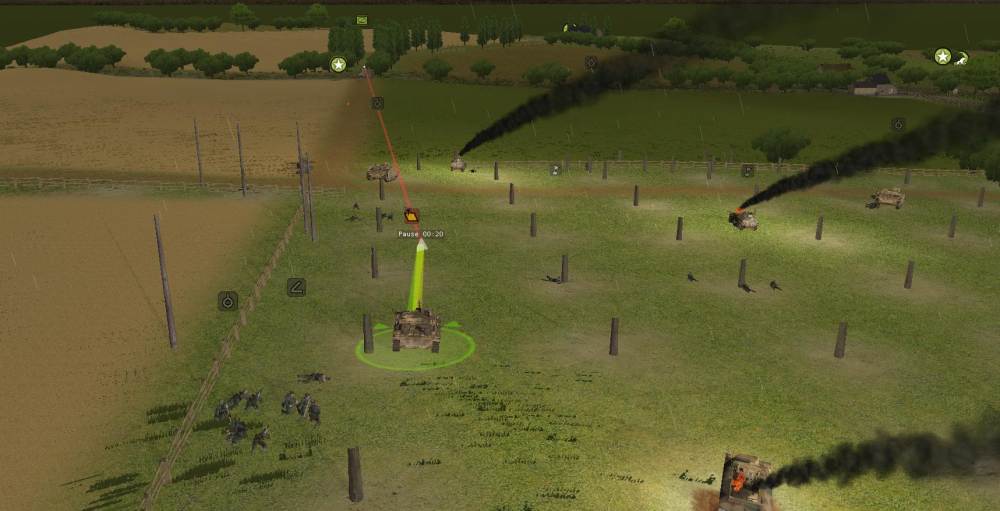
The final moves to take up positions on the next field. On the right hand side of the picture you can see the “backup and keep your front towards the enemy” orders I gave to the panther. I need to finish off that Churchill on the far right if I am to make any progress here but I cannot just turn the Panther to face it because of the new arrivals on the other side of the field. My hope is that the Panther can keep its front armour towards both enemies and finish off that pesky Churchill.
Near the town I am backing off the Stugs and infantry to let the Panther’s through to face that Churchill.
The spotting rounds for my 150mm barrage are due soon so time to move my FO back over the crest of the hill so they can call the spotting.
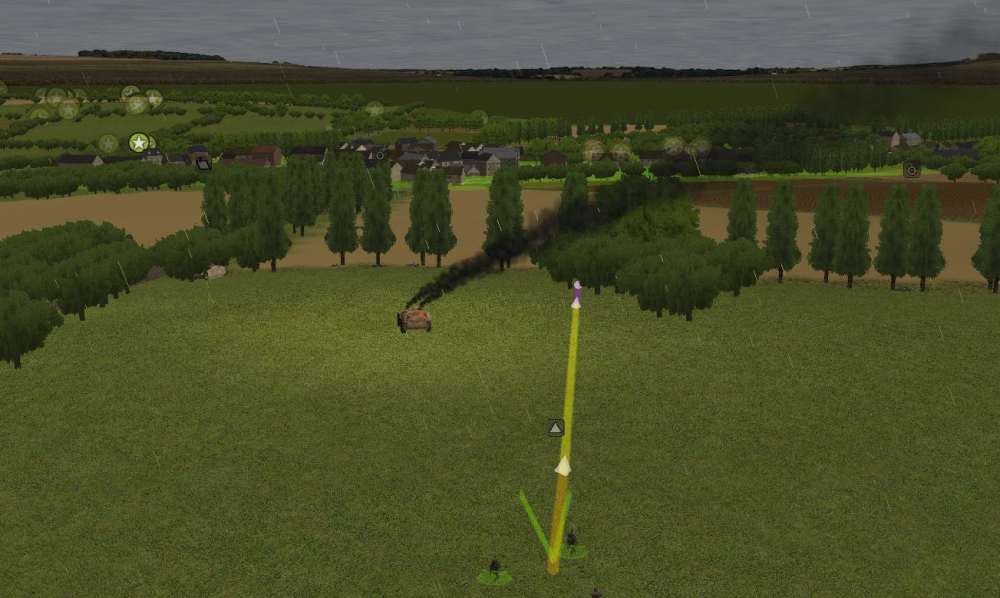
Back at the ambush I give orders for the last remaining AFV to move forward into the tress and then back up under cover to escape the Achilles. It will all come down to how fast the driver can get that beast moving and how close the Achilles crew is to pulling the trigger. This is going to be close.
-
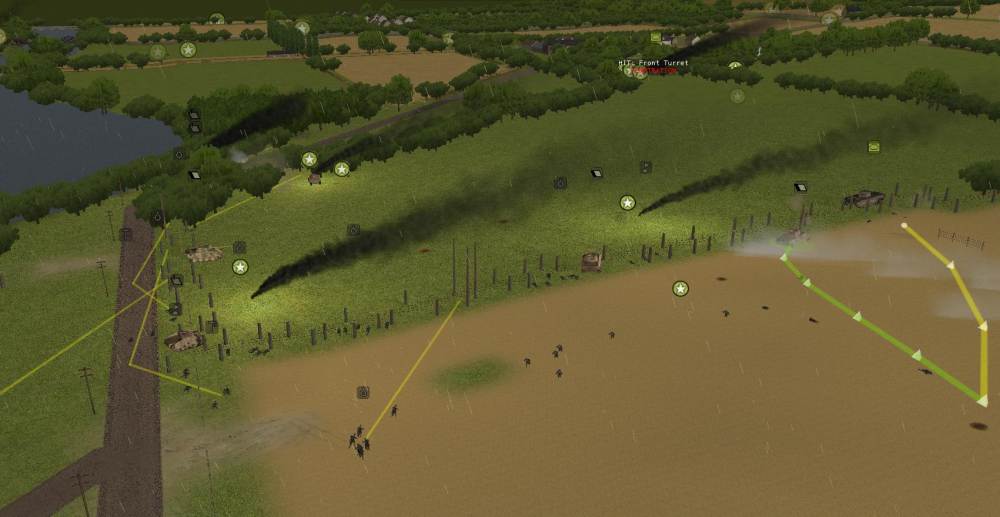
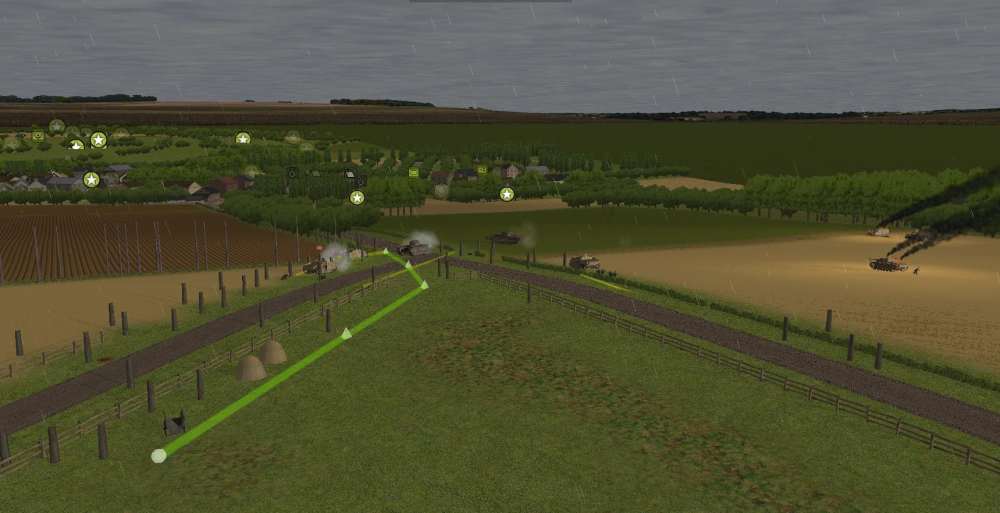
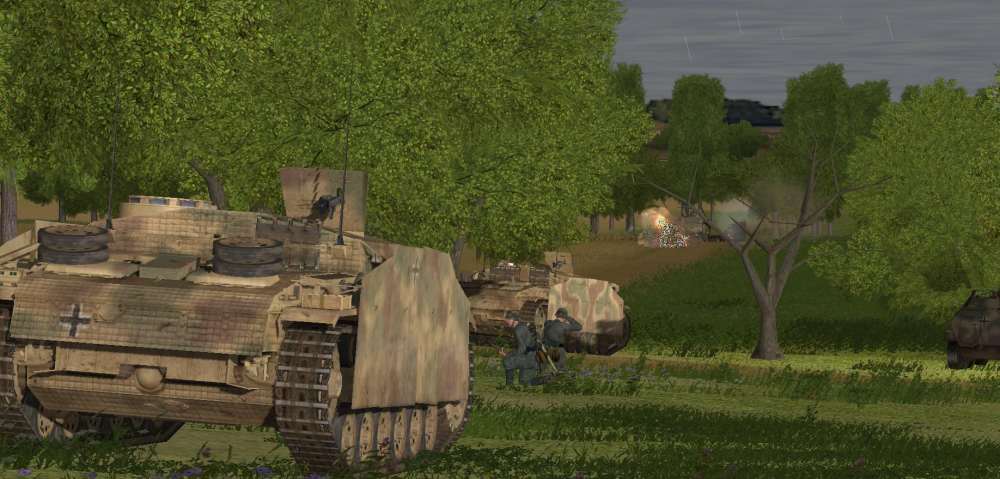
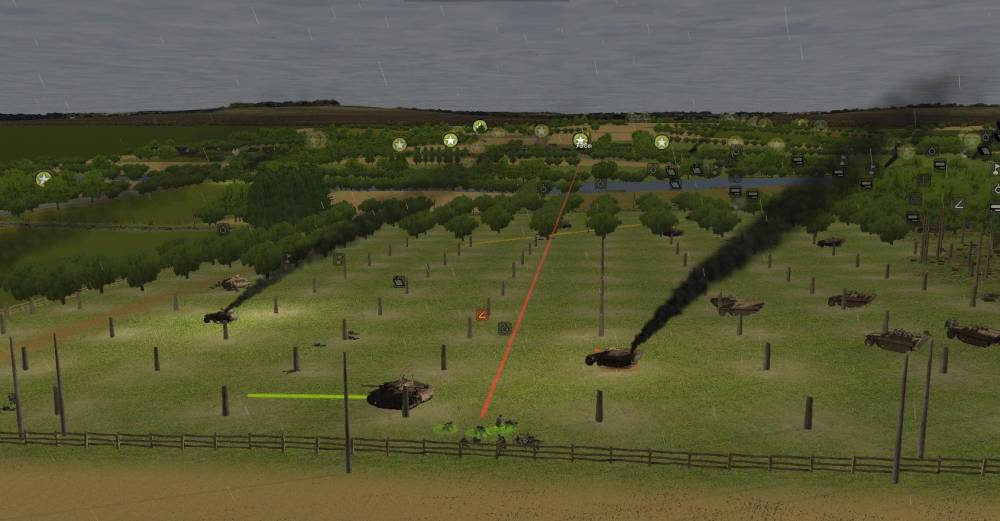
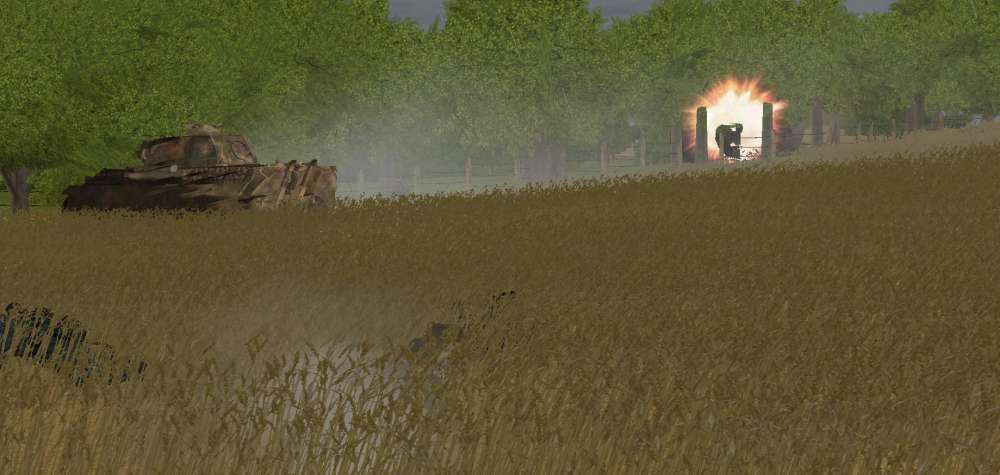
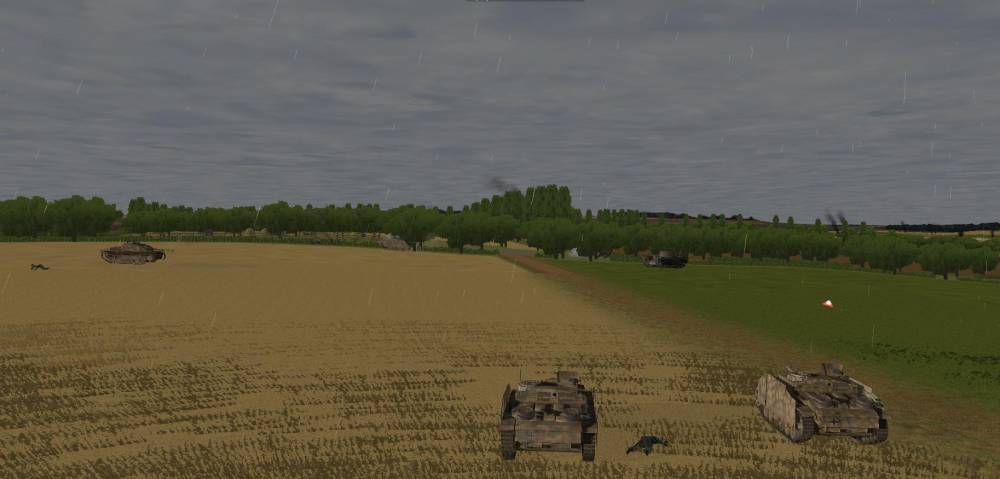
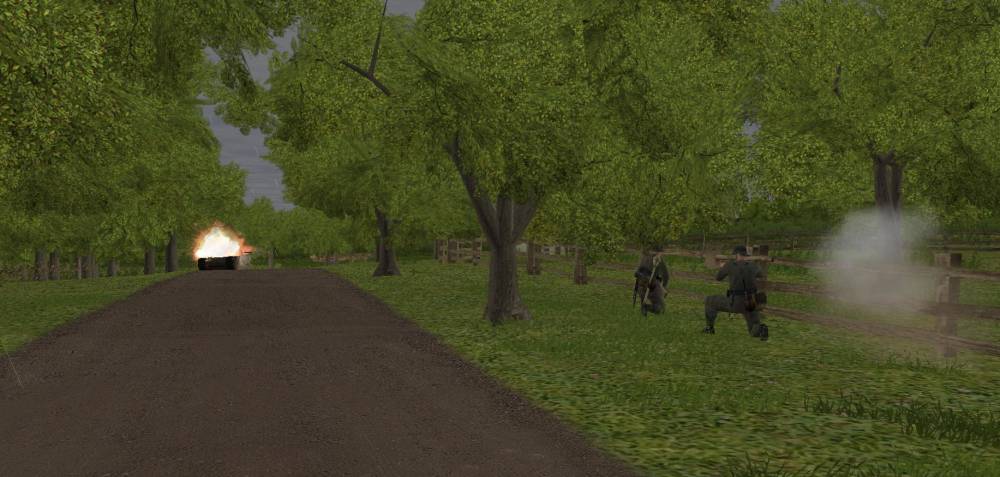
My infantry make it to the tree line along with their Stugs in support. I am very glad to have Panthers there too.
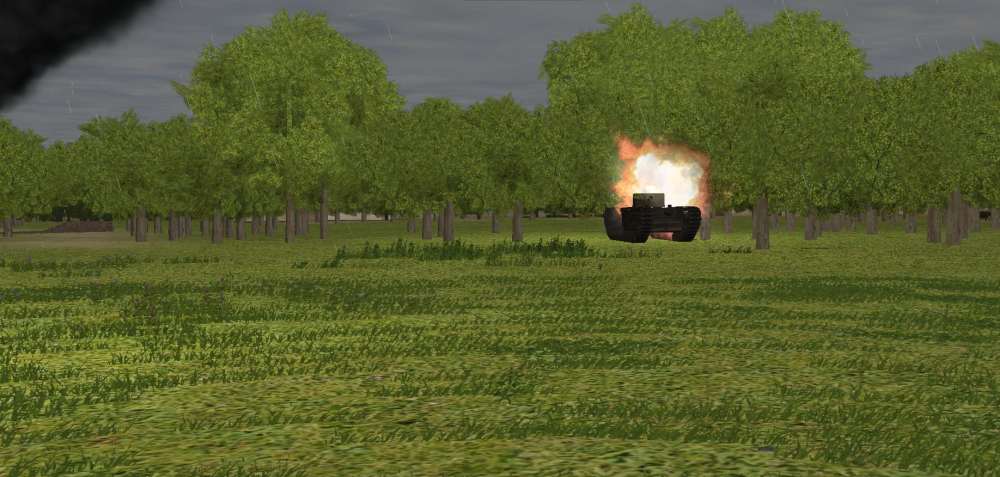
Meanwhile over the river in the orchard 5 Company’s supporting Stugs from 1 Battery score a kill on another Stuart trying to get close to the orchard.
And the crew bails only to get blasted.
-
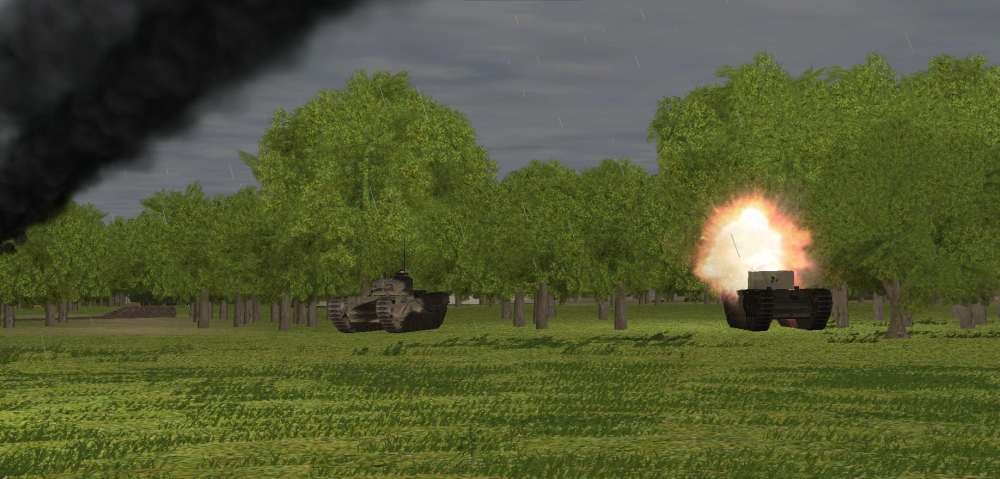
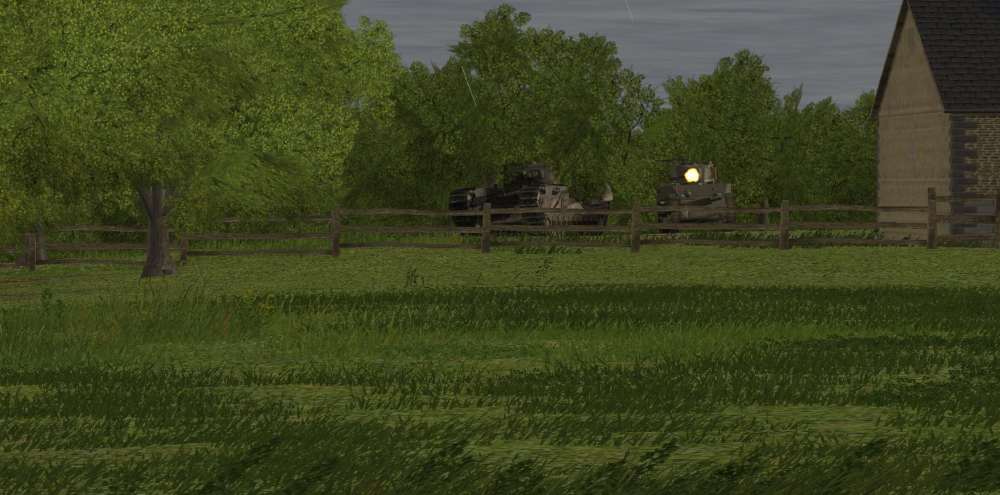
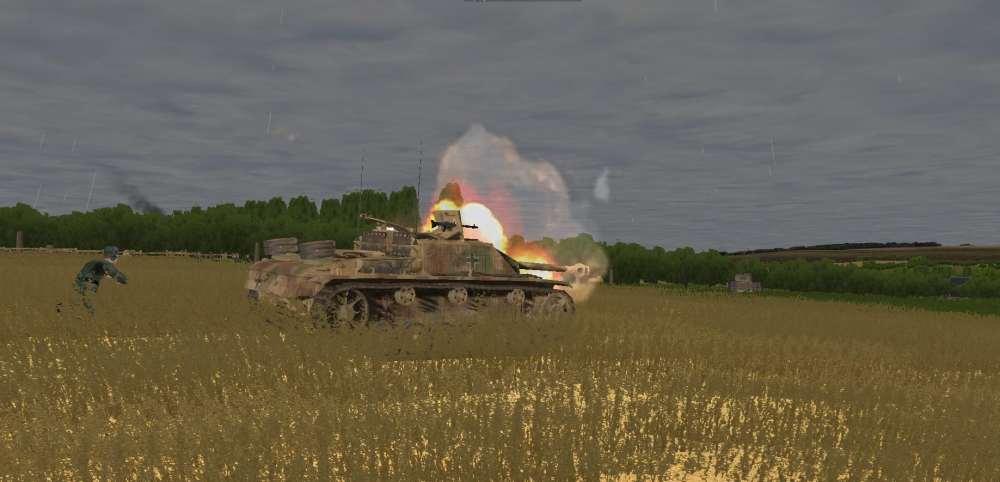
Over near the bridge head the fighting heats up. First the Stuart the pulled up alongside my point Stug loses the quick draw. The Stuart crew must have been slow to notice the Stug in the trees given that they were pointing across the river at the end of the turn.
The Panther’s have a little success hitting Churchill tanks. They get penetrations but no kills this turn. Starting with the one in the treeline that chewed up my infantry last turn.
And then an new arrival on the other side of the field.
Three hits later we see he has a friend.
-
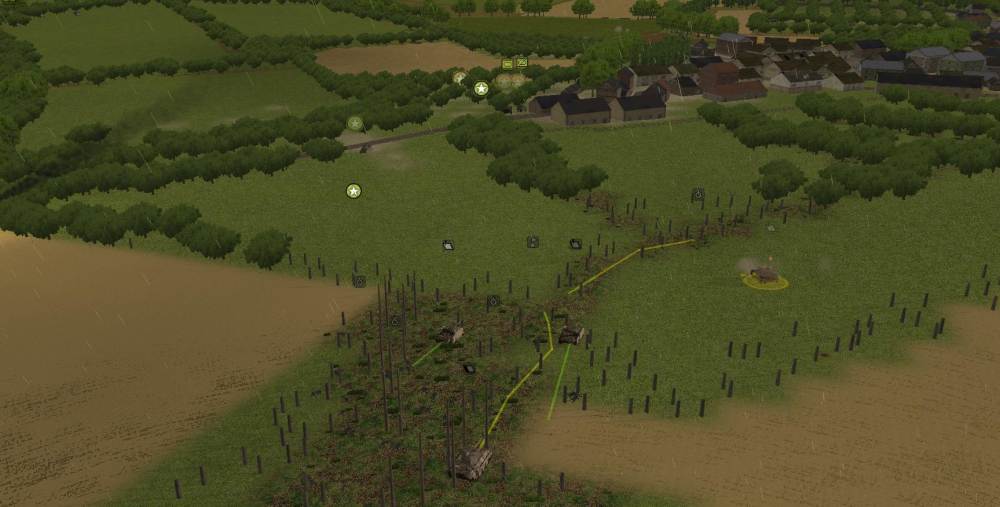
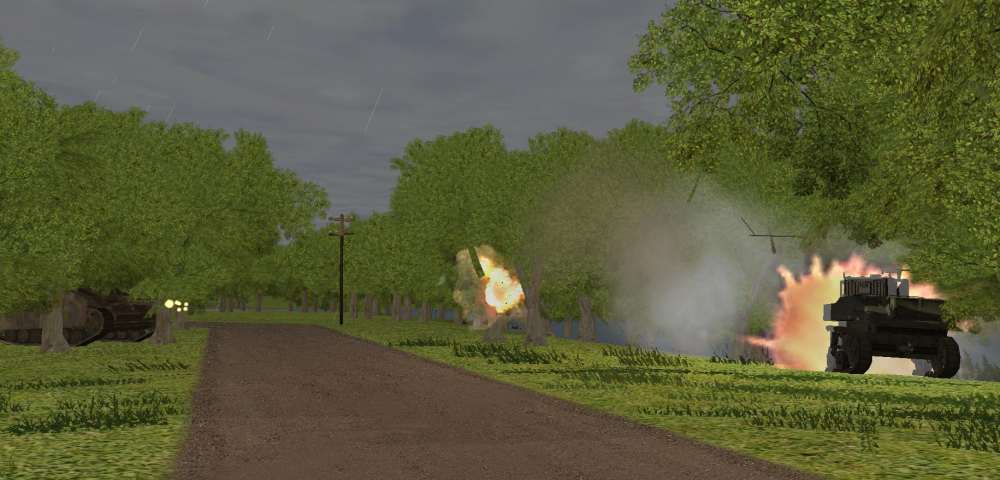
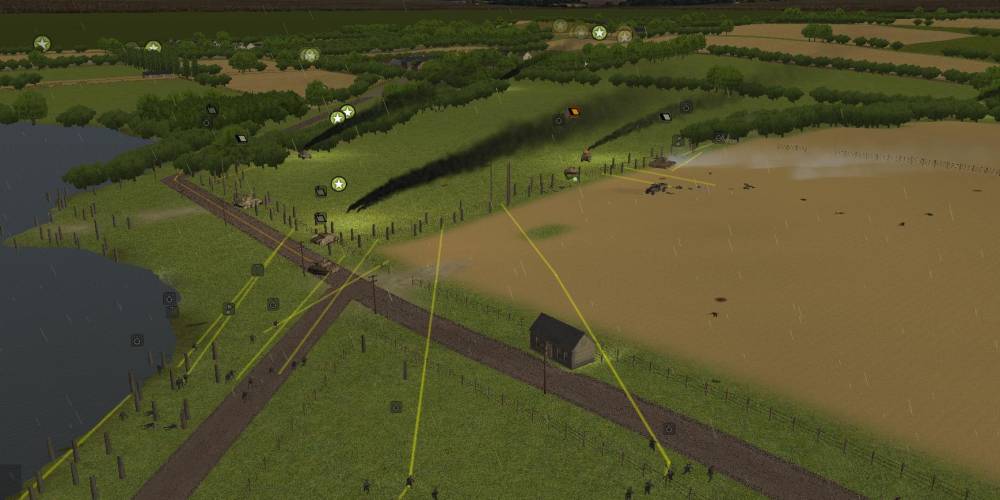
Near the town the Stug I sent forward to find and destroy that Stuart comes under fire from something much nastier than a 37mm gun. Even the infantry start running after this.
The crew remain in their Stug and start backing off but are hit again.
Found them. That Stuart has a Churchill as a buddy right near by.
-
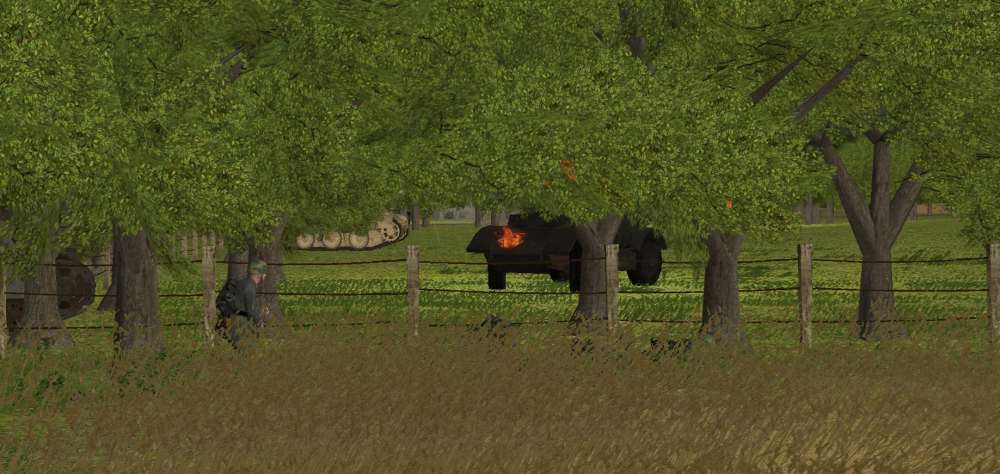
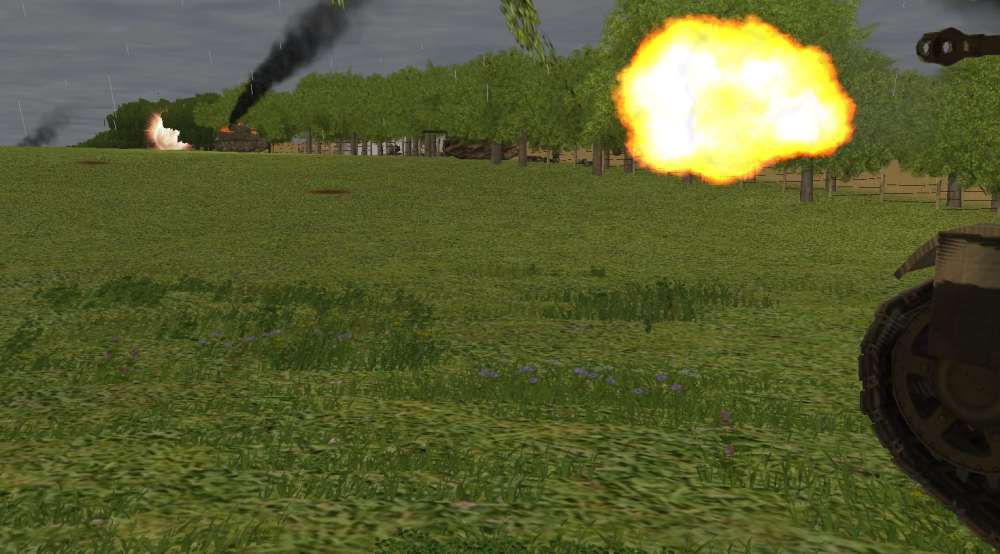
The third shot at close range has bite and finishes the job but the crew had just bailed – one managed to escape from view.
Finally my men have had some success against those two Churchills. But the turn ends badly once again. Those Achilles on over watch destroy another Stug. To make matters worse they seem to have a bead on the second Stug in the trees as the turn comes to an end.
-
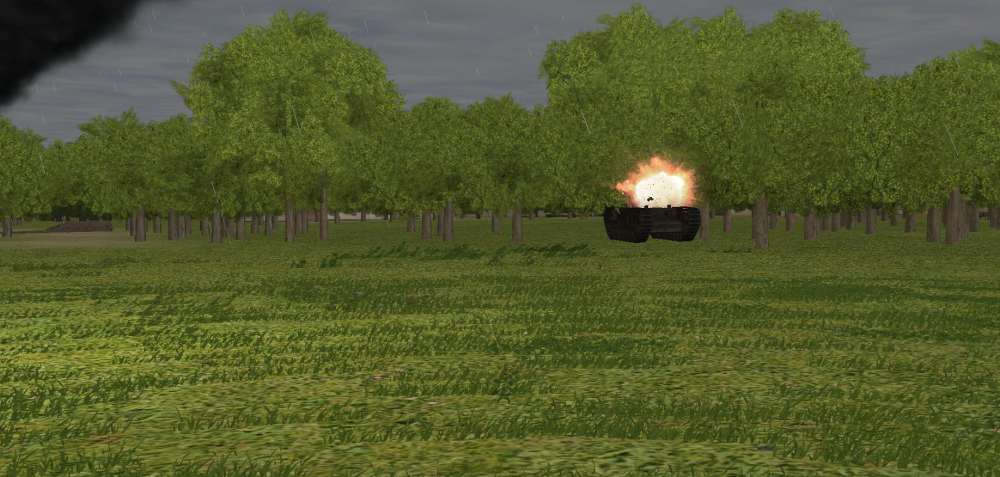
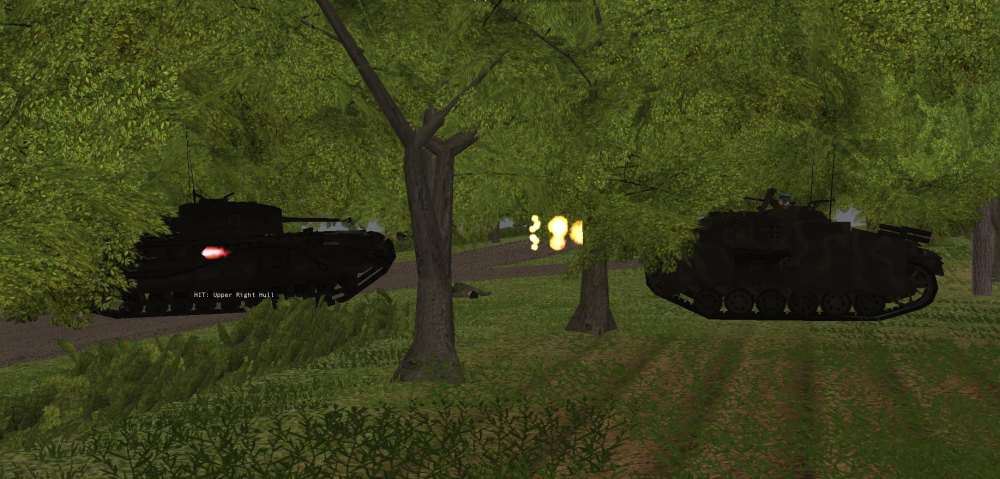
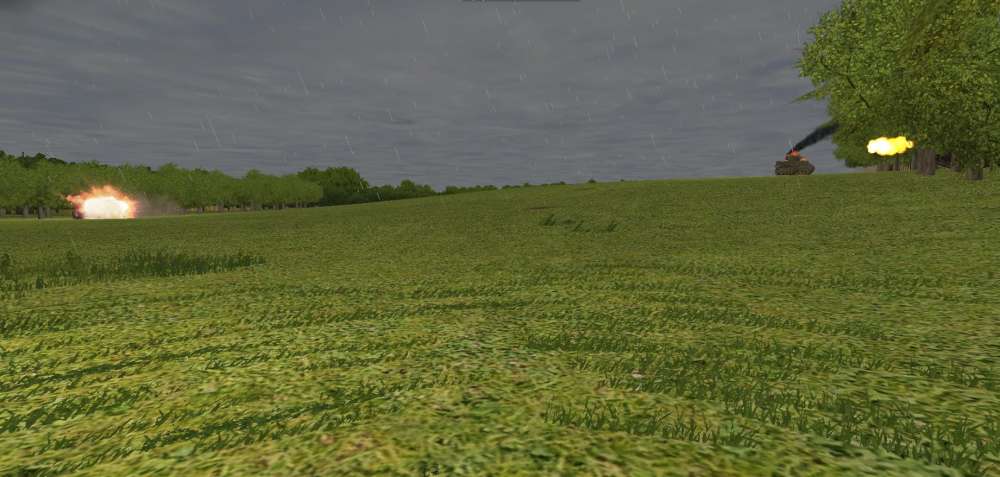
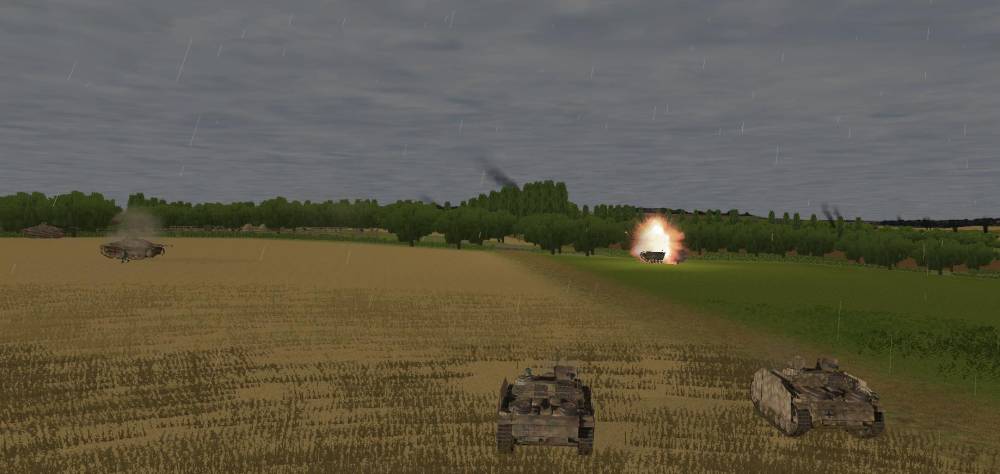
The ambush continues to go poorly at the start. That Achilles on the other side of the valley scores a dramatic kill shot.
And then another kill shot this time to the abandoned Stug. You can see the crew was just about to remount it and hopefully drive it out of harm’s way. To late.
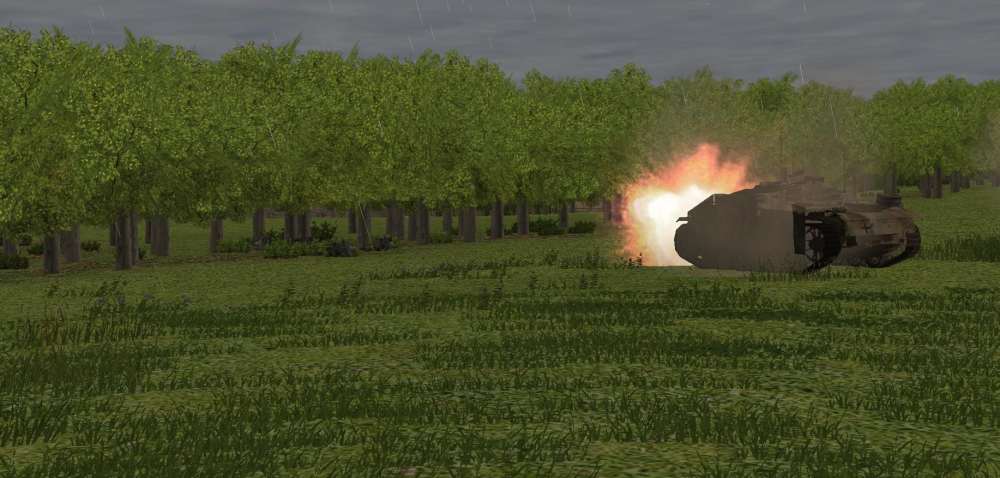
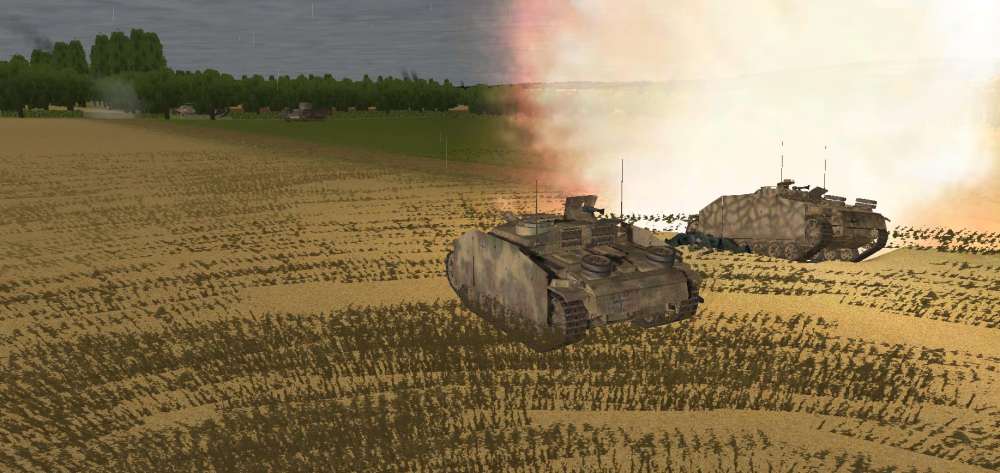
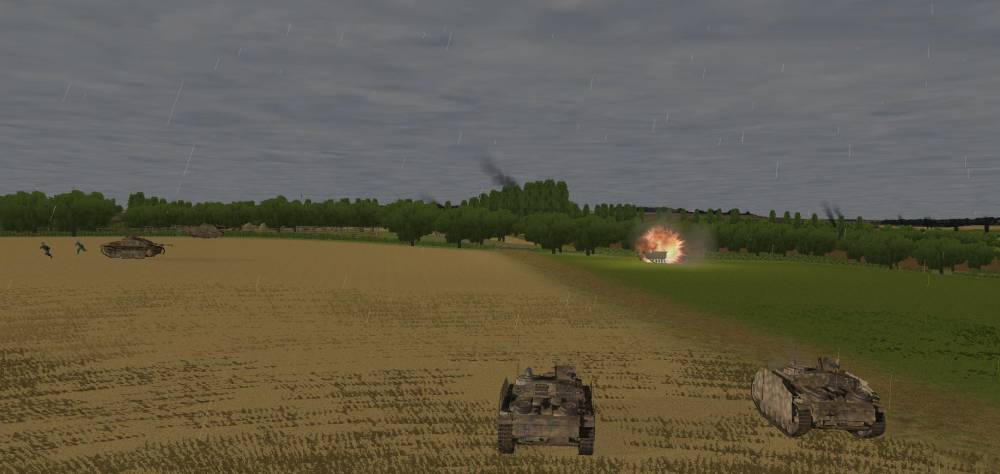
Meanwhile the two newly arrived Stugs (that crossed the field earlier) arrive at close quarters. And I mean close. The Churchill tank that took the Shrek round in the face earlier gets pounded at close range. Several hits bounce of the side of the tank (which is at a less than 45% angle to the Stug).
And again…
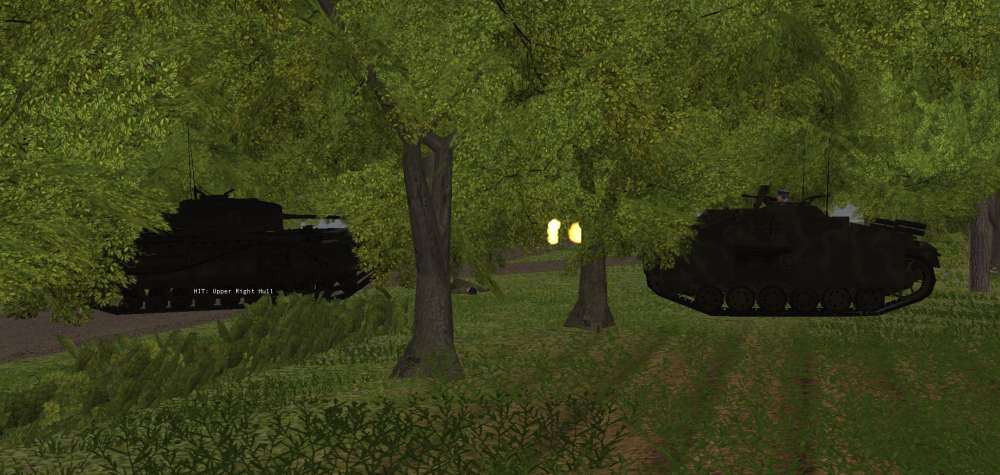
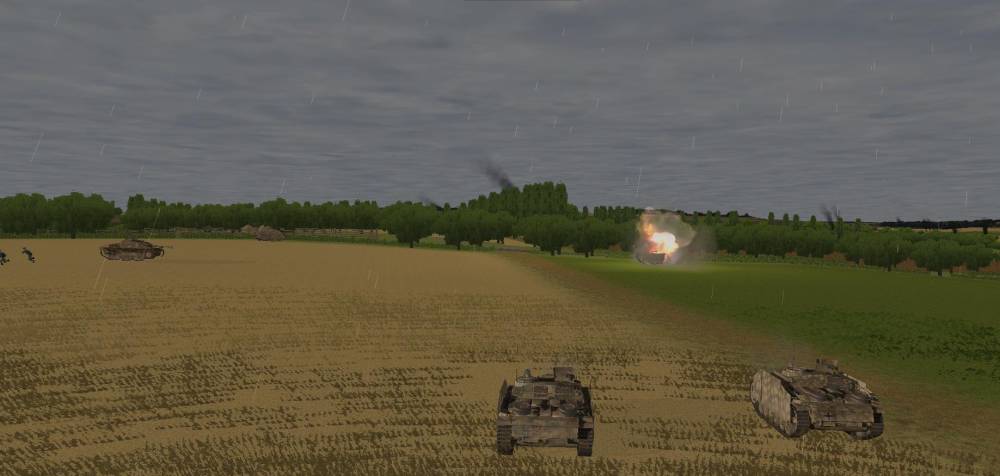
The other Stug fairs better nailing the further Churchill squarely. In the picture below you can see the Stug and Churchill from the above shots and how close they are.
-
I am looking forward to the results of that test under fire.
I am writing it up now...
It seems to me that anything under 200 meters or so may be trying to gild the lily in terms of penetration ability for the 75mm L/48.Well the results are a mixed bag. One Churchill that was side on was KO'ed at close range. But the other one that was at about 45 shrugged off several close range hits.
The STuHs probably had no business near the Churchills, but it seems you have found that out.Yeah - note to self don't do that again.
-
Over near the orchard a Stuart is approaching. I definitely do not want that tank to get close and start hurting the infantry. The nearest Stug gets a set of shoot and scoot orders to move up engage the Stuart and then pull back.
The mortar team finally has eyes on the Churchill across the river.
At the bridge head the infantry and the rest of the Stugs move up to secure the Panther’s flank.
Over near the town I will send a few Stugs forward to try to catch that Stuart next to the barns.
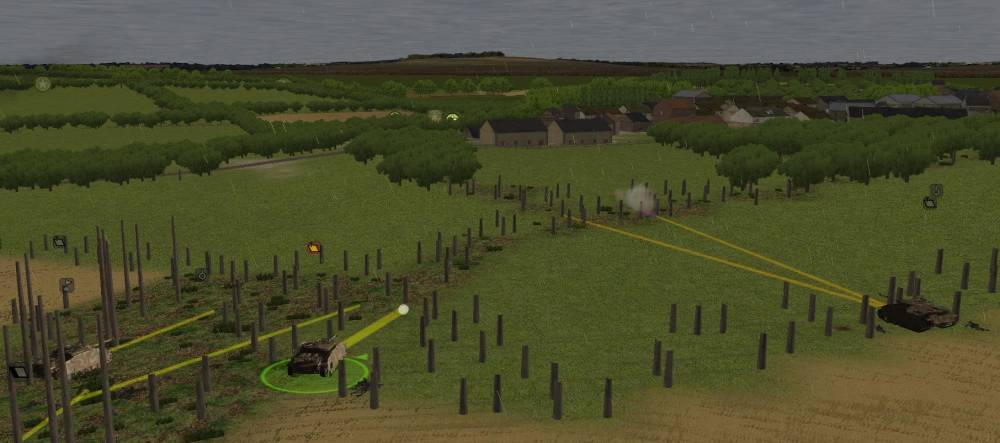
I am going all in on this ambush the two Stugs that I moved up last turn do not have LOS to the Churchills so I will move then in close – really close. Lets see if those Churchill tanks can shrug off hits at point blank range.
-
The Shrek team in the field scores a hit but it has little effect. Hopefully this hit will be like the other one where there was no visible damage but there are crew casualties.
Meanwhile the Panther’s partner dispatches an armoured car as it tries to cross the field on the opposite side of the tree line.
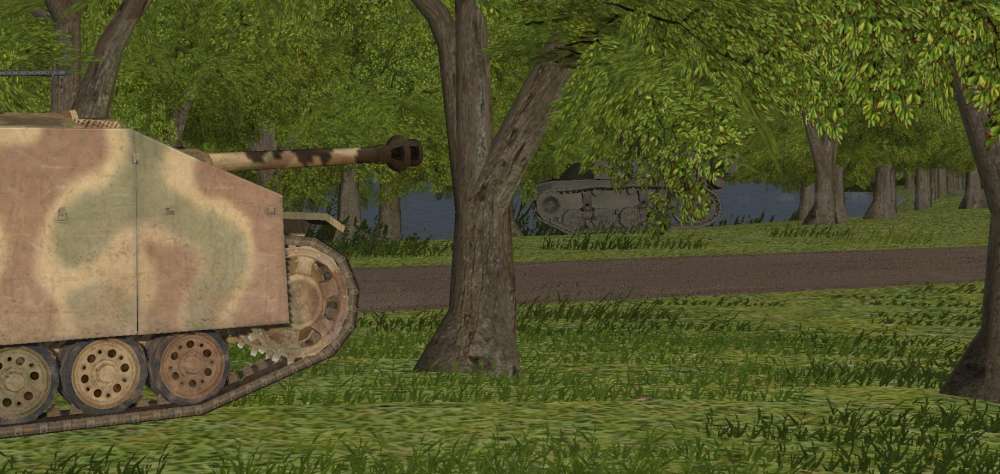
Along the river a Stug pulls up to protect the other edge of the field above and a Stuart drives up right next to him. This happened right at the end of the turn. Oh man Stuart vs Stug. At this close range it will be close.
-
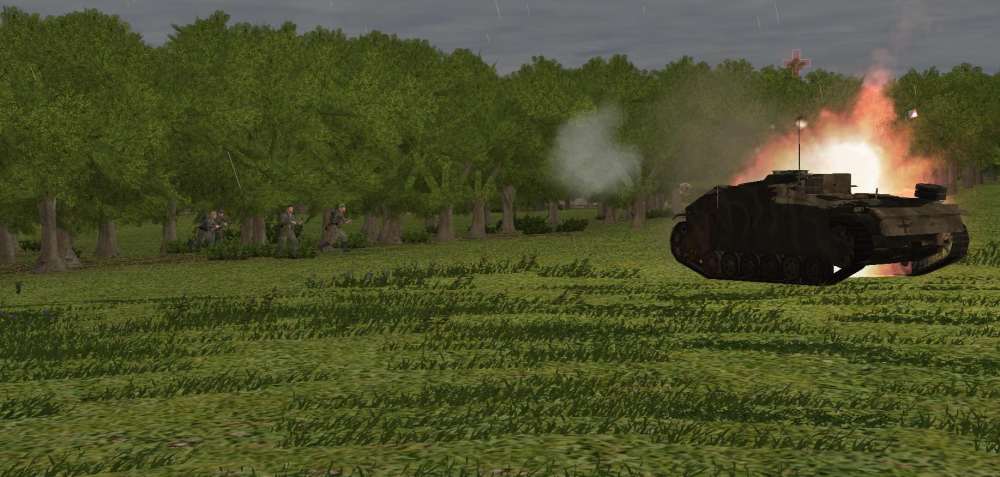
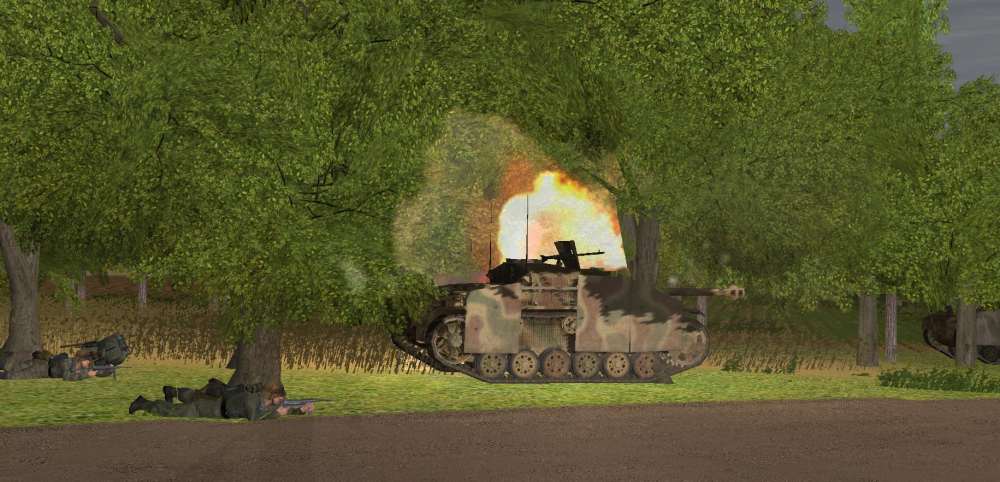
And then it hits one of the Stu42s.
Turns out there is an unseen enemy nearby and they put a hole in the Stu42.

Thankfully it survives that and shrugs off another hit from the uber Churchill.
This ambush has definitely not gone well at all.
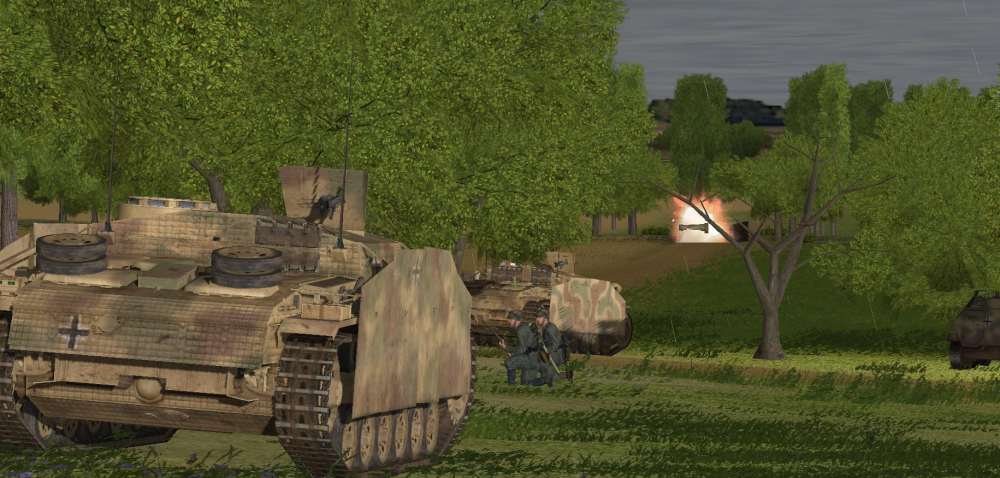
In the centre near the bridge the Panther backs away from the Churchill. That enemy tank was much closer to the tree line than originally anticipated.
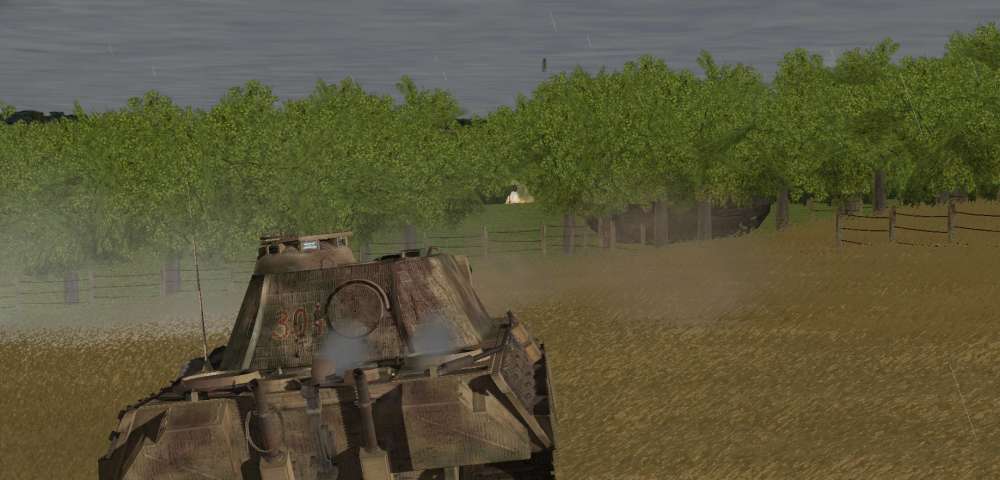
Then the Panther starts moving forward again and takes a couple of shots at the Churchill. The trees save it once.
-
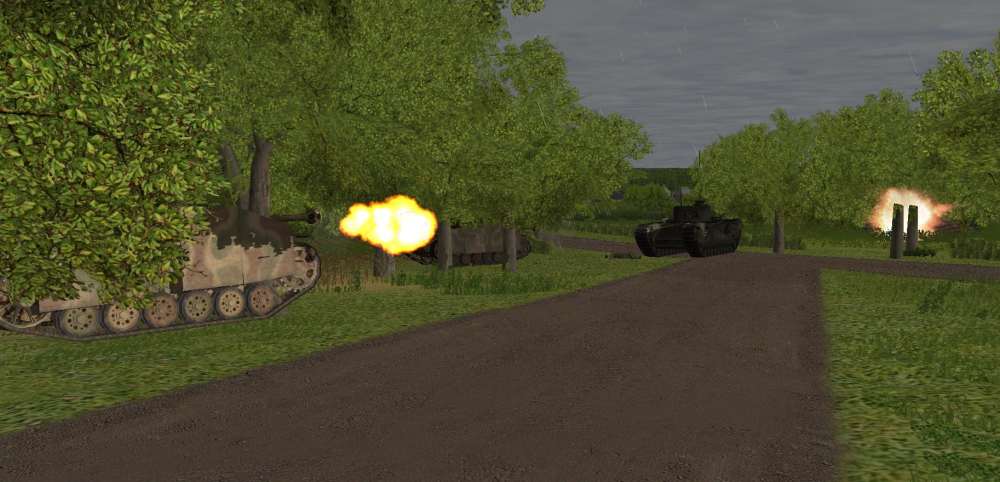
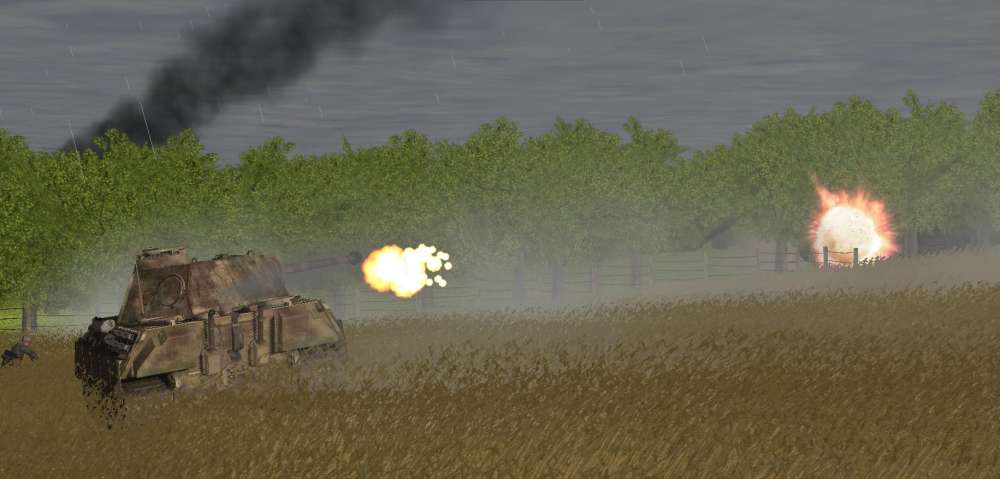
Over on my far right flank the ambushing of two Churchill tanks continues to go poorly. The enemy tanks take a pounding and still manage to take out a couple more Stugs.
The Shrek team seem to get a nice solid hit (with penetration) but the Churchill is still operational after the hit.
The Stugs continue to unleash a pounding with hit…
…after hit, on the Churchill…
… and yet another.
But it is still fighting and takes out another of the four ambushing Stugs.
-
Yep. I noticed it. From time to time it catches my eye.
Yeah, ditto. I seem to remember someone writing that they could not fix it. But I cannot find the reference I remember. But I did find this:
http://www.battlefront.com/community/showpost.php?p=1375068&postcount=33
A beta tester talking about that seam being there since CMSF. And there was mention of it on the CMBN threads too.
-
man we are never satisfied.
Nope, never
2 releases this year and possibly a 3rd on the way. Tons of new stuff in version 2 (hell does no one else appreciate the new mapping tools?).Oh, those mapping enhancements are awesome. I will play the $10 for that alone in CMBN. Now if I could tear myself away from *playing* I might finish my scenario
-
Or I could say "Download it and slap it in the editor silly".
Thanks for not going there. I *will* be firing up the editor and trying this out but your explanation will make that more meaningful. I also like your idea of handling the shoreline differently too. Interesting. Are those ford tiles next to your water tiles?
This will be an interesting evening of playing around.
-
But I have to laugh at how the Colonel's videos always have him come out looking like a tactical genius...can anybody beat this guy? Now that's something I'd like to see: All his excellent planning, the action begins, and then he's "WTF!? My platoon is falling back in chaos. My flank is turned..."
Actually that would be an excellent suggestion for him. Do a video on "What to do when your plan goes sideways" I could use that right now

-
<snip>Thats straight up bizarre the HEAT round didnt penetrate. But in real life, you never know, it could happen and thats the beauty of the game. If it consistently didn't it'd be a bug, but nothings for sure..
Yeah s**t happens. Upon reflection for clarity we are talking about one HEAT round that hit and did not penetrate. One Stu42 was out of HEAT and the other one had 2 and its first round missed. I have had lots of good luck with 105 Sherman HEAT rounds - ironically against Stugs. So I am not down on HEAT in general - just frustrated that me perfect ambush did not work out.
You gotta love the Shreks and fausts. Surprisingly I noticed in playing as Germans against people (especially in the shadow of the hill) that I consistently got more kills with shreks and fausts that say, 75 PAK at. Its a definite art that takes time to cultivate, but those wheat fields provide excellent cover. <snip>Agreed, and even though there is a current thread (that I added my 2 cents to) discussing the problems of urban combat, those Fausts and Shreks can be nasty in those environments too. In fact right now I am hoping that will save my face here. If I can get a significant force into the town and engage his tanks at close quarters with all the Shreks I have. I could make this interesting again.
I envy you that you have an opponent you can meet in person to discuss the game.Yeah, it is pretty awesome. He often says he has more fun talking about it than playing. There are three of us that play CM and work here. Still working on the third guy to move him up to CM2x. We had a good laugh this morning because he was pointing out that in all our previous games I have kicked his butt; here we are in our first public game and he is the one taking names.
Yes, that was my lame attempt at feeling better for getting my butt handed to me.

 Sorry guys!
Question regarding Aris`s explosion mod
in CM Fortress Italy Maps and Mods
Posted
The Aris HD Explosions mod folder.
Under my z folder I have a folder named "The Aris HD Explosions mod" and under that are all the bmp files needed to for explosions. Along with lots of other folders with the Aris name in them:)