

A Canadian Cat
-
Posts
16,500 -
Joined
-
Last visited
-
Days Won
55
Posts posted by A Canadian Cat
-
-
Thanks to everyone. I have a much clearer idea of purchasing now.... and Ian, a surprising and very helpful addition to the thread. I suspected that the 'combined arms' route was the way to go, but I just wasn't too sure considering the size of the battle.
It was all part of my SYOPS plan...
I also like getting a good balance of forces, but at the same time I don't want to end up purchasing in a ridiculously un-historical manner.Indeed - lots of room for mixing and stay in bounds for historical formations. My first few games I was armor light and those games ended badly - I would loose the armor battle and then my infantry would die to HE. Then I went way the other way but that did not work either. I would win the armor battle but my infantry screen would be stripped. Eventually my tanks would succumb one by one to close assaults or rocket AT weapons. There defiantly is a happy medium there some where.
-
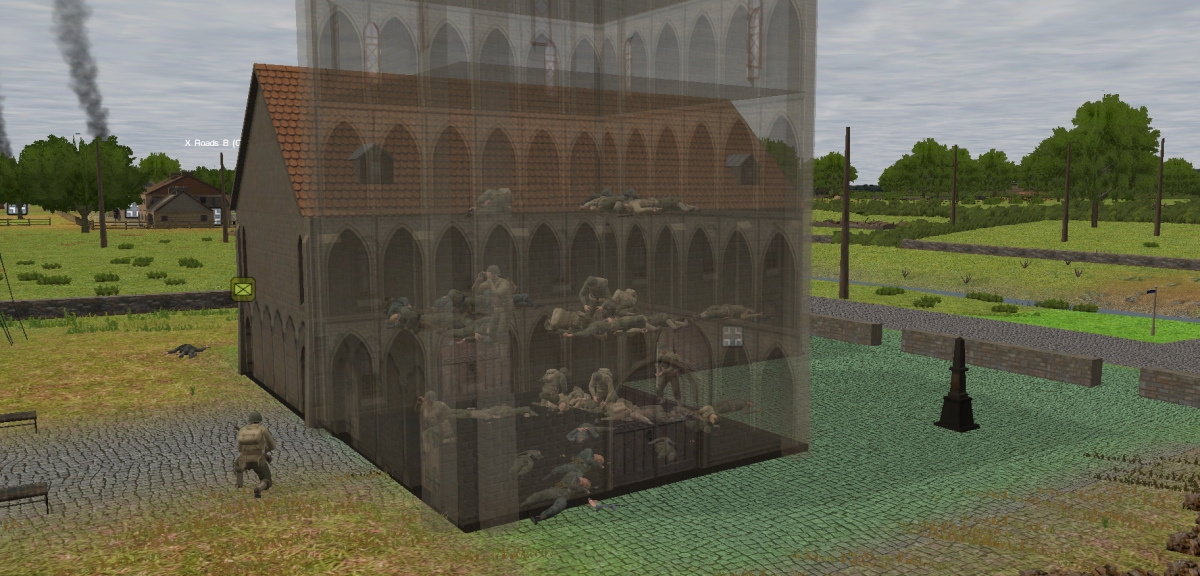
From the scenario Bloody St. Omer Capelle I finally took the tower after assaulting it four times. As you can see it cost me a lot of men - the successful squads gave buddy aid to them all. And that was the end of my attack - no one had any desire to keep going after that. Lost the game in the end too:(
-
Hey, don't help him - he's talking about the game we are about to start:D
Oh, hell I'll throw in my 2 cents too...
1) Should I purchase a whole battalion formation 'as is', or is it far better to use a 'combined arms' approach and delete a few companies to add specialised single units and vehicles?So far I have never bought a whole battalion as is - except for some large scale tests but that don't really count. My experience with QBs that combined arms are the way to go but I tend to be armor heavy.
Humm perhaps I shouldn't be telling you this stuff...
2) When purchasing vehicles such as tanks should I attach them as individual units to my existing battalion, or add them as a completely separate formation? What are the advantages/disadvantages of the two approaches.In a small scale battle I have done this - attached a couple of tanks to the platoon of infantry. But not in a large battle like this. I usually buy an infantry battalion and an armor battalion and then strip then down to get the balance I want between armor and infantry. Then I might tweak things with a single vehicle or four here and there. For example I have bought a Stug based assault gun battalion (stripped down to a single company) and then added two Panthers to the company. While I like Stugs it is nice to have a few Panthers around too. Also I have bought a single truck and attached it to a company just so I can strip it of extra ammo during setup - gamey I know:)
3) What is the main difference between panzer grenadiers and fusiliers, in game terms?I'm glad someone else answered this cause I had no idea.
4) Any other purchasing advice for a large battle would be helpful.I hope that my questions are not considered as cheating - I'm just overwhelmed by the purchasing choices.
Certainly not cheating - great questions.
My only other advice is think about the plan you would use for the map you are on with a combined tank and infantry operation and then think about where you want artillery support during that plan and pick up a few howitzer batteries and or mortars to help you make that happen.
Also consider breaching. Is there bocage to deal with - what about walled compounds. Then depending on need add breach teams.
Looking forward to this.
-
Excellent - I really like having your mods installed. Thanks again.
-
(If anyone knows a better file hosting place that doesn't require registration, I'll be delighted to hear it!)
Drop box. You would have to register and then you can put file in a public folder and share URLs to them (like above) but those of us downloading do not have to register.
Recommending drop box to others give you additional space. So, if you go that way tell them I recommended Drop box to you by registering via this link http://db.tt/IzQN7r4
-
Friggin awesome. You guys add so much value to the game it's hard to express the appreciation. Can't wait to see these on the repository.
+1 to that
I hope I'm not putting in any spoilers, but the more observant among you will notice Tanks has found a way to circumvent/eliminate the dreaded building 'base.' How cool is that?!The looked sooo nice I did not even notice the absence of the building bases. Very cool!
-
Something I think I noticed since the 1.1 patch: I see this when positioning infantry in buildings. While at view level 3 (approx, I scroll up and down with the mouse wheel as I see fit) I click on the building I want them to enter and they actually end up in the building closer to the camera even though that building is off camera. I have to delete the last way point and reposition the camera away from the other building and try again.
Could this be the same thing? I try to click on the woods near the end of the bridge and instead it thinks I am clicking on the ford under the camera. The suggestion offered by @Barrage works because now you are clicking to place way points more under the camera.
-
Interesting. I learned something. Was it always like this? I could have sworn you used to have to click the endpoint.
It was always like that. I too spend the first year clicking on the white circle or triangle only found out just before the CW release that you can also hit the movement line.
-
Interesting suggestions. What you *can* do now is select the entire company and give move orders to it. Once you have the entire unit selected pay attention to which icon is flashing because it is the one you are plotting the move orders for. Plot your series of move orders where you would like that unit to go and all the rest of the selected units will plot parallel moves.
I have done this with platoon sized units often and company sized units rarely never with more than that but the game does not care how many units there are.
It helps especially during setup.
-
I don't know if this will help... I had trouble placing waypoints along the bank of a river. The problem was solved by rotating the view point until I could look almost straight down on the bank.
That worked perfectly! Thanks. I usually work at view 1, 2 or 3 and when I do that with these bridges I can repeat it. But go to view 7 and it works. I don't have to go that high for t to work. I am so pleased. Thanks - a new trick for the tool box.
-
One of my squads heading into the smoke:
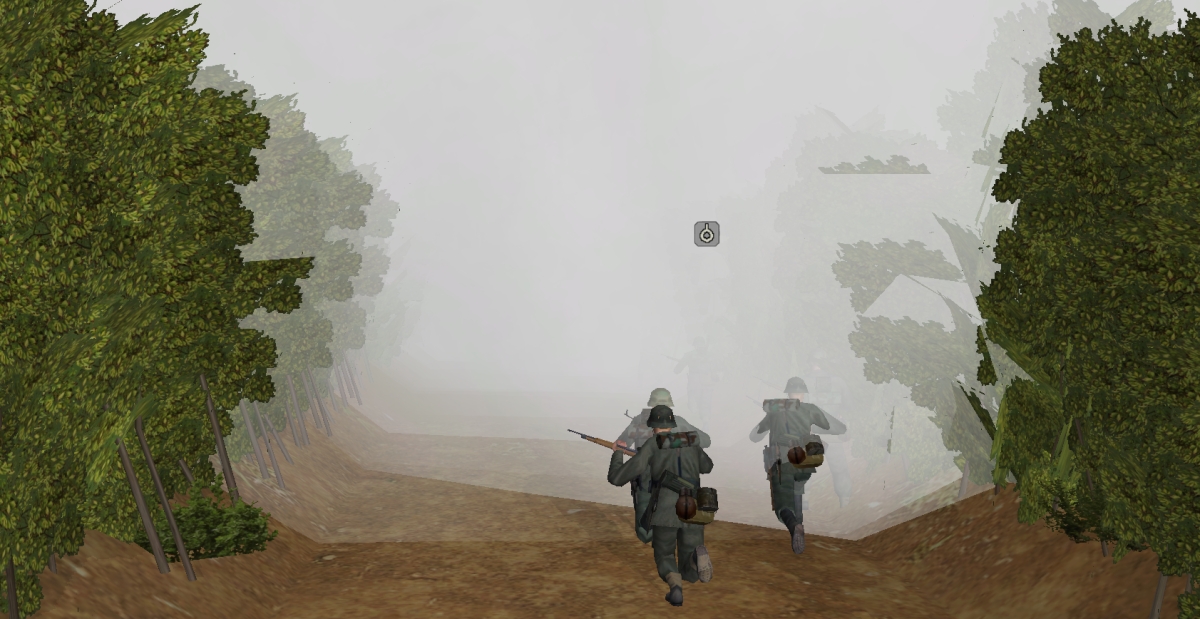
I thought I was being clever heading into the side of my opponent's smoke screen. My hope was that when the smoke cleared they would be right on his flank or better yet behind his advance across a near by open field. Boy was I wrong. His tank and HTs did not go through the field at all but instead they turned and came right towards these poor guys. Once the smoke cleared they were totally surrounded and did not last long.
-
That was my first concern too. I assure you that my way points were placed in locations that were not inaccessible. There is plenty of space around the bridge that is accessible to tanks and I cannot select those as way points. Or more accurately it looks like I can place a way point at the cursor but instead the way point jumps back into the water.
-
Oh then I'm in for a long wait - to bad:(
-
A friend and I are currently about to embark on a really large battle using Pete Wenman's recently posted 2km by 2km map. I quite like the map but during testing I had trouble getting stuff to cross the bridges sensibility. I could not plot way points to just the other side of the bridge and then move left or right into the woods the way points would drop into the water. I cracked open Huzzar! and looked at the way the bridges were mapped and compared.
Based on what I saw I tweaked the bridges in Pete's map and things improved slightly. With the vanilla map I had to set way points 100m away from the bridge to prevent the odd double back into the water problem. With my tweaks now I can get the tanks to cross the bridge with way point much closer < 30m or so. But for the life of me I cannot get tanks to cross the bridge and then fan out left and right. What ends up happening is the way point I click in the woods doubles back and drops in the water.
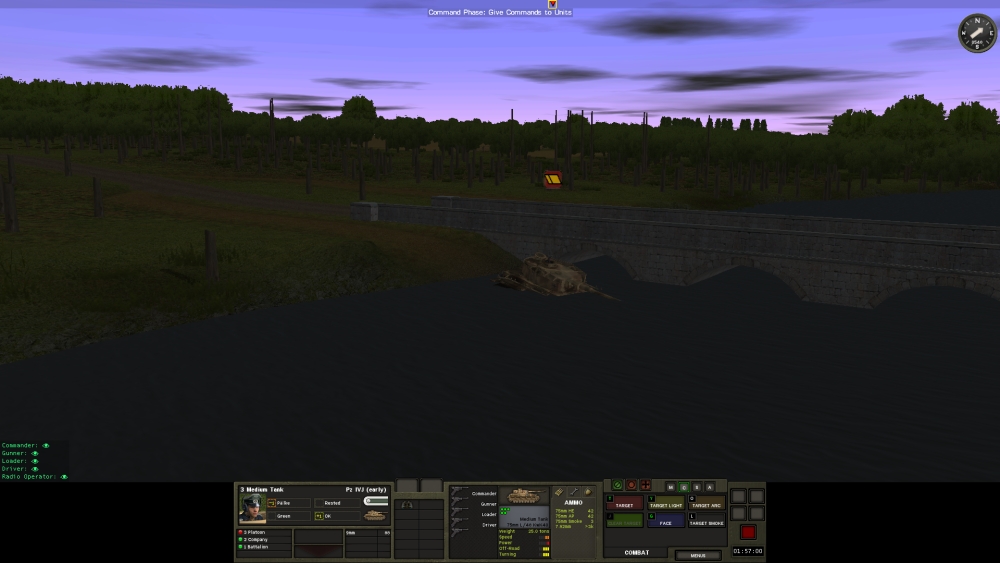
I set a way point on my side of the bridge. Then one on the other side of the bridge - which ends up in the middle of the bridge. I can fiddle and get one near the other side of the bridge. Then I set a way point in the woods at the place where the green arrow is located. That way point ends up in the water (but I cannot even see it):
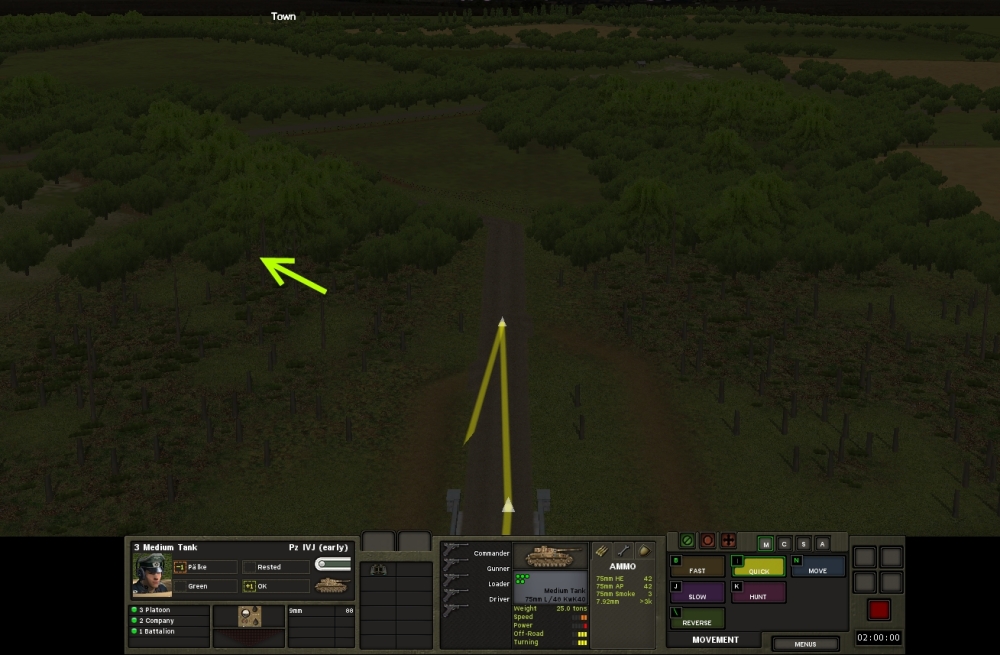
The tank ends up swimming:
Here is what the map looks like (tweaked from Pete's original):
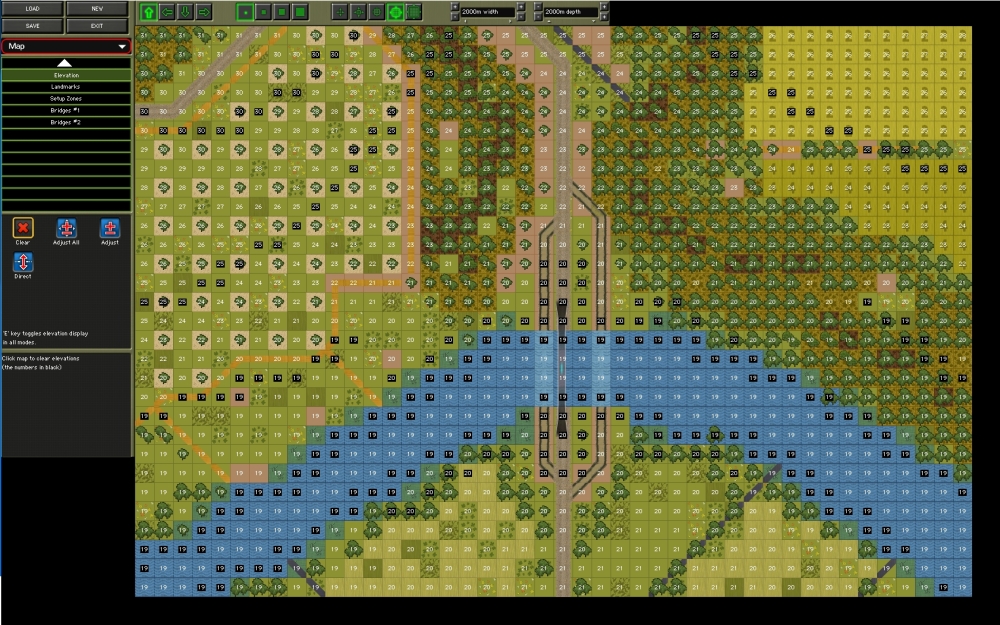
I also though that the fords could be causing the confusion but the same problems happen at the other bridges too - where there are no fords next to the bridge. In the area about 60m around the bridge ends I cannot get my tanks to do sensible things - they keep being drawn back to the water.
I am looking for help - any advice on how to tweak the map to solve this problem?
Pete's original map can be found in the repository here: http://www.battlefront.com/index.php?option=com_remository&Itemid=314&func=fileinfo&id=1921
-
You set your lone BS arc, as there is no more armored covered arc's and hope for the best as they plop AT rifle grenades at Panthers at 100m.
One thing I do is split off the AT team and give them a tighter cover arc so they don't go shooting at targets to far away. It helps.
-
BTW, next is the Churchill VII, and then,...the Jagdpanther!
Awesome work - I cannot wait to play with the Churchil. Is the King Tiger up there on your list. A friend of mine and I are about to start a huge PBEM battle which will feature Churchills and King Tigers prominently. I would love to capture screen shots featuring you mods:)
I know you work on your own schedule - which is good. Never hurts to ask though:D
-
I didn't set any objectives - it was up to them to determine victory - *except* for making each sides entire force a 1000pt DESTROY obj. That way they'd get at least some objective sense of how much damage they'd inflicted on each other.
Interest peaked. I thought a destroy unit objective was an all or nothing thing based on destroying a specific target unit. Do I have that wrong? Must read manual - oh the pain, the pain.

-
I assume you would need a 3rd party to set up the scenario, correct? Unless you and your opponent are ok with knowing each other's purchases. I recall people doing this with the CMx1 games too.
In general I could see a 3rd party being used but we will not be. If the German player chooses first then the allied player will not accidentally see the German force selection. We are working with a high level of trust. I have known my opponent for over 15 years. Plus, as the saying goes I can punch him I real life:)
-
"we are custom creating a QB with 12 000 points"
How do you do that?
Well we are planning to write an aar and post our experiences plus instructions. In a nut shell we used the QB screen to choose 12000 points. Then we recorded each unit's stats and what we bought. Then we used a large map to create a scenario were we each recreated our force selection. Then we will play it.
Right now we are still testing that our machines can handle a game this size.
-
I would be cautious making judgements about how typical that is in the game based on personal experience. We would need scores of hits at least, probably more than a hundred, and compare that to a similar amount of hits on other tanks to get a solid basis.
I am about to start a huge battle (we are custom creating a QB with 12 000 points) with 14 Tiger IIs and 12 Panthers. I hope my luck is better:-)
I have not commanded Tigers before - killed one and it cost me 7 shermans to do it. I have had command of Panthers before. One battle I lost three and the main gun on a forth. I have also had a 75mm sherman take out an opponent Panther's main gun. So it happens to the wonderful Panther as well.
@phil stanbridge
I think you are just experiencing a string of bad luck. Get a Tiger next time and go shred some enemy tanks - you will feel better:-)
-
I agree. Huzzar! is a classic. My friend and I really enjoined it. In the end I won as the Americans. In my case my plan was to move my forces to the right side via a ford. After loosing 5 vehicles including 3 Shermans I changed gears and attacked on two flanks (my force was split) my initial scout forces played havoc with my opponent's stugs as they moved up (I put all my recon deep in his rear area). That coupled with a hero green crew that took out a bunch of stugs. Allowed me to get through on my left and roll across the map.
Awesome scenario. Nice job only loosing one Sherman!
-
I agree that nosing into the bocage is a good thing to do. I am not so sure that it has the effect of preventing the enemy from seeing your tank - at least not all the time. I used it to good advantage recently in Huzzar! I had a 76 Sherman at a higher elevation nosed into the bocage and it dueled with a Panther. I checked with my opponent and his Panther could certainly see my Sherman - when it was there. What I did was nose in take a few shots and back off. I repeated that two or three times. Then I had the HQ crew dismount and crawl up to call in some artillery. While the artillery was falling they remounted and nosed in again. Once the dust settled the two tanks took more shots at each other. The hits on the Panther deflected over and over. The "hits" on the Sherman were mostly absorbed by the bocage and a few managed to get to the Sherman but did not damage it. Finally the Sherman connected and KO'ed the Panther.
My opponent says that when the Sherman was firing (which was when it was nosed into the bocage) his Panther could see it - and target it.
Using this tactic certainly allowed my Sherman to come out on top. Several other (burning) Shermans that were not behind the bocage were a testament to that.
-
As long as they are not considered to be 'inside' a complete building then they can fire.
I remember reading that Shreks and Bazookas cannot be fired from a totally destroyed building either. I searched but could not find the thread. Can any one confirm my memory?
-
Huh. People like to throw out "but won't anybody think of the realism!" like it's a get out of jail free card
I did not think I was in jail;)

Building mods on the horizon?
in CM Normandy Maps and Mods
Posted
He He He
I would vote for option 1.
In the event that you do not get consensus then option 3 looks good:D