

Kingfish
-
Posts
4,211 -
Joined
-
Last visited
Posts posted by Kingfish
-
-
Perhaps, but consider again the UC w/ 3" mortar team. That's 4 men (3 man team + 1 driver) and 60+ rounds of ammo.Originally posted by stoat:I believe the MMG carriers have a crew of three while the ATR carrier only has a crew of two. Perhaps that would go some way into cutting down on passenger room?
-
I'm trying to understand the reasoning for not allowing the MMG carrier to carry passengers, when it would appear at first glance (to me at least) it could carry a team in much the same manner as it's ATR cousin.
I base my opinion on the fact that the Universal Carrier , which is esentially the same vehicle, can carry the 3" mortar section.
So why is the MMG exempt when all other variants have the capability? A CM bug, established battlefield doctrine, or did the Vickers ammo really take up that much room in the back?
-
-
You got beaucoup mail
-
Good to see it back.
BTW, I believe I have another CMAK conversion of one of your CMBO scenarios, as well as several works by The Desert Fox. The maps around Villers-Bocage are exceptional, but then again his Normandy maps are second to none.
Would you like them?
-
When you say the whole pack are you referring to the 10 CMBO scenarios he did on the campaign in southern France?
-
Has anyone figured out how to get around the part of the code which places all water and marsh tiles at one elevation, apart from changing them to soft ground?
I've tried changing the elevation to a 7, preview, change back to original. No luck. Then tried changing to open tile, preview, back to original. Again no luck.
-
A lesson learned the hard way, to be sure.
I actually had a good surge protector covering the electrical connections, but the lightning apparently came in via my phone line instead. Not only did it zap my N-card but my neighbors at the same time.
-
It could be possible that the designer gave you a force estimated at battalion strength, but actually made up from 2 depleted battalions. This would account for the higher than normal ratio of HQs to platoons.
-
You're not able to to get HQ-less squads or platoons, at least from the purchase screen. The best alternative is to buy a platoon and move the squad far outside of HQ range -or- buy an extra couple of TH teams, which are independent formations anyways.Originally posted by Tux:For the Russians we're using about a batallion's worth of men, but a fair few of them will be HQ-less squads/ half squads. The odd HQ-less SMG squad will represent shock troops, and TH teams will represent smaller ambush teams of men with SMGs.
Will your opponent be so accomodating? You know that old adage about military plans...We think the idea will be for the Russians to have a porous front line, rather than a solid one, let infantry pass and then murder them from close range before HE support can be brought to bear. Does that sound about right?
The Russians assembled a fairly impressive arty park on the eastern side of the Volga, but I think this didn't happen until later in the campaign. Jason can confirm. My guess would be a mix of mortars, 76mm & 122mm.Also, we're both aware that the Russians would have had heavy artillery support, but that it might have taken quite a while to arrange. What sort of calibre/s would be most realistic? -
An operation on a 400m x 240m map? Is it going to be one battle 10 turns long?
You may want to increase the size of the original map, not only to make compatible with the minimum size allowed in CMAK, but to allow more room for manuever.
With regards to your second question, you don't really copy and paste one map to another with the converter program. Instead, you are transferring the data of one map to the program, which in turn converts the information of each tile from the original engine's code to the new code.
If you need help you can send it to me and I'll convert it for you, but again you'll need to increase the first map's size to at least 1200m x 240m.
-
A recent T-storm has fried the network and sound cards on my PC, forcing me to commandeer my son's computer until I can scrap up enough funds to send my rig to the local geek shop.
For the time being is there any way of connecting the two?
-
IMO, it would be more accurate to represent the Russian infantry forces as a hodge-podge of different formations, rather than having it from one unified command. A Guards platoon here, a SMG squad there, etc. Most would be well below full strength, with ammo loads also a mixed bag.
-
In a nutshell, it is a computer program you download and install on your HD, allowing you to convert any map made in any of the CM series of games from one game to another. For instance, a CMBO map can be converted to CMAK, or CMBB, or the other way around.
Before this program became available I had converted several mid to large size maps from CMBO to CMAK the old fashioned way. It took me all of a month to do Wild Bill's Team Desorby, one painstaking tile at a time. With the map converter program the same map can be converted with 3-4 mouse clicks.
An excellent program.
-
Sometimes the battle is brought to the general, and he is not prepared.No battlefield general goes into battle without knowing what back-up he hasSometimes the general is dead, and his #2 is unprepared.
Sometimes the back-up is dead, or out of comm, or committed elsewhere.
Sometimes the opposition decides a battlefield general under attack, and with no back up, is in their best interest, and will do their level best to assure such a situation occurs.
Having said all that, sometimes scenario designers really do drop the ball when it comes to briefings.
-
Is your Italian scenario pre-July '44? The reason I ask is because the Italian theater did receive M4/76s, only not as quickly as their comrades in NWE.
-
...psss...49th reccee...Originally posted by Andreas:I'll put Hasselt onto TSD II.
-
If you consider trucks and Kubelwagons in the same category as Russian tanks and AT guns.an American staff sergeant named Lafayette G. Pool who, while operating a 76mm Sherman, managed to destroy 258 enemy vehicles between 27 June 1944 and 15 September 1944. This is a far greater achievement than Wittmann's,
Forget the Typhoon theory, lets kick it up a notch and give the credit to a carpet bombing B17.Wittmann appears to have been killed in a series of Allied air raids called Operation Totalize; he never had a chance to fight back, and his company and his tank were destroyed in the bombing. -
You can move them anywhere within the setup zones of subsequent battles, but bear in mind that some operations have the no-man's land setting set to zero, meaning you could literally have the two sides begin the game within kissing distance of each other. Depending on who kisses who first, it could make or break the rest of the game. My suggestion is to play as realistic as possible, with units in cover and a distance away from the front lines.
Some folks prefer to play by a rule known as "play where they lay" which basically means you leave the units in place and begin the next battle as though the action never stopped. Depending on the situation this is sometimes the most realistic option.
Also keep in mind that, again depending on the situation, some units will begin the game within their own exclusive setup zone. This is meant to signify units that have pushed far ahead of the main advance and find themselves cutoff when the next battle begins. These smaller setup zones are always a different color than the main zone, and only the units currently in it at setup can deploy there. You have a choice of leaving them there, and possibly losing them if the enemy deploys nearby, or pulling them back inside the main zone.
-
During the campaign the Russians were able to lay a single rail line that ran from the oilfields near Baku to Astrakhan. This was laid directly atop the steppes without any foundations, so although German mobile detachments were able to cut it at many points with ease, it could be just as easily repaired.
This line served two purposes; it supplemented the amount of oil supplies being delivered from tankers on the Caspain sea, and later in the campaign it allowed the Russians to deploy forces along that wide open flank of Army Group A. It was these additional forces that helped speed up the withdrawl of AG A from the Caucasus by threatening the crossing points along the Manych river.
-
Lack of resources, at least in the opening stages. The dual axis advances towards Stalingrad and the Caucasus, plus the losses sustained from as far back as the Izyum offensive, left the Russians with very little to commit to the open flank of Army Group A.Originally posted by coe:was this really only lightly guarded and if so what prevent the soviets from simply just marching up the step in that area
-
Where did you get the info on the flak guns on Guadacanal? My source states only one each of the 13mm and 3" at Kukum, plus another 2 each of 70mm and 75mm at the strip.
-
Here are a few pics of Tulagi during the invasion:Originally posted by stoat:I'm very skeptical about the flak guns you mention. None of the aforementioned units would have necessarily packed along AA guns, and flak, if present, was not much of an issue among the attacking planes. I'm guessing the two Rufes the YAG maintained were the main air defence.
I would say dedicated flak guns would not have showed up until the 38th, 45th, and 1st Battery of the 47th AA Battalions showed up as part of the 35th Brigade's support units.
There were a few coast guns on the island, but I'm not sure that they were ever used. They were big (120-170mm), but they were old, and I have no clue when they were brought ashore.

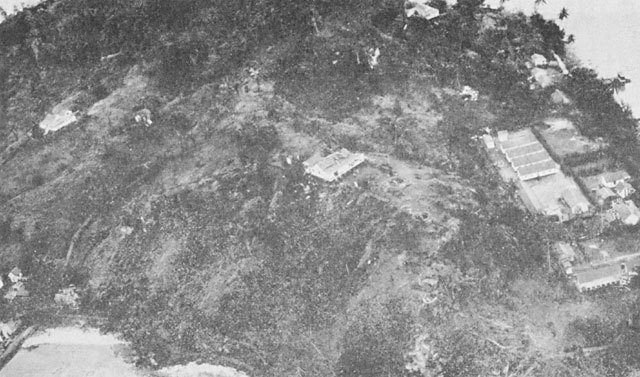
You can see one circular AA position just to the right of the lone house in the center of the photo. A smaller firing pit is located at about the 5 o'clock position from the first, and right at the edge of the ridge.
In my copy of "Guadacanal: The First Offensive" by John Miller (which has a much clearer copy of the second pic above) it lists the captured Japanese weapons as two 13mm and one 3" AA gun. I would assume the larger pit nearer the house would be for the 3".
Unfortunately, I don't have any pics showing any AA guns on either Gavutu or Tanambogo. I do have this map:

Which shows suspected and confirmed AA positions on both islands.
-
The two old howitzers were no doubt the type 92 70mm infantry guns:
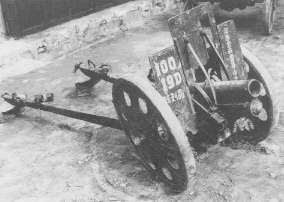
Each battalion included a gun platoon comprising two weapons.
Why no passenger capacity for CW MMG carrier?
in Combat Mission: Afrika Korps
Posted
OK, so it would appear that the traditional layout of the Vickers MMG carrier is one that has the weapon mounted on a pedestal in the center of the passenger compartment, much like the Jeep MG.
Is this correct?