

Bannon DC
-
Posts
622 -
Joined
-
Last visited
Posts posted by Bannon DC
-
-
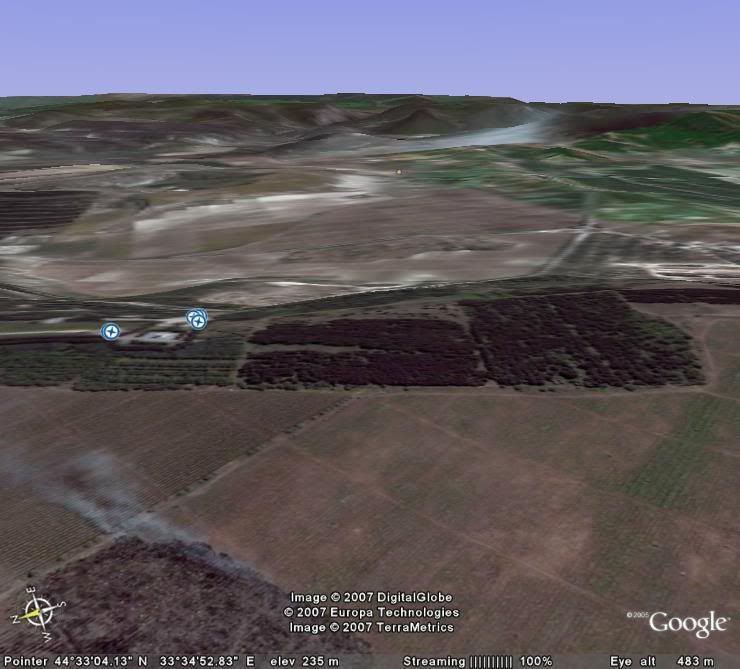
Here is Google picture. The Causeway Hills (IIRC) are on the right in the low res part of picture. Can you see the yellow dot in the distance? That is about the middle of the Valley of Death. Funny thing about this picture is the field on fire in the foreground. Doesn't seem like anyone is around putting it out.
Also, this is a good view from one of the strongly defended anchors of the Russian defensive belts in WWII. One of the photos attached on Google Earth shows a concrete anti-tank position with some scattered guns.
 ]Valley of Death looking west from Mt. Sapun
 -
Came across some source material for this older scenario when researching another battle near Sevastopol. These are quick reads... there are many detailed sites. I located the area on Google Earth, but as of this writting it is one of the few low-resolution shots of the Crimea. I'm throwing this up for no other reason other than to share the links. You may want to play the scenario too.
Basic map and desciption of the "Charge" action.
Article from local Nottingham news about "Battlefield Detectives' " Richard Rutherford-Moore. Some pictures of the area.
Interview with Richard Rutherford-Moore
The National Archives -- summary of the action and period map.
The full 6 verses of Tennyson's "The Charge of the Light Bridgade."
Tennyson's "The Charge of the Light Brigade"
Many are familiar with the Battlefield Detectives series. Episode was partial inspiration for scenario. This link describes series: book seller
"Charge of the Light Brigade" CMBB Scenario at
-
This scenario is "Historical" based on description of fighting NE of Sevastopol in December 1941.
This is a classic "King of the Hill" scenario as the German 22nd Infantry Division rallies to go up the heights one more time to dislodge the weakened Russian 40th Calvary Division. An aggressive attack will give the Germans time to establish a hilltop defense before the counterattack of the black-uniformed 79th Independent Naval Brigade who are marching into battle direct from their transport ships.
Designed to be played as German vs. AI. It is possible to play as two-player (suggest a 25% to 50% increase in German forces). Some limited heavy caliber artillery for both sides.
The photo below shows the type of terrain in the area. I have not been able to locate a specific "MacKenzie Heights" ridge or hill. It could refer to the wider wooded and hilly area NE of Sevastopol, east of Inkerman. The east-west valley at the top of the photo is the Belbek Valley.
How did this part of Russia become known as MacKenzie Heights? How is this related to the nearby town of Mekensievy-Gory that is the subject of a few CM scenarios? Read the brief and find out.

 ]Terrain around Mackenzie Heights
 -
Do you still have the original CMBB file? I no long have Winamp and don't feel like installing it for a one time view. thx
-
Couldn't view it. Came in as a MS video clip but my MS player only played the audio. Did sound like a lot of shooting going on.
Can you upload the actual CM file?
-
A quick search with "the Google" yields:
http://en.wikipedia.org/wiki/Winter_War#_note-Ries
Wiki has what appears to be a well-written and documented article.
During four months of fighting, the Soviet Army suffered huge losses. One Red Army General remarked that "we have won enough ground to bury our dead." Casualty estimates vary widely — from 48,000 killed, died from wounds, and missing in action, as quoted by Soviet officials immediately after the war, to 391,800 according to some recent research[15] According to Nikita Khrushchev, 1.5 million men were sent to Finland and one million of them were killed, while 1000 aircraft, 2300 tanks and armored cars and an enormous amount of other war materials were lost. [7] The most reliable current estimate puts the figure at 126,875[6]. Finland's losses were limited to around 22,830 men[16].
(Go to Wiki link to see the notes)
http://www.kaiku.com/winterwar.html
This guys states 250,000 for the opening attack... and another 600,000 for the final offensive.
Add in some reinforcements and replacements over the course of the war and maybe some logistical and "rear area" formations and you could get close to 1.5 million that Khrushchev throws out.
http://virtual.finland.fi/netcomm/news/showarticle.asp?intNWSAID=25937
Seems authoratative: Lessons of the Winter War
Written for Virtual Finland by Dr. Tomas Ries, senior researcher, National Defence College, Finland
In the winter dawn of 30 November four Soviet Armies with 23 divisions - some 460,000 men with over 2,000 tanks - began advancing across the length of Finland's 1,200 km long eastern border...
Four months later, after the hardest fighting seen in Europe since the first World War and massive Soviet reinforcements, Finland's lines remained unbroken, while the Red Army had lost up to 400.000 soldiers in casualties.
http://www.winterwar.com/War%27sEnd/casualti.htm#total
Breakdown of number deployed and losses by army. A Russian division of the time was about 14,000 men I believe. Final figure, about 400,000.
So -- overall, 400,000 casualities seems to be the consensus figure. I didn't go in depth... just a quick read of the sites for figures.
-
Agreed... it happens. I just chalk it up to the fog of war (not the CM setting
 ). Stuff happens in war. It is not a sane environment.
 -
Well, Jason is prone to do that. He has the manners of a precocious tot. Just pat him on the head and smile.Originally posted by Garand51:then Jason decided to treat me like an idiot...
And for the record, scenario designers can't spike your game. Once it is set in motion, the Tac AI takes over and does the stupid things it normally does. Although this is not normal. Just a fluke.
In the future, follow the designer's advice and you'll get a better game out of it. Cheers.
-
Try this one if you want something a little off beat but still worth while for a basic conscript picnic:
It's fun and you will get the basic training needed for dealing with conscript attacks.
Good luck.

-
Givens:
Support weapons are more easily spotted when moving than squads. If they are moving fast, they will be even more easily spotted. The AI prefers to target them over squads. They move slow. They tire easily.
That all adds up to the obvious problem. To solve this, start with some of the CM basics. If they are easily spotted, put them under the command of an HQ with a good stealth bonus. Use terrain which offers the best cover, even if you have to go "the long way." Avoid open ground. If you are taking fire from very few sources, use your squads to suppress the enemy. If you have smoke, use smoke to cover your move. Move in short moves and hide. These are basic CM manuevers.
Now a little more advanced... coordinate your movement as a platoon instead of individual units. Combine all of the above basics with platoon movement tactics. What draws enemy fire? Movement draws fire. Fire draws fire. If you don't know where the enemy is... move a squad first and hope to draw enemy fire. Even if you don't need to "advance" across the map... just move to a different position and hope to get shot at. If nothing happens, move a squad on "fast" which is more easily spotted by the enemy. Order the squad to "hide" after his move so he does not take needless casualties. For "fire draws fire," you can order a squad or two to fire with "area fire." The enemy will return fire and give away their location (if they are in range, of course). In this way, you will know where the enemy is. Now, you can use suppression fire or smoke to cover your move.
For movement, consider that the AI would prefer to shoot your mortar or MG over your infantry squad. And generally, your infantry squad can withstand enemy fire better than a support unit. Also, the AI will go for the "best shot" which usually means targeting units that are closer or in less cover. You need to offer the AI targets other than your support units or "better" targets where it can use its firepower more effectively. This is where you move as a platoon.
For this example, you have to cross an open area of steppe about 60m across to get to the next "good cover" (like woods or pines). You have a platoon of infantry and 3 or 4 support units. To set it up, you have a good HQ with stealth bonus commanding your support units. Look for terrain height differences which may block the enemy's view... "dead ground". Your infantry squads are in position to the front or flank (the squads' cover or concealment is the same, but not better than, the support units). While doing your best to suppress enemy fire, time your moves so that infantry squads are exposed before support units. Your squads can either try to "advance" the whole 60m or go about 20 or 30m and "hide"... next round they will cover the rest of the distance. You can use the delay command to let the squad move 10 or 20 seconds before the support unit. Since 60m is too far for a support unit to run across, you can move it in 10 or 15m mini-moves and then hide. Don't move support units on "fast" because they will be spotted easier. Have them "move" and "hide." Stagger their moves by 10 seconds each so not all of them are moving at the same time. Keep them spread out by about 15 to 20m so they are not effected by fire on close-by units. It might take 3 or 4 turns to get across the open stretch.
What you hope to achieve is the squads take the inital fire. By the time the AI spots your support units they have hit the dirt and gone out of direct sight. Their staggered movement will cause the AI to redirect its fire often so hopefully they are not taking sustained fire. The AI sees a better target and switches fire to that one... which then hits the dirt... and another unit is moving which soon hits the dirt. And so on.
The above situation assumes the enemy is at 100 to 150m away. Any closer and the enemy fire will be deadlier and you will be more easily spotted. I'm not saying you will get through this with no casualties, but you should be able to advance to the next "good cover" and set up a new fire base.
Switching gears... keep in mind you can fire your mortars with an HQ as the spotter. This may help your mortars keep out of direct fire and not need to move as often.
Good luck.
-
Thanks, Mudhugger
Worth reading. Entertaining to see those clunky examples of Soviet certitude. This one was near the leading section:
"The Hungarian Communist Party, which expressed the true aspirations of the workers, took a position of internationalism. The birth of a partisan movement began in the country with the approach of the Soviet forces. It was headed by the communists."
-
Chalk it up to bad luck or "user error." Sounds like the defending HQ had gone "fanatical" and probably had his Thompson out. Was he in a trench, foxhole, or a "ditch?" Wherever he was, he had good cover.
In my experience, these sort of examples are rare. And when they do occur, it is usually a good thing, not bad. I get more of a "crazy things happen in war" reaction than a "this game is crap" reaction.
That said, Redwolf's comments above are right on target. This series of games has many flaws. But overall, the good points outweigh the bad and the game still provides fun.
Squatdog, I suggest you stop playing against the AI and play only against humans. That is where the most fun comes with this game.
Good luck
-
Bumping... still seeking details on this action. Anyone?
thanks
-
Fun with Forts and Fortifications
Cross posted thread.
Over the years, I have experimented with forts, field fortifications, and defensive lines. I have designed a number of scenarios representing field fortifications and forts ranging fror simple to complex. One of my goals with these scenarios is to minimize the use of Combat Mission’s bunkers as the main defensive backbone of the scenarios. As with any attack, a good plan is important with these scenarios.
Size: Small
Turns: 15+
Difficulty: Hard
Play: Axis vs. AI only
The objective is simple… the Germans must destroy a single Russian Bunker. Terrain is open Steppe. I designed this as a "training mission" for myself. Can be over in 5 or 6 turns if lucky… or can chew you up if luck is not on your side. It is your plan and speed that matter most.
Size: Medium
Turns: 30+
Difficulty: Moderate
Play: Allied vs. AI (Potential for 2 player, untested as 2P)
Tactical exercise in clearing a minefield primarily using artillery. Advance through minefield to break German line and capture command post.
Size: Small
Turns: 20+
Difficulty: Moderate
Play: Either side vs. AI (Potential for 2 player, untested as 2P)
An earthen infantry works built before the First World War will see action again. Will its obsolete design stand up to the new German tactics?
Size: Large
Turns: 40+
Difficulty: Very Hard
Play: Axis vs. AI only (suggest NOT increasing AI experience)
Battalion level assault on first line of a Russian fortified zone near Kiev. This must be a well-coordinated attack, especially for your artillery plan. The objective is a fortified combat outpost. Combat outposts were typically the first line of fortified zones designed to slow the enemy attack, gauge its strength, and provide observation for artillery. The outpost provides all around defense (hedgehog) and coordinates various weapon types. Interlocking outposts provide mutual fire support. An attacking enemy will be engaged by various weapons according to their range: artillery, guns, machine guns, small arms.
Tank Trap, Muzeum Blvd., Pest (CMBB)
Size: Medium
Turns: 46+
Difficulty: Hard
Play: H2H or Allies vs. AI
Semi-historical battle. January 17, 1945 -- The Germans and Hungarians are retreating to their fallback line at Muzeum Blvd., just blocks from the Danube River. They must get their tired infantry into place to defend the line. A tank trap blocks this major intersection. A company of Russian pioneers is attacking down Rakoczi Ave. If they can demolish the obstacle, Russian tanks can drive to the river. This is a cut down version from the larger scenario "Kalvin Square, Pest." "Tank Trap" map is narrow and features only the immediate area along this major avenue. (1280 x 240)
Size: Medium
Turns: 42+
Difficulty: Hard
Play: Axis vs. AI only
Semi-historical. German infantry struggles up the slopes and ravines of Fort Stalin, north of Sevastopol. They encounter frigid temperatures and fanatical resistance but they have come too far to stop now. MISSION - destroy the main gun emplacement and secure the north sally port. Artillery is "blind" - you must have an artillery plan before the battle starts. Map and forces small (640 x 560).
Size: Large
Turns: 78+ (may be more than you need)
Difficulty: Hard
Play: Allied vs. AI
This one is a big urban brawl. The Germans have developed a superior defensive position along a ridge known as The Heights. In this urban environment, the Germans can use the height of the ridge to direct artillery, guns, and mg fire to harass the American effort. The Americans must advance block-by-block to reach the towering Royal Estate and critical road junction. Will the American's overwhelming artillery support overcome the German's interlocking and fanatical defense? Approx. 5000 artillery/air points combined for both sides. Map medium sized at 1280 x 720.
West Wall -- Assault at Rimburg (CMAK)
Size: Large
Turns: 50+
Difficulty: Hard
Play: Allied vs. AI or H2H
The U.S. 30th Division ("Old Hickory") sets out across the muddy fields near Rimburg Castle to breakthrough Germany's vaunted West Wall. Historical recreation based on period aerial photos and maps, topographical data and overlay maps with bunker locations. Very close to real map. Designed to be played as 2 player or American vs. AI. See discussion thread via link above for screen shots and related links.
As always – thanks to the people who have tested these scenarios at The Proving Grounds and to GJK for hosting these essential community sites. The “sizes” listed above are in my terms, not CM’s. Small: about a company to command; medium: company and up; larger: battalion and up.
Generally speaking, I only consider my scenarios “finished” if they have been playtested a few times. Playtesters are always needed at TPG. Support the community!
[ December 30, 2007, 04:15 PM: Message edited by: Bannon DC ]
-
Keep up the fire. Conscripts are slow to pick up targets on their own, so make sure they are shooting at something during your command phases. If the target is going in and out of direct site, use area fire.
Pick a platoon commander with good moral and combat bonuses for the actual attack. Company COs are useful to rally troops that break.
Spread your squads out as much as possible. Any close shots will send your men to the ground even if the actual target is a nearby platoon.
Avoid factors that pannick troops... like getting tired, out of command, etc.
When you do actually charge the trenches or enemy position, send as many units as possible. Count on most of them falling back. Don't worry about the end position... for example, go ahead and send three or four units for the same crater because most of them won't make it.
EDIT, Added: When charging, use the pause delay in order to spread your men out. Pause every other unit by 20 seconds or so. This is important to avoid the units dropping to the ground as other nearby units take fire. Don't worry if the order delay is 60 seconds or more.
Use the move and hide commands. Make your conscript hide at the end of his move so they have better cover and are less likely to get fired on. Unless they are right next to an enemy unit they are unlikely to fire at the enemy anyway.
Bring in an NKVD unit behind them and threaten to shoot them if they retreat. That will strengthen their courage.

[ April 22, 2007, 07:03 AM: Message edited by: Bannon DC ]
-
Fun with Forts and Fortifications
Cross posted thread.
Over the years, I have experimented with forts, field fortifications, and defensive lines. I have designed a number of scenarios representing field fortifications and forts ranging fror simple to complex. One of my goals with these scenarios is to minimize the use of Combat Mission’s bunkers as the main defensive backbone of the scenarios. As with any attack, a good plan is important with these scenarios.
I have just moved “Assault on Fort Stalin” and “Clearing the Field” over to TSD.
Size: Small
Turns: 15+
Difficulty: Hard
Play: Axis vs. AI only
The objective is simple… the Germans must destroy a single Russian Bunker. Terrain is open Steppe. I designed this as a "training mission" for myself. Can be over in 5 or 6 turns if lucky… or can chew you up if luck is not on your side. It is your plan and speed that matter most.
Size: Medium
Turns: 30+
Difficulty: Moderate
Play: Allied vs. AI (Potential for 2 player, untested as 2P)
Tactical exercise in clearing a minefield primarily using artillery. Advance through minefield to break German line and capture command post.
Size: Small
Turns: 20+
Difficulty: Moderate
Play: Either side vs. AI (Potential for 2 player, untested as 2P)
An earthen infantry works built before the First World War will see action again. Will its obsolete design stand up to the new German tactics?
Size: Large
Turns: 40+
Difficulty: Very Hard
Play: Axis vs. AI only (suggest NOT increasing AI experience)
Battalion level assault on first line of a Russian fortified zone near Kiev. This must be a well-coordinated attack, especially for your artillery plan. The objective is a fortified combat outpost. Combat outposts were typically the first line of fortified zones designed to slow the enemy attack, gauge its strength, and provide observation for artillery. The outpost provides all around defense (hedgehog) and coordinates various weapon types. Interlocking outposts provide mutual fire support. An attacking enemy will be engaged by various weapons according to their range: artillery, guns, machine guns, small arms.
Size: Medium
Turns: 42+
Difficulty: Hard
Play: Axis vs. AI only
Semi-historical. German infantry struggles up the slopes and ravines of Fort Stalin, north of Sevastopol. They encounter frigid temperatures and fanatical resistance but they have come too far to stop now. MISSION - destroy the main gun emplacement and secure the north sally port. Artillery is "blind" - you must have an artillery plan before the battle starts. Map and forces small (640 x 560).
Size: Large
Turns: 78+ (may be more than you need)
Difficulty: Hard
Play: Allied vs. AI
This one is a big urban brawl. The Germans have developed a superior defensive position along a ridge known as The Heights. In this urban environment, the Germans can use the height of the ridge to direct artillery, guns, and mg fire to harass the American effort. The Americans must advance block-by-block to reach the towering Royal Estate and critical road junction. Will the American's overwhelming artillery support overcome the German's interlocking and fanatical defense? Approx. 5000 artillery/air points combined for both sides. Map medium sized at 1280 x 720.
Coming soon to TSD: West Wall – Assault at Rimburg (CMAK)
Size: Large
Turns: about 50
Difficulty: Hard
Play: Allied vs. AI
The U.S. 30th Division ("Old Hickory") sets out across the muddy fields near Rimburg Castle to breakthrough Germany's vaunted West Wall. Historical recreation based on period aerial photos and maps, topographical data and overlay maps with bunker locations. Very close to real map. Designed to be played as 2 player or American vs. AI. Currently in testing at The Proving Grounds… done soon.
As always – thanks to the people who have tested these scenarios at The Proving Grounds and to GJK for hosting these essential community sites. The “sizes” listed above are in my terms, not CM’s. Small: about a company to command; medium: company and up; larger: battalion and up.
Generally speaking, I only consider my scenarios “finished” if they have been playtested a few times. Playtesters are always needed at TPG. Support the community!
-
I saw the history of canned food this morning on the History Channel. While canned food was initially created for military needs and there was a brief segment on the K ration, I found the program a bit dull. The Iron Chef competion on the Food Channel was much more exciting.
-
Fun with Forts and Fortifications
Cross posted thread.
Over the years, I have experimented with forts, field fortifications, and defensive lines. I have designed a number of scenarios representing field fortifications and forts ranging fror simple to complex. One of my goals with these scenarios is to minimize the use of Combat Mission’s bunkers as the main defensive backbone of the scenarios. As with any attack, a good plan is important with these scenarios.
Size: Small
Turns: 15+
Difficulty: Hard
Play: Axis vs. AI only
The objective is simple… the Germans must destroy a single Russian Bunker. Terrain is open Steppe. I designed this as a "training mission" for myself. Can be over in 5 or 6 turns if lucky… or can chew you up if luck is not on your side. It is your plan and speed that matter most.
Size: Medium
Turns: 30+
Difficulty: Moderate
Play: Allied vs. AI (Potential for 2 player, untested as 2P)
Tactical exercise in clearing a minefield primarily using artillery. Advance through minefield to break German line and capture command post.
Size: Small
Turns: 20+
Difficulty: Moderate
Play: Either side vs. AI (Potential for 2 player, untested as 2P)
An earthen infantry works built before the First World War will see action again. Will its obsolete design stand up to the new German tactics?
Size: Large
Turns: 40+
Difficulty: Very Hard
Play: Axis vs. AI only (suggest NOT increasing AI experience)
Battalion level assault on first line of a Russian fortified zone near Kiev. This must be a well-coordinated attack, especially for your artillery plan. The objective is a fortified combat outpost. Combat outposts were typically the first line of fortified zones designed to slow the enemy attack, gauge its strength, and provide observation for artillery. The outpost provides all around defense (hedgehog) and coordinates various weapon types. Interlocking outposts provide mutual fire support. An attacking enemy will be engaged by various weapons according to their range: artillery, guns, machine guns, small arms.
Tank Trap, Muzeum Blvd., Pest (CMBB)
Size: Medium
Turns: 46+
Difficulty: Hard
Play: H2H or Allies vs. AI
Semi-historical battle. January 17, 1945 -- The Germans and Hungarians are retreating to their fallback line at Muzeum Blvd., just blocks from the Danube River. They must get their tired infantry into place to defend the line. A tank trap blocks this major intersection. A company of Russian pioneers is attacking down Rakoczi Ave. If they can demolish the obstacle, Russian tanks can drive to the river. This is a cut down version from the larger scenario "Kalvin Square, Pest." "Tank Trap" map is narrow and features only the immediate area along this major avenue. (1280 x 240)
Size: Medium
Turns: 42+
Difficulty: Hard
Play: Axis vs. AI only
Semi-historical. German infantry struggles up the slopes and ravines of Fort Stalin, north of Sevastopol. They encounter frigid temperatures and fanatical resistance but they have come too far to stop now. MISSION - destroy the main gun emplacement and secure the north sally port. Artillery is "blind" - you must have an artillery plan before the battle starts. Map and forces small (640 x 560).
Size: Large
Turns: 78+ (may be more than you need)
Difficulty: Hard
Play: Allied vs. AI
This one is a big urban brawl. The Germans have developed a superior defensive position along a ridge known as The Heights. In this urban environment, the Germans can use the height of the ridge to direct artillery, guns, and mg fire to harass the American effort. The Americans must advance block-by-block to reach the towering Royal Estate and critical road junction. Will the American's overwhelming artillery support overcome the German's interlocking and fanatical defense? Approx. 5000 artillery/air points combined for both sides. Map medium sized at 1280 x 720.
West Wall -- Assault at Rimburg (CMAK)
Size: Large
Turns: 50+
Difficulty: Hard
Play: Allied vs. AI or H2H
The U.S. 30th Division ("Old Hickory") sets out across the muddy fields near Rimburg Castle to breakthrough Germany's vaunted West Wall. Historical recreation based on period aerial photos and maps, topographical data and overlay maps with bunker locations. Very close to real map. Designed to be played as 2 player or American vs. AI.
As always – thanks to the people who have tested these scenarios at The Proving Grounds and to GJK for hosting these essential community sites. The “sizes” listed above are in my terms, not CM’s. Small: about a company to command; medium: company and up; larger: battalion and up.
Generally speaking, I only consider my scenarios “finished” if they have been playtested a few times. Playtesters are always needed at TPG. Support the community!
[ December 30, 2007, 04:06 PM: Message edited by: Bannon DC ]
-
Rune -- FWIW, I highly enjoyed your Beda Fomm scenario. Even playing it against the AI. :eek:
-
Harry --
I have done some tests with early war Soviet and German tanks. The biggest problem you will encounter is the flight tendancy of Soviet early tanks. Instead of actually fighting, they will almost always go into reverse and retreat.
BT series tanks are more likely than all the other tin cans to fight. BT7 are, afterall, "medium" tanks. But, even they will tend to retreat.
If you want to have a go at it, try 38(t)'s vs. BT7s. Try roughly 2 to 1 odds favoring the Soviets. I just checked in the editor for the 38's... two version (a) and (e)... (a) carries more ammo which you will definataly need; (e) has thicker armor but less ammo.
good luck
-
Dook, when does enrolement start for you next course?
-
The 13th book on this list, Siege! has a section about Budapest. I have the book. It gives a good overview, slightly more detail than the article mentioned in the opening post. As a whole the book is good, but not very detailed. The maps in the book are poor. Photos... many photos of the personalities, but few of the actual action.
As mentioned above, "Siege of Budapest" by Ungvary is the best book I have found.
For CM scenarios... do a search for author "UHU" at The Scenario Depot. You will find 5 or 6 scenarios depicting the Hungarian army, some in Budapest (including the breakout and retreat from Pest).
I also have one at TPG based on the fighting for Margit Island. It is an operation.
-
Excellent... thanks, guys. Very helpful.
-
That Sturmtiger in the Panzermuseum link fired twice in 7 seconds.


Charge of the Light Brigade
in Combat Mission - Scenario Talk
Posted
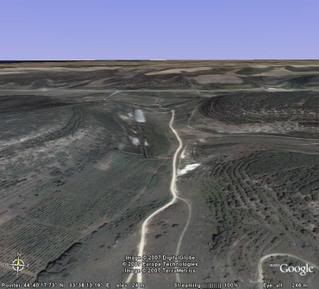
Here is closer view of the ground where the Charge of the Light Brigade occured. The hills on either side do not seem that step. The end of the valley opens up on the left. What appears to be mist in the background is actually clouds from the ajoining tile.