
Iktah
-
Posts
17 -
Joined
-
Last visited
Posts posted by Iktah
-
-
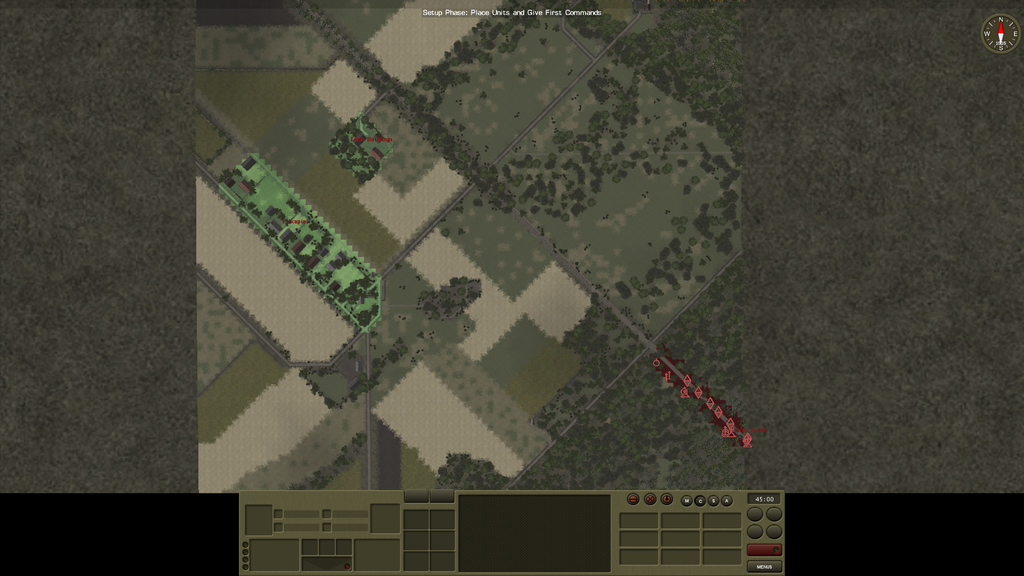
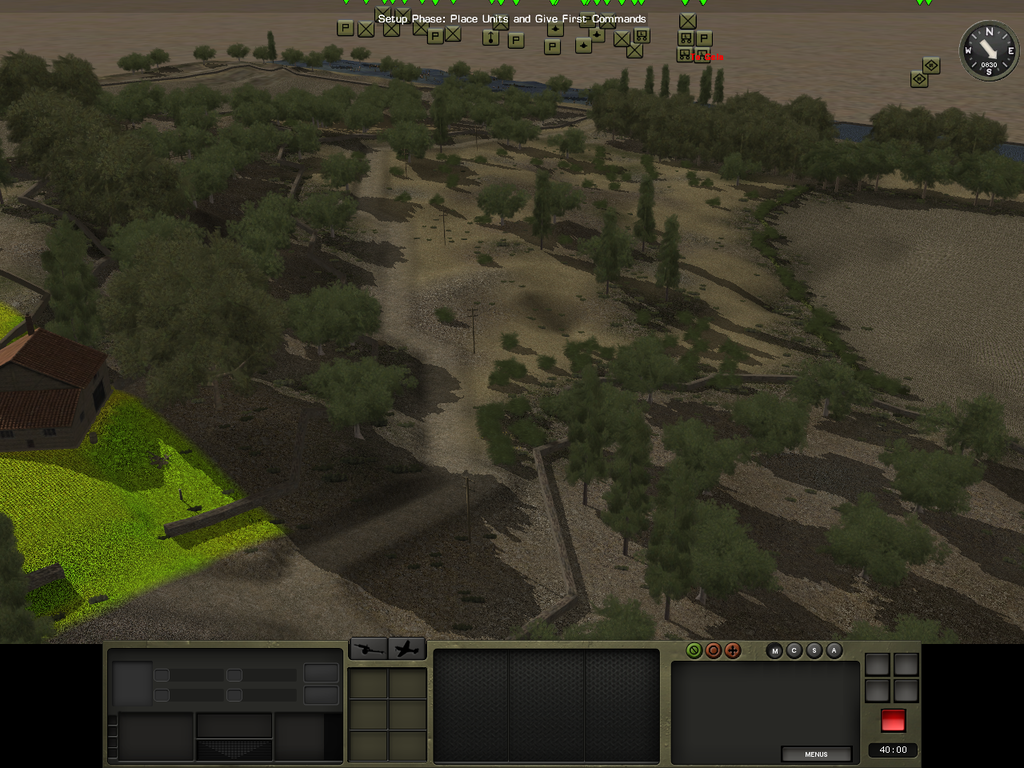
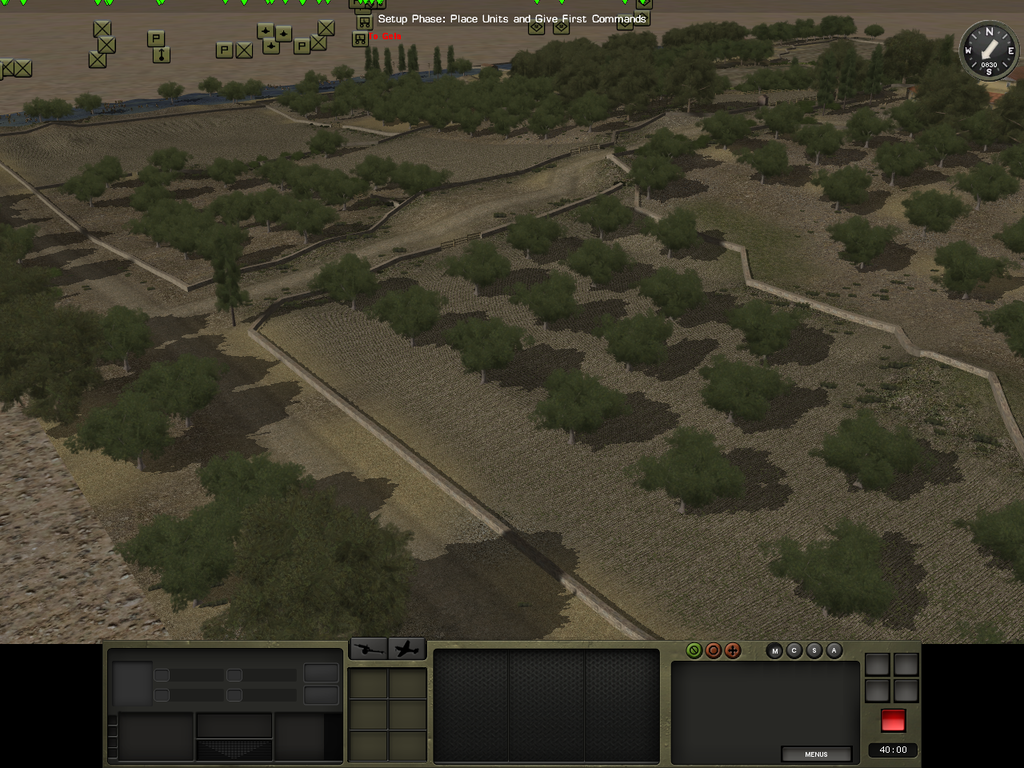
Force disposition:
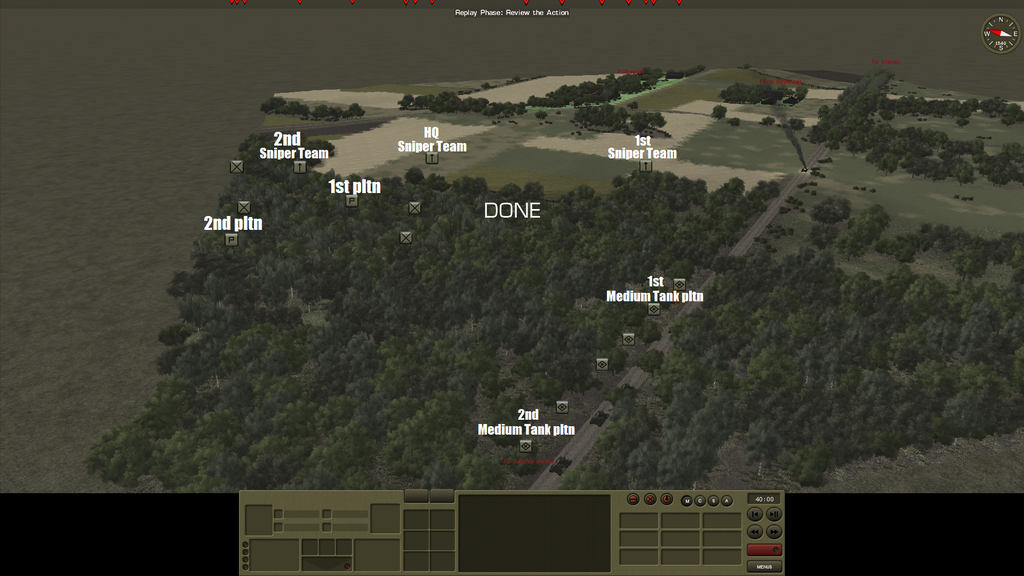
Road going through KT 3:
View from the 2nd objective: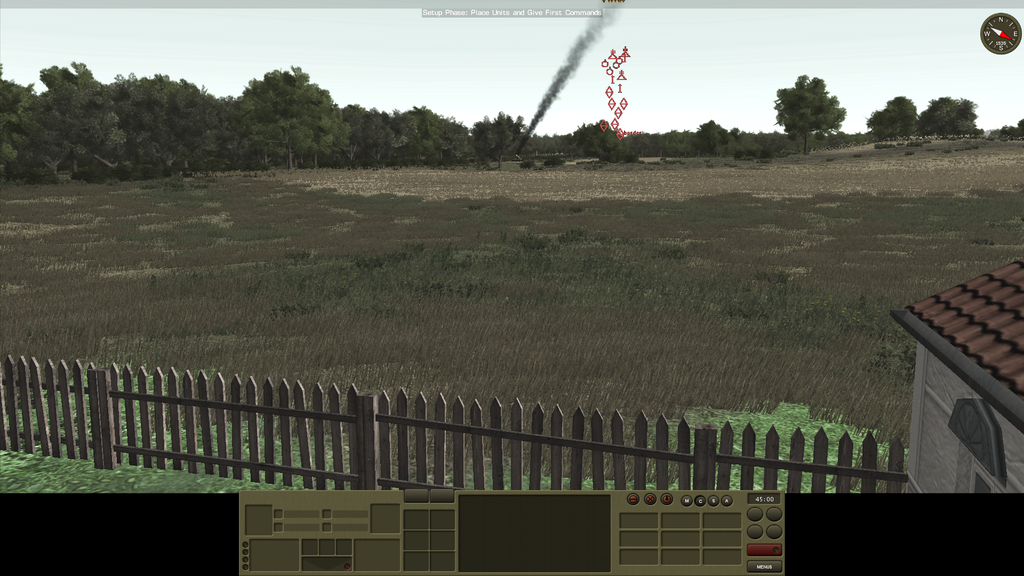
-
The opening minutes, chapter 1:
"…Bear through, he thought as the scene turned silent. In front of him blurred lines, right left, straight ahead, all a blurr.A road, that much he could clearly se, a road dressed in all black and white, which mixes to grey at the end, there they are, so quickly had they ducked out of sight.
Our formation had halted, the troops ordered to embark and due to the speed of it all and how hastily this was executed, Afanasy found himself hunkered down with his leg in an awkward position with his foot numbing.He dared not move. So the pain of sitting on it he thought, would just have to go away. This was his first contact with the enemy since being conscripted. But in his memories, not the first contact with the Germans.
To us, he thought, nothing is sacred anymore because to survive we have to be twisted to the core. The guns now silent, only the occasional nervous cough broke the silence...” – Prvt Afanasy Sokol , 2nd Squad, 2nd platoon
"... at Pilpakiai? Why, ask of it? The orders where simple, deploy the infantry in the woods to our left, send out one platoon as the first wave, and when the enemy is revealed, the 2nd wave can take care of the rest, the tanks is to act in support, we came at them the same old style, and they, well..." - from the memoares of 3rd Company HQ: Galimov
COA:
What you see is what you get:
"... We had a quick briefing by our superiors, there where three spots that they needed our eyes on, We were to act as a first screen, we were used to that kind of mission, to go in first to observe with our rifles, I trusted we could find the defenders, I must admitt I was not expecting this to be nothing more than a mine..." - Parshin, attached sniper
Map: sniper teams move into contact, one team is still a few minutes away from its designated area.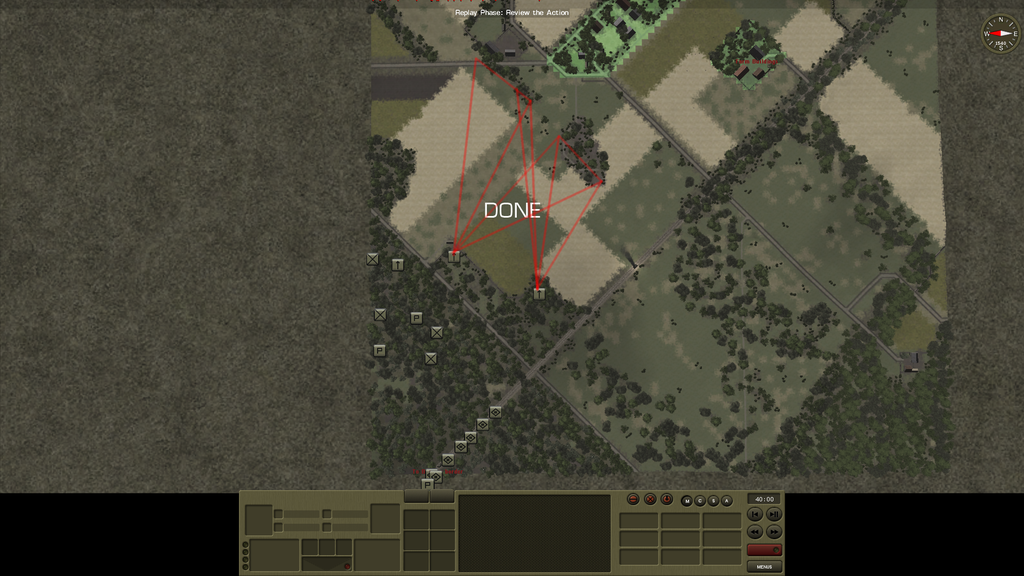
A view of what they see: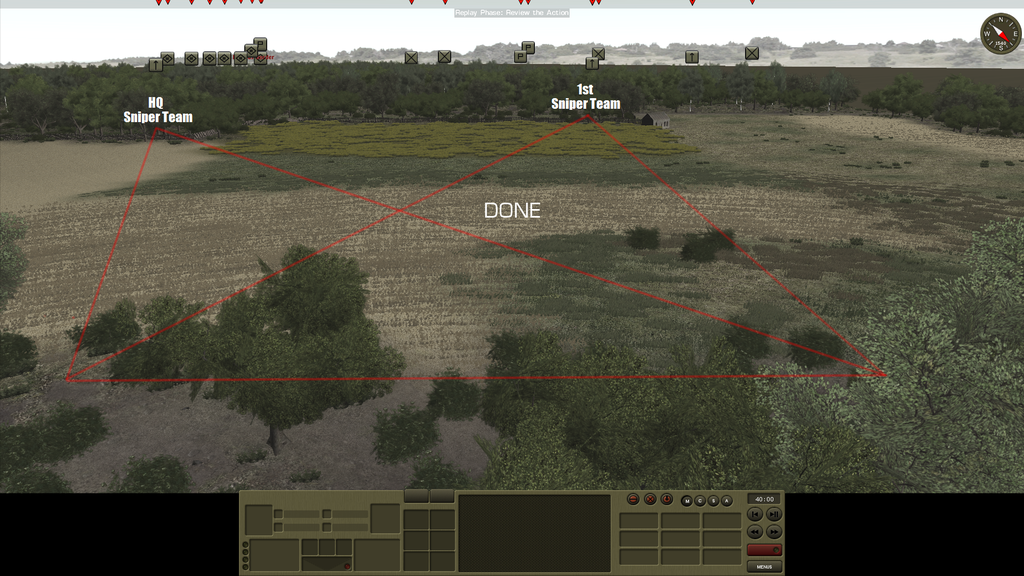
First contact:
"...What I remember from that day is not much about the engagement, I remember deploying to our left, and I had the furthest to walk before getting to my designated area, I had struck a vager with Petrukhin that I would be faster than him, even though he had some 25 meters to advance and I some 200. All in good spirit you know.. I was to overlook the enemy positions to our most left position. When I got there, I guess I was not catious enough I got hit in the leg, that is when I lost it. Spent the rest of the war in hospitals and then I was sent home. I have thought about that day ever since, but you look shocked, what if they had fired that Anti Tank Gun. When they fire, you feel the blast rippling through the air. I am lucky to be alive..." - excerpt from an interview
Petrukhin overlooking KT 3: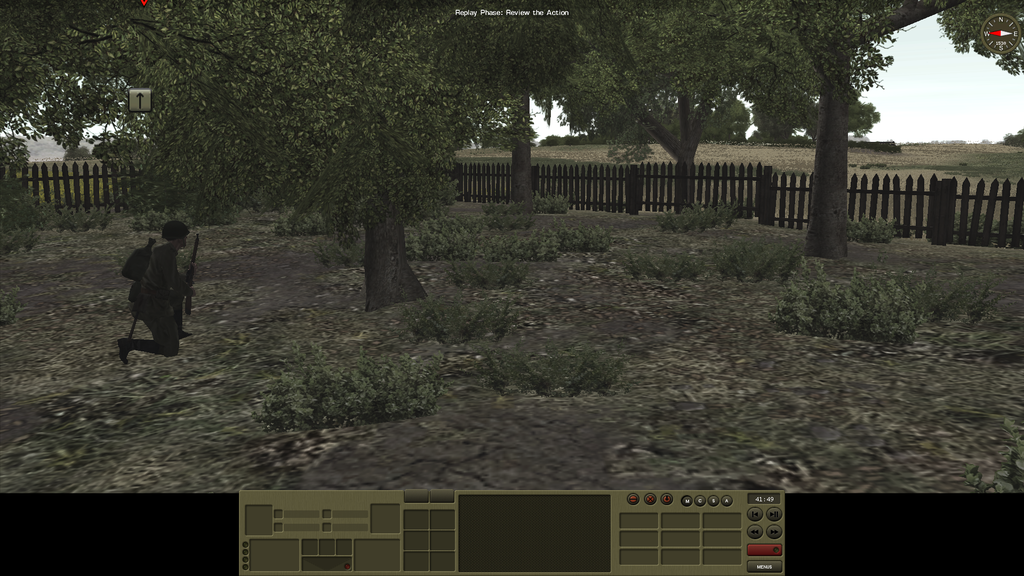
2nd sniper team spots the gun: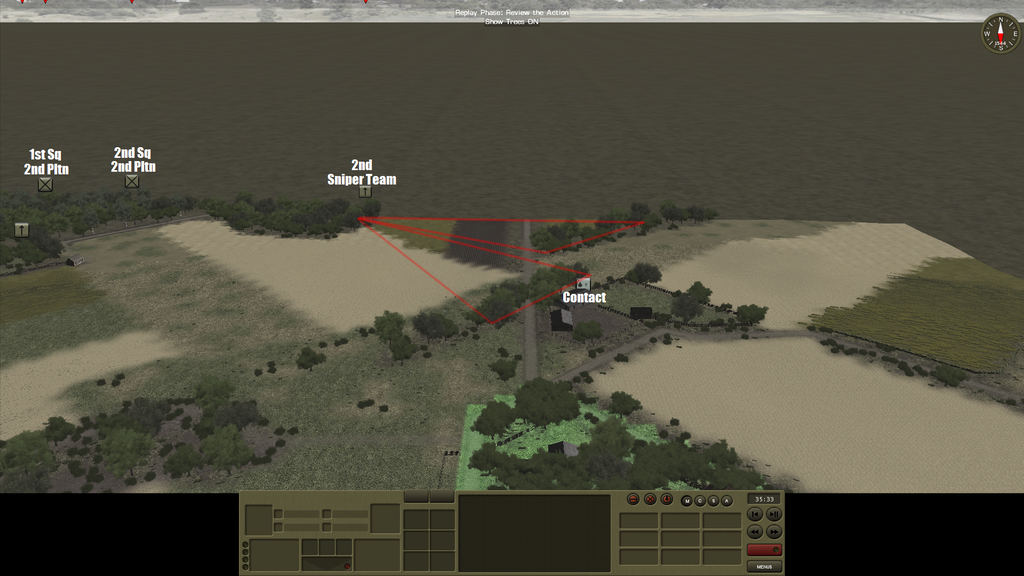
Untill next time // Cheers
-
This is a fun scenario - I have played it twice - the first time pretty much going exclusively down the left flank and the second time employing something similar to your COA 2.
Seems the left is the more sensible route, and it is a good spot over all. There is a position in the town where I after carefull consideration guess that the shot that killed our forward tank came from (Setting up a move order from the deployment area and using the measure tool for a solid 10 minutes). But it depends on the German strength defending the town, a smal force will not be spread out. That is what I hope for..
I am not so sure about COA 1, If the enemy has AT guns in the Village they can probably fire down at objective nr 2.. It will take time to move and my forces will be separated.
A picture of the view from KT 3 (My left):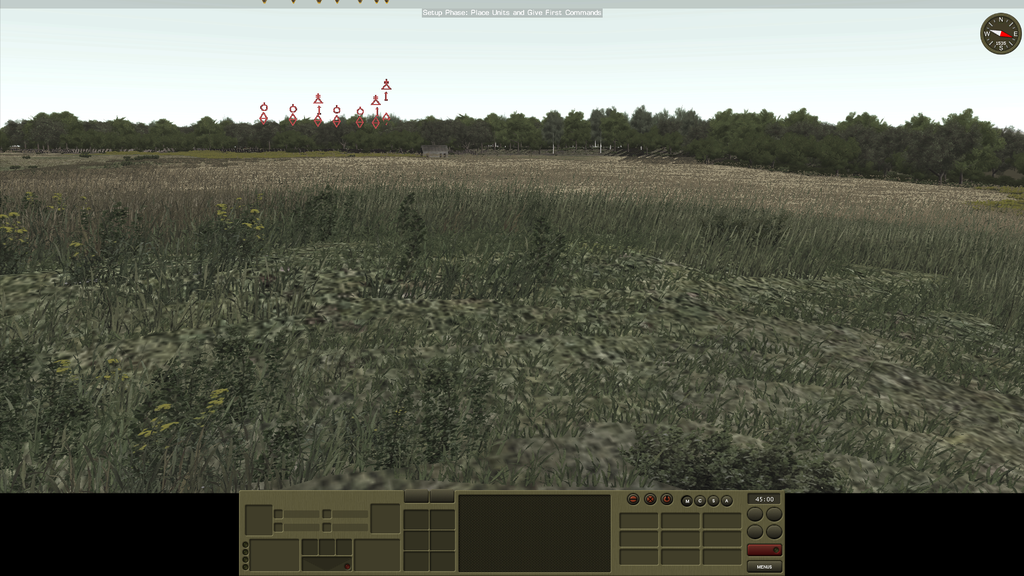
-
COA 1
My first thought was, hey, can I go arround it, and directly afterwards was, can I make it longer. All I am worried is that it will separate the tanks and the infantry. It surely is to avoid the enemy, and if we take this route we will have arround 15-20 minutes of combat at the objectives.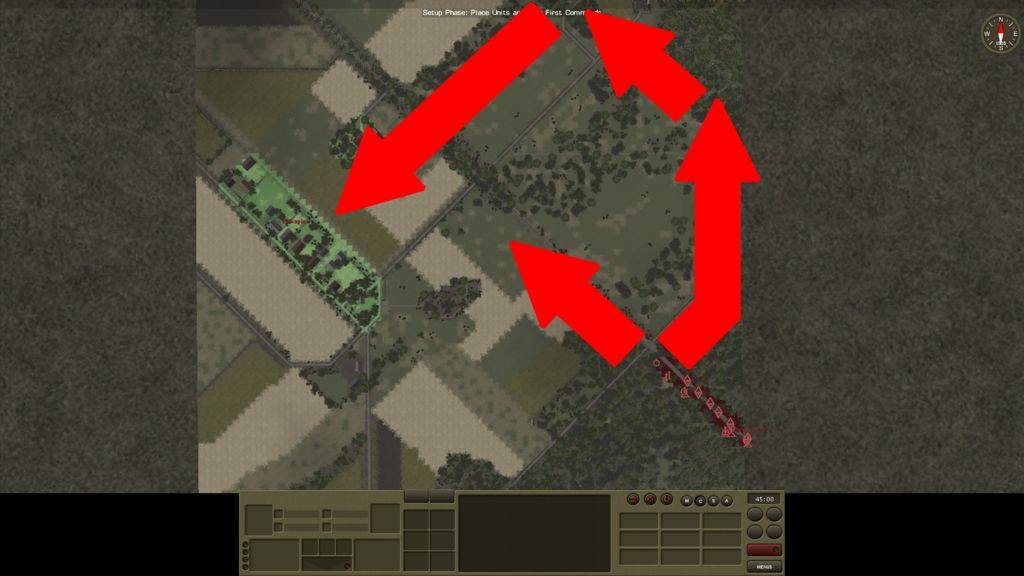
COA 2
The most sensible plan in my opinion, not as fun as the first option that came to mind. One thinf that sits in this COAs favour is that it will take less time to actualy deploy our infantry to begin an advance and we can be supported by the tanks since there is a road some 50 meters to our left that can help us be obscured from the Village and surroundings areas.
COA 3
Not something I would rekomend since they have guns there, I am talking offcourse of the forward assault. Urrah? or something..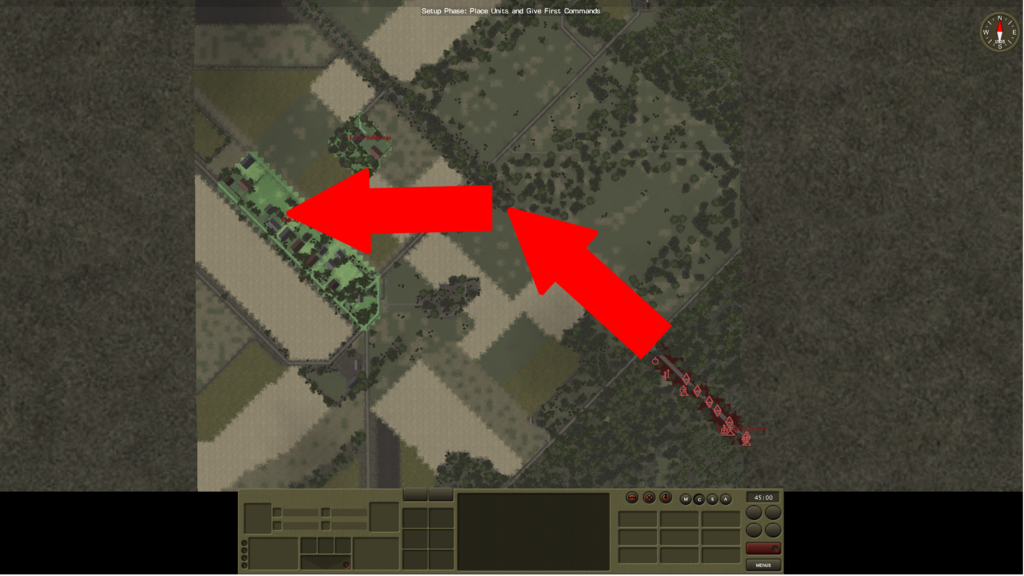
Next is some combat, and this will take some time, so stay tuned for when the action turns real.. We now have the stage to plan our attack on the Fascist defenders..
//Cheers -
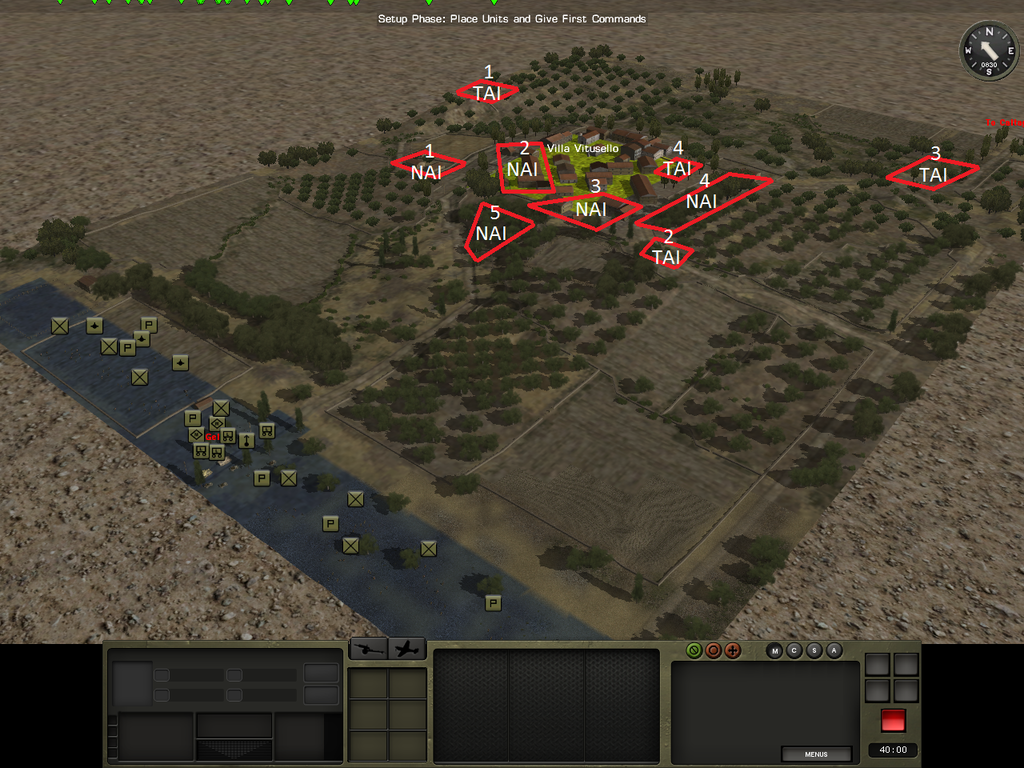
Our Companys Task Analasys:
Secure 1
Secure the Village of Pilkapiai until relieved by friendly forcesClear 2
scout and assault to secure the southern approach to the town and gain access to the wheat field north of it. If the enemy has mounted a forward defence it is most likely situated here. If we are to clear KT 10 and establish a secure presence in the village we need to hold KT 3.Screen/Clear 3
Not necessary to hold, but it can be no enemy presence there if we are to move up AA 3Most likely it is a task assigned to the T34s once the AT assets of the enemy is found and neutralized.
Clear 4
The area KT 4 is a good central position, with enemy forces in it there can be no movement into the village.Secure 5
To secure the road AA3 we need to secure this farmhouse and neighbouring buildings. Is needed to further secure the retreat of enemy forces from KT 5Freedom of Action:
Our company must secure KT 10, KT 5 and KT 9I can't cross the boundries of the AO
I have freedom of action within the AO
I am free to plan any preleminary bombardments and smokescreens as needed.
Analyse Tasks:
Task 1 – Secure KT 5 and KT 10Task 2 – Deploy scouts to find enemies main line of resistance
Task 3 – Find and destroy the enemy AT assets aimed at AA 3
Identifying, critical facts, judgements and assumptions:
Critical facts:
The enemy has AT assets on over watch at AA 3They know we are traveling down AA 3 to reach Vilnius
The enemy is in an ambush stance
The enemy has a presence at KT 5, KT 10 and KT 9
We have off map mortar support from 1 battery
Judgements:
We have enough forces to assault the Objectives if circumventedThe enemy has guns focused in the valley in the middle of KT 4 , KT 11 , KT 7 and KT 6
There are probable have weapons assets concealed at KT 4, KT 6, KT 7 and KT 10
We have arround 10 minutes of mortar fire if we mind our fire rate
Assumptions:
Our force composition is possibly outnumbering the enemyThe enemy relies on us not gaining access to the flanks of the Village
We have enough ammunition for this engagement
We will not receive reinforcements and neither will the Germans
The enemy is likely to have enough ammunition for a sustained defence
They are supported by mortars
Intent:

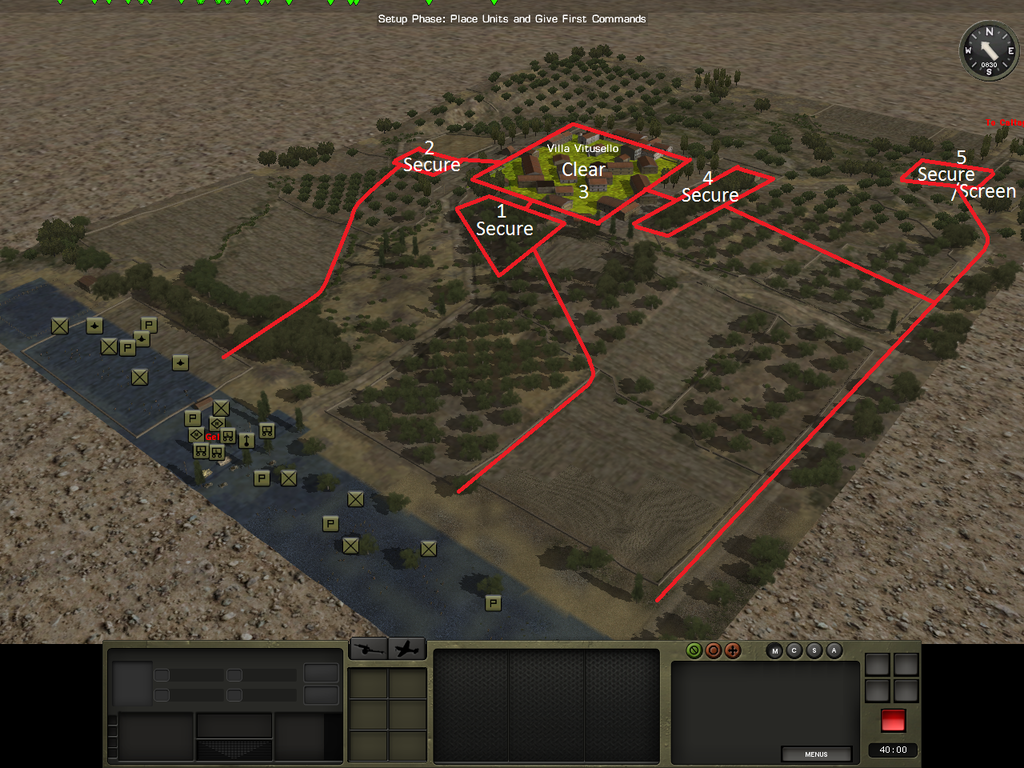
Intent Schematic:
Secure 1 – To secure the objectiveClear 2 – To create a staging area to assault the village and is the enemies probable main line of defence
Screen / Clear 3 - to deny the enemy eyes on AA 3 and secure a point from which to attack KT 4
Secure 4 – To deny the enemy this central point and prevent spoters targeting our advance at AA 3
Secure 5 – To secure the objective and most likely a point in the enemies main defensive line
PIR:
Where the enemy has its main effortWhere it has its AT assets
The assess the traficability of AA 3, AA 4, AA 1 and AA 5
Assess what the enemy force is compromised of
TAIs and NAIs:

Dividing my Companies Resources and TAI'NAI:
TAIs:
TAI 1 - correlates to the clear 4 intent on the mission intent map
TAI 2 - correlates to the screen / clear 3 intent on the mission intent map
TAI 3 - correlates to the secure intent on the mission intent map
Tai 4 - correlates to the secure 5 intent on the mission intent map
NAIs:
NAI 1 - correlates to the secure 1 intent on the mission intent mapNAI 2 - correlates to the clear 2 intent on the mission intent map
NAI 3 - correlates to the clear 2 intent on the mission intent map
NAI 4 - correlates to the screen / clear 3 intent on the mission intent map
NAI 5 - correlates to the secure 5 intent on the mission intent map
NAI 6 - correlates to the Screen / clear 3 and secure 5 intent on the mission intent map
Task assignments, action and effect:
Tasks:
Task 1
Establish a Fire base at KT 1 or KT 11Task 2
Clear KT 2Task 3
Clear KT 4Task 4
Secure KT 9Task 5
Secure KT 6Task 6
Execute a scouting manouvre to KT 4, KT 7, KT 10 , AA 4Task 7
Secure KT 10Task 8
Secure KT 5
// Next is some COA so the next is mostly some what ifs and what to do.. So, cheers till then -
Threat Evalutaion:
Now for some guestimations, the Scenario is vague at best on the force composition, the more fun for us as the attacker, all we know is that they have AT capabilities and that they overlook the road ahead of us..
Enemy composition:
Most likely it consists of an infantry company reinforced with AT assets and HMGs, we estimate that the enemy numbers atleast a company due to the size of the AO and objectives.The chance of encountering Chevaux-de-frise. is low, we can't discount it however considering the frequent use of it by the Germans. There are some areas of the map that is well suited for fortifications/fox holes.
The enemy possess AT capable of at long range destroying our T34s
The enemy has had time to prepare this ambush
Threat integration:
My best guess is that they are within the village with some scouts or mines placed a bit unsure of the mines but one can dream can't I?
Likely enemy mission:
Enemy is trying to halt our advanceThe enemy is trying to deny the road and the farmhouse by T the intersection
The enemy is to inflict casualties
Likely mission statement:
To deny the attacker the VillageTo inflict casualties
Contain us to the road AA 3
Likely associated tasks:
Identify our main axis of attackDeny the west side of the AO
Engage and destroy HVT
Preserve own combat power
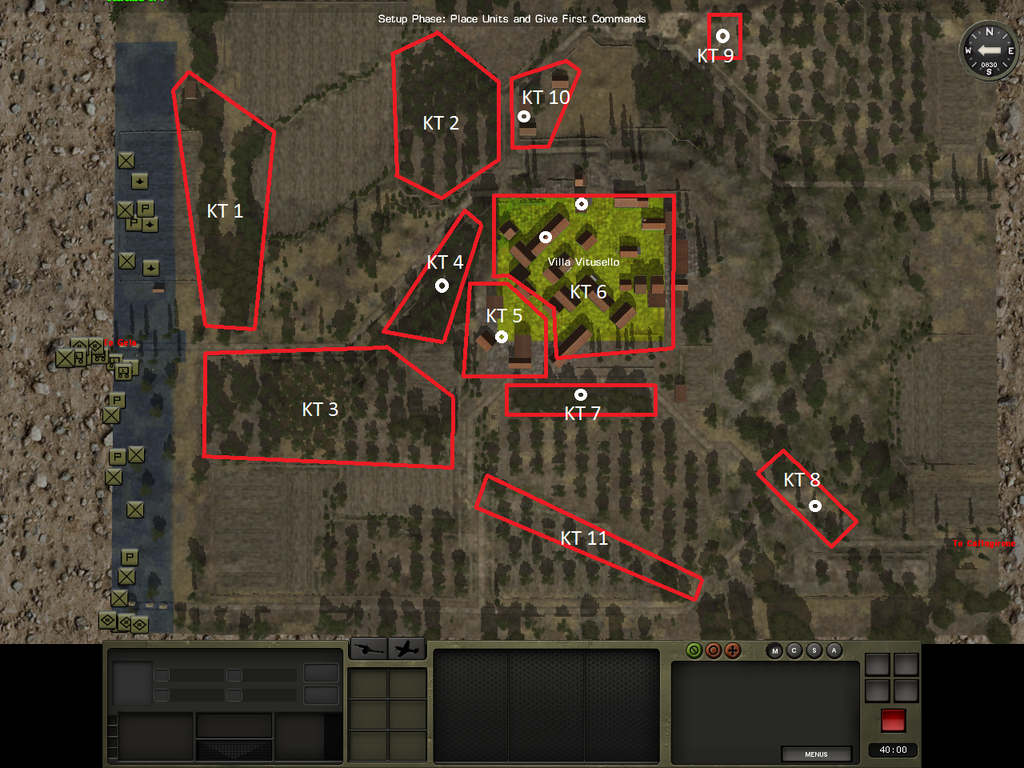
Map of EKT:

Enemy Key terrain:
KT 1 KT 1 overlooks the road AA 3 and has a field of view with good fire laneKT 2 Protects the flank of KT 1
KT 3 KT 3 the main objective
KT 4 Is in a good spot to keep controll of the center of the AO
KT 5 The 2ndary objective to have controll of the road AA 3
KT 6 A good spoot to hold since it is a good pouint for observing the wood line down south
KT 7 Has good fields of fire down at our KT 1 and covers the road
KT 8 Is a 2ndary defence line for any attacker to overcome if an attack is from the east
KT 9 Is a natural point to block off any attempt to go arround the long way
Next up is some of the good stuff before we present our different COAs
// Cheers till next .. -
The Battlefield Area Evaluation (BAE):
Wind – Medium from the north east, as it is now, deploying a smoke screen to hide our initial deployment could be a possibility since the wind is favorable. The wind could affect long distance fire since it blows from our right to left in our direction of travel.
Ground condition – Dry, since it is cool our tank movement should not be hindered considerably. And the conditions should have no ill affects on our infantry or tank engines.
Temperatures – Cool, should not have any ill affects on troops or tanks if the weather stays the same.
Visibility – Hazy, generaly it is restricted by the terrain, a problem could be to spot enemies at 400 meters and more, if a long range engagement is in order, HQ suggests not to split its forces so that the squad leader can direct fire with their binoculars.
Area of Operations (AO) – Ground analasys (OCOKA)
Observation:
Visibility is somewhat effected by the hazy weather conditions, visibility on KT 11 if viewing KT 4, KT 6 and KT 7 is good to AA 3, the exception is the wheat field AA 2.Positions from KT 4 KT 6 and KT 7 can fire at the road AA 3. KT 10 also has a good covered view to the road AA3
From KT 9 there is somewhat of an obstructed view on AA 3 but it protects the Village KT 5 from beeing unhinged.
KT 4, KT 3 and KT 2 is perfect locations for a direct path to the village since AA 1 offers great options to gain access to the village.
KT 1 is a good spot to set up a fire base and cover the infantry advancing into KT 3 and KT 4
KT 11 is not the most ideal place for an over watch position since it is to close to AA 3 which is most likely due to recent events viewed directly by and in the firing line of the enemy AT and heavier assets.
Cover and Concealment:
Hard cover is scarce, AA 4 offers obstruction with the tree line and it is a great way to get past the slopes at KT 7 which is protecting positions further down AA 4.2AA 4 goes past a lone, it offers good cover and if the enemy occupies it it can delay a flank manouvre at AA 4.
KT 4 and 7 has good concealment from troops moving up at AA 3
KT 3 offers defenders concealment from troops advancing down AA 1, this can be mitigated by taking up positions at KT 2.
KT 3 has great concealment and the terrain favours the defender, the road going through it looks like a natural trench. The position is vulnerable though.
KT 2 is behind a slope from the hill so it is a good point to clear since it offers a point from the lipp off the hill to observe the Village KT 5 and KT 10 at its south western side.
Just west of KT 7 there is a great spot to halt our advance where our position is in enfilade to KT 4.
Obstacles:
The Village itself KT 5 and KT 10 offers a signicant obstacle to our Tanks, so does the woods to the west, the ground is dry but, we have only 45 minutes to secure the objective and the risk of beeing delayed is considerable if we advance in that direction AA 4.The Area is filled with gentle slopes, the area where our tank got destroyed is in a valley its edges are KT KT 11, KT 4, KT 6 and KT 7. So we can assume that the enemy has blind spots that we can attack if we get arround that valley. So the valley itself is an obstacle for us since the enemy points its guns into it.
Map of KT:
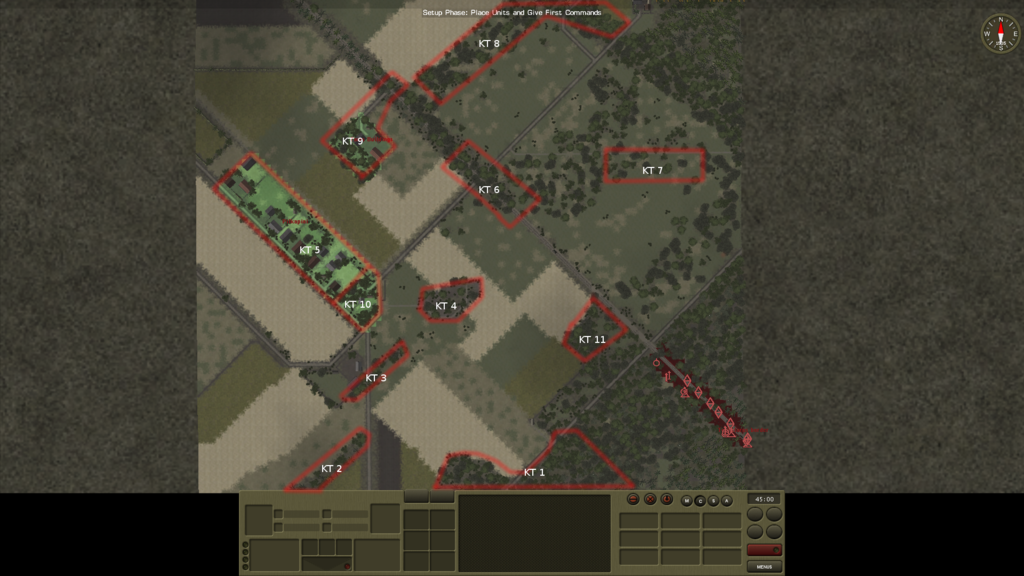
Key Terrain:
KT 1 - Offers a fire base not overlooked by positions from KT 4, KT 8 and KT 7
KT 2 - Offers a way wo flank positions at KT 3 and KT 4
KT 3 - A natural defensive trench with woods to conceal defenders
KT 4 - Overlooks AA 3 and is a good position to hold the center of the AO
KT 5 - The Village, the objective
KT 6 - A crossroads that secures access from KT 7 and AA 4.1 to KT 10
KT 7 - A Position overlooking AA 3
KT 8 - If we want to flank KT 9 from the west we must first secure KT 8.
KT 9 - Secures the road AA3 and is one of the objectives
KT 10 - A good spot to secure if we attack from AA 1 clearing KT 2 and 3
KT 11 - overlooks KT 4, KT 6 and KT 7
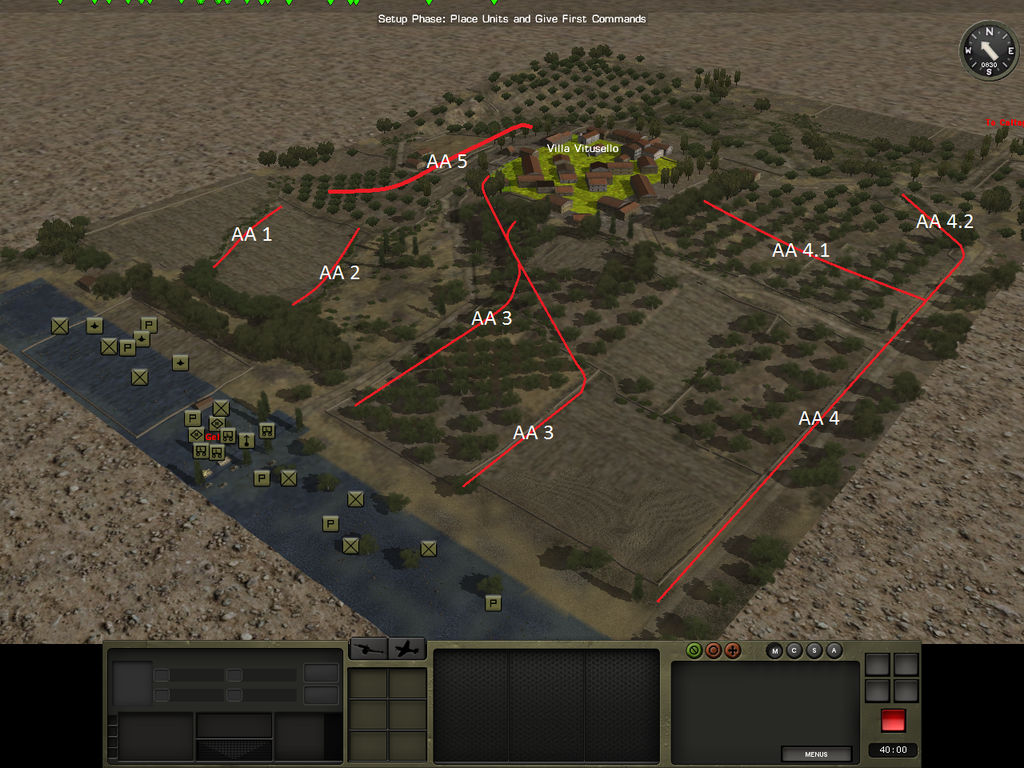
Map of AA:
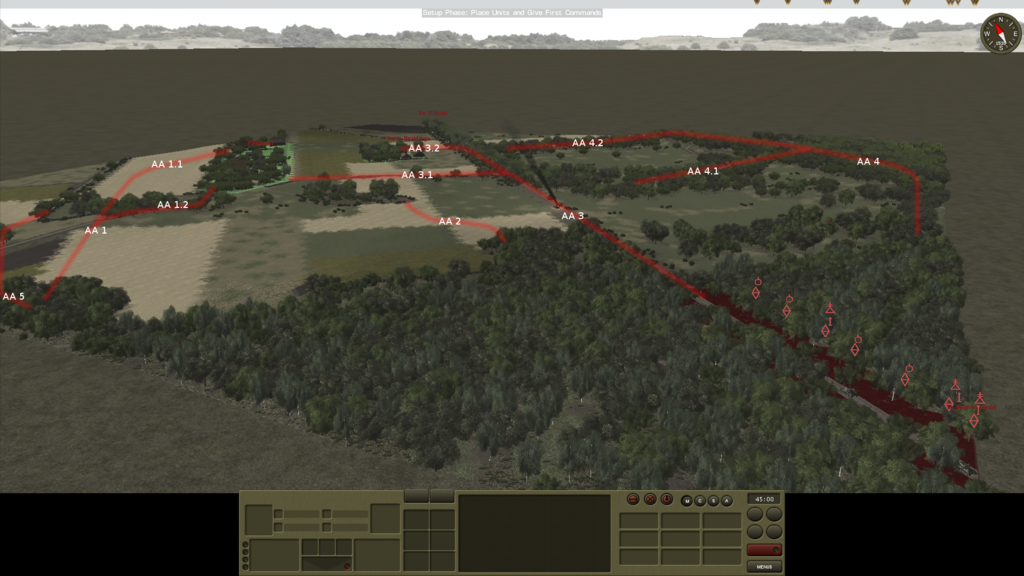
Avenues of Approach:
AA 1 - A concealed approach for a direct attack on KT 3
AA 1.1 - A concealed approach to access KT 5 and 10 from the west
AA 1.2 - A Route with a trench overlooking KT 10
AA 2 - A route with concealment to KT 4
AA 3 - A The main road with access to AA 3.1 and AA 3.2
AA 3.1 - A natural path to the Village from the east
AA 3.2 - A path to clear one of the objectives
AA 4 - A Route to the east that has options for 2 additional routes
AA 4.1 - To flank KT 7 from AA 4
AA 4.2 - To reach the objective if AA 3 is not accessible
AA5 - A route to flank KT 2 to reach KT 3 and KT 10
// Cheers till Next one -
Hi Forum!
I recently found a user made scenario I had been wanting to play for some time. So I thank Seinfledrules for it. The Scenario is AD into Lithuania. I must admit, I have been oogling it for some time now so when a bit of extra time was presented this weekend who was I to refuse.. So without further stalling:
Situation
July the 9th 1944, following the capture of Minsk our unit is driving into Lithuania, operating on a road on route to Vilnius. Our Companys lead tank is suddenly hit and brews up in an explosion. After contacting our head quarters the situation is made clear to us: It has been deemed possible for our company of T-34s and attached infantry to attack; Orders are to clear the village of Pilpakiai of German defenders, and see to it that the rest of our forces can advance along this road to Vilnius.Mission
Our orders are to Seize and Occupy the Village of Pilpakiai and a farm complex near the road to Vilnius. We are ordered to deploy, assess and attack where it is deemed necessary. As everything is assembled total combat time is calculated to arround 45 minutes.Execution
The enemy is at unknown strength, orders from HQ is that a two wave attack is best adviced so that our company of tanks can act as support assets for the infantry company.The enemy is most likely defending the T intersection and Village to deny us road access and has praobably deployed several antitank and machinegun assets in the surrounding terrain with a good field of view on the road.
Accounting for the German Doctrine it can be assault guns covering the road. So be prepared for the tanks to engage armor.
Our company of Tanks has seen some losses.
We are likely not receiving any reinforcements and so are the Germans,we do however need the infantry to have a reserve in case the Germans are reinforced.
Enemy force composition is unclear, estimating the size of the Village and the Germans will to defend and based on the previous month asses that the enemy fields atleast a half strength infantry company (we assume full strength though), light fortifications (foxholes at best, if any) and AT and heavy machineguns overlooking the road.
We will make no attempt to splitt forces.
The enemy is defending the village so most of them vill be centralised arround the objectives.
The infantry attacement is well motivated for an assault and is likely to stay in the fight once commited, that is, if it is not strained or pummeled before the enemies main line of resistance is found and engaged.
Our Forces Consists of:
3rd Company HQ: Galimov
Regular, Rested, Good Command, Ok1st platoon HQ: Salamatin
Regular, Rested, Good Command, Good motivation, Ok1st Medium Tank: Chalov
Regular, Rested, good motivation, Ok2nd Medium Tank: Kapitonov
Green, Rested, exceptional motivation, Ok2nd Platoon HQ Tank: Aushev
Regular, Rested, Good Command, exceptional motivation, Ok1st Medium Tank: Ryleev
Regular, Rested, Ok2nd Medium Tank: Gamzulin
Regular, Rested, Good Command, exceptional motivation, Ok1st Company INF HQ: Terekhov
Regular, Rested, exceptional command and motivation, OkSniper Team: Parshin
Veteran, Rested, exceptional command, Ok2nd Platoon HQ: Novozhilov
Regular, Rested, good command, exceptional motivation, OkSniper Team: Asafyev
Veteran, Rested, negative command, good motivation, Ok2nd Squad: Dudarenko
Green, Rested, good command, Ok3rd Squad: Kagantsev
Regular, Rested, good command, good motivation, Ok1st platoon HQ: Skuratov
Regular, Rested, Exceptional motivation, OkSniper Team: Petrukhin
Regular, Rested, good motivation, Ok2nd Squad: Nazarov
Regular, Rested, exceptional motivation, Ok3rd Squad: Kalyugin
Veteran, Rested, exceptional command and motivation, OkMap Top View:
Map Tilted View, Top: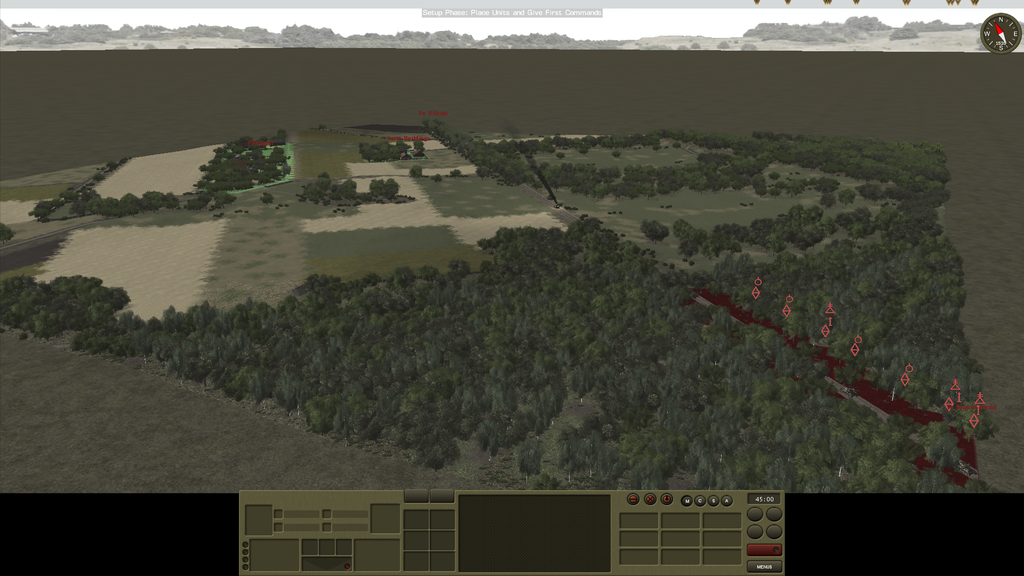
Until next post // Cheers -
TAIs and NAIs
Some Thoughts:
Now, we are nearly done with the pre battle planning.. I have decided that the 3rd platoon will advance on AA 3 and the first platoon will secure KT 1 and KT 2 to await further order. Both platoons will scout ahead to pre planned locations. Fire missions is also planned I am firing wildly into TAI 4, but, I am considering German doctrine here, there ought to be something from the Village covering the road (AA 4) a AT gun or a STUG variant. It would be so German it is almost criminal if there is not anything there. So I am throwing a quick fire mission there and will pray to the pGods that there is something there considering that we only have arround 5 minutes of indirect fire. It is however a considerable gamble, and I am not happy about my decision to do it. But I do feel that it is such a good spot. And if there is nothing there at least we have attacked a perfectly good brick wall.
My preliminary assesment of how to divide my assets untill the enemy disposition is known:
NAI 1 correlates to the secure 2 intent on the mission intent graph
NAI 2 correlates to the secure 2 intent on the mission intent graph
NAI 3 correlates to the clear 3 intent on the mission intent graph
NAI 4 correlates to the secure 4 intent on the mission intent graph
NAi 5 correlates to the Secure 1 intent on the mission intent graph
TAI 1 corralates to the secure 2 and secure 1 intent on the mission intent graph
TAI 2 Correlates to the secure 4 intent on the mission intent graph
Tai 3 correlates to the secure / Screen 5 intent on the mission intent graph
TAI 4 correlates to the secure 4 and secure/screen 5 intent on the mission intent graph
TAIs
TAI 1 - This is a ‘secure’ effect , this can be accomplished by our indirect firing assets
1st section, 2nd team,
1st platoon, 3rd Squad: Houston
Veteran, negative command, Rested, Ok
TAI 2 - This is a ‘Clear’ effect this can be accomplished by our indirect firing assets and tank fire and then a quick follow up of armored units along AA4 to the T intersection.
1st section, 3rd team
11/66th Tank Req HQ: Sieland
Veteran, negative command, exceptionally motivated, Rested, Ok.
1st Squad: Kramer
Veteran, motivated, Rested, Ok
TAI 3 - This is a ‘Clear’ effect this can be accomplished by our Tank assets, since the enemy probably will have heavier assets stationed there
1st Platoon HQ: Carollo
Veteran, motivated, good command, Rested, Ok
1st Medium Tank: Xavier
Veteran, exceptional command, Rested, Ok
2nd squad: Mckee
Veteran, exceptionally motivated, Rested, Ok
TAI 4 - This is a ‘Clear’ effect this can be accomplished by our indirect firing assets
1st section, 1st Team
2nd Platoon HQ: Smith
Veteran, motivated, Rested, Ok
1st Squad: Kramer
Veteran, motivated, Rested, Ok
2nd squad: Mckee
Veteran, exceptionally motivated, Rested, Ok
3rd Squad: Sowden
Veteran, motivated, well led, Rested, Ok
E Company HQ tank: Eagle
Veteran, exceptionally motivated, Rested, Ok.
1st Medium Tank: Pinard
Veteran, good command, Rested, Ok
NAIs
NAI 1 - This is a ‘Clear’ effect this can be accomplished by 1st platoon
1st Platoon HQ: Glessen
Veteran, exceptionally motivated, Rested, Ok
1st Squad: Kaminsky
Veteran, motivated, Rested, Ok
2nd Squad: Yates
Veteran, motivated, Rested, Ok
3rd Squad: Houston
Veteran, negative command, Rested, Ok
4th platoon HQ: Rock
Veteran, Rested, motivated, Ok.
1st jeep team: Gwin
Veteran, Rested, motivated, Ok.
2nd HMG Team: Todd
Veteran, exceptional command, Rested, Ok.
NAI 2 - this is a clear effect this can be accomplished by 1st platoon
1st Platoon HQ: Glessen
Veteran, exceptionally motivated, Rested, Ok
1st Squad: Kaminsky
Veteran, motivated, Rested, Ok
2nd Squad: Yates
Veteran, motivated, Rested, Ok
3rd Squad: Houston
Veteran, negative command, Rested, Ok
4th platoon HQ: Rock
Veteran, Rested, motivated, Ok.
1st jeep team: Gwin
Veteran, Rested, motivated, Ok.
2nd HMG Team: Todd
Veteran, exceptional command, Rested, Ok.
NAI 3 - this is a clear effect this can be accomplished by 3rd platoon
3rd Platoon: Savage
Veteran, exceptionally motivated, good command, Rested, Ok
1st Squad
Veteran, motivated, Rested, exceptional command, Ok
2nd Squad: Boggs
Veteran, motivated, Rested, Ok
3rd Squad:
Veteran, motivated, good command, Rested, Ok
1st Jeep Team: Truppner
Veteran, motivated, Rested, Ok
NAI 4 - this is a secure effect this can be accomplished by 2nd platoon
2nd Platoon HQ: Smith
Veteran, motivated, Rested, Ok
1st Squad: Kramer
Veteran, motivated, Rested, Ok
2nd squad: Mckee
Veteran, exceptionally motivated, Rested, Ok
3rd Squad: Sowden
Veteran, motivated, well led, Rested, Ok
2nd Jeep Team: Novak
Veteran, motivated, Rested, Ok
NAI 5 - this is a secure effect this can be accomplished by 3rd platoon
1st Platoon HQ: Glessen
Veteran, exceptionally motivated, Rested, Ok
3rd Squad: Houston
Veteran, negative command, Rested, Ok
4th platoon HQ: Rock
Veteran, Rested, motivated, Ok.
1st jeep team: Gwin
Veteran, Rested, motivated, Ok.
2nd HMG Team: Todd
Veteran, exceptional command, Rested, Ok.
3rd Platoon: Savage
Veteran, exceptionally motivated, good command, Rested, Ok
1st Squad
Veteran, motivated, Rested, exceptional command, Ok
2nd Squad: Boggs
Veteran, motivated, Rested, Ok
3rd Squad:
Veteran, motivated, good command, Rested, Ok
COURSES OF ACTION
gro This all depends on my inital scouting, but I have 4 COAs ready and the COA is decided when we have established how the enemy is dispositioned and where his main are of resistance is. The COA is as follows:
COA 1 - Left
COA 2- Frontal
COA 3 - Right
COA 4 - Heavy right
Next post will be the first minutes of action, I feel that this is enough and the next step must be decided by a swift and broad scouting action.
Untill next post // Cheers
-
Hi Forum!
First of, thanks for all the kind words.. feel free to comment or add in if I miss something, I have grown a tad bit fond of my pTruppen and would disslike to see them getting murdered because of my poor judgement. Without further stalling:
So, here it is, the third question, my intent for this bout. I have an idea allready that the heavy fighting must be carried out by the third platoon, 1st platoon is fairly weak in morale. When splitt the problem of motivation is all the more apparant.
My reasoning so far is to have them set up a fire base at KT 1, and scout, keeping most of the squads unsplitt so that they can all benefit from the squad leaders and its half decent platoon HQ compared to the rest of the platoon.INTENT GRAPH:
IntentSecure 1 – To create a staging area to assault the village
Secure 2 – To flank the village
Clear 3 – To deny the enemy the main objective and defeat the enemies main effort
Secure 4 – To flank the village
Screen 5 – To Screen to the north to watch out for enemy reinforcements
My focus for the early stages will be to evaluate the enemy presence, I am hoping that they dont oversee the open ground separating KT 1 and KT 2 and if they dont have units in KT 4, mainly the wall the tanks and heavy assets supporting first platoon can lay down heavy fire on the main objective and a group of three houses which has fields of fire at the ground separating KT 1 and KT 2.
This is all guess work, so only my Recce can give me some ansvers so the PIR is as follows:
PIR:
Where the enemy has its main effort
Where the enemy forward units is
The trafficability of AA 4
// Untill next post with some TAINAI action so, Cheers -
Seems like it'll be a very interesting DAR. I'm looking forward to it.
Thanks for the kind words.
"..Welcome to the forums, will be following this. .." - Rinaldi
Thanks, I feel like this is a welcoming place for new ppl -
Great stuff Iktah!
Very impressive
")
Thanks ^^ Glad to hear it. Been thinking about the specified tasks required and here is the first draft:
As a side note, I am looking forward to this battle since I quite frankly like the map, it is... interesting to say the least so a great jobb to the one who made the Scenario.
Next step is to; Analyse Tasks
Task 1
Secure/Clear KT 1 and KT 2 – Establish a fire base and send scouts to KT 2Task 2
Secure KT 10 – Secure KT 10 and seize it if the enemy has a presence thereTask 3
Scout/Clear – Scout and secure KT 4Task 4
Assault – Assault KT 5 to secure the entrence to the village (KT 6)Task 5
Assault KT 7 – Assault KT 7 to secure the East flank of the village (KT 6)Task 6
Scout KT 8 – Once the T intersection is reached, we need eyes on KT 8Task 7
Secure KT 8 – Once the scouts has given us sufficient information of KT 8 it is time to seize itTask 8
Secure KT 6 – Once the main enemy lines of resistance is found and KT 5 and/or KT 7 and/or KT 10 is secure an assault can begin.Task 8 Determine Freedome of Action;
I must secure the Village KT 5 KT 6
I can’t cross my boundaries (AO)
I have freedom of action within the AO (the map)
Identify critical facts, judgements and assumption;
Critical Facts:
The enemy is at reduced company strength
The enemy will receive reinforcements of tanks/mechanized
There is an enemy presence in the Village KT 5 and KT 6
We have a full ammunitions load
I have only 3 mortars
I am bound within the AO
Judgements:
There is an enemy presence in KT 5 and 6
There is probably heavy weapons assets at KT 9 and KT 7 KT 10 KT 8
We have around 5 minutes of mortar fire
We have enough fire power and munitions to suppress targets within LOS
Assumptions:
The enemy is around Company Strength
The enemy is reinforced with at least half a platoon in Mechanized and tank assets
There are no or few man made obstacles in the AO
The enemy is likely to have enough ammunitions for a sustained defense
-
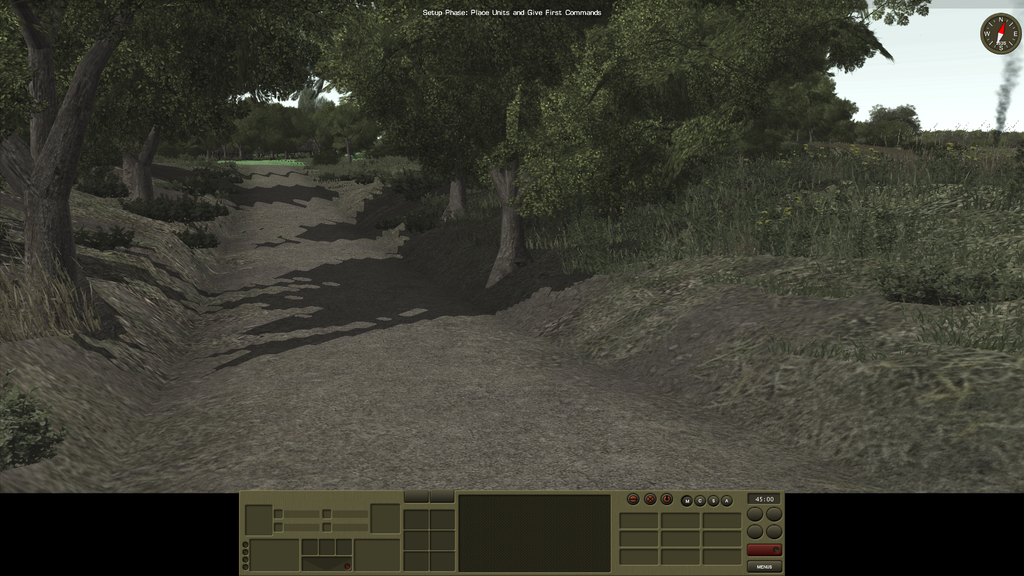
To give some points of perspective before we go any further..
View, my left flank
View, my right flank
 Top view, behind KT 8
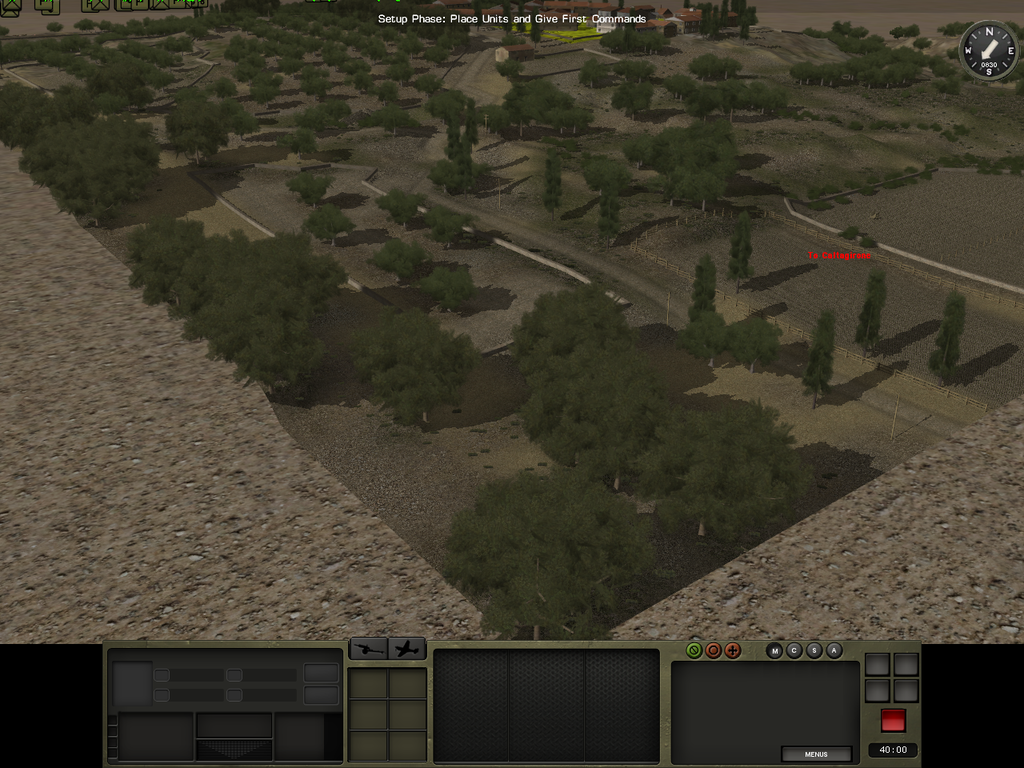
View, behind KT 9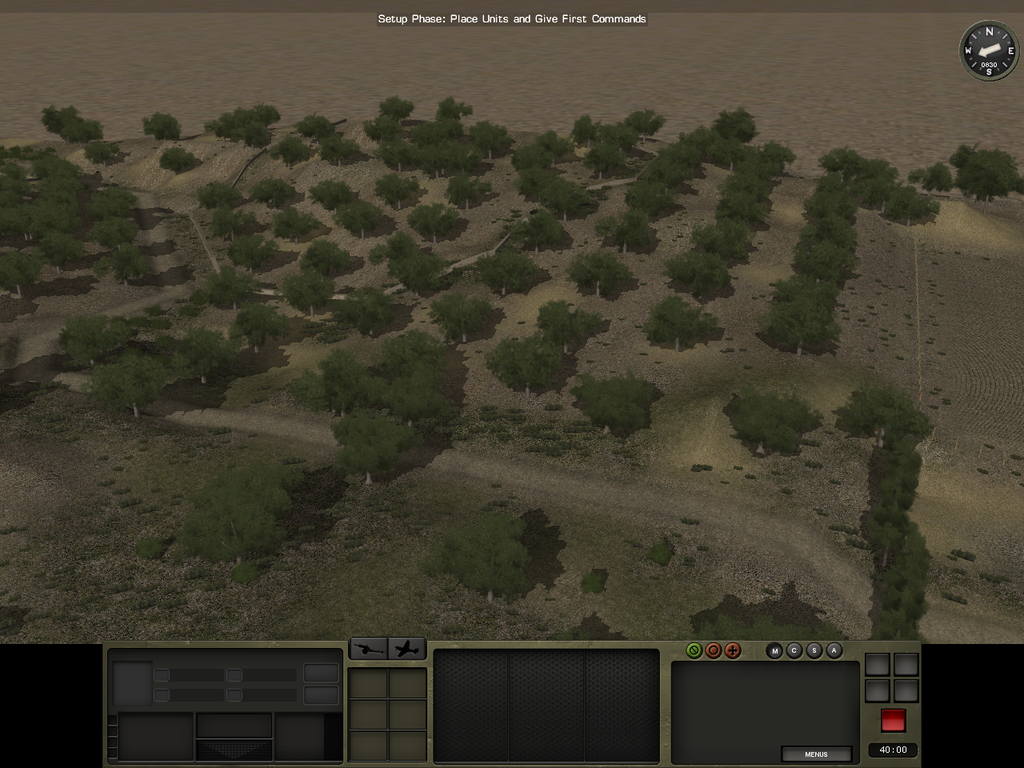
-
..To kick things off here is my first steps of designing my plans for this engagement..
Battlefield Area Evaluation (BAE)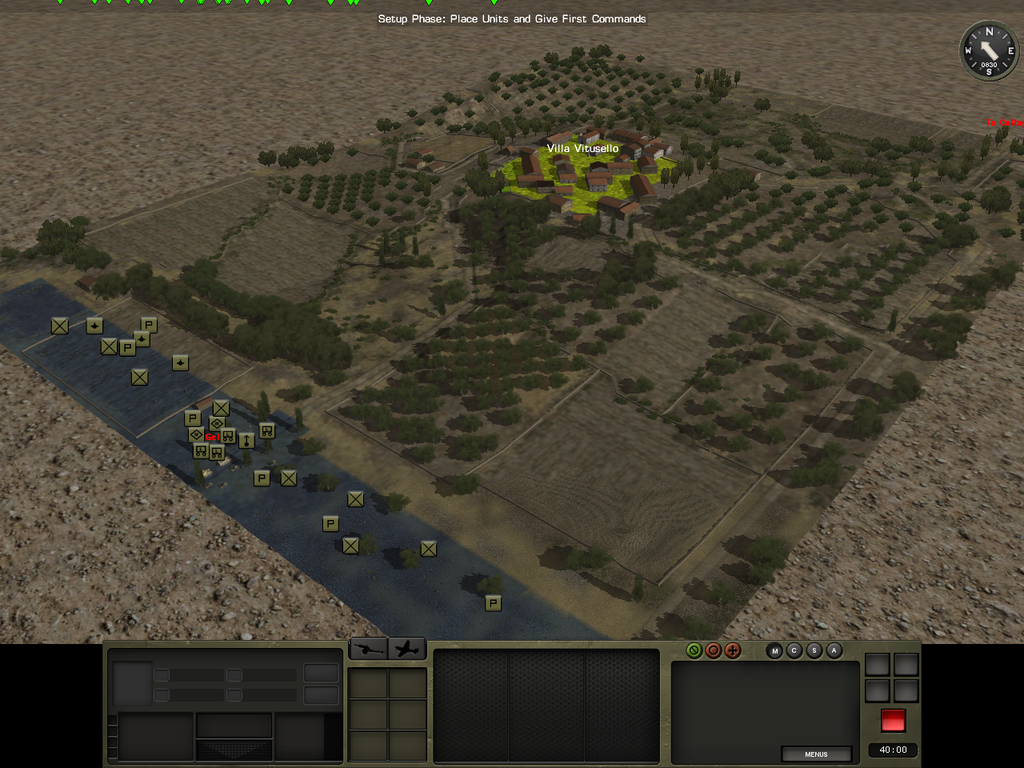
NOTES:
Ground Conditions – No overcast or heavy winds means that the terrain is dry, so moving our vehicles off road should not pose any serious problem if we mind our speed
Wind Direction- The weather is mild, we won’t deploy artillery or large smoke screens for this engagement so this will not hinder us in any way. Long range accuracy won’t be considerably affected either by heavy winds
Temperatures – Should have no ill effects on troops or vehicles.
Visibility - is generally good under these conditions.
Area of Operations (AO) – Ground Analysis
Key Terrain
Avenues of approach
Observation:
Visibility is good, the exception is the woods and trees scattered about that limits LOS to around 400 meters and positions behind the village is not visible at the start of the engagement. KT 1, KT 10, KT 7 and KT 8 is vital to establish an all-round field of view and fire bases with good visibility to KT 6.
Cover and Concealment:
From the woods, designated KT 3, over at KT 4 there is a wall near the edges of the west side which is excellent enemy defence points that overlooks the field separating KT 1 and KT 2 with only minor obstruction in visibility by some trees and gentles slopes. This is an excellent field of fire for the defenders. We have an option to set up our own units in over watch at KT 1 with good fields of fire on those positions.
Key terrain 9 overlooks the fields separating KT 1 and KT 2, KT 4. And the elevations behind it offers Good over watch positions to KT 8 and 7 and parts of KT 6.
The hilly terrain at KT 8 is an excellent point for hull down tanks, it is from there that most of our tanks once there will await the enemy armor or most likely is that our own armor can expect the enemy to already have AT assets there, advance with caution. There is also a T intersection down south leading up to KT 8 AA 4 which is a good spot for armor to be able to traverse if the need arise to fire at the south most buildings in KT 6.
AA 4 and AA3 offers hard cover and concealment for our infantry, AA1 and AA2 offers concealment when advancing
KT 11 is excellent positions for advancing infantry moving into KT 7 from AA 4 and offer a mix of hard cover and concealment. It also fairly close to KT7 so tanks can support the advance from AA 4 if needed.
Obstacles:
Apart from the village itself no real obstacles is present, the exception is that some terrain to the west of the village and the town itself is not ideal for out tanks to cross into. Fields of fire is generaly only around 300 meters due to the scattered tree formations.
The Woods at KT 3 offers a natural obstacle and is our natural point from which we can probe the village defences from.
Key Terrain:
KT 1 – offers us an initial Fire base that overlooks likely enemy positions at KT 6 and KT 4
KT 2 – offers an obscured path to KT 10 which defends KT 6 from a flanking manoeuvre
KT 3 – a natural path from our deployment area to KT 5 and KT 4
KT 4 – offers and additional path into KT 5 and KT 6 and is also a prime occupant of enemy infantry
KT 5 – a series of three buildings which protects entry from KT 3 and KT 4
KT 6 – the main objective and the brunt of the enemy force will most likely be there
KT 7 – sits ideally to over watch AA 4 and protects the flank of KT 5 and KT 6 also has ideal hard cover
KT 8 – protects the rear of the town most likely an enemy assembly area for armor
KT 9 – a good spot to over watch the fields between KT 1, KT 2 and KT 4
KT 10 – a strongpoint that can contain heavy enemy resistance
Avenues of Approach:
AA 1 – a rout with concealment from the town and surrounding areas
AA 2 - a rout with concealment from the town and surrounding areas
AA 3 - a rout with concealment and hard cover from the town and surrounding areas, forested
AA 4 – our main road to bring troops around to KT 11 and KT 8 to assault the town KT 6 and KT 7
AA 4.1 – The rout to approach the town to KT 7
AA 4.2 – The rout from AA 4 to approach KT 8
AA 5 – To encircle the village
Threat Evaluation and Enemy Composition
The enemy is probably a reinforced company with 85%-90% of their initial combat Strength. Enemy reinforcements will most likely consist of enemy armor and halftracks and will be the brunt of the enemy combat strength.
Enemy Tactics
The enemy is most likely fighting to delay our advance
The enemy needs reinforcements to hold the village
The enemy most likely has placed scouts 100 to 150 meters at key locations facing our advance.
The enemy, we guess, knows we are trying to encircle it and will deploy accordingly
Enemy supplies could possibly be low since we have driven them forward deep into Sicily.
High Value Targets (HVT)
Enemy reinforcing Combined Arms Force - The enemy reinforcements is our most high valued targets, since it is mostly mechanized, one key mission is to find ground suitable to ambush them from when they are moving into the area surrounding the town.
Enemy Strongpoints AT assets and HMGs - Enemy units at KT 10, KT 5 and KT 8 is also considered high value targets since they occupy such valuable ground and will most likely contain the AT or HMGs.
3 – Threat Integration
Likely Enemy Mission:
Enemy is fighting a delaying action
The enemy is to deny the town
The enemy is to inflict casualties and hinder out advance
Likely mission statement:
The enemy company is to deny the attacker the village
The enemy company is to inflict casualties
The enemy company is to deny any flanking action by the attacker
The enemy has orders to hold until relieved
Likely associated tasks would be:
Identify and track main axis of attack
Delay the attacker
Engage High value targets identified by scouts
Preserve own combat power
Enemy Key Terrain:
KT 5 - The access point from KT 3 and KT 4 which is my natural infantry avenue of approach
KT 6 - The Village itself since it is the objective for both sides
KT 7 - Defends the Flank of KT 5 and KT 6
KT 10 - Defends the flank of KT 6
KT 8 - oversees AA 4, AA 4.1 and 4.2
To be continued .. My thoughts now is mostly on the troops, I have some units expecially third platoon which is highly motivated, more so than 1st platoon. So I guess we will have to take the soldier experience, motivation into account in the next post.. untill then
Cheers
-
Situation
July the 13th 1943, the Company with the aid of the 66th tank battalion is moving deep into Sicily moving up rout 124 to seize a town occupied by a weakened unit from the Herman Göring Regiment, estimated to be at weakened company strength (around 10-15% loss in manpower is guessed). Weather is tolerable and will not hinder our tank movement considerably.
Mission
Our company is to seize or expel the German occupants with an encircling manoeuvre.
Execution
T company is estimated to being able to deploy safely around 200-300 meters from the village with only an enemy reinforced company guarding the village at the initial stages of the battle.
Our infantry company is well led and motivated and committed to the attack, the platoons are well rested and supplied thoroughly for the assault.
The enemy motivation is expected to be weary strong and the village well defended with heavy weapons. Some light fortifications is expected but the enemy has not likely had the time to have constructed heavy fortifications due to the German withdrawal in the area.
They are likely fighting a delaying action to bring up more troops and halt our advance further inland.
Enemy units is within striking distance from the north and may reinforce the defenders from that direction once the battle starts, these units are likely from an enemy combined arms force including at least a platoon sized element of tanks that will counterattack with mechanized elements.
We can expect the units counterattacking to be supported by artillery when the German counterattack begins.
Our Forces Consists of:
11/179th InfReg HQ
Veteran, motivated, good command, Rested, Ok
1st Jeep Team: Truppner
Veteran, motivated, Rested, Ok
2nd Jeep Team: Novak
Veteran, motivated, Rested, Ok
Operations Team: Cowher
Veteran, motivated, Rested, Ok
A Company:
A Company HQ: Tuominen
Veteran, Rested, motivated, Ok.
XO Team: LaVita
Veteran, Rested, motivated, Ok.
1st section HQ Light Mortars: Geer
Regular, Rested, Ok
1st Team: Conrad
Veteran, Rested, Ok
2nd team: Gwin
Veteran, Rested, Ok
3rd team: Prior
Regular, Rested, Ok
2nd Platoon HQ: Smith
Veteran, motivated, Rested, Ok
1st Squad: Kramer
Veteran, motivated, Rested, Ok
2nd squad: Mckee
Veteran, exceptionally motivated, Rested, Ok
3rd Squad: Sowden
Veteran, motivated, well led, Rested, Ok
1st Platoon HQ: Glessen
Veteran, exceptionally motivated, Rested, Ok
1st Squad: Kaminsky
Veteran, motivated, Rested, Ok
2nd Squad: Yates
Veteran, motivated, Rested, Ok
3rd Squad: Houston
Veteran, negative command, Rested, Ok
3rd Platoon: Savage
Veteran, exceptionally motivated, good command, Rested, Ok
1st Squad:
Veteran, motivated, Rested, exceptional command, Ok
2nd Squad: Boggs
Veteran, motivated, Rested, Ok
3rd Squad:
Veteran, motivated, good command, Rested, Ok
4th platoon HQ: Rock
Veteran, Rested, motivated, Ok.
1st jeep team: Gwin
Veteran, Rested, motivated, Ok.
2nd HMG Team: Todd
Veteran, exceptional command, Rested, Ok.
11/66th Tank Req HQ: Sieland
Veteran, negative command, exceptionally motivated, Rested, Ok.
1st Platoon HQ: Carollo
Veteran, motivated, good command, Rested, Ok
1st Medium Tank: Xavier
Veteran, exceptional command, Rested, Ok
E Company HQ tank: Eagle
Veteran, exceptionally motivated, Rested, Ok.
1st Medium Tank: Pinard
Veteran, good command, Rested, Ok
Notes
Scoring is based on loss of manpower (mostly my own objective) and that no German units occupies the town.
-
Hi Community!
Lately I have been getting really into CM, and this is not a small amount of "getting into" It is worse than any man-crush or fem-crush imaginable. My first conundrum was to pick a scenario, and wrestling with the decision to do an AAR on the forums or just badger friends with how great this game is and my ideas for a mission. I finally convinced myself to give AAR a go.. But I had already played most of the games scenarios and a big part of CM for me is to plan for an engagement and the unknown.
A quick solution came to mind because I quickly turned to my good friend Google, he told me about a new thing called the scenario depotIII and a thing called a few good men and greenasjade.
I was thrilled…
After careful consideration I found a new scenario with both Bon Giorno and Tomahawk in its name. Some might call it a bit childish, but I am okay with it as I am sometimes finding myself being drawn to names and a good cover art over a deeper read through of the content.
After a quick download I fired up the game and the process began.. MDMP.. here we go.. that process took about 4 hours and mind you it still is only a rough sketch and I must give a shout out to combatintman for the rehash of the formula.
This AAR follows a rough idea of how I want the presentation to be like, so this is more of a plan, execute and show tid bits of action as the battle unfolds. So without further stalling here it is..


")


DAR - AD Into Lithuania
in Combat Mission Red Thunder
Posted · Edited by Iktah
Not doing it would be no fun ^.-
Glad you like it, and I will be, after I am done offcourse, do my part and write a review of the scenarios so that other future downloaders can get a feel for the scenario before downloading.
I found the scenario by having a buddy tell me about yours and the reputation of your maps beeing good and well thought out.
But user input was lacking, so, count on it.
The next scenario I am looking at is also one of yours.. ^^
I am really impressed with the map so far, it is, well, interesting and feels genuine, not like some maps that feels constructed somehow.
It offers a fair ammount of flexibility for the attacker, I might not have it all nailed down but I see it having replayability. I am now only starting the scenario but I have a good feeling about it.
// Cheers