Combatintman
-
Posts
5,065 -
Joined
-
Last visited
-
Days Won
68
Everything posted by Combatintman
-
 Bill, thanks for that - so unless I'm mistaken, while Baneman has more points to spend it seems you have the advantage because you only need to deny him parts of Phase Line 2 and all of Phase Lines 3 and 4 to win. Added to that, to reach Phase Line 2 he has to cover 2.2km in 90 minutes ... I'm glad I declined your challenge!!!!
 -
Bill - it goes without saying I am enjoying this. Can we dial back a bit - first of all the mission which you stated in an earlier post was ... MISSION: Word from higher HQ is to delay and attrit, the enemy if he chooses to attack through my AO, applying stiffer and stiffer resistance as he penetrates the zone. There can be no withdrawal out of this zone, we will hold to the last man or tank. Secondly (related to the mission) the ground. From my understanding terrain objectives are spots along Phase Lines however I don't know their values. Third - time and distance. I would find it really useful if you could expand on your understanding of casualty and terrain objective values plus your understanding of how long you think it will take Baneman's troops and vehicles to reach each objective so that I can visualise potential COAs better.
-
You're trying though ... that is the important bit - keep at it - I'm sure that your stuff will turn out great.
-
BATTLE DRILL - A CM Tactics Blog
Combatintman replied to Bil Hardenberger's topic in Combat Mission Battle for Normandy
I'm not Bill, but can offer some generic advice given that each situation will be unique. The trick (as with many CM problems) generally is suppression, obscuration, aggression and synchronisation. First of all you need to secure the important areas on the home bank and in particular any spots that give you good overwatch. Once you've done that you need to hammer likely defended areas close to the crossing point and once you think you've achieved suppression, chuck some smoke around and send your lead element across. Generally once you've got the lead element across you've pretty much solved the problem so long as it is strong enough to look after itself for a short while and you don't do anything dumb with it. -
Don't know ... test and experiment - it is all about the thresholds you need to achieve the desired result.
-
But yours aren't far off mate.
-
Then all you need to do is have part of your enemy force as reserves that do not arrive (additional to those that you already have planned for your scenario) - if your scenario is 2 hours long set the arrival time of three hours. This group (which can't be killed) will mean that the enemy will not surrender (so long as you make the group big enough).
-
As Bud-B says - the best mechanism is to use a 'Preserve' Objective. The VP allocation is entirely your choice but clearly to achieve the effect you want you will need to balance the points value you assign it against other points values you have allocated. You may need to experiment a little with this. For guidance on how VP calcs work, refer to the manual which explains the various ratios for the victory point levels. Some helpful soul has produced a VP calculator which may make this process easier although I can't find the link right now.
-
CMSF Original Disk but Can't Install
Combatintman replied to huhr's topic in Combat Mission: Shock Force Tech Support
Have you tried looking here: http://www.battlefront.com/index.php?option=com_content&task=category§ionid=5&id=41&Itemid=378 -
Yemen Yemen probably.
-
SeinfeldRules Scenario Thread
Combatintman replied to SeinfeldRules's topic in CM Red Thunder Maps and Mods
At first look I'm guessing my scheme of manoeuvre from 'Assault Position' ain't going to work this time!!! I'll give this a spin when I can. -
They'll be too drunk to care today ... winning the Rugby World Cup and beating the Aussies to boot will stop them from worrying about the wind in Wellington.
-
Confused about soft factors (very confused)
Combatintman replied to markshot's topic in Combat Mission Battle for Normandy
No he shouldn't. As a starter for ten ... My understanding of 'doctoral stuff' requires the research to be of a high standard, to be publishable and subject to peer review. The link above indicates that he's not crossed the line. -
Nope - I think Op GLACIER 4 is an amalgamation of Op GLACIER's 3 and 4, I seem to recall making a note to that effect somewhere in the orders for the Op GLACIER 4 mission. It is either that or Op GLACIER 3 wasn't really worth converting into a CMSF mission.
-
Hindu Kush ... don't know - afghan terrain yes ... I have posted a number of scenarios based on UK ops in Helmand to the repository. http://www.battlefront.com/index.php?option=com_remository&Itemid=314&func=fileinfo&id=2507 http://www.battlefront.com/index.php?option=com_remository&Itemid=314&func=fileinfo&id=2495 http://www.battlefront.com/index.php?option=com_remository&Itemid=314&func=fileinfo&id=2468 http://www.battlefront.com/index.php?option=com_remository&Itemid=314&func=fileinfo&id=2611 http://www.battlefront.com/index.php?option=com_remository&Itemid=314&func=fileinfo&id=2790 This one is on fictional but typical Green Zone terrain in Helmand and reflects standard Coy ops of the time http://www.battlefront.com/index.php?option=com_remository&Itemid=314&func=fileinfo&id=3362 Some of these missions were part of my scenario design apprenticeship so they are not to the standard that I would be proud of now but they are perfectly playable and will give you an hour or two of fun.
-
QUESTION 2 – WHAT HAVE I BEEN TOLD TO DO AND WHY? Recall that in this step, the focus was very much on our own forces and what we needed to do to succeed. As Sun Tzu said ‘If you know the enemy and you know yourself, you need not fear the results of a 100 battles’. This was broken down into 5 sub-steps: Mission Analysis Step 1 – Review the situation. Mission Analysis Step 2 – Analyse superior commander’s intent and own mission. Mission Analysis Step 3 – Analyse tasks. Mission Analysis Step 4 – Determine freedom of action. Mission Analysis Step 5 – Identify critical facts, judgements and assumptions. While all steps are important in the real world, their application in CM varies. Steps 1, 3 and 5 can be applied in their entirety to any CM problem while Step 2 generally can only be done in part depending on the amount of information available in the briefing. Most of Step 4 has only limited applicability to CM although if your victory conditions imply or state combat effectiveness (or similar) parameters then there is value in applying the step. I was pretty happy with the way this went and I was pleasantly surprised by the number of comments I saw from you about finally realising the importance of analysing your own forces in detail and it comes back to the essence of the Sun Tzu quote. In terms of tasks, I probably went a bit over the top but I did this consciously in order to demonstrate the process and to show what tasks could be teased out the problem and the mission I was given. That said, all of the tasks were relevant to the mission and they were achievable with the force that I had and in the time available. The fact that I didn’t achieve them was a fail in execute on my part, not that they were unrealistic.
-
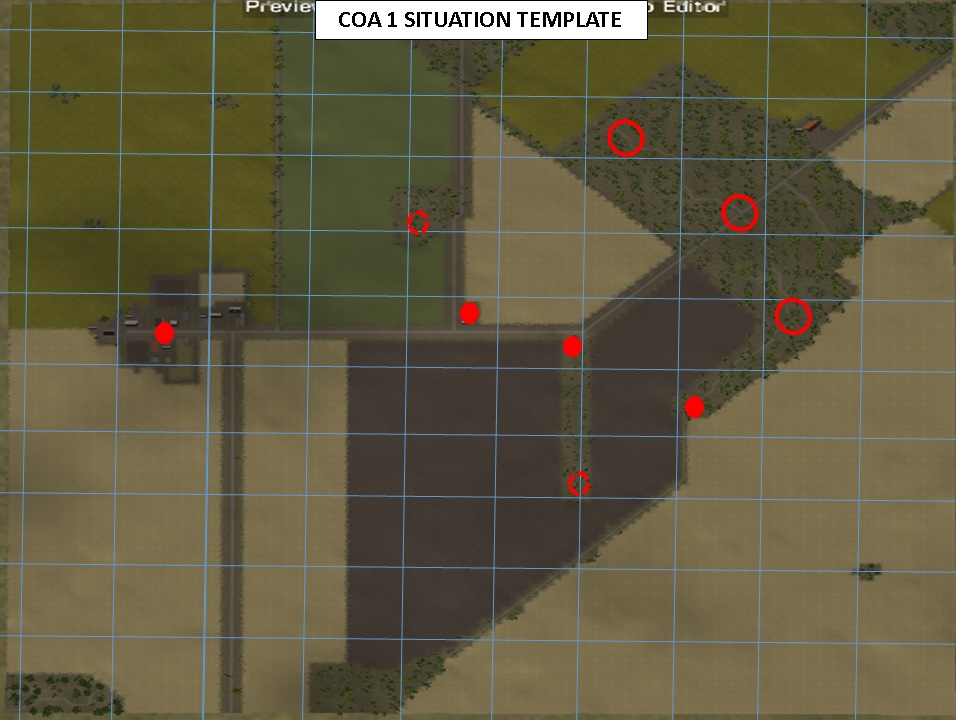
POST BATTLE ANALYSIS In many ways, despite gaining a victory, the post battle analysis is perhaps the most important part of the process. This is where we identify and learn the lessons and therefore make ourselves better equipped to face future challenges. My intent is to break this down into the various component parts starting off by picking through the various steps of the planning process. SPOILER ALERT ************************************************** QUESTION 1 – WHAT IS THE ENEMY DOING AND WHY? First of all, I would not have been able to do this justice without SeinfeldRules’ excellent explanation above of his intent for the mission as a whole, his force picks and defensive laydown. He has saved me the possibility of double guessing his intent and getting it wrong. Overall I was pretty happy with Question 1 and given that it is my day job, I was always confident that I could come up with a workable enemy picture for planning. Clearly it wasn’t 100% right but importantly it was close enough. This is an important point, not only for Question 1 but for planning as a whole. The process is about reducing uncertainty, delivering a plan that can achieve the objective and identify contingencies to deal with any curveballs as they crop up. While 99% of the time people will turn around and say something like ‘the intelligence was all screwed up’, in many instances they say this because they expect it to be 100% right all of the time – this is almost never going to be the case. So the important part about Question 1 is to come up with a workable enemy COA that can be used to drive planning. This I achieved. In terms of my terrain analysis, I was pretty happy with that but I think I really ought to have marked out the locations of the single strand wire fences. The reason I say this is that, while they don’t constitute obstacles in the formal sense, they do cause damage to tracked and wheeled vehicles. I was able to overcome this during execute by using different lead vehicles to break through fences thus ensuring that I didn’t inflict significant mobility damage. This was at the cost of having to pass vehicles through created gaps one at a time thus imposing delays. Enemy OOB analysis was made pretty easy due mainly to the well-written enemy paragraph in Seinfeld Rules’ scenario orders. He got the balance right between giving the player sufficient information to plan without giving the whole game away. There were plenty of gaps for me to fill and having to go through the thought process adds to the fun of the scenario. Again, my analysis of the enemy OOB was not bang on the money, I overestimated the enemy strength; however, this did not adversely affect the plan. The actual number of enemy was 44 in a two-section platoon with task-organised elements versus my initial assessment of 52 in a full-strength platoon with task-organised elements. So although I got it wrong, there was nothing there that caused any unpleasant surprises. The only thing I am truly surprised about (doubly so when SeinfeldRules revealed his gunner background!!!) was the absence of any indirect fire assets. I think it is better to overestimate than underestimate because it means that resourcing in Question 5 will give you significant margin for error in terms of enemy-friendly force ratios. Enemy COA analysis was pretty close to the money even though I based mine on Red Army doctrinal publications while, as you have heard, SeinfeldRules based his defensive laydown on what seemed sensible. I don’t think it was luck that our divergent approaches essentially came up with the same result. I admit that this was one of the reasons I picked this scenario as a demonstration vehicle for planning. Having played three of SeinfeldRules’ scenarios, I was confident that this one would be well put together, would offer a challenge, and have an enemy laydown and plan which would be based on sound tactics. Here was my assessed COA 1: Here is the exact laydown: Moving on to the back end of Question 1, the only other thing I want to touch on is my event template and matrix. While both were in the ballpark I do regret my conscious decision not to look at movement rates in greater detail – remember that I did run out of time!! I should certainly have examined movement rates through Main Wood at ‘hunt’ speeds and then built in a slight time fudge to give me a better appreciation of how long clearing the wood would take. In this instance, it is not that I got the process wrong or overlooked the factor, I just skimped on the detail. So that was Question 1


-
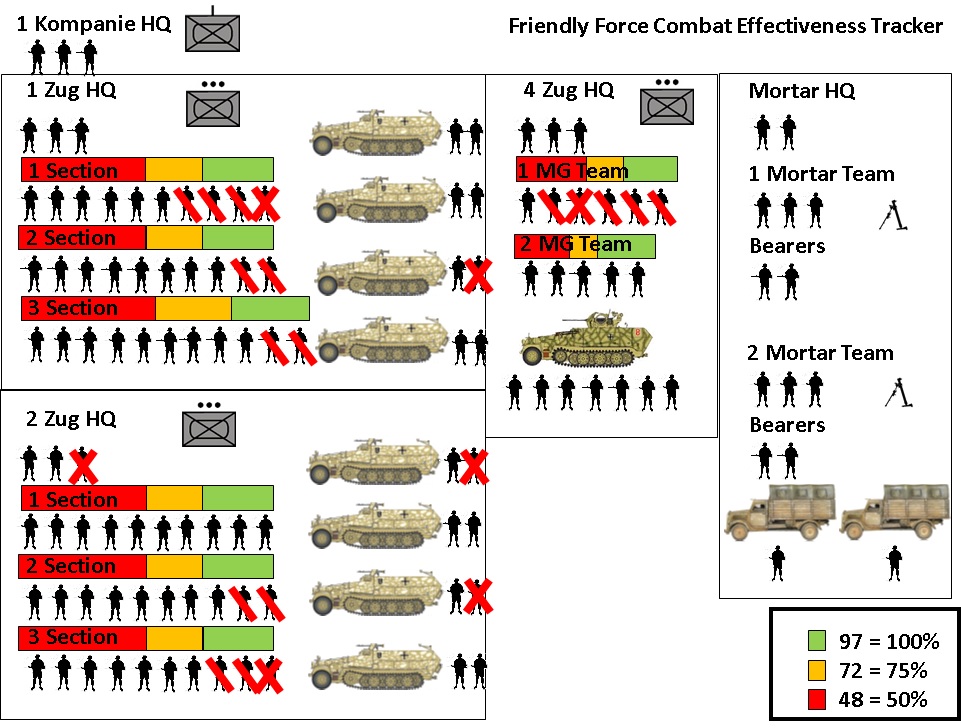
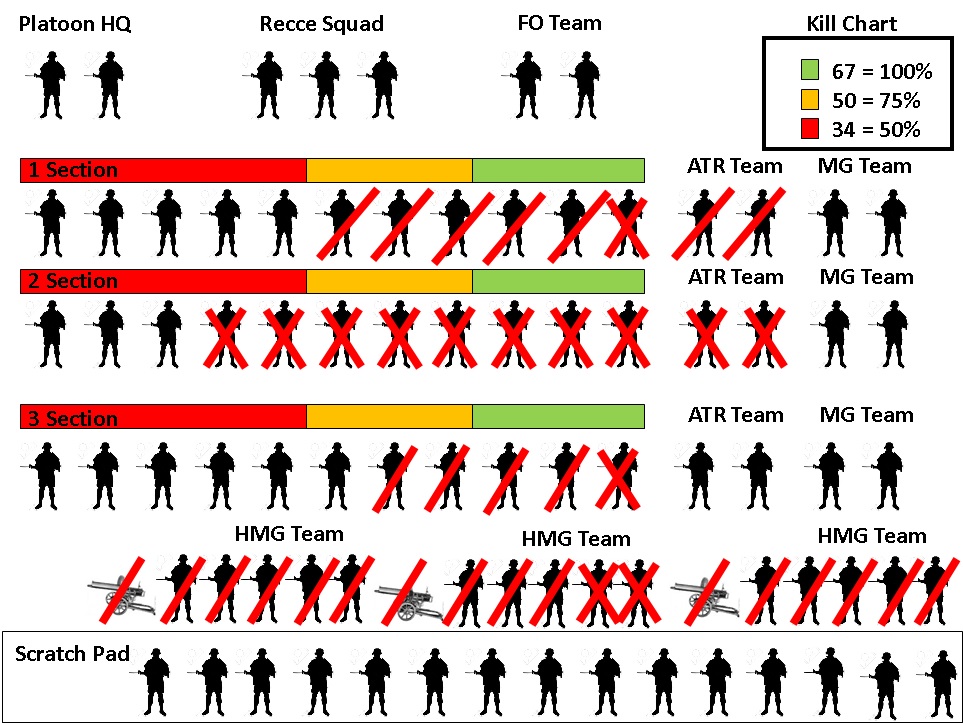
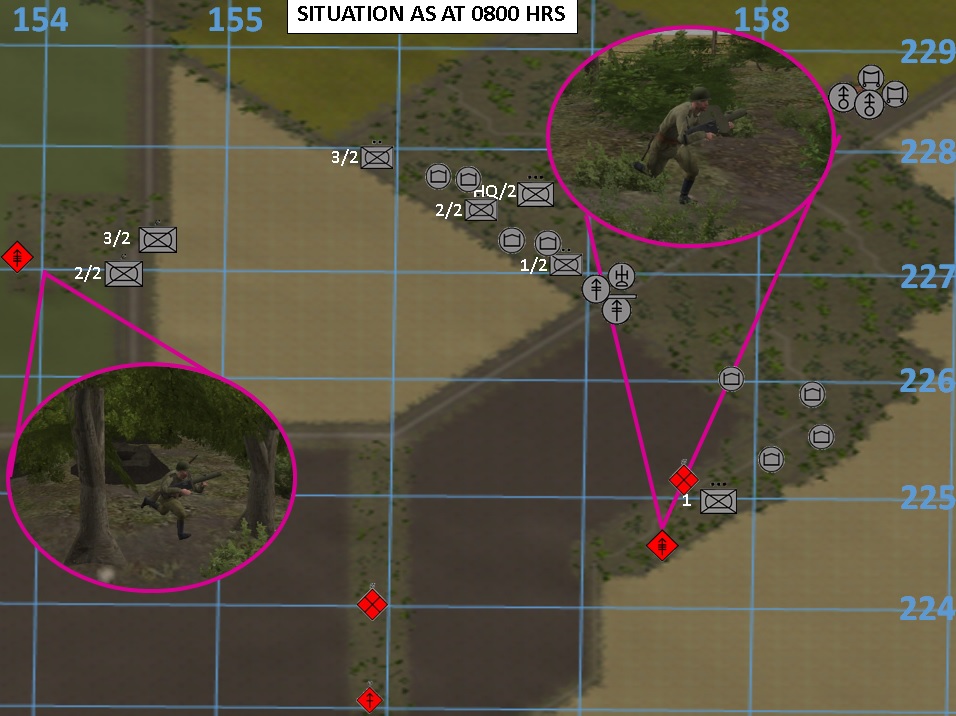
0755 TO 0800 HOURS – TURNS 55-60 SPOILERS FOLLOW***************** Significant event 0756 hrs. The Maxim HMG spotted at Grid 157224 at 0751 hrs has engaged the lead element of 1 Zug inflicting 2 x WIA. The Maxim HMG on Objective DIETER is bugging out. Significant event 0757 hrs. Mortar missions are ending and in the light of the Maxim MMG movement on Objective DIETER, I have decided to launch 2 Zug across the open ground to clear that objective. Significant event 0800 hrs. The Maxim HMG at Grid 157224 is now also bugging out. So here is the situation map: Here is the Friendly Force Tracker: Here is the Enemy Force Tracker: Significant event …. GERMAN ARMY MAJOR VICTORY Which is nice … Scores on the doors were: German 736 VPs Red Army 39 VPs Here are the screenshots: So my thoughts on the above … I’m not going to say too much at this stage because the next stage of the thread will involve analysing the thing in its entirety. However, naturally I’m pleased that I saw this through to a victory and, while I didn’t execute my plan as I intended, the plan appeared to be sound. More detailed analysis will follow in due course but I would be grateful for any thoughts or observations from those that have been following this thread. One thing I can promise is input from the guy who made all of this possible … SeinfeldRules. He has very generously offered to provide his scenario designer’s perspective (in essence the view from the other side of the hill). So there is plenty of life in this yet and I hope you stay onboard for a while longer.


-
I think the thread started by the OP in May of this year provides the answer: http://community.battlefront.com/topic/119450-combat-mission-battle-for-normandy-price/
-
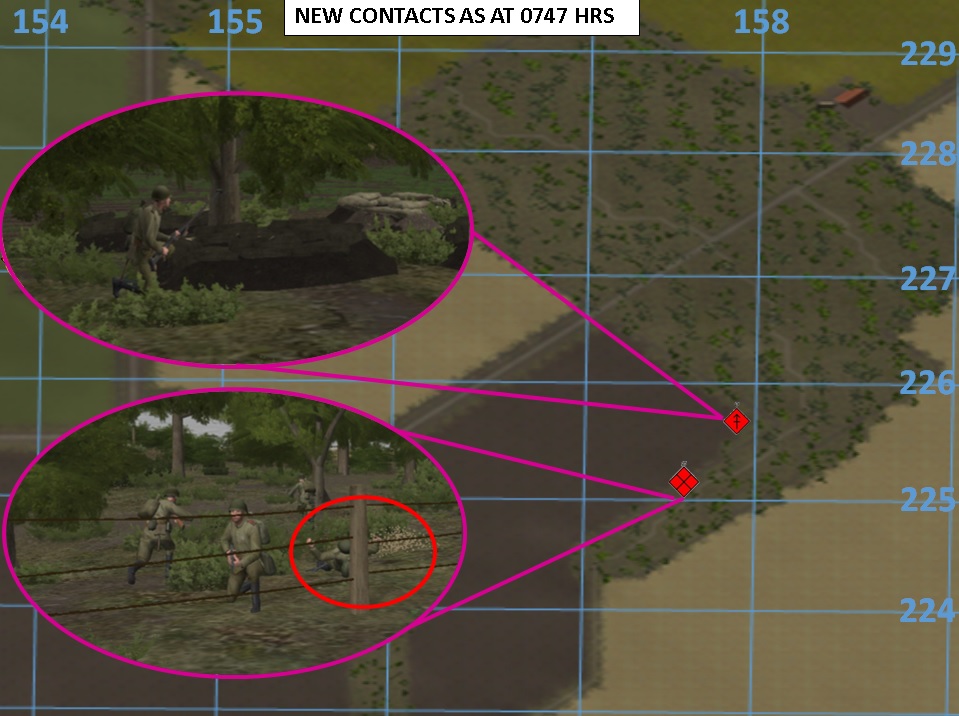
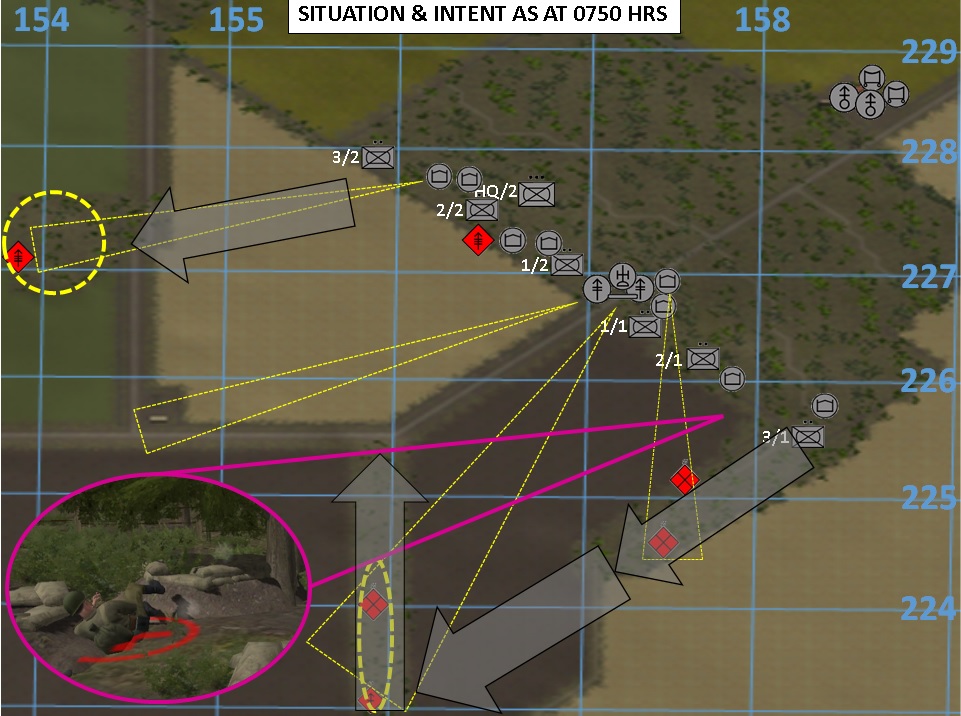
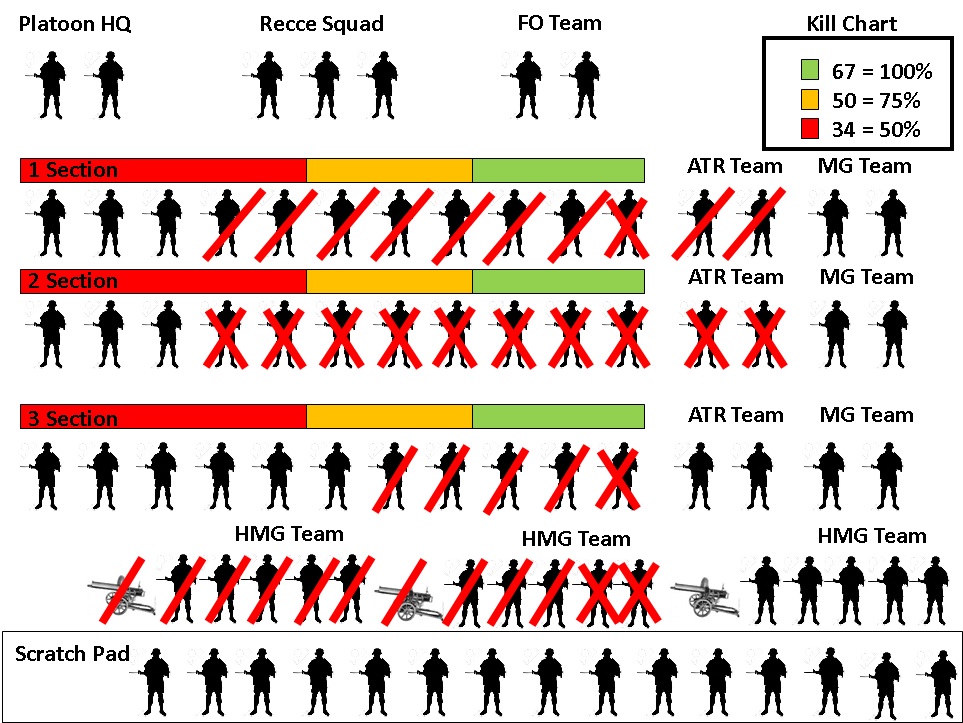
0750 TO 0755 HOURS – TURNS 50-55 SPOILERS FOLLOW***************** CONTACT! Date Time Group: 250751Jun44. Location of contact: Grid 157224 Location of observer: Grid 157226. Target description: 1 x Enemy HMG. Action by target: Observing and preparing to fire. Action by own forces: Engaging with MG fire. Intent is to suppress while 1 Zug closes and assaults. Situation as at 0755 hrs 1 Zug is now moving through Objs MUNCHEN and COCHEM using Line FRIEDA as an axis to clear the wooded outcrop with 3/1 Section in the lead. 2 Zug situation is no change, it remains on the woodline poised to cross the open ground to clear Obj DIETER. 4 Zug situation is also no change and remains in overwatch providing suppressive fire in support of 1 and 2 Zug, with fire support to 1 Zug being the current priority. Mortars are now firing on Objectives DIETER and FRITZ. With no more kills identified, the enemy KIA numbers remain 14 x KIA which is 20% of his force. The HMG contact spotted I assess to be the group previously assessed as part of 1 Section which engaged my 2 Zug scouts at 0722 hrs. As a result I have amended the kill chart which means that I have now seen 56% of his force. So my thoughts on the above … Not much change from before to be honest – unless I get any extra time in this scenario Objectives DIETER, OTTO and FRITZ will be too much to achieve in the time remaining between my mortar fire missions ending and getting troops on to them. We’ll see what happens I guess …


-
Ken, one of my truck drivers saw the elephant crossing the open field when the Maxim HMG opened up - trust me they are happy lurking around those buildings!!
-
This one for starters: http://community.battlefront.com/topic/119474-c2-information-sharing/ I'm sure more folks will be a long shortly to give you pointers.
-
Operational Level Game Announcement
Combatintman replied to choppinlt's topic in Combat Mission Battle for Normandy
Ok I've done my bit spreading the word - Army Rumour Service (ARRSE): http://www.arrse.co.uk/community/threads/combat-operations.243467/ Wargames Guild: http://www.guildwargamers.com/phpBB3/viewtopic.php?f=96&t=39281#p421200 We'll see what comes from those two - probably not much from the former but you may get a tickle from the Guild. -
Bill, thanks again for your comments and yes you may say that of course .... although it is by now pretty obvious that while the plan was generally sound ... as you point out in your second comment about casualties, the execution didn't quite hit the mark. Mind you, I never said I was a good player and from my perspective as a fairly middling player I am quite pleased with my casualty count.
-
0745 TO 0750 HOURS – TURNS 45-50 SPOILERS FOLLOW***************** Situation as at 0746 hrs. Enemy previously sighted at Grid 157225 is attempting to extract NW along the outcrop of the wood. I am attempting to fix and then destroy him with MG and cannon fire. Sound contact at Grid 157225 in the right angle corner of the open ground/wood remains unsighted. Sound contact at Grid 157226 remains unsighted. Troops of 1 Zug’s 2 Section have now identified foxholes in that location. No further enemy sighted at the position at Grid 157226 assaulted by 1 Zug’s 1 Section and I am now firm on that position. No new enemy sightings in 2 Zug’s AO, final elements are closing up to the woodline now and will shortly call Codeword REIS (Obj KOBLENZ secure). Own forces casualty tracking. I have identified a further member of 1 HMG Section with a light wound. Otherwise I am conducting buddy aid where I can. CONTACT! Date Time Group: 250747Jun44. Location of contact: Grid 157225 Location of observer: Grid 158225. Target description: Enemy Anti-tank rifle in foxholes. Action by target: Engaging 1 Zug Half-tracks. Action by own forces: Will suppress position with small arms fire prior to assaulting with 1 Zug. CONTACT! Date Time Group: 250747Jun44. Location of contact: Grid 157225 Location of observer: Grid 158226. Target description: 4 x Enemy infantry on woodline – assessed as group formerly sighted in foxholes in this area. Action by target: Engaging 1 Zug Half-tracks now extracting back into the woods. Action by own forces: Have returned small arms and cannon fire resulting in 1 x Enemy KIA. Will continue to put suppressive fire down on this location to fix and destroy the enemy. Situation as at 0747 hrs Sound contact at Grid 157226 is now firmed up as enemy infantry. 2 x EKIA sighted on the position by 1 Zug’s 2 Section. I have lost an MG gunner from one of 1 Zug’s Half-tracks. I have now identified 10 x KIA which is 14% of his force and seen 49% of his force. Situation as at 0748 hrs A further 2 x Enemy KIA inflicted at Grid 157225. This group had extracted from its position in front of 1 Zug 2 Section and moved SW along the treeline. No other significant contacts or changes. I have now identified 12 x KIA which is 17% of his force and seen 52% of his force. Situation as at 0750 hrs 1 Zug is now fully up on the woodline and is now posturing to manoeuvre along the wooded outcrop 157224 and 157225. Suppressive fire on to the ATR team at Grid 157225 has resulted in both being KIA. 2 Zug is also now fully up on the woodline and has called Codeword REIS. It will now suppress and observe objectives to its front prior to assaulting Obj DIETER 4 Zug has also fully moved up to the woodline and is providing overwatch and suppressive fire in support of both 1 and 2 Zug. It is poised to move and clear Obj OTTO. Mortars are preparing to fire on Objectives DIETER and FRITZ. I have now identified 14 x KIA which is 20% of his force and seen 52% of his force. If I inflict another 3 x KIA, the enemy will be at amber combat effectiveness. At least one of his sections is already combat ineffective. Conversely my combat effectiveness remains well in the green. Please also note that I have tidied up my enemy plots – those elements that I am pretty sure I have destroyed have been removed. So my thoughts on the above … Clearing the remaining enemy from Main Wood is proving time consuming, however I don’t want to pick up unnecessary casualties in a mad rush. With the enemy casualties starting to mount up, I feel he is at tipping point now and of course he has been completely outmanoeuvred or dare I say … Unhinged … Next steps are pretty much as stated in the ‘Situation as at 0750’ narrative above. Nothing is going to cross that open ground until I’ve put some mortar rounds down on DIETER and FRITZ, on the plus side, I’m pretty convinced that there is nothing in Objective OTTO. The downside is that my mortars haven’t started firing yet which means it is going to be 0755 hrs at the earliest before I can get moving to clear DIETER, OTTO and FRITZ. Stay tuned – we’re nearly there ….